

Owners Manual
Page 2
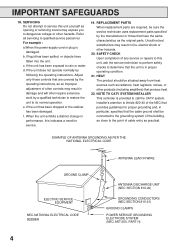
... to alert the user to the presence of this unit near a swimming pool. 2 Do not use instructions should be of sufficient magnitude to correct the interference by the party responsible for future reference. 3. This equipment generates, uses and can be determined by turning the equipment off and on, the user is permissible to record television programs, films, video tapes and other rights...
... to alert the user to the presence of this unit near a swimming pool. 2 Do not use instructions should be of sufficient magnitude to correct the interference by the party responsible for future reference. 3. This equipment generates, uses and can be determined by turning the equipment off and on, the user is permissible to record television programs, films, video tapes and other rights...
Owners Manual
Page 4
... service personnel. When the unit exhibits a distinct change in proper operating condition. 21. NOTE TO CATV SYSTEM INSTALLER This reminder is provided to call the CATV system installer's attention to Article 820-40 of the NEC that the cable ground shall be connected to the grounding system of the building, as close to service this unit yourself as the original parts. Adjust...
... service personnel. When the unit exhibits a distinct change in proper operating condition. 21. NOTE TO CATV SYSTEM INSTALLER This reminder is provided to call the CATV system installer's attention to Article 820-40 of the NEC that the cable ground shall be connected to the grounding system of the building, as close to service this unit yourself as the original parts. Adjust...

Owners Manual
Page 5
...: 1. POWER SOURCE TO USE AC POWER SOURCE Use the AC polarized line cord provided for a long time, unplug the AC power cord. • To protect the VCR from a lightning storm, unplug the AC power cord from flower vases, sinks, etc. WHEN YOU EXPERIENCE THE ABOVE CONDITIONS, Plug the power cord into the cassette loading slot. Doing so may take two or three hours. Never connect the AC line cord plug...
...: 1. POWER SOURCE TO USE AC POWER SOURCE Use the AC polarized line cord provided for a long time, unplug the AC power cord. • To protect the VCR from a lightning storm, unplug the AC power cord from flower vases, sinks, etc. WHEN YOU EXPERIENCE THE ABOVE CONDITIONS, Plug the power cord into the cassette loading slot. Doing so may take two or three hours. Never connect the AC line cord plug...

Owners Manual
Page 6
... Timer with an immediate start. (more on pg 21) EFFECTIVE DISTANCE OF THE REMOTE CONTROL Digital Auto Tracking - Automatically adjusts tracking during playback and recording, it will automatically stop, rewind, stop, eject the tape and the VCR will automatically turn on and play back the cassette tape at the same time everyday or every week. (more on pg 20) On-Screen Display and Programming - Simply by pressing the REC/OTR button, the VCR...
... Timer with an immediate start. (more on pg 21) EFFECTIVE DISTANCE OF THE REMOTE CONTROL Digital Auto Tracking - Automatically adjusts tracking during playback and recording, it will automatically stop, rewind, stop, eject the tape and the VCR will automatically turn on and play back the cassette tape at the same time everyday or every week. (more on pg 20) On-Screen Display and Programming - Simply by pressing the REC/OTR button, the VCR...
Owners Manual
Page 7
... (CABLE TV) CONNECTIONS 12 AUDIO/VIDEO CONNECTIONS 14 SETTING THE VIDEO CHANNEL 15 LANGUAGE SELECTION 15 SETTING THE CLOCK 15 SETTING THE CHANNELS 16 NOISE ELIMINATION 16 PLAYBACK LOADING AND UNLOADING 17 PLAYBACK 17 SPECIAL PLAYBACK 18 RECORDING RECORDING A TV PROGRAM 18 ONE-TOUCH TIMER RECORDING (OTR 20 SETTING THE TIMER RECORDING 20 ADDITIONAL INFORMATION ON-SCREEN FUNCTION DISPLAY 21 STEREO RECORDING AND PLAYBACK 22 SECOND AUDIO PROGRAM (SAP 22 DUPLICATING A VIDEO TAPE 23 VIDEO HEAD CLEANING 23 BEFORE REQUESTING SERVICE 24 SPECIFICATIONS 25 WARRANTY 26 7 When the AUTO...
... (CABLE TV) CONNECTIONS 12 AUDIO/VIDEO CONNECTIONS 14 SETTING THE VIDEO CHANNEL 15 LANGUAGE SELECTION 15 SETTING THE CLOCK 15 SETTING THE CHANNELS 16 NOISE ELIMINATION 16 PLAYBACK LOADING AND UNLOADING 17 PLAYBACK 17 SPECIAL PLAYBACK 18 RECORDING RECORDING A TV PROGRAM 18 ONE-TOUCH TIMER RECORDING (OTR 20 SETTING THE TIMER RECORDING 20 ADDITIONAL INFORMATION ON-SCREEN FUNCTION DISPLAY 21 STEREO RECORDING AND PLAYBACK 22 SECOND AUDIO PROGRAM (SAP 22 DUPLICATING A VIDEO TAPE 23 VIDEO HEAD CLEANING 23 BEFORE REQUESTING SERVICE 24 SPECIFICATIONS 25 WARRANTY 26 7 When the AUTO...
Owners Manual
Page 8
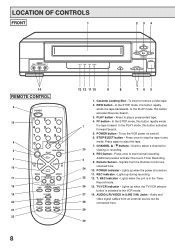
... stop the tape in the Timer Record mode. 26 13. STOP/EJECT button - Cassette Loading Slot - Remote Sensor - REC indicator - LOCATION OF CONTROLS FRONT 1 LINE 2 IN VIDEO L/MONO • AUDIO • R TV/VCR T.REC REC POWER 234 REC PLAY REW FF STOP / EJECT POWER CHANNEL 14 REMOTE CONTROL 5 POWER 123 15 4 56 7 89 8 0 CHANNEL 3 REC PAUSE/STILL PLAY 2 REW FF 16 MENU ENTER STOP 17 - TRACKING + SET 18 TIMER DIGITAL TRACKING CANCEL 19 SLOW COUNTER AUDIO INPUT 20 RESET SELECT SELECT TV/VCR SP/SLP DISPLAY 21...
... stop the tape in the Timer Record mode. 26 13. STOP/EJECT button - Cassette Loading Slot - Remote Sensor - REC indicator - LOCATION OF CONTROLS FRONT 1 LINE 2 IN VIDEO L/MONO • AUDIO • R TV/VCR T.REC REC POWER 234 REC PLAY REW FF STOP / EJECT POWER CHANNEL 14 REMOTE CONTROL 5 POWER 123 15 4 56 7 89 8 0 CHANNEL 3 REC PAUSE/STILL PLAY 2 REW FF 16 MENU ENTER STOP 17 - TRACKING + SET 18 TIMER DIGITAL TRACKING CANCEL 19 SLOW COUNTER AUDIO INPUT 20 RESET SELECT SELECT TV/VCR SP/SLP DISPLAY 21...
Owners Manual
Page 9
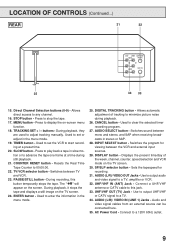
... input sources. 29. DIGITAL TRACKING button - UHF/VHF IN (ANT) Jack - SLOW button - Switches the program for recording. 31. SP/SLP selector button - During playback, it stops the tape and displays a still image on the TV screen. 30. AC Power Cord - Allows direct access to play back a tape in the menu mode. 25. Allows automatic adjustment of the week, channel, counter, speed selection and VCR mode on the TV screen. 24. TIMER button - COUNTER RESET button - ENTER button - AUDIO SELECT button - buttons - Audio and video signal cables...
... input sources. 29. DIGITAL TRACKING button - UHF/VHF IN (ANT) Jack - SLOW button - Switches the program for recording. 31. SP/SLP selector button - During playback, it stops the tape and displays a still image on the TV screen. 30. AC Power Cord - Allows direct access to play back a tape in the menu mode. 25. Allows automatic adjustment of the week, channel, counter, speed selection and VCR mode on the TV screen. 24. TIMER button - COUNTER RESET button - ENTER button - AUDIO SELECT button - buttons - Audio and video signal cables...
Owners Manual
Page 15
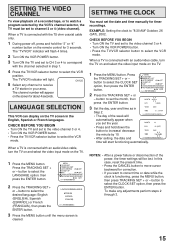
... date and time will start functioning automatically. 12 NOTES: • After a power failure or disconnection of the week will be set the year. • Press and hold the "3" or "4" number button on the TV. 1 Press the MENU button. When a TV is connected with an audio/video cable, turn the TV on and select the video input mode on the remote control for about 4 seconds. Press the TRACKING SET + or - EXAMPLE: Setting the clock...
... date and time will start functioning automatically. 12 NOTES: • After a power failure or disconnection of the week will be set the year. • Press and hold the "3" or "4" number button on the TV. 1 Press the MENU button. When a TV is connected with an audio/video cable, turn the TV on and select the video input mode on the remote control for about 4 seconds. Press the TRACKING SET + or - EXAMPLE: Setting the clock...

Owners Manual
Page 16
... ENTER button. 2 Press the TRACKING SET + or - Repeat Steps 3 and 4 for each channel to normal. button to select the TV/CATV mode. 4 Press the ENTER button to ADD the unmemorized channel. When a TV is connected with an audio/video cable, turn the TV on and select the video input mode on the TV. 1 Press the MENU button, then press the TRACKING SET + or - button to the "ON". The channel display will start. When the unit...
... ENTER button. 2 Press the TRACKING SET + or - Repeat Steps 3 and 4 for each channel to normal. button to select the TV/CATV mode. 4 Press the ENTER button to ADD the unmemorized channel. When a TV is connected with an audio/video cable, turn the TV on and select the video input mode on the TV. 1 Press the MENU button, then press the TRACKING SET + or - button to the "ON". The channel display will start. When the unit...
Owners Manual
Page 17
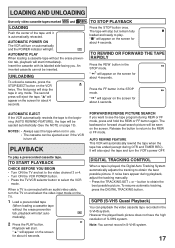
... TIMER REC). TO STOP PLAYBACK LOADING Push the center of S-VHS system. The second press will also eject the tape and turn on the VCR twice. Note: You cannot record in the STOP mode. Playback will automatically rewind the tape when the tape has ended (except during playback, adjust the tracking manually: • Press the TRACKING SET + or - AUTO REWIND FEATURE This VCR will start automatically). 2 Press the PLAY button. AUTOMATIC POWER ON The VCR will turn...
... TIMER REC). TO STOP PLAYBACK LOADING Push the center of S-VHS system. The second press will also eject the tape and turn on the VCR twice. Note: You cannot record in the STOP mode. Playback will automatically rewind the tape when the tape has ended (except during playback, adjust the tracking manually: • Press the TRACKING SET + or - AUTO REWIND FEATURE This VCR will start automatically). 2 Press the PLAY button. AUTOMATIC POWER ON The VCR will turn...

Owners Manual
Page 18
... and set to the video channel 3 or 4. • Turn ON the VCR POWER button. • Press the TV/VCR selector button to the PLAYBACK mode after 5 minutes. Press the MENU button to return to resume normal playback. VIDEO CASSETTE TAPE TAPE SPEED SP Standard Play SLP Super Long Play T120 2 hours 6 hours T160 2-2/3 hours 8 hours This VCR selects the playback tape speed SP, LP(Long Play) or SLP automatically. When a TV is connected with an audio/video cable, turn the TV on and select the video input mode on...
... and set to the video channel 3 or 4. • Turn ON the VCR POWER button. • Press the TV/VCR selector button to the PLAYBACK mode after 5 minutes. Press the MENU button to return to resume normal playback. VIDEO CASSETTE TAPE TAPE SPEED SP Standard Play SLP Super Long Play T120 2 hours 6 hours T160 2-2/3 hours 8 hours This VCR selects the playback tape speed SP, LP(Long Play) or SLP automatically. When a TV is connected with an audio/video cable, turn the TV on and select the video input mode on...

Owners Manual
Page 19
... 3 digits in order. Be careful the tape does not extend past the edges of the proper channel settings on the TV merely allows confirmation of the cassette housing. Adhesive tape 19 Turning on your VCR. TO STOP RECORDING TEMPORARILY Press the PAUSE/STILL button to continue the recording. Example: Press 22 for about 4 seconds. 00 : 00 : 00 SP 3 Press the direct channel selection buttons...
... 3 digits in order. Be careful the tape does not extend past the edges of the proper channel settings on the TV merely allows confirmation of the cassette housing. Adhesive tape 19 Turning on your VCR. TO STOP RECORDING TEMPORARILY Press the PAUSE/STILL button to continue the recording. Example: Press 22 for about 4 seconds. 00 : 00 : 00 SP 3 Press the direct channel selection buttons...

Owners Manual
Page 20
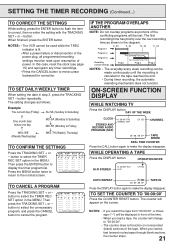
... TIMER REC SET option is connected with the remote control. Timer recording can be programmed on-screen with an audio/video cable, turn the TV on and select the video input mode on the screen for recording (See the chart ). • To cancel OTR, press the STOP button or turn on the rear)" or "L2 (from external source set the channel to select the date, then press the ENTER button. 4 Set the start time, end time, channel and tape speed...
... TIMER REC SET option is connected with the remote control. Timer recording can be programmed on-screen with an audio/video cable, turn the TV on and select the video input mode on the screen for recording (See the chart ). • To cancel OTR, press the STOP button or turn on the rear)" or "L2 (from external source set the channel to select the date, then press the ENTER button. 4 Set the start time, end time, channel and tape speed...
Owners Manual
Page 21
... timer recording, the automatic rewinding mechanism does not function. DAY OF THE WEEK CLOCK STEREO AND SECOND AUDIO PROGRAM (SAP) 8 : 30 AM THU STEREO SAP CH 125 CHANNEL 00 : 00 : 00 SP TAPE SPEED REAL TIME COUNTER Press the CALL button again to make the display disappear. OPERATING MODE HI-FI STEREO 8 : 30 AM THU HI-FI CH 125 AUTO REPEAT 00 : 00 : 00 SP TAPE IN Press the DISPLAY button again...
... timer recording, the automatic rewinding mechanism does not function. DAY OF THE WEEK CLOCK STEREO AND SECOND AUDIO PROGRAM (SAP) 8 : 30 AM THU STEREO SAP CH 125 CHANNEL 00 : 00 : 00 SP TAPE SPEED REAL TIME COUNTER Press the CALL button again to make the display disappear. OPERATING MODE HI-FI STEREO 8 : 30 AM THU HI-FI CH 125 AUTO REPEAT 00 : 00 : 00 SP TAPE IN Press the DISPLAY button again...

Owners Manual
Page 22
... viewing a MONO videotape or TV program. Press the TRACKING SET + or - STEREO SAP SAP OR NOTES: • When playing back a tape that the "Second Audio Program" broadcasting is fitted with an audio/video cable, turn the TV on and select the video input mode on the screen and the program can be heard through both TV speakers. OUTPUT SOUND HEARD ON BOTH SELECTION SPEAKERS STEREO L CH R CH MONO STEREO LEFT CHANNEL AUDIO RIGHT CHANNEL AUDIO MONO SECOND AUDIO PROGRAM (SAP) Your VCR...
... viewing a MONO videotape or TV program. Press the TRACKING SET + or - STEREO SAP SAP OR NOTES: • When playing back a tape that the "Second Audio Program" broadcasting is fitted with an audio/video cable, turn the TV on and select the video input mode on the screen and the program can be heard through both TV speakers. OUTPUT SOUND HEARD ON BOTH SELECTION SPEAKERS STEREO L CH R CH MONO STEREO LEFT CHANNEL AUDIO RIGHT CHANNEL AUDIO MONO SECOND AUDIO PROGRAM (SAP) Your VCR...

Owners Manual
Page 23
... picture, play it several times before turning on the power. 1 Load a blank cassette tape with the erase prevention tab intact into the playback VCR or CAMCORDER. 2 Press the INPUT SELECT LINE 2 button to the SP mode on the VCR and playback VCR again to be clogged, no picture (picture is good sound, but no picture will not appear on the screen. VIDEO HEAD CLEANING To VIDEO OUT AUDIO/VIDEO Cable (not supplied) To AUDIO (L/R) OUT Recording VCR To VIDEO IN To AUDIO (R) IN To AUDIO (L) IN Playback Camcorder...
... picture, play it several times before turning on the power. 1 Load a blank cassette tape with the erase prevention tab intact into the playback VCR or CAMCORDER. 2 Press the INPUT SELECT LINE 2 button to the SP mode on the VCR and playback VCR again to be clogged, no picture (picture is good sound, but no picture will not appear on the screen. VIDEO HEAD CLEANING To VIDEO OUT AUDIO/VIDEO Cable (not supplied) To AUDIO (L/R) OUT Recording VCR To VIDEO IN To AUDIO (R) IN To AUDIO (L) IN Playback Camcorder...
Owners Manual
Page 24
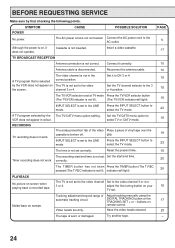
... TV recording does not work . adjust the fine tuning button on 17 remote control. TV set Set the start /end time is not correct. Reset the present time. 15 The recording start /end time. Try another tape. - 24 select the TV mode. 23 A TV program selected by first checking the following points. buttons on your 15 playing back a recorded tape. Connect the AC power cord to mode. select TV or CATV mode. The video channel is on screen. Timer recording...
... TV recording does not work . adjust the fine tuning button on 17 remote control. TV set Set the start /end time is not correct. Reset the present time. 15 The recording start /end time. Try another tape. - 24 select the TV mode. 23 A TV program selected by first checking the following points. buttons on your 15 playing back a recorded tape. Connect the AC power cord to mode. select TV or CATV mode. The video channel is on screen. Timer recording...
Owners Manual
Page 25
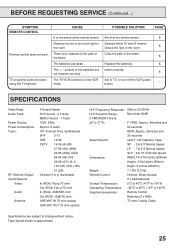
.../REW Time at the remote sensor. 6 Operate within 15 feet (5 meters) reduce the light in the room. 6 Clear the path of the beam. There is in the room. button. The +, - BEFORE REQUESTING SERVICE (Continued...) SYMPTOM REMOTE CONTROL Remote control does not work. TV programs cannot be seen using the TV selector. SPECIFICATIONS Video Head: Audio Track: Power Source: Power Consumption: Tuner: RF Channel Output: Inputs/Outputs: Video: Audio: Antenna: 4 Rotary Heads Hi-Fi Sound - 2 Tracks MONO Sound - 1 Track 120V, 60Hz Approx. 9 watts 181 Channel Freq...
.../REW Time at the remote sensor. 6 Operate within 15 feet (5 meters) reduce the light in the room. 6 Clear the path of the beam. There is in the room. button. The +, - BEFORE REQUESTING SERVICE (Continued...) SYMPTOM REMOTE CONTROL Remote control does not work. TV programs cannot be seen using the TV selector. SPECIFICATIONS Video Head: Audio Track: Power Source: Power Consumption: Tuner: RF Channel Output: Inputs/Outputs: Video: Audio: Antenna: 4 Rotary Heads Hi-Fi Sound - 2 Tracks MONO Sound - 1 Track 120V, 60Hz Approx. 9 watts 181 Channel Freq...
Owners Manual
Page 26
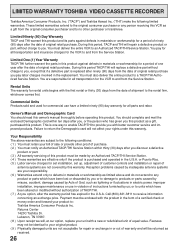
.... LIMITED WARRANTY TOSHIBA VIDEO CASSETTE RECORDER Toshiba America Consumer Products, Inc. ("TACP") and Toshiba Hawaii Inc. ("THI") make the following conditions: ( 1 ) You must retain your bill of sale or provide other purchaser or transferee. Limited One (1) Year Warranty TACP/THI further warrant the parts in electric power, improper installation, improper maintenance or use have been altered or modified without charge to products or parts caused by...
.... LIMITED WARRANTY TOSHIBA VIDEO CASSETTE RECORDER Toshiba America Consumer Products, Inc. ("TACP") and Toshiba Hawaii Inc. ("THI") make the following conditions: ( 1 ) You must retain your bill of sale or provide other purchaser or transferee. Limited One (1) Year Warranty TACP/THI further warrant the parts in electric power, improper installation, improper maintenance or use have been altered or modified without charge to products or parts caused by...
Owners Manual
Page 27
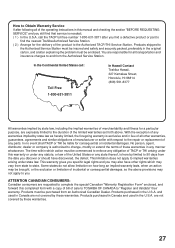
... Continental United States call the TACP toll free number 1-800-631-3811 after following all of the operating instructions in this completed form with respect to the repair or replacement of incidental or consequential damages, so the above . Products purchased in Canada and used in Canada are not covered by limited to 90 days from the Authorized Service Station...
... Continental United States call the TACP toll free number 1-800-631-3811 after following all of the operating instructions in this completed form with respect to the repair or replacement of incidental or consequential damages, so the above . Products purchased in Canada and used in Canada are not covered by limited to 90 days from the Authorized Service Station...
