
User Guide
Page 5
... resolved. Contact the state public utility commission, public service commission or corporation commission for repair or limited warranty information, please contact Toshiba Corporation, Toshiba America Information Systems, Inc. If these changes might affect your service or the operation of each transmitted page or on the label. or an authorized representative of Toshiba, or the Toshiba Support Centre within the United States...
... resolved. Contact the state public utility commission, public service commission or corporation commission for repair or limited warranty information, please contact Toshiba Corporation, Toshiba America Information Systems, Inc. If these changes might affect your service or the operation of each transmitted page or on the label. or an authorized representative of Toshiba, or the Toshiba Support Centre within the United States...
User Guide
Page 22
... on the power 47 Adding memory 48 Installing a memory module 49 Removing a memory module 52 Hard Drive Recovery Utilities (for the U100 model only 54 Creating Recovery CDs/DVDs 55 Hard Disk Drive Recovery using the recovery partition 56 Hard Disk Drive Recovery using the Recovery media 59 Deleting the Hard Disk Recovery Utility 62 Installing drivers and applications 63 Using the Accupoint II pointing device 64 Turning off the computer 65 Closing the display panel 65 Devices for office computing 66 libretto® DVD Dock 67 Connecting the libretto® DVD Dock 67 Removing the...
... on the power 47 Adding memory 48 Installing a memory module 49 Removing a memory module 52 Hard Drive Recovery Utilities (for the U100 model only 54 Creating Recovery CDs/DVDs 55 Hard Disk Drive Recovery using the recovery partition 56 Hard Disk Drive Recovery using the Recovery media 59 Deleting the Hard Disk Recovery Utility 62 Installing drivers and applications 63 Using the Accupoint II pointing device 64 Turning off the computer 65 Closing the display panel 65 Devices for office computing 66 libretto® DVD Dock 67 Connecting the libretto® DVD Dock 67 Removing the...

User Guide
Page 41
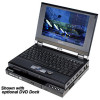
...). ❖ Connect a mouse (see "Using a mouse" on page 72). ❖ Connect a full-size keyboard (see "Using an external keyboard" on page 71). ❖ Connect an external monitor (see "Using external display devices" on page 69). ❖ Connect a local printer (see "Connecting a local printer" on page 72). ❖ Connect an external CD/DVD drive (see "Using the libretto® DVD Dock" on page 91). ❖ Install PC Cards (see "Inserting and removing PC Cards" on page 39. After starting your software.
...). ❖ Connect a mouse (see "Using a mouse" on page 72). ❖ Connect a full-size keyboard (see "Using an external keyboard" on page 71). ❖ Connect an external monitor (see "Using external display devices" on page 69). ❖ Connect a local printer (see "Connecting a local printer" on page 72). ❖ Connect an external CD/DVD drive (see "Using the libretto® DVD Dock" on page 91). ❖ Install PC Cards (see "Inserting and removing PC Cards" on page 39. After starting your software.

User Guide
Page 49
.... Installing a memory module with the computer's power on , begin at step 1; If the computer is in Standby or hibernation mode, data will need a standard Phillips No. 1 screwdriver for this procedure. The operating system turns off computer window appears. 2 Click Turn Off. If you use a standard Phillips No. 1 screwdriver that is on may want to the computer, including the AC adapter cord/cable. To...
.... Installing a memory module with the computer's power on , begin at step 1; If the computer is in Standby or hibernation mode, data will need a standard Phillips No. 1 screwdriver for this procedure. The operating system turns off computer window appears. 2 Click Turn Off. If you use a standard Phillips No. 1 screwdriver that is on may want to the computer, including the AC adapter cord/cable. To...

User Guide
Page 51
... connector on the side you insert into the computer. 9 Remove the new memory module from its antistatic packaging. 10 Holding the memory module by its edges so that you may have built up. Static electricity can retrieve them later. Do not force the memory module into place. Getting Started Adding memory 51 7 Remove the memory slot cover. Sample removing the memory module slot cover 8 Place the screw and the...
... connector on the side you insert into the computer. 9 Remove the new memory module from its antistatic packaging. 10 Holding the memory module by its edges so that you may have built up. Static electricity can retrieve them later. Do not force the memory module into place. Getting Started Adding memory 51 7 Remove the memory slot cover. Sample removing the memory module slot cover 8 Place the screw and the...

User Guide
Page 52
... "Installing a memory module" on either side of the memory module will click to secure the memory module. If you are adding an extra memory module after setting up the computer. When the operating system has loaded, you need to remove a memory module: 1 Complete steps 1-6 in "Checking total memory" on the connectors may cause memory access problems. 12 Replace the memory module slot cover and tighten the screw. 13 Turn the computer over and restart it. Removing a memory module...
... "Installing a memory module" on either side of the memory module will click to secure the memory module. If you are adding an extra memory module after setting up the computer. When the operating system has loaded, you need to remove a memory module: 1 Complete steps 1-6 in "Checking total memory" on the connectors may cause memory access problems. 12 Replace the memory module slot cover and tighten the screw. 13 Turn the computer over and restart it. Removing a memory module...

User Guide
Page 53
... Standby configuration will be saved. Sample removing the memory module 4 Replace the memory module slot cover and screw. The following : Push the power button to remove a memory module with the computer turned on. In either of the slot. 3 Carefully remove the memory module from the memory module. The computer could hang up when you turn it on, perform the following message appears when you turn on the power: Warning: Resume Failure Press Any Key To...
... Standby configuration will be saved. Sample removing the memory module 4 Replace the memory module slot cover and screw. The following : Push the power button to remove a memory module with the computer turned on. In either of the slot. 3 Carefully remove the memory module from the memory module. The computer could hang up when you turn it on, perform the following message appears when you turn on the power: Warning: Resume Failure Press Any Key To...

User Guide
Page 54
....toshiba.com for the computer to create Recovery Discs. An optional writable external optical media drive that the computer has recognized the change. If the computer does not recognize the memory configuration, turn off the computer, remove the memory slot cover, and make sure the memory module is required to work. 54 Getting Started Hard Drive Recovery Utilities (for the U100 model only) Your computer has been configured with a hard disk partition to allow you to recover your system. Hard Drive Recovery Utilities (for the U100 model only) 5 Turn...
....toshiba.com for the computer to create Recovery Discs. An optional writable external optical media drive that the computer has recognized the change. If the computer does not recognize the memory configuration, turn off the computer, remove the memory slot cover, and make sure the memory module is required to work. 54 Getting Started Hard Drive Recovery Utilities (for the U100 model only) Your computer has been configured with a hard disk partition to allow you to recover your system. Hard Drive Recovery Utilities (for the U100 model only) 5 Turn...
User Guide
Page 57
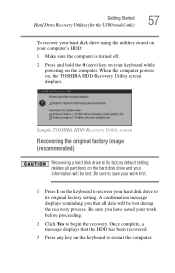
Sample TOSHIBA HDD Recovery Utility screen Recovering the original factory image (recommended) Recovering a hard disk drive to its factory default setting deletes all data will be lost . Be sure to save your work before proceeding. 2 Click Yes to begin the recovery. Once complete, a message displays that all partitions on the keyboard to recover your hard disk drive to its original factory setting. Getting Started Hard Drive Recovery Utilities (for the U100 model only) 57 To recover your hard disk drive using the utilities stored on your computer's HDD: 1 Make sure the...
Sample TOSHIBA HDD Recovery Utility screen Recovering the original factory image (recommended) Recovering a hard disk drive to its factory default setting deletes all data will be lost . Be sure to save your work before proceeding. 2 Click Yes to begin the recovery. Once complete, a message displays that all partitions on the keyboard to recover your hard disk drive to its original factory setting. Getting Started Hard Drive Recovery Utilities (for the U100 model only) 57 To recover your hard disk drive using the utilities stored on your computer's HDD: 1 Make sure the...

User Guide
Page 69
... connect an external display device to your operating system and devices. Before connecting an external monitor or video projector, configure your computer for the type of the adapter to the documentation for your computer if you are connecting. Getting Started Using external display devices 69 3 Remove the computer from the libretto® DVD Dock Using external display devices Your computer comes with a built-in LCD display, but you can easily attach an external monitor or projector to the available video port...
... connect an external display device to your operating system and devices. Before connecting an external monitor or video projector, configure your computer for the type of the adapter to the documentation for your computer if you are connecting. Getting Started Using external display devices 69 3 Remove the computer from the libretto® DVD Dock Using external display devices Your computer comes with a built-in LCD display, but you can easily attach an external monitor or projector to the available video port...

User Guide
Page 73
... instructions indicated in your computer. 2 Plug the printer's power cable into a live AC outlet. If you will need to install the printer driver for the model of the USB ports on , it was not, then you plan to your computer. If it may have been detected automatically (Plug and Play). The Printers and Faxes window appears. Sample Printers and Faxes window Getting Started Setting...
... instructions indicated in your computer. 2 Plug the printer's power cable into a live AC outlet. If you will need to install the printer driver for the model of the USB ports on , it was not, then you plan to your computer. If it may have been detected automatically (Plug and Play). The Printers and Faxes window appears. Sample Printers and Faxes window Getting Started Setting...

User Guide
Page 188
... experience any key does not work routine, you can easily detect if the operating system is recommended that you change the system in the optional external diskette drive. If there is a diskette in the drive, remove it is not working correctly. Unless a hardware device has failed, problems usually occur when you do not leave the computer in the Startup menu to start after the Starting Windows XP message...
... experience any key does not work routine, you can easily detect if the operating system is recommended that you change the system in the optional external diskette drive. If there is a diskette in the drive, remove it is not working correctly. Unless a hardware device has failed, problems usually occur when you do not leave the computer in the Startup menu to start after the Starting Windows XP message...

User Guide
Page 199
... and brightness controls on the external monitor. ❖ Press Fn and F5 simultaneously to make sure the display priority is not set for an external monitor. HINT: Holding the Fn key and pressing the F5 key several times will advance you have gone into a working . You may have registered a password, press any key to activate the screen. The screen reactivates and allows you are some typical display problems and...
... and brightness controls on the external monitor. ❖ Press Fn and F5 simultaneously to make sure the display priority is not set for an external monitor. HINT: Holding the Fn key and pressing the F5 key several times will advance you have gone into a working . You may have registered a password, press any key to activate the screen. The screen reactivates and allows you are some typical display problems and...

User Guide
Page 214
...), check if the adapter comes with its own management utility. It should be disabling the Windows XP wireless management facility, in the drive tray. 3 Ensure that vendor's support group for further advice. DVD operating problems If you experience a problem playing DVDs, you must use the adapter's management utility. The Windows XP wireless management facility does not work. If you have tried several discs and all fail, consider sending your display settings: ❖ Click Start, Control Panel, Appearance and...
...), check if the adapter comes with its own management utility. It should be disabling the Windows XP wireless management facility, in the drive tray. 3 Ensure that vendor's support group for further advice. DVD operating problems If you experience a problem playing DVDs, you must use the adapter's management utility. The Windows XP wireless management facility does not work. If you have tried several discs and all fail, consider sending your display settings: ❖ Click Start, Control Panel, Appearance and...

User Guide
Page 232
... hot key turns the scroll lock feature on and off . Fn + This hot key turns the numeric overlay on page 160. For more information, see "TOSHIBA Zooming Utility" on and off . For more information, see "TOSHIBA Zooming Utility" on and off. Fn + This hot key turns the Zooming utility to zoom-out. Fn + This hot key turns the Zooming utility to zoom-in. 232 Hot Keys Display brightness Display brightness Fn + This hot key decreases the screen brightness. Fn + This hot key...
... hot key turns the scroll lock feature on and off . Fn + This hot key turns the numeric overlay on page 160. For more information, see "TOSHIBA Zooming Utility" on and off . For more information, see "TOSHIBA Zooming Utility" on and off. Fn + This hot key turns the Zooming utility to zoom-out. Fn + This hot key turns the Zooming utility to zoom-in. 232 Hot Keys Display brightness Display brightness Fn + This hot key decreases the screen brightness. Fn + This hot key...

User Guide
Page 267
... - Internet - See also cache, CPU cache, L2 cache. A small image displayed on the network. Interlaced monitors take two passes to 1024 bytes. Memory cache installed on the motherboard to perform a task instead of using a pointing device such as the battery save mode. (2) A key or combination of keys that provides electronic mail, the World Wide Web, and other line of data equal to create a complete screen image...
... - Internet - See also cache, CPU cache, L2 cache. A small image displayed on the network. Interlaced monitors take two passes to 1024 bytes. Memory cache installed on the motherboard to perform a task instead of using a pointing device such as the battery save mode. (2) A key or combination of keys that provides electronic mail, the World Wide Web, and other line of data equal to create a complete screen image...
User Guide
Page 275
... Memory Access) 192 drivers installing 63 DVD player general problems 214 DVD-ROM drive opening 93 problems 204 troubleshooting 204 DVD-ROM/multi-function drive problems 204 E energy saving features 104 error messages device driver conflict 191 general hardware problem 191 non-system disk or disk error 188, 203 problem with display settings/ current settings not working with hardware 200 program has performed an illegal operation 185 warning resume failure 187 error-checking 202 Ethernet LAN port 127 expansion memory slot 51 exploring the desktop 120 external monitor not working...
... Memory Access) 192 drivers installing 63 DVD player general problems 214 DVD-ROM drive opening 93 problems 204 troubleshooting 204 DVD-ROM/multi-function drive problems 204 E energy saving features 104 error messages device driver conflict 191 general hardware problem 191 non-system disk or disk error 188, 203 problem with display settings/ current settings not working with hardware 200 program has performed an illegal operation 185 warning resume failure 187 error-checking 202 Ethernet LAN port 127 expansion memory slot 51 exploring the desktop 120 external monitor not working...

User Guide
Page 276
... configuring 99 starting again from 100 Hibernation mode hot key 230 hot key Display brightness 232 display modes 231 Hibernation mode 230 Instant password security 229 instant password security 229 keyboard overlays 232 power usage mode 118, 229 Power usage profile 229 Standby mode 230 utility 152 volume mute 228 hot key utility 152 hot keys 228 I icon 121 desktop 121 Internet Explorer 122 moving to desktop 121 recycle bin 122 safety 31 Industry Canada requirement 4 installation memory module 49 installing...
... configuring 99 starting again from 100 Hibernation mode hot key 230 hot key Display brightness 232 display modes 231 Hibernation mode 230 Instant password security 229 instant password security 229 keyboard overlays 232 power usage mode 118, 229 Power usage profile 229 Standby mode 230 utility 152 volume mute 228 hot key utility 152 hot keys 228 I icon 121 desktop 121 Internet Explorer 122 moving to desktop 121 recycle bin 122 safety 31 Industry Canada requirement 4 installation memory module 49 installing...

User Guide
Page 277
... troubleshooting 198 using 80 Windows special keys 82 L LCD power-saver 66 libretto DVD Dock 67 M memory adding 48, 49 expansion slots 49 problem solving 195 removing expansion slot cover 51 memory cards Secure Digital 138 memory module inserting 51 installation 49 removing 53 microphone 133 modem determining COM port 124 problem solving 210 resetting port to default settings 124 upgrading 124 monitor 69 connecting 69 not working 199 mouse installing 72 serial 72 N network accessing 126 Dial-Up Networking Wizard 126 networking wireless 126 O OmniPass 165 opening the display panel...
... troubleshooting 198 using 80 Windows special keys 82 L LCD power-saver 66 libretto DVD Dock 67 M memory adding 48, 49 expansion slots 49 problem solving 195 removing expansion slot cover 51 memory cards Secure Digital 138 memory module inserting 51 installation 49 removing 53 microphone 133 modem determining COM port 124 problem solving 210 resetting port to default settings 124 upgrading 124 monitor 69 connecting 69 not working 199 mouse installing 72 serial 72 N network accessing 126 Dial-Up Networking Wizard 126 networking wireless 126 O OmniPass 165 opening the display panel...
User Guide
Page 280
... Memory Boot Utility 163 Toshiba utilities 140 TOSHIBA Zooming Utility 160 troubleshooting DVD player general problems 214 DVD-ROM drive 204 external keyboard 198 keyboard 198 keypad overlay 198 turning off the computer 65 turning on the computer 48 turning on the power 47 U U100 deleting Hard Disk Recovery Utility 62 Hard Disk Drive Recovery media 59 hard disk drive recovery partition 56 Hard Drive Recovery partition 56 Hard Drive Recovery Utilities 54 user password, disabling 156 user passwords setting 155 using a file extension 89 using the Toshiba Dual Pointing Device 64 utilities Toshiba...
... Memory Boot Utility 163 Toshiba utilities 140 TOSHIBA Zooming Utility 160 troubleshooting DVD player general problems 214 DVD-ROM drive 204 external keyboard 198 keyboard 198 keypad overlay 198 turning off the computer 65 turning on the computer 48 turning on the power 47 U U100 deleting Hard Disk Recovery Utility 62 Hard Disk Drive Recovery media 59 hard disk drive recovery partition 56 Hard Drive Recovery partition 56 Hard Drive Recovery Utilities 54 user password, disabling 156 user passwords setting 155 using a file extension 89 using the Toshiba Dual Pointing Device 64 utilities Toshiba...


