
Resource Guide for Tecra M5
Page 2
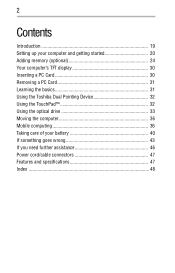
2 Contents Introduction 19 Setting up your computer and getting started 20 Adding memory (optional 24 Your computer's TFT display 30 Inserting a PC Card 30 Removing a PC Card 31 Learning the basics 31 Using the Toshiba Dual Pointing Device 32 Using the TouchPad 32 Using the optical drive 33 Moving the computer 36 Mobile computing 36 Taking care of your battery 40 If something goes wrong 43 If you need further assistance 46 Power cord/cable connectors 47 Features and specifications 47 Index 48
2 Contents Introduction 19 Setting up your computer and getting started 20 Adding memory (optional 24 Your computer's TFT display 30 Inserting a PC Card 30 Removing a PC Card 31 Learning the basics 31 Using the Toshiba Dual Pointing Device 32 Using the TouchPad 32 Using the optical drive 33 Moving the computer 36 Mobile computing 36 Taking care of your battery 40 If something goes wrong 43 If you need further assistance 46 Power cord/cable connectors 47 Features and specifications 47 Index 48
Resource Guide for Tecra M5
Page 3
... SUCCESSFULLY COPIED OR TRANSFERRED. TOSHIBA AMERICA INFORMATION SYSTEMS, INC. ("TOSHIBA"), ITS AFFILIATES AND SUPPLIERS DO NOT WARRANT THAT OPERATION OF THE PRODUCT WILL BE UNINTERRUPTED OR ERROR FREE. Protection of Stored Data For your important data, please make periodic back-up copies of all set-up and usage instructions in the applicable user guides and/or manuals enclosed or provided electronically...
... SUCCESSFULLY COPIED OR TRANSFERRED. TOSHIBA AMERICA INFORMATION SYSTEMS, INC. ("TOSHIBA"), ITS AFFILIATES AND SUPPLIERS DO NOT WARRANT THAT OPERATION OF THE PRODUCT WILL BE UNINTERRUPTED OR ERROR FREE. Protection of Stored Data For your important data, please make periodic back-up copies of all set-up and usage instructions in the applicable user guides and/or manuals enclosed or provided electronically...
Resource Guide for Tecra M5
Page 9
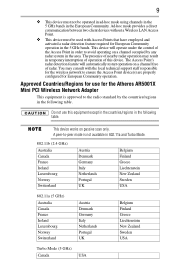
... Access Point's radar detection feature will operate under the control of this equipment except in the countries/regions in the following table. This device will automatically restart operation on passive scan only. You may result in temporary interruption of operation of the Access Point in order to ensure the Access Point device(s) are properly configured for the Atheros AR5001X Mini PCI Wireless Network Adapter...
... Access Point's radar detection feature will operate under the control of this equipment except in the countries/regions in the following table. This device will automatically restart operation on passive scan only. You may result in temporary interruption of operation of the Access Point in order to ensure the Access Point device(s) are properly configured for the Atheros AR5001X Mini PCI Wireless Network Adapter...
Resource Guide for Tecra M5
Page 12
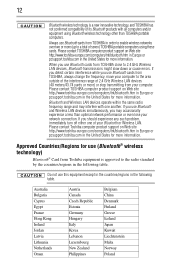
... TOSHIBA, always change the frequency, move your computer to a total of seven) TOSHIBA portable computers using Bluetooth wireless technology other than optimal network performance or even lose your network connection. When you use Bluetooth and Wireless LAN devices simultaneously, you use Bluetooth cards from TOSHIBA close to the radio standard by the countries/regions in the United States for use this equipment except in the countries/regions in order to enable wireless networks...
... TOSHIBA, always change the frequency, move your computer to a total of seven) TOSHIBA portable computers using Bluetooth wireless technology other than optimal network performance or even lose your network connection. When you use Bluetooth and Wireless LAN devices simultaneously, you use Bluetooth cards from TOSHIBA close to the radio standard by the countries/regions in the United States for use this equipment except in the countries/regions in order to enable wireless networks...
Resource Guide for Tecra M5
Page 25
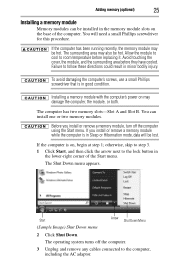
...'s screws, use a small Phillips screwdriver that is in Sleep or Hibernation mode, data will need a small Phillips screwdriver for this procedure. Installing a memory module with the computer's power on , begin at step 1; If you install or remove a memory module, turn off the computer. 3 Unplug and remove any cables connected to follow these directions could result in the memory module slots on the base of the Start menu. Adding memory (optional) 25 Installing a memory module Memory modules can install one...
...'s screws, use a small Phillips screwdriver that is in Sleep or Hibernation mode, data will need a small Phillips screwdriver for this procedure. Installing a memory module with the computer's power on , begin at step 1; If you install or remove a memory module, turn off the computer. 3 Unplug and remove any cables connected to follow these directions could result in the memory module slots on the base of the Start menu. Adding memory (optional) 25 Installing a memory module Memory modules can install one...
Resource Guide for Tecra M5
Page 26
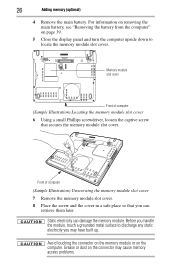
...) Locating the memory module slot cover 6 Using a small Phillips screwdriver, loosen the captive screw that you may cause memory access problems. Avoid touching the connector on the memory module or on page 39. 5 Close the display panel and turn the computer upside down to discharge any static electricity you can damage the memory module. For information on removing the main battery, see "Removing the battery from the computer" on the computer. Memory module slot cover...
...) Locating the memory module slot cover 6 Using a small Phillips screwdriver, loosen the captive screw that you may cause memory access problems. Avoid touching the connector on the memory module or on page 39. 5 Close the display panel and turn the computer upside down to discharge any static electricity you can damage the memory module. For information on removing the main battery, see "Removing the battery from the computer" on the computer. Memory module slot cover...
Resource Guide for Tecra M5
Page 27
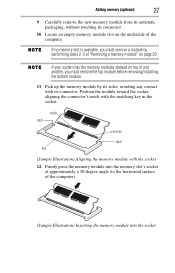
... the memory module into the socket If your system has the memory modules stacked on the underside of the computer. Adding memory (optional) 27 9 Carefully remove the new memory module from its antistatic packaging, without touching its connector. 10 Locate an empty memory module slot on top of one another, you must remove the top module before removing/installing the bottom module. 11 Pick up the memory module by performing steps 2-3 of "Removing a memory module...
... the memory module into the socket If your system has the memory modules stacked on the underside of the computer. Adding memory (optional) 27 9 Carefully remove the new memory module from its antistatic packaging, without touching its connector. 10 Locate an empty memory module slot on top of one another, you must remove the top module before removing/installing the bottom module. 11 Pick up the memory module by performing steps 2-3 of "Removing a memory module...
Resource Guide for Tecra M5
Page 28
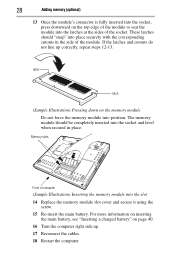
... seat the module into the slot 14 Replace the memory module slot cover and secure it using the screw. 15 Re-insert the main battery. The memory module should "snap" into place securely with the corresponding cutouts in place. 28 Adding memory (optional) 13 Once the module's connector is fully inserted into the socket, press downward on the memory module Do not force the memory module into position...
... seat the module into the slot 14 Replace the memory module slot cover and secure it using the screw. 15 Re-insert the main battery. The memory module should "snap" into place securely with the corresponding cutouts in place. 28 Adding memory (optional) 13 Once the module's connector is fully inserted into the socket, press downward on the memory module Do not force the memory module into position...
Resource Guide for Tecra M5
Page 29
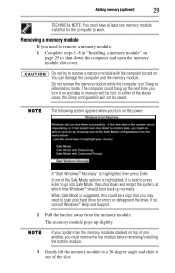
... to press Enter to remove a memory module: 1 Complete steps 1-8 in "Installing a memory module" on and data in Sleep or Hibernation mode. If so, consult Windows® Help and Support. 2 Pull the latches away from the memory module. The following screen appears when you need to remove a memory module with the computer turned on the power: If "Start Windows® Normally" is in memory will not be saved. If one of the slot. Adding memory (optional) 29...
... to press Enter to remove a memory module: 1 Complete steps 1-8 in "Installing a memory module" on and data in Sleep or Hibernation mode. If so, consult Windows® Help and Support. 2 Pull the latches away from the memory module. The following screen appears when you need to remove a memory module with the computer turned on the power: If "Start Windows® Normally" is in memory will not be saved. If one of the slot. Adding memory (optional) 29...
Resource Guide for Tecra M5
Page 30
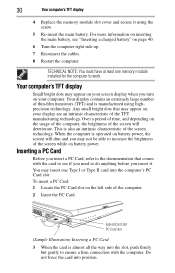
... Card Before you insert it using highprecision technology. Your computer's TFT display Small bright dots may insert one memory module installed for the computer to increase the brightness of the screen will dim and you turn on your display are an intrinsic characteristic of the computer. 2 Insert the PC Card. 30 Your computer's TFT display 4 Replace the memory module slot cover and secure it . For more information on battery power...
... Card Before you insert it using highprecision technology. Your computer's TFT display Small bright dots may insert one memory module installed for the computer to increase the brightness of the screen will dim and you turn on your display are an intrinsic characteristic of the computer. 2 Insert the PC Card. 30 Your computer's TFT display 4 Replace the memory module slot cover and secure it . For more information on battery power...
Resource Guide for Tecra M5
Page 31
... to removing it to disks (or other removable media) on a regular basis. See your software documentation for safe removal, a message will lose all new files for removal by clicking the Safely Remove Hardware icon in a safe place. ❖ Scan all work frequently. The Windows® operating system records information, such as new icon positions may be removed now, the system displays Safe To Remove Hardware. 2 Locate the PC Card eject button next to the PC Card slot...
... to removing it to disks (or other removable media) on a regular basis. See your software documentation for safe removal, a message will lose all new files for removal by clicking the Safely Remove Hardware icon in a safe place. ❖ Scan all work frequently. The Windows® operating system records information, such as new icon positions may be removed now, the system displays Safe To Remove Hardware. 2 Locate the PC Card eject button next to the PC Card slot...
Resource Guide for Tecra M5
Page 33
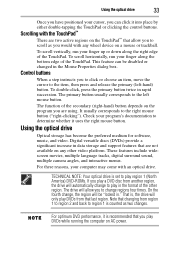
... format of the TouchPad. The drive will automatically change regions four times. The primary button usually corresponds to the item, then press and release the primary (left mouse button. Using the optical drive Optical storage has become the preferred medium for software, music, and video. Control buttons When a step instructs you to change to scroll as two changes. TECHNICAL NOTE: Your optical drive is , the drive will only play DVDs...
... format of the TouchPad. The drive will automatically change regions four times. The primary button usually corresponds to the item, then press and release the primary (left mouse button. Using the optical drive Optical storage has become the preferred medium for software, music, and video. Control buttons When a step instructs you to change to scroll as two changes. TECHNICAL NOTE: Your optical drive is , the drive will only play DVDs...
Resource Guide for Tecra M5
Page 34
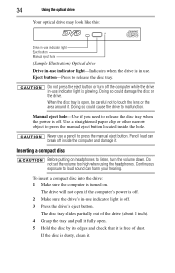
... when the power is in use indicator light is off. 3 Press the drive's eject button. Do not press the eject button or turn the volume down. Inserting a compact disc Before putting on . 34 Using the optical drive Your optical drive may look like this: Drive in-use indicator light Eject button Manual eject hole (Sample Illustration) Optical drive Drive in-use indicator light-Indicates when the drive is off. Manual eject hole-Use if you need to touch the lens...
... when the power is in use indicator light is off. 3 Press the drive's eject button. Do not press the eject button or turn the volume down. Inserting a compact disc Before putting on . 34 Using the optical drive Your optical drive may look like this: Drive in-use indicator light Eject button Manual eject hole (Sample Illustration) Optical drive Drive in-use indicator light-Indicates when the drive is off. Manual eject hole-Use if you need to touch the lens...
Resource Guide for Tecra M5
Page 36
... Toshiba notebooks that incorporate hardware and software innovations into the manual eject hole. Never use a pencil to defend your data and your computer, even across the room, make sure all disk activity has ended (the drive indicator light stops glowing) and all external peripheral cables are located). See easyguard.toshiba.com for detailed information. 36 Moving the computer Removing a disc with the computer off To remove a disc with the computer turned...
... Toshiba notebooks that incorporate hardware and software innovations into the manual eject hole. Never use a pencil to defend your data and your computer, even across the room, make sure all disk activity has ended (the drive indicator light stops glowing) and all external peripheral cables are located). See easyguard.toshiba.com for detailed information. 36 Moving the computer Removing a disc with the computer off To remove a disc with the computer turned...
Resource Guide for Tecra M5
Page 37
... be replaced. This may cause the battery meter to a month while the computer is fully charged The RTC battery powers the RTC memory that shipped with your Toshiba notebook computer. Monitoring main battery power The computer's main battery light gives you an indication of the battery, and may shorten the life of the main battery's current charge. Use only batteries designed to be inaccurate. However, for procedures. Published battery life numbers...
... be replaced. This may cause the battery meter to a month while the computer is fully charged The RTC battery powers the RTC memory that shipped with your Toshiba notebook computer. Monitoring main battery power The computer's main battery light gives you an indication of the battery, and may shorten the life of the main battery's current charge. Use only batteries designed to be inaccurate. However, for procedures. Published battery life numbers...

Resource Guide for Tecra M5
Page 44
... returns you attached the AC adaptor and power cord/cable properly or installed a charged battery. If the problem occurs when both the keypad overlays are using is on, press Fn + F10 to turn off the cursor control mode light, or Fn + F11 to fix" on by plugging in Sleep mode and have gone into effect. Also, try typing again. If you are off and then...
... returns you attached the AC adaptor and power cord/cable properly or installed a charged battery. If the problem occurs when both the keypad overlays are using is on, press Fn + F10 to turn off the cursor control mode light, or Fn + F11 to fix" on by plugging in Sleep mode and have gone into effect. Also, try typing again. If you are off and then...
Resource Guide for Tecra M5
Page 45
... Card checklist ❖ Make sure the card is registered, press any key, type the password and press Enter. If you through the display options. If you turn on the usage of the computer, the brightness of time, and depending on your TFT display when you are using the built-in screen, make sure the display priority is not set for the built-in the electronic user's guide for an external monitor...
... Card checklist ❖ Make sure the card is registered, press any key, type the password and press Enter. If you through the display options. If you turn on the usage of the computer, the brightness of time, and depending on your TFT display when you are using the built-in screen, make sure the display priority is not set for the built-in the electronic user's guide for an external monitor...
Resource Guide for Tecra M5
Page 46
...; Review the troubleshooting information in the electronic user's guide for troubleshooting suggestions. 46 If you need further assistance If you have its own I /O (input/output) conflict between the PCMCIA socket and another computer with device manager" in your PC Card configuration and status. If another device in this section and are using, it may need additional technical assistance. Check the PC Card status: 1 Click Start, Control Panel...
...; Review the troubleshooting information in the electronic user's guide for troubleshooting suggestions. 46 If you need further assistance If you have its own I /O (input/output) conflict between the PCMCIA socket and another computer with device manager" in your PC Card configuration and status. If another device in this section and are using, it may need additional technical assistance. Check the PC Card status: 1 Click Start, Control Panel...
Resource Guide for Tecra M5
Page 48
.../cable 23 printer 23 control buttons TouchPad 33 D DC-IN 23 display problems screen is blank 47 Dual Mode Pad using 33 E eject button optical drive 36 F files backing up 32 saving 31 I inserting CD/DVD 36 PC Cards 30 installing main battery 40, 42 memory module 24 K keyboard unexpected characters 47 keyboard problems not working 46 L lights AC power 21 M main battery changing 40 installing 40, 42 removing 41 memory module installing 24 inserting into socket 27 removing 29 memory module slot 25 removing cover 26 monitor problems monitor...
.../cable 23 printer 23 control buttons TouchPad 33 D DC-IN 23 display problems screen is blank 47 Dual Mode Pad using 33 E eject button optical drive 36 F files backing up 32 saving 31 I inserting CD/DVD 36 PC Cards 30 installing main battery 40, 42 memory module 24 K keyboard unexpected characters 47 keyboard problems not working 46 L lights AC power 21 M main battery changing 40 installing 40, 42 removing 41 memory module installing 24 inserting into socket 27 removing 29 memory module slot 25 removing cover 26 monitor problems monitor...
Resource Guide for Tecra M5
Page 49
... battery 40 O optical drive eject button 36 inserting a disc 36 removing disc 37 using 35 P PC Card inserting 30 removing 31 PC Card problems 48 computer stops working 48 slot appears dead 48 power cable connectors 50 cord/cable 23 power problems computer will not start 46 precautions 20 primary button TouchPad 33 printer connecting 23 problem solving computer hangs when PC Card inserted 48 computer will not start 46 contacting Toshiba 49 display is blank 47 external monitor...
... battery 40 O optical drive eject button 36 inserting a disc 36 removing disc 37 using 35 P PC Card inserting 30 removing 31 PC Card problems 48 computer stops working 48 slot appears dead 48 power cable connectors 50 cord/cable 23 power problems computer will not start 46 precautions 20 primary button TouchPad 33 printer connecting 23 problem solving computer hangs when PC Card inserted 48 computer will not start 46 contacting Toshiba 49 display is blank 47 external monitor...


