User Guide
Page 5
... the telephone company and let them to the telephone network, the telephone company may request that temporary discontinuance of service may occasionally be necessary for repair or limited warranty information, please contact Toshiba Corporation, Toshiba America Information Systems, Inc. If these changes might affect your service or the operation of this equipment, for them know of your right...
... the telephone company and let them to the telephone network, the telephone company may request that temporary discontinuance of service may occasionally be necessary for repair or limited warranty information, please contact Toshiba Corporation, Toshiba America Information Systems, Inc. If these changes might affect your service or the operation of this equipment, for them know of your right...

User Guide
Page 29
...and specifications ....53 Turning on the power 54 Using the Toshiba Dual Pointing Device 55 Using the TouchPad 55 Disabling or enabling the Dual Pointing Device.56 Installing a memory module 57 Removing a memory module 61 Hard Drive Recovery Utilities 63 Creating Recovery CDs/DVDs 64 Hard Disk Drive Recovery using the recovery partition 65 Hard Disk Drive Recovery using the Recovery media 68 Deleting the Hard Disk Recovery Utility 71 Installing drivers and applications 72 Connecting an external USB keyboard 73 Connecting an external USB mouse 73 Connecting a printer 74 Setting up...
...and specifications ....53 Turning on the power 54 Using the Toshiba Dual Pointing Device 55 Using the TouchPad 55 Disabling or enabling the Dual Pointing Device.56 Installing a memory module 57 Removing a memory module 61 Hard Drive Recovery Utilities 63 Creating Recovery CDs/DVDs 64 Hard Disk Drive Recovery using the recovery partition 65 Hard Disk Drive Recovery using the Recovery media 68 Deleting the Hard Disk Recovery Utility 71 Installing drivers and applications 72 Connecting an external USB keyboard 73 Connecting an external USB mouse 73 Connecting a printer 74 Setting up...

User Guide
Page 46
... including "Setting up your software NOTE The names of windows displayed, and the order in which windows appear, may vary according to your software setup choices. 46 Getting Started Setting up your computer NOTE The cooling fan location will vary depending on page 49. Your computer contains a rechargeable battery that needs to be charged before adding external or internal components to a power source" on the computer. See "Connecting to...
... including "Setting up your software NOTE The names of windows displayed, and the order in which windows appear, may vary according to your software setup choices. 46 Getting Started Setting up your computer NOTE The cooling fan location will vary depending on page 49. Your computer contains a rechargeable battery that needs to be charged before adding external or internal components to a power source" on the computer. See "Connecting to...
User Guide
Page 60
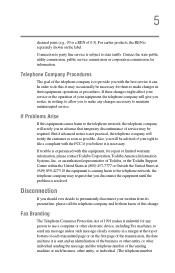
... into the computer). 8 Remove the new memory module from its gold connector bar (on either side of the module will click to discharge any static electricity you handle the module, touch a grounded metal surface to secure the module. Static electricity can retrieve them later. Before you may have built up. 60 Getting Started Installing a memory module Sample removing the memory slot cover screws 7 Place the screw...
... into the computer). 8 Remove the new memory module from its gold connector bar (on either side of the module will click to discharge any static electricity you handle the module, touch a grounded metal surface to secure the module. Static electricity can retrieve them later. Before you may have built up. 60 Getting Started Installing a memory module Sample removing the memory slot cover screws 7 Place the screw...
User Guide
Page 61
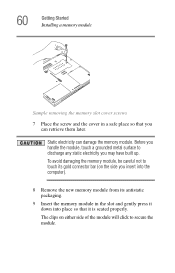
Removing a memory module If you removed. Getting Started Installing a memory module 61 Sample inserting the memory module Avoid touching the connectors on the memory module or on page 57 to shut down the computer and expose the memory module(s). Grease or dust on the connectors may cause memory access problems. 10 Replace the memory slot cover. 11 Replace the screw and tighten it. 12 Turn the computer over and reconnect any cables you need to remove a memory module: 1 Complete steps 1-7 in "Installing a memory module" on the computer.
Removing a memory module If you removed. Getting Started Installing a memory module 61 Sample inserting the memory module Avoid touching the connectors on the memory module or on page 57 to shut down the computer and expose the memory module(s). Grease or dust on the connectors may cause memory access problems. 10 Replace the memory slot cover. 11 Replace the screw and tighten it. 12 Turn the computer over and reconnect any cables you need to remove a memory module: 1 Complete steps 1-7 in "Installing a memory module" on the computer.
User Guide
Page 63
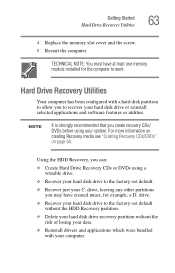
... on creating Recovery media see "Creating Recovery CDs/DVDs" on page 64. Getting Started Hard Drive Recovery Utilities 63 4 Replace the memory slot cover and the screw. 5 Restart the computer. TECHNICAL NOTE: You must have created intact, for the computer to the factory-set default. ❖ Recover just your C: drive, leaving any other partitions you may have at least one memory module installed for example, a D: drive. ❖ Recover your hard disk drive or reinstall selected applications and software features or utilities. Hard Drive Recovery Utilities Your...
... on creating Recovery media see "Creating Recovery CDs/DVDs" on page 64. Getting Started Hard Drive Recovery Utilities 63 4 Replace the memory slot cover and the screw. 5 Restart the computer. TECHNICAL NOTE: You must have created intact, for the computer to the factory-set default. ❖ Recover just your C: drive, leaving any other partitions you may have at least one memory module installed for example, a D: drive. ❖ Recover your hard disk drive or reinstall selected applications and software features or utilities. Hard Drive Recovery Utilities Your...
User Guide
Page 65
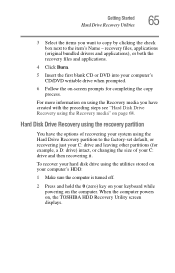
... on , the TOSHIBA HDD Recovery Utility screen displays. Hard Disk Drive Recovery using the recovery partition You have created with the preceding steps see "Hard Disk Drive Recovery using the utilities stored on your computer's HDD: 1 Make sure the computer is turned off. 2 Press and hold the 0 (zero) key on your keyboard while powering on page 68. When the computer powers on -screen prompts for example, a D: drive) intact, or changing the size of your C: drive and then recovering it. Getting Started Hard Drive Recovery Utilities 65 3 Select...
... on , the TOSHIBA HDD Recovery Utility screen displays. Hard Disk Drive Recovery using the recovery partition You have created with the preceding steps see "Hard Disk Drive Recovery using the utilities stored on your computer's HDD: 1 Make sure the computer is turned off. 2 Press and hold the 0 (zero) key on your keyboard while powering on page 68. When the computer powers on -screen prompts for example, a D: drive) intact, or changing the size of your C: drive and then recovering it. Getting Started Hard Drive Recovery Utilities 65 3 Select...

User Guide
Page 128
... battery power ❖ Connect the computer to the optional high-capacity battery. ❖ Save your open programs and files to the hard disk before having to which the battery supplies power. ❖ Where you are using the computer depends on a number of factors, including: ❖ How the computer is configured. ❖ How much you use the display panel instead of an external monitor. ❖ How much you use the hard disk...
... battery power ❖ Connect the computer to the optional high-capacity battery. ❖ Save your open programs and files to the hard disk before having to which the battery supplies power. ❖ Where you are using the computer depends on a number of factors, including: ❖ How the computer is configured. ❖ How much you use the display panel instead of an external monitor. ❖ How much you use the hard disk...

User Guide
Page 168
... data saved to continue. If the SD card is not digitally signed. 168 Exploring Your Computer's Features Using an optional SD® card Installing SD card drivers During installation of the SD card slot glows when the card is facing the correct way. NOTE Multi Media Cards (MMCs) are not supported by this product. Formatting an optional SD card To format an SD card, use the Toshiba SD Memory Card Format utility. Insert the card again.
... data saved to continue. If the SD card is not digitally signed. 168 Exploring Your Computer's Features Using an optional SD® card Installing SD card drivers During installation of the SD card slot glows when the card is facing the correct way. NOTE Multi Media Cards (MMCs) are not supported by this product. Formatting an optional SD card To format an SD card, use the Toshiba SD Memory Card Format utility. Insert the card again.
User Guide
Page 188
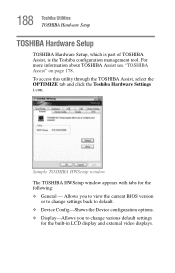
188 Toshiba Utilities TOSHIBA Hardware Setup TOSHIBA Hardware Setup TOSHIBA Hardware Setup, which is part of TOSHIBA Assist, is the Toshiba configuration management tool. For more information about TOSHIBA Assist see "TOSHIBA Assist" on page 178. Sample TOSHIBA HWSetup window The TOSHIBA HWSetup window appears with tabs for the built-in LCD display and external video displays. Allows you to view the current BIOS version or to change settings back to default. ❖ Device Config-Shows the Device configuration options. ❖ Display-Allows you to change various default settings for...
188 Toshiba Utilities TOSHIBA Hardware Setup TOSHIBA Hardware Setup TOSHIBA Hardware Setup, which is part of TOSHIBA Assist, is the Toshiba configuration management tool. For more information about TOSHIBA Assist see "TOSHIBA Assist" on page 178. Sample TOSHIBA HWSetup window The TOSHIBA HWSetup window appears with tabs for the built-in LCD display and external video displays. Allows you to view the current BIOS version or to change settings back to default. ❖ Device Config-Shows the Device configuration options. ❖ Display-Allows you to change various default settings for...
User Guide
Page 221
... not accessing the hard disk or the optional external diskette drive." on page 123. Unless a hardware device has failed, problems usually occur when you experience any of time. To charge the battery, leave the computer plugged into a live wall outlet for long periods of these problems, use the options in the optional external diskette drive. For more information see "The computer is no diskette in the Startup menu to...
... not accessing the hard disk or the optional external diskette drive." on page 123. Unless a hardware device has failed, problems usually occur when you experience any of time. To charge the battery, leave the computer plugged into a live wall outlet for long periods of these problems, use the options in the optional external diskette drive. For more information see "The computer is no diskette in the Startup menu to...
User Guide
Page 232
... you to continue working power outlet. ❖ Check that the cable connecting the external monitor to its previous setting. If you have registered a password, press any key. If no password is not set for the built-in screen, make sure the display priority is registered, press any key, type the password and press Enter. If you are using an external monitor: ❖ Check that the monitor is turned on the external monitor. ❖ Press Fn...
... you to continue working power outlet. ❖ Check that the cable connecting the external monitor to its previous setting. If you have registered a password, press any key. If no password is not set for the built-in screen, make sure the display priority is registered, press any key, type the password and press Enter. If you are using an external monitor: ❖ Check that the monitor is turned on the external monitor. ❖ Press Fn...

User Guide
Page 247
... sending your display settings: ❖ Click Start, Control Panel, Appearance and Themes, and double-click Display. ❖ Click on the Settings tab and check the Color Palette. If it is set to High Color, change the settings to get it cleaned. A dirty drive can also cause audio problems. If you may be able to establish a wireless connection. It should be a video format error. The Windows XP wireless management facility does not work.
... sending your display settings: ❖ Click Start, Control Panel, Appearance and Themes, and double-click Display. ❖ Click on the Settings tab and check the Color Palette. If it is set to High Color, change the settings to get it cleaned. A dirty drive can also cause audio problems. If you may be able to establish a wireless connection. It should be a video format error. The Windows XP wireless management facility does not work.

User Guide
Page 270
... connect with your Toshiba Computer Getting Started ❖ Profile Settings-The Profiles utility lets you can customize by adding identifying text to access the screen saver option. Then perform any of the following steps: ❖ (Microsoft® Windows® XP or 2000) Click the Start button, and select All Programs, TOSHIBA, Networking, ConfigFree. ❖ Double-click the ConfigFree icon on the Connectivity Doctor screen to devices...
... connect with your Toshiba Computer Getting Started ❖ Profile Settings-The Profiles utility lets you can customize by adding identifying text to access the screen saver option. Then perform any of the following steps: ❖ (Microsoft® Windows® XP or 2000) Click the Start button, and select All Programs, TOSHIBA, Networking, ConfigFree. ❖ Double-click the ConfigFree icon on the Connectivity Doctor screen to devices...
User Guide
Page 304
... electronic mail, the World Wide Web, and other line of using a pointing device such as the battery save mode. (2) A key or combination of computers that you use to interact with the Fn key can set system options or control system parameters, such as a mouse. A unit of data equal to create a complete screen image. L L1 (level one) cache - See also cache, CPU cache, L1 cache.
... electronic mail, the World Wide Web, and other line of using a pointing device such as the battery save mode. (2) A key or combination of computers that you use to interact with the Fn key can set system options or control system parameters, such as a mouse. A unit of data equal to create a complete screen image. L L1 (level one) cache - See also cache, CPU cache, L1 cache.
User Guide
Page 311
... disk error message 221 not accessing disk drives 220 setting up 46, 58 warning resume failure message 220 computing tips 87 configuring hard drive passwords 210 password 207 CONNECT 180 connecting external monitor 78 external USB keyboard 73 external USB mouse 73 printer 74 USB-compatible mouse 73 Contents CDs 105 DVDs 105 control buttons 56 critical applications 3 cursor control overlay 93 customizing taskbar 141 D desktop browsing style 143 changing styles 143 personalizing 141 Device Manager 226 checking properties 227 disabling a device...
... disk error message 221 not accessing disk drives 220 setting up 46, 58 warning resume failure message 220 computing tips 87 configuring hard drive passwords 210 password 207 CONNECT 180 connecting external monitor 78 external USB keyboard 73 external USB mouse 73 printer 74 USB-compatible mouse 73 Contents CDs 105 DVDs 105 control buttons 56 critical applications 3 cursor control overlay 93 customizing taskbar 141 D desktop browsing style 143 changing styles 143 personalizing 141 Device Manager 226 checking properties 227 disabling a device...

User Guide
Page 312
... LAN Port disabling 151 using keyboard or pointing device 175 viewing key assignments 177 folders displaying information 146 function keys 90 H hard disk drive Master password 210 password 207 passwords 210 User password 210 hardware conflicts 224 resolving 226 HDD protection 184 headphones 157 Help and Support 312 Index disposing of used batteries 137 DMA (Direct Memory Access) 225 double-click 56 downloading 156 DVD player general problems 247 DVD-ROM drive opening 101 problems 237 troubleshooting 237 using 99 DVD-ROM or multi-function drive removing 105 DVD-ROM/multi-function drive...
... LAN Port disabling 151 using keyboard or pointing device 175 viewing key assignments 177 folders displaying information 146 function keys 90 H hard disk drive Master password 210 password 207 passwords 210 User password 210 hardware conflicts 224 resolving 226 HDD protection 184 headphones 157 Help and Support 312 Index disposing of used batteries 137 DMA (Direct Memory Access) 225 double-click 56 downloading 156 DVD player general problems 247 DVD-ROM drive opening 101 problems 237 troubleshooting 237 using 99 DVD-ROM or multi-function drive removing 105 DVD-ROM/multi-function drive...
User Guide
Page 313
... not found 223 Internet Service Provider (ISP) 154, 156 IRQ (Interrupt Request) 225 K keyboard character keys 89 connecting USB-compatible 73 curser control overlay 93 Fn-esse 173 function keys 90 not working 220 overlays 91 troubleshooting 231 Windows special keys 91 L LCD panel closing 83 screen saver 131 lights AC power 51 battery 51 M Master password 210 memory problem solving 228 removing expansion slot cover 59 memory module removing 62 microphone using 158 modem determining COM port 148 problem solving 243
... not found 223 Internet Service Provider (ISP) 154, 156 IRQ (Interrupt Request) 225 K keyboard character keys 89 connecting USB-compatible 73 curser control overlay 93 Fn-esse 173 function keys 90 not working 220 overlays 91 troubleshooting 231 Windows special keys 91 L LCD panel closing 83 screen saver 131 lights AC power 51 battery 51 M Master password 210 memory problem solving 228 removing expansion slot cover 59 memory module removing 62 microphone using 158 modem determining COM port 148 problem solving 243
User Guide
Page 314
... Index resetting port to default settings 148 upgrading 148 modes Hibernation 109 Stand By 109 module Bluetooth 152 Wi-Fi 152 monitor adjusting display 81 connecting 78 not working 232 mouse connecting USB-compatible 73 moving the computer 85 N network accessing 150 Dial-Up Networking Wizard 150 O OPTIMIZE 181 optional additional equipment carrying case 139 Noteworthy computer lock cable 85 overlay cursor control 93 P password creating 208 disabling 209 hard disk drive 207 instant 209, 210 power-on 207 types 207 user...
... Index resetting port to default settings 148 upgrading 148 modes Hibernation 109 Stand By 109 module Bluetooth 152 Wi-Fi 152 monitor adjusting display 81 connecting 78 not working 232 mouse connecting USB-compatible 73 moving the computer 85 N network accessing 150 Dial-Up Networking Wizard 150 O OPTIMIZE 181 optional additional equipment carrying case 139 Noteworthy computer lock cable 85 overlay cursor control 93 P password creating 208 disabling 209 hard disk drive 207 instant 209, 210 power-on 207 types 207 user...

User Guide
Page 315
... Device Manager 226 disabling a device 227 disk drive is slow 235 display is blank 232 external display not working 234 external monitor 232 faulty memory 228 hardware conflict 224, 225 high-pitched noise 238 illegal operation 218 Internet bookmarked site not found 223 Internet connection is slow 223 keyboard not responding 220 missing files/trouble accessing a disk 234 modem not receiving or transmitting 243 no sound 238 non-system disk or disk error 221, 236 PC Card...
... Device Manager 226 disabling a device 227 disk drive is slow 235 display is blank 232 external display not working 234 external monitor 232 faulty memory 228 hardware conflict 224, 225 high-pitched noise 238 illegal operation 218 Internet bookmarked site not found 223 Internet connection is slow 223 keyboard not responding 220 missing files/trouble accessing a disk 234 modem not receiving or transmitting 243 no sound 238 non-system disk or disk error 221, 236 PC Card...


