
Tecta M2 User's Guide (PDF)
Page 29
29 Contents Turning on the power 54 Setting up your software 55 Registering your computer with Toshiba 57 Setting up other devices 57 Turning off the computer 57 Closing the display panel 58 Chapter 2: Connecting Other External Devices 59 Using ... Connecting an optional external diskette drive 67 Connecting external speakers or headphones 68 Connecting an external microphone 68 Using an expansion device 69 Adding memory 70 Installing memory modules 70 Using Slim SelectBay® modules 80 Removing a module from the Slim SelectBay 80 Inserting a module into the Slim SelectBay 82 ...
29 Contents Turning on the power 54 Setting up your software 55 Registering your computer with Toshiba 57 Setting up other devices 57 Turning off the computer 57 Closing the display panel 58 Chapter 2: Connecting Other External Devices 59 Using ... Connecting an optional external diskette drive 67 Connecting external speakers or headphones 68 Connecting an external microphone 68 Using an expansion device 69 Adding memory 70 Installing memory modules 70 Using Slim SelectBay® modules 80 Removing a module from the Slim SelectBay 80 Inserting a module into the Slim SelectBay 82 ...
Tecta M2 User's Guide (PDF)
Page 33
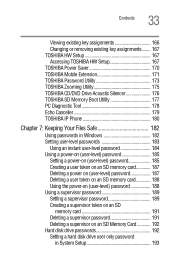
... Changing or removing existing key assignments........ 167 TOSHIBA HW Setup 167 Accessing TOSHIBA HW Setup 167 TOSHIBA Power Saver 170 TOSHIBA Mobile Extension 171 TOSHIBA Password Utility 173 TOSHIBA Zooming Utility 175 TOSHIBA CD/DVD Drive Acoustic Silencer 176 TOSHIBA SD Memory Boot Utility 177 PC Diagnostic Tool 178 Echo Canceller 179 TOSHIBA IP Phone 180 Chapter 7: Keeping Your Files...
... Changing or removing existing key assignments........ 167 TOSHIBA HW Setup 167 Accessing TOSHIBA HW Setup 167 TOSHIBA Power Saver 170 TOSHIBA Mobile Extension 171 TOSHIBA Password Utility 173 TOSHIBA Zooming Utility 175 TOSHIBA CD/DVD Drive Acoustic Silencer 176 TOSHIBA SD Memory Boot Utility 177 PC Diagnostic Tool 178 Echo Canceller 179 TOSHIBA IP Phone 180 Chapter 7: Keeping Your Files...

Tecta M2 User's Guide (PDF)
Page 34
... can help you 204 Resolving a hardware conflict 205 A plan of action 205 Resolving hardware conflicts on your own ........206 Fixing a problem with Device Manager 207 Memory problems 209 Power and the batteries 210 Keyboard problems 211 Display problems 212 Disk drive problems 214 DVD-ROM or multi-function drive problems......216...
... can help you 204 Resolving a hardware conflict 205 A plan of action 205 Resolving hardware conflicts on your own ........206 Fixing a problem with Device Manager 207 Memory problems 209 Power and the batteries 210 Keyboard problems 211 Display problems 212 Disk drive problems 214 DVD-ROM or multi-function drive problems......216...
Tecta M2 User's Guide (PDF)
Page 48
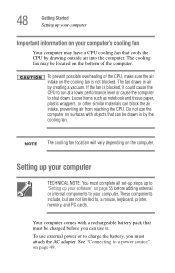
... before adding external or internal components to your software" on the cooling fan is blocked, it . To use external power or to , a mouse, keyboard, printer, memory, and PC cards. The cooling fan may have a CPU cooling fan that can block the air intake, preventing air from reaching the CPU. To prevent...
... before adding external or internal components to your software" on the cooling fan is blocked, it . To use external power or to , a mouse, keyboard, printer, memory, and PC cards. The cooling fan may have a CPU cooling fan that can block the air intake, preventing air from reaching the CPU. To prevent...
Tecta M2 User's Guide (PDF)
Page 49
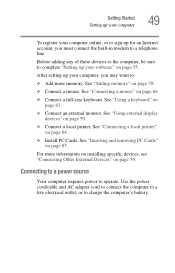
... page 59. ❖ Connect a local printer. See "Using external display devices" on page 63. ❖ Connect an external monitor. See "Adding memory" on page 64. ❖ Connect a full-size keyboard. Connecting to a power source Your computer requires power to charge the computer's battery. Use the... computer to a live electrical outlet, or to operate. See "Connecting a mouse" on page 70. ❖ Connect a mouse. For more memory. See "Inserting and removing PC Cards" on page 59. See "Connecting a local printer" on page 55. Getting Started Setting up your computer...
... page 59. ❖ Connect a local printer. See "Using external display devices" on page 63. ❖ Connect an external monitor. See "Adding memory" on page 64. ❖ Connect a full-size keyboard. Connecting to a power source Your computer requires power to charge the computer's battery. Use the... computer to a live electrical outlet, or to operate. See "Connecting a mouse" on page 70. ❖ Connect a mouse. For more memory. See "Inserting and removing PC Cards" on page 59. See "Connecting a local printer" on page 55. Getting Started Setting up your computer...

Tecta M2 User's Guide (PDF)
Page 58
.... Doing so may damage the media in use and result in use the Windows® Standby or Hibernate commands to save your system settings to memory so that it is in loss of the computer. If you close the computer while it is still on. ❖ If you have an action...
.... Doing so may damage the media in use and result in use the Windows® Standby or Hibernate commands to save your system settings to memory so that it is in loss of the computer. If you close the computer while it is still on. ❖ If you have an action...
Tecta M2 User's Guide (PDF)
Page 70
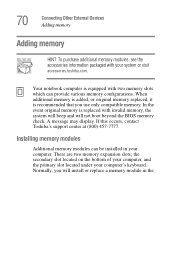
... installed in the If this occurs, contact Toshiba's support center at (800) 457-7777. Normally, you use only compatible memory. Your notebook computer is recommended that you will not boot beyond the BIOS memory check. Installing memory modules Additional memory modules can provide various memory configurations. There are two memory expansion slots; the secondary slot located on...
... installed in the If this occurs, contact Toshiba's support center at (800) 457-7777. Normally, you use only compatible memory. Your notebook computer is recommended that you will not boot beyond the BIOS memory check. Installing memory modules Additional memory modules can provide various memory configurations. There are two memory expansion slots; the secondary slot located on...
Tecta M2 User's Guide (PDF)
Page 71
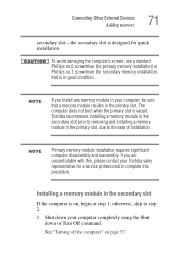
...when the primary slot is designed for quick installation. If you install any memory module in your computer completely using the Shut down or Turn Off command. Toshiba recommends installing a memory module in the secondary slot prior to step 2. 1 Shut down your ...slot, due to complete this , please contact your Toshiba sales representative for secondary memory installation) that a memory module resides in good condition. To avoid damaging the computer's screws, use a standard Phillips no.0 screwdriver (for primary memory installation) or Phillips no.1 screwdriver (for a service...
...when the primary slot is designed for quick installation. If you install any memory module in your computer completely using the Shut down or Turn Off command. Toshiba recommends installing a memory module in the secondary slot prior to step 2. 1 Shut down your ...slot, due to complete this , please contact your Toshiba sales representative for secondary memory installation) that a memory module resides in good condition. To avoid damaging the computer's screws, use a standard Phillips no.0 screwdriver (for primary memory installation) or Phillips no.1 screwdriver (for a service...

Tecta M2 User's Guide (PDF)
Page 72
... with the computer's power on may have connected. 4 Turn the computer upside down, remove the battery, and locate the memory module cover to the memory slot. Memory module cover Locating the sample memory module cover 5 Using a standard Phillips no. 1 screwdriver, unscrew the screw that you may damage the computer, the module, or both. 3 Close... the display panel and remove any cables you can retrieve them later. Place the screw and the cover in a safe place so that secures the memory module cover, then remove the memory module cover. 72 Connecting Other External Devices Adding...
... with the computer's power on may have connected. 4 Turn the computer upside down, remove the battery, and locate the memory module cover to the memory slot. Memory module cover Locating the sample memory module cover 5 Using a standard Phillips no. 1 screwdriver, unscrew the screw that you may damage the computer, the module, or both. 3 Close... the display panel and remove any cables you can retrieve them later. Place the screw and the cover in a safe place so that secures the memory module cover, then remove the memory module cover. 72 Connecting Other External Devices Adding...
Tecta M2 User's Guide (PDF)
Page 73
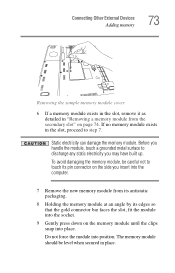
...you insert into the computer. 7 Remove the new memory module from the secondary slot" on the memory module until the clips snap into position. If no memory module exists in "Removing a memory module from its antistatic packaging. 8 Holding the memory module at an angle by its pin connector on the... you may have built up. To avoid damaging the memory module, be level when secured in place. Do not force the module into place. Connecting Other External Devices Adding memory 73 Removing the sample memory module cover 6 If a memory module exists in the slot, remove it as detailed ...
...you insert into the computer. 7 Remove the new memory module from the secondary slot" on the memory module until the clips snap into position. If no memory module exists in "Removing a memory module from its antistatic packaging. 8 Holding the memory module at an angle by its pin connector on the... you may have built up. To avoid damaging the memory module, be level when secured in place. Do not force the module into place. Connecting Other External Devices Adding memory 73 Removing the sample memory module cover 6 If a memory module exists in the slot, remove it as detailed ...

Tecta M2 User's Guide (PDF)
Page 74
... Turn the computer over and restart it automatically recognizes the additional memory. Grease or dust on the computer, it . When you need to remove a secondary memory module: 1 Complete steps 1-5 in "Installing a memory module in the secondary slot" to shut down the computer and... remove the memory module cover. 74 Connecting Other External Devices Adding memory Inserting the sample memory module into the secondary slot Avoid touching...
... Turn the computer over and restart it automatically recognizes the additional memory. Grease or dust on the computer, it . When you need to remove a secondary memory module: 1 Complete steps 1-5 in "Installing a memory module in the secondary slot" to shut down the computer and... remove the memory module cover. 74 Connecting Other External Devices Adding memory Inserting the sample memory module into the secondary slot Avoid touching...
Tecta M2 User's Guide (PDF)
Page 75
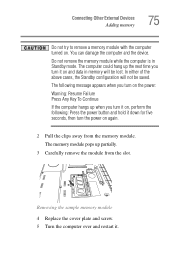
... computer over and restart it on and data in Standby mode. Do not remove the memory module while the computer is in memory will not be lost. The memory module pops up partially. 3 Carefully remove the module from the memory module. In either of the above cases, the Standby configuration will be saved. You... turn it on, perform the following: Press the power button and hold it down for five seconds, then turn it . Connecting Other External Devices Adding memory 75 Do not try to remove a memory module with the computer turned on again. 2 Pull the clips away from the slot.
... computer over and restart it on and data in Standby mode. Do not remove the memory module while the computer is in memory will not be lost. The memory module pops up partially. 3 Carefully remove the module from the memory module. In either of the above cases, the Standby configuration will be saved. You... turn it on, perform the following: Press the power button and hold it down for five seconds, then turn it . Connecting Other External Devices Adding memory 75 Do not try to remove a memory module with the computer turned on again. 2 Pull the clips away from the slot.
Tecta M2 User's Guide (PDF)
Page 76
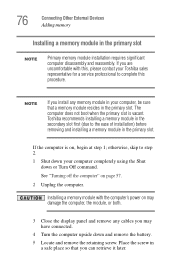
... 1; See "Turning off the computer" on may have connected. 4 Turn the computer upside down or Turn Off command. Toshiba recommends installing a memory module in the primary slot. otherwise, skip to step 2. 1 Shut down your computer completely using the Shut down and ... 3 Close the display panel and remove any memory module in your Toshiba sales representative for a service professional to the ease of installation) before removing and installing a memory module in the primary slot NOTE Primary memory module installation requires significant computer disassembly and reassembly....
... 1; See "Turning off the computer" on may have connected. 4 Turn the computer upside down or Turn Off command. Toshiba recommends installing a memory module in the primary slot. otherwise, skip to step 2. 1 Shut down your computer completely using the Shut down and ... 3 Close the display panel and remove any memory module in your Toshiba sales representative for a service professional to the ease of installation) before removing and installing a memory module in the primary slot NOTE Primary memory module installation requires significant computer disassembly and reassembly....
Tecta M2 User's Guide (PDF)
Page 77
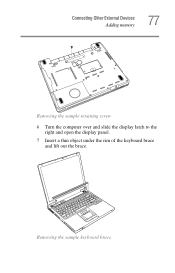
Connecting Other External Devices Adding memory 77 Removing the sample retaining screw 6 Turn the computer over and slide the display latch to the right and open the display panel. 7 Insert a thin object under the rim of the keyboard brace and lift out the brace. Removing the sample keyboard brace
Connecting Other External Devices Adding memory 77 Removing the sample retaining screw 6 Turn the computer over and slide the display latch to the right and open the display panel. 7 Insert a thin object under the rim of the keyboard brace and lift out the brace. Removing the sample keyboard brace

Tecta M2 User's Guide (PDF)
Page 78
Removing the sample metal brace 78 Connecting Other External Devices Adding memory 8 Remove two screws securing the keyboard. Place the screw in a safe place so that you can retrieve them later. 9 Lift up the back of the ... the metal brace. Place the screws in a safe place so that you and lay in antistatic packaging and store it later. 11 Remove the existing memory module from the slot by pulling the clips away from the...
Removing the sample metal brace 78 Connecting Other External Devices Adding memory 8 Remove two screws securing the keyboard. Place the screw in a safe place so that you can retrieve them later. 9 Lift up the back of the ... the metal brace. Place the screws in a safe place so that you and lay in antistatic packaging and store it later. 11 Remove the existing memory module from the slot by pulling the clips away from the...
Tecta M2 User's Guide (PDF)
Page 79
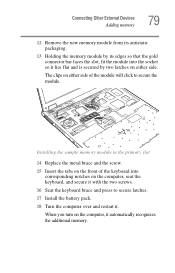
When you turn on the computer, it automatically recognizes the additional memory. The clips on either side. Installing the sample memory module in the primary slot 14 Replace the metal brace and the screw. 15 Insert the tabs on the front of the keyboard into the ... two screws. 16 Seat the keyboard brace and press to secure the module. Connecting Other External Devices Adding memory 79 12 Remove the new memory module from its antistatic packaging. 13 Holding the memory module by two latches on either side of the module will click to secure latches. 17 Install the battery...
When you turn on the computer, it automatically recognizes the additional memory. The clips on either side. Installing the sample memory module in the primary slot 14 Replace the metal brace and the screw. 15 Insert the tabs on the front of the keyboard into the ... two screws. 16 Seat the keyboard brace and press to secure the module. Connecting Other External Devices Adding memory 79 12 Remove the new memory module from its antistatic packaging. 13 Holding the memory module by two latches on either side of the module will click to secure latches. 17 Install the battery...
Tecta M2 User's Guide (PDF)
Page 91
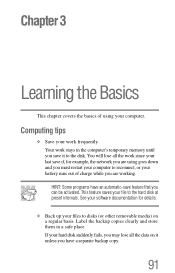
... disk at preset intervals. You will lose all the data on a regular basis. Label the backup copies clearly and store them in the computer's temporary memory until you can be activated. Computing tips ❖ Save your file to the disk. HINT: Some programs have a separate backup copy. 91 Your work frequently...
... disk at preset intervals. You will lose all the data on a regular basis. Label the backup copies clearly and store them in the computer's temporary memory until you can be activated. Computing tips ❖ Save your file to the disk. HINT: Some programs have a separate backup copy. 91 Your work frequently...
Tecta M2 User's Guide (PDF)
Page 122
...system is being retrieved from the hard disk rather than restarting from Standby, because information is held on page 178. When you left it from memory. NOTE For more information about the Power Saver utility, see "PC Diagnostic Tool" on the hard disk, no battery power. ❖ Because...battery power than does Turn Off. ❖ Resuming from Hibernation uses a little more time and power to start the computer up than from memory. Since Hibernation mode does not require power to green. 122 Learning the Basics Powering down To start up again, press the power button ...
...system is being retrieved from the hard disk rather than restarting from Standby, because information is held on page 178. When you left it from memory. NOTE For more information about the Power Saver utility, see "PC Diagnostic Tool" on the hard disk, no battery power. ❖ Because...battery power than does Turn Off. ❖ Resuming from Hibernation uses a little more time and power to start the computer up than from memory. Since Hibernation mode does not require power to green. 122 Learning the Basics Powering down To start up again, press the power button ...

Tecta M2 User's Guide (PDF)
Page 124
... until the on the computer, you can start up again, the computer returns to the screen you were using. If you put the computer in memory so that, when you power on /off . Be sure to save your information will be lost. Using Standby The Standby command puts the computer into...
... until the on the computer, you can start up again, the computer returns to the screen you were using. If you put the computer in memory so that, when you power on /off . Be sure to save your information will be lost. Using Standby The Standby command puts the computer into...
Tecta M2 User's Guide (PDF)
Page 129
... battery, you are away from an AC outlet. The computer also has an internal real-time-clock (RTC) battery. The RTC battery powers the RTC memory that the battery maintains its maximum capacity, operate the computer on page 138 for procedures for doing this information for an extended period (more than...
... battery, you are away from an AC outlet. The computer also has an internal real-time-clock (RTC) battery. The RTC battery powers the RTC memory that the battery maintains its maximum capacity, operate the computer on page 138 for procedures for doing this information for an extended period (more than...


