

User Guide
Page 2
...POSSIBILITY THEREOF. IF YOUR DATA IS ALTERED OR LOST DUE TO ANY TROUBLE, FAILURE OR MALFUNCTION OF THE HARD DISK DRIVE OR OTHER STORAGE DEVICES AND THE DATA CANNOT BE RECOVERED, TOSHIBA SHALL NOT BE LIABLE FOR ANY DAMAGE OR LOSS OF DATA, OR ANY OTHER DAMAGE RESULTING THEREFROM. ...TOSHIBA AMERICA INFORMATION SYSTEMS ("TOSHIBA"), ITS AFFILIATES AND SUPPLIERS DO NOT WARRANT THAT OPERATION OF THE PRODUCT WILL BE UNINTERRUPTED OR ERROR FREE. As with any new technology, you must read and follow all set-up copies of all the data stored on the hard disk or other damage. 2 Model: Tecra 9000 ...
...POSSIBILITY THEREOF. IF YOUR DATA IS ALTERED OR LOST DUE TO ANY TROUBLE, FAILURE OR MALFUNCTION OF THE HARD DISK DRIVE OR OTHER STORAGE DEVICES AND THE DATA CANNOT BE RECOVERED, TOSHIBA SHALL NOT BE LIABLE FOR ANY DAMAGE OR LOSS OF DATA, OR ANY OTHER DAMAGE RESULTING THEREFROM. ...TOSHIBA AMERICA INFORMATION SYSTEMS ("TOSHIBA"), ITS AFFILIATES AND SUPPLIERS DO NOT WARRANT THAT OPERATION OF THE PRODUCT WILL BE UNINTERRUPTED OR ERROR FREE. As with any new technology, you must read and follow all set-up copies of all the data stored on the hard disk or other damage. 2 Model: Tecra 9000 ...

User Guide
Page 17
17 Inserting a module into the Slim SelectBay 73 Inserting and removing hard drives 74 Inserting and removing PC Cards 76 Inserting a PC Card 76 Removing a PC Card 77 Inserting and removing Bluetooth modules 78 Setting up a PC Card ... Function keys 90 Windows special keys 90 Overlay keys 91 Using the AccuPoint II 93 Using the TOSHIBA Console button 94 Starting a program 96 Saving your work 96 Printing your work 97 Using a compact disc drive 98 Inserting compact discs 99 Removing compact discs 101 Caring for CDs and DVDs 102 Using...
17 Inserting a module into the Slim SelectBay 73 Inserting and removing hard drives 74 Inserting and removing PC Cards 76 Inserting a PC Card 76 Removing a PC Card 77 Inserting and removing Bluetooth modules 78 Setting up a PC Card ... Function keys 90 Windows special keys 90 Overlay keys 91 Using the AccuPoint II 93 Using the TOSHIBA Console button 94 Starting a program 96 Saving your work 96 Printing your work 97 Using a compact disc drive 98 Inserting compact discs 99 Removing compact discs 101 Caring for CDs and DVDs 102 Using...

User Guide
Page 20
Windows 2000 190 Setting a hard disk drive master password 191 Deleting a hard disk drive master password 193 Setting a hard disk drive user password 194 Creating a user password service diskette 195 Deleting the hard disk drive user password 197 20 Getting Help 164 Exiting WinDVD 164 Chapter 8: Toshiba Utilities 165 Fn-esse 166 Starting Fn-esse 166 Assigning a key to a program... 186 Using the power-on (user-level) password 187 Using the instant (user-level) password 188 Supervisor-level passwords 189 Setting a supervisor-level password 189 Hard disk drive passwords -
Windows 2000 190 Setting a hard disk drive master password 191 Deleting a hard disk drive master password 193 Setting a hard disk drive user password 194 Creating a user password service diskette 195 Deleting the hard disk drive user password 197 20 Getting Help 164 Exiting WinDVD 164 Chapter 8: Toshiba Utilities 165 Fn-esse 166 Starting Fn-esse 166 Assigning a key to a program... 186 Using the power-on (user-level) password 187 Using the instant (user-level) password 188 Supervisor-level passwords 189 Setting a supervisor-level password 189 Hard disk drive passwords -
User Guide
Page 37
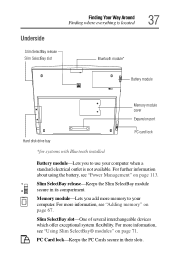
... computer when a standard electrical outlet is located Underside Slim SelectBay release Slim SelectBay slot Bluetooth module* 37 Battery module Memory module cover Expansion port Hard disk drive bay PC card lock *for systems with Bluetooth installed Battery module-Lets you add more memory to use your computer. Slim SelectBay slot-One of...
... computer when a standard electrical outlet is located Underside Slim SelectBay release Slim SelectBay slot Bluetooth module* 37 Battery module Memory module cover Expansion port Hard disk drive bay PC card lock *for systems with Bluetooth installed Battery module-Lets you add more memory to use your computer. Slim SelectBay slot-One of...

User Guide
Page 39
Hard disk drive light-Flashes to indicate that wireless device is currently in use . Slim SelectBay indicator light-Indicates the status of a secondary battery in the Slim SelectBay, ... and the battery is fully charged. Finding Your Way Around Indicator panel lights 39 ❖ Glows green when you are connected to indicate that the hard disk is currently in use .
Hard disk drive light-Flashes to indicate that wireless device is currently in use . Slim SelectBay indicator light-Indicates the status of a secondary battery in the Slim SelectBay, ... and the battery is fully charged. Finding Your Way Around Indicator panel lights 39 ❖ Glows green when you are connected to indicate that the hard disk is currently in use .

User Guide
Page 56
... a few additional things to keep in mind when you turn off the power. ❖ Never turn off the power while the hard disk drive light or the SelectBay drive light on the system indicator panel is on, the Panel Close Alarm beeps loudly. ❖ You can turn off the Panel Close... Alarm by using Toshiba Hardware Setup's Hardware Alarm tab. ❖ For additional information about powering down your hard disk, diskette drive, or DVD/ CD-ROM drive. ❖ If you left off, see "Power down options" on . Doing so may ...
... a few additional things to keep in mind when you turn off the power. ❖ Never turn off the power while the hard disk drive light or the SelectBay drive light on the system indicator panel is on, the Panel Close Alarm beeps loudly. ❖ You can turn off the Panel Close... Alarm by using Toshiba Hardware Setup's Hardware Alarm tab. ❖ For additional information about powering down your hard disk, diskette drive, or DVD/ CD-ROM drive. ❖ If you left off, see "Power down options" on . Doing so may ...

User Guide
Page 72
72 Connecting Other External Devices Using Slim SelectBay® modules ❖ Secondary battery ❖ Secondary hard disk drive (HDD) HINT: Items from the Slim SelectBay® 1 Slide the Slim SelectBay® ejection bar towards the front of the computer. Removing a module from this list that did not come with your computer can be purchased separately. Unlatching the Slim SelectBay® See the accessories information packaged with your system or visit www.toshibaaccessories.com.
72 Connecting Other External Devices Using Slim SelectBay® modules ❖ Secondary battery ❖ Secondary hard disk drive (HDD) HINT: Items from the Slim SelectBay® 1 Slide the Slim SelectBay® ejection bar towards the front of the computer. Removing a module from this list that did not come with your computer can be purchased separately. Unlatching the Slim SelectBay® See the accessories information packaged with your system or visit www.toshibaaccessories.com.

User Guide
Page 74
... exposed edge of the hard drive and pull it to increase storage capacity by inserting a drive into the select bay module. 74 Connecting Other External Devices Inserting and removing hard drives Inserting and removing hard drives Your Tecra® 9000 can also add additional hard drive space by changing the internal drive, or you may wish to remove the hard drive from the computer.
... exposed edge of the hard drive and pull it to increase storage capacity by inserting a drive into the select bay module. 74 Connecting Other External Devices Inserting and removing hard drives Inserting and removing hard drives Your Tecra® 9000 can also add additional hard drive space by changing the internal drive, or you may wish to remove the hard drive from the computer.

User Guide
Page 75
Inserting the new hard disk drive 9 Replace the hard drive bay cover and tighten the screws removed in step 5 above. Do not force the drive into the hard drive bay and pressing it firmly until it into the computer. Connecting Other External Devices Inserting and removing hard drives 75 Removing the hard drive from the computer 8 Install the new hard drive by sliding it locks.
Inserting the new hard disk drive 9 Replace the hard drive bay cover and tighten the screws removed in step 5 above. Do not force the drive into the hard drive bay and pressing it firmly until it into the computer. Connecting Other External Devices Inserting and removing hard drives 75 Removing the hard drive from the computer 8 Install the new hard drive by sliding it locks.

User Guide
Page 86
Turning off the computer while it takes time. Do not turn off the computer if a drive indicator light indicates a drive is active. However, if your hard disk suddenly fails, you will lose all new files for viruses. If you receive via diskette, email, or download from or writing ...10070; Take frequent breaks to a disk may be lost. NOTE: Windows® records information, such as new icon positions may damage the disk, the drive, or both. ❖ Always turn off backing up because it is especially important for more information on these and other utilities. ❖ Scan all ...
Turning off the computer while it takes time. Do not turn off the computer if a drive indicator light indicates a drive is active. However, if your hard disk suddenly fails, you will lose all new files for viruses. If you receive via diskette, email, or download from or writing ...10070; Take frequent breaks to a disk may be lost. NOTE: Windows® records information, such as new icon positions may damage the disk, the drive, or both. ❖ Always turn off backing up because it is especially important for more information on these and other utilities. ❖ Scan all ...

User Guide
Page 96
... Explorer. Many programs offer a feature that contains the information you want to open the program first, you have an automatic-save your work to the hard disk drive or a diskette. If you prefer to work on your desktop ❖ Use the Start menu ❖ Use Windows Explorer or My Computer to locate...
... Explorer. Many programs offer a feature that contains the information you want to open the program first, you have an automatic-save your work to the hard disk drive or a diskette. If you prefer to work on your desktop ❖ Use the Start menu ❖ Use Windows Explorer or My Computer to locate...

User Guide
Page 103
... can replace one PC Card with water or a neutral cleaner (not benzine or rubbing alcohol). For example: ❖ Do not remove a hard disk card while the system is in the drive. Hot swapping With PC Cards, you could lose valuable information. Other cards may work with your computer, but are operating. After...
... can replace one PC Card with water or a neutral cleaner (not benzine or rubbing alcohol). For example: ❖ Do not remove a hard disk card while the system is in the drive. Hot swapping With PC Cards, you could lose valuable information. Other cards may work with your computer, but are operating. After...

User Guide
Page 104
..., you connect both devices to the port simultaneously. Important: Do not use the following the procedures outlined in "Inserting an SD Media card" on the hard disk drive. 4 Copy the contents of the source SD Media card into the temporary folder you created in step 3. 5 Remove the source SD Media card. 6 Insert...
..., you connect both devices to the port simultaneously. Important: Do not use the following the procedures outlined in "Inserting an SD Media card" on the hard disk drive. 4 Copy the contents of the source SD Media card into the temporary folder you created in step 3. 5 Remove the source SD Media card. 6 Insert...
User Guide
Page 109
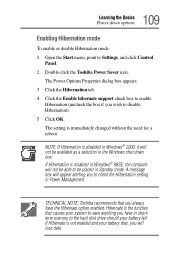
... you to Settings, and click Control Panel. 2 Double-click the Toshiba Power Saver icon. TECHNICAL NOTE: Toshiba recommends that causes your system to save anything you have in Windows® 98SE, the computer will appear alerting you wish to the hard disk drive should your battery dies, you always have the Hibernate option enabled...
... you to Settings, and click Control Panel. 2 Double-click the Toshiba Power Saver icon. TECHNICAL NOTE: Toshiba recommends that causes your system to save anything you have in Windows® 98SE, the computer will appear alerting you wish to the hard disk drive should your battery dies, you always have the Hibernate option enabled...

User Guide
Page 122
... combined these modes lets you choose between maximum power savings and peak system performance. By using the computer depends on again. ❖ Use Toshiba's power-saving options. Using one of these options into preset power usage modes. The following sections describe how to suit your battery: ❖...computer before you need to recharge the battery. These power-saving options control the way in which you can use the hard disk, DVD-ROM/CD-ROM, and diskette drives, or other optional devices. ❖ Where you are various ways in which saves power when you turn off the ...
... combined these modes lets you choose between maximum power savings and peak system performance. By using the computer depends on again. ❖ Use Toshiba's power-saving options. Using one of these options into preset power usage modes. The following sections describe how to suit your battery: ❖...computer before you need to recharge the battery. These power-saving options control the way in which you can use the hard disk, DVD-ROM/CD-ROM, and diskette drives, or other optional devices. ❖ Where you are various ways in which saves power when you turn off the ...
User Guide
Page 172
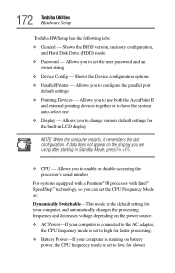
... - Allows you to set to high for the built-in Standby Mode, press Fn + F5. ❖ CPU - Shows the BIOS version, memory configuration, and Hard Disk Drive (HDD) mode ❖ Password - Allows you to use both the AccuPoint II and external pointing devices together or to configure the parallel port default settings...
... - Allows you to set to high for the built-in Standby Mode, press Fn + F5. ❖ CPU - Shows the BIOS version, memory configuration, and Hard Disk Drive (HDD) mode ❖ Password - Allows you to use both the AccuPoint II and external pointing devices together or to configure the parallel port default settings...

User Guide
Page 177
...You can use different Power Save modes for battery operation and for presentations. ❖ Super Long Life mode-Saves maximum power. 177 Toshiba Utilities Power Saver Power Save Modes tab There are several modes from which to choose. It has the following tabs: ❖ ...10070; Monitor Brightness-Offers display power management options ❖ Turn Off Monitor-Offers display power management options ❖ Turn Off Hard Disks-Offers hard disk drive power management options button. The Power Save Mode Setup dialog appears. Power saving has a higher priority than power savings. ❖...
...You can use different Power Save modes for battery operation and for presentations. ❖ Super Long Life mode-Saves maximum power. 177 Toshiba Utilities Power Saver Power Save Modes tab There are several modes from which to choose. It has the following tabs: ❖ ...10070; Monitor Brightness-Offers display power management options ❖ Turn Off Monitor-Offers display power management options ❖ Turn Off Hard Disks-Offers hard disk drive power management options button. The Power Save Mode Setup dialog appears. Power saving has a higher priority than power savings. ❖...

User Guide
Page 182
... password in Hardware Setup or in Toshiba Utilities and System Setup. User-level passwords The user-level password is to bypass the password function when starting your data by restricting who can set a hard disk drive user password and/or a hard disk drive master password. You can use it... password. Once you have used to create a password service diskette. For most users, this is using the computer. ❖ A hard disk drive password that protects system settings by requiring a password when you can also create a password service diskette which can be used the diskette,...
... password in Hardware Setup or in Toshiba Utilities and System Setup. User-level passwords The user-level password is to bypass the password function when starting your data by restricting who can set a hard disk drive user password and/or a hard disk drive master password. You can use it... password. Once you have used to create a password service diskette. For most users, this is using the computer. ❖ A hard disk drive password that protects system settings by requiring a password when you can also create a password service diskette which can be used the diskette,...

User Guide
Page 203
... displays the message "system transferred" when complete. 7 Remove the diskette from the hard drive. The computer is a device driver conflict or a general hardware problem, try restarting the computer with the Toshiba Companion Diskette or another reliable system diskette in the diskette drive. If pressing any key to troubleshoot the problem first. 1 From the Windows...
... displays the message "system transferred" when complete. 7 Remove the diskette from the hard drive. The computer is a device driver conflict or a general hardware problem, try restarting the computer with the Toshiba Companion Diskette or another reliable system diskette in the diskette drive. If pressing any key to troubleshoot the problem first. 1 From the Windows...

User Guide
Page 288
... removing 101 composite video port connecting a device 58 computer display latch 35 precautions 46 shut down 244 configuration management tool 171 configuring hard drive passwords 190 password 181 PC Cards 78 connecting headphones 65 memory module 68 modem to telephone line 81 monitor 57, 58, 59... mouse 62 dialog box Shut Down Windows 244 Direct Memory Access (DMA) 205 disc, positioning 100 Disk Defragmenter troubleshooting tool 214 diskette drive 64 external 64 display external, adjusting 60 hot key 59 television, connecting 57 troubleshooting 211 video projector, connecting 57 display latch 31...
... removing 101 composite video port connecting a device 58 computer display latch 35 precautions 46 shut down 244 configuration management tool 171 configuring hard drive passwords 190 password 181 PC Cards 78 connecting headphones 65 memory module 68 modem to telephone line 81 monitor 57, 58, 59... mouse 62 dialog box Shut Down Windows 244 Direct Memory Access (DMA) 205 disc, positioning 100 Disk Defragmenter troubleshooting tool 214 diskette drive 64 external 64 display external, adjusting 60 hot key 59 television, connecting 57 troubleshooting 211 video projector, connecting 57 display latch 31...


