
User Guide
Page 16
... printer 63 Connecting an external diskette drive 64 Connecting external speakers or headphones 65 Connecting an external microphone 65 Using an expansion device 66 Adding memory 67 Memory module sizes 67 Installing a memory module 68 Removing a memory module 70 Using Slim SelectBay® modules 71 Removing a module from the Slim SelectBay 72
... printer 63 Connecting an external diskette drive 64 Connecting external speakers or headphones 65 Connecting an external microphone 65 Using an expansion device 66 Adding memory 67 Memory module sizes 67 Installing a memory module 68 Removing a memory module 70 Using Slim SelectBay® modules 71 Removing a module from the Slim SelectBay 72
User Guide
Page 21
...the computer 200 Resolving a hardware conflict 203 Using the Windows 2000 troubleshooting feature...... 203 A plan of action 204 Resolving hardware conflicts on your own 204 Memory card problems 207 Power and the batteries 208 Keyboard problems 209 AccuPoint II problems 211 Display problems 211 Disk drive problems 213 Modem problems 215... 228 Minimum system requirements 228 Developing good computing habits 229 Use VirtualTech 230 If you need further assistance 232 Before you call 232 Contacting Toshiba 232 Other Toshiba Internet Web sites 234 Toshiba's worldwide offices 235
...the computer 200 Resolving a hardware conflict 203 Using the Windows 2000 troubleshooting feature...... 203 A plan of action 204 Resolving hardware conflicts on your own 204 Memory card problems 207 Power and the batteries 208 Keyboard problems 209 AccuPoint II problems 211 Display problems 211 Disk drive problems 213 Modem problems 215... 228 Minimum system requirements 228 Developing good computing habits 229 Use VirtualTech 230 If you need further assistance 232 Before you call 232 Contacting Toshiba 232 Other Toshiba Internet Web sites 234 Toshiba's worldwide offices 235
User Guide
Page 37
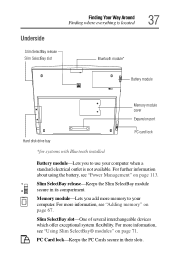
... 67. For more information, see "Power Management" on page 71. PC Card lock-Keeps the PC Cards secure in its compartment. Memory module-Lets you to your computer when a standard electrical outlet is not available. Slim SelectBay slot-One of several interchangeable devices which offer.... Finding Your Way Around Finding where everything is located Underside Slim SelectBay release Slim SelectBay slot Bluetooth module* 37 Battery module Memory module cover Expansion port Hard disk drive bay PC card lock *for systems with Bluetooth installed Battery module-Lets you add more...
... 67. For more information, see "Power Management" on page 71. PC Card lock-Keeps the PC Cards secure in its compartment. Memory module-Lets you to your computer when a standard electrical outlet is not available. Slim SelectBay slot-One of several interchangeable devices which offer.... Finding Your Way Around Finding where everything is located Underside Slim SelectBay release Slim SelectBay slot Bluetooth module* 37 Battery module Memory module cover Expansion port Hard disk drive bay PC card lock *for systems with Bluetooth installed Battery module-Lets you add more...
User Guide
Page 47
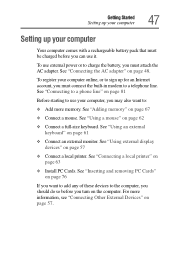
... before you turn on page 81 Before starting to use external power or to charge the battery, you must attach the AC adapter. See "Adding memory" on page 62 ❖ Connect a full-size keyboard. See "Using a mouse" on page 67 ❖ Connect a mouse. See "Connecting a local printer" on... page 57. For more memory. Getting Started Setting up your computer 47 Setting up your computer online, or to sign up for an Internet account, you must connect the built...
... before you turn on page 81 Before starting to use external power or to charge the battery, you must attach the AC adapter. See "Adding memory" on page 62 ❖ Connect a full-size keyboard. See "Using a mouse" on page 67 ❖ Connect a mouse. See "Connecting a local printer" on... page 57. For more memory. Getting Started Setting up your computer 47 Setting up your computer online, or to sign up for an Internet account, you must connect the built...
User Guide
Page 67
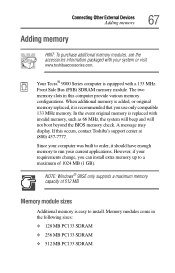
... requirements change, you use only compatible 133 MHz memory. Memory modules come in this occurs, contact Toshiba's support center at (800) 457-7777. When additional memory is added, or original memory replaced, it should have enough memory to order, it is replaced with your current ... memory module. Connecting Other External Devices Adding memory 67 Adding memory HINT: To purchase additional memory modules, see the accessories information packaged with invalid memory, such as 66 MHz, the system will beep and will not boot beyond the BIOS memory check. Your Tecra® 9000 ...
... requirements change, you use only compatible 133 MHz memory. Memory modules come in this occurs, contact Toshiba's support center at (800) 457-7777. When additional memory is added, or original memory replaced, it should have enough memory to order, it is replaced with your current ... memory module. Connecting Other External Devices Adding memory 67 Adding memory HINT: To purchase additional memory modules, see the accessories information packaged with invalid memory, such as 66 MHz, the system will beep and will not boot beyond the BIOS memory check. Your Tecra® 9000 ...
User Guide
Page 68
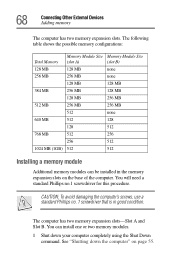
.... CAUTION: To avoid damaging the computer's screws, use a standard Phillips no .1 screwdriver for this procedure. The computer has two memory expansion slots-Slot A and Slot B. See "Shutting down your computer completely using the Shut Down command. You can be installed in... good condition. 68 Connecting Other External Devices Adding memory The computer has two memory expansion slots. The following table shows the possible memory configurations: Memory Module Size Memory Module Size Total Memory (slot A) (slot B) 128 MB 128 MB none 256 MB 256 MB...
.... CAUTION: To avoid damaging the computer's screws, use a standard Phillips no .1 screwdriver for this procedure. The computer has two memory expansion slots-Slot A and Slot B. See "Shutting down your computer completely using the Shut Down command. You can be installed in... good condition. 68 Connecting Other External Devices Adding memory The computer has two memory expansion slots. The following table shows the possible memory configurations: Memory Module Size Memory Module Size Total Memory (slot A) (slot B) 128 MB 128 MB none 256 MB 256 MB...
User Guide
Page 69
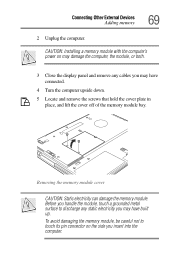
... with the computer's power on the side you may have built up. Connecting Other External Devices Adding memory 69 2 Unplug the computer. Before you handle the module, touch a grounded metal surface to touch its pin connector on may damage the computer, the module, ...or both. 3 Close the display panel and remove any static electricity you insert into the computer. To avoid damaging the memory module, be careful not to discharge any cables you may have connected. 4 Turn the computer upside down. 5 Locate and remove the screws that hold the...
... with the computer's power on the side you may have built up. Connecting Other External Devices Adding memory 69 2 Unplug the computer. Before you handle the module, touch a grounded metal surface to touch its pin connector on may damage the computer, the module, ...or both. 3 Close the display panel and remove any static electricity you insert into the computer. To avoid damaging the memory module, be careful not to discharge any cables you may have connected. 4 Turn the computer upside down. 5 Locate and remove the screws that hold the...
User Guide
Page 70
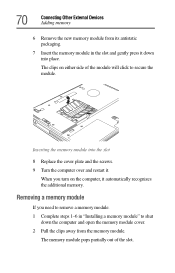
... steps 1-6 in the slot and gently press it down the computer and open the memory module cover. 2 Pull the clips away from its antistatic packaging. 7 Insert the memory module in "Installing a memory module" to secure the module. The memory module pops partially out of the module will click to shut down into the slot...
... steps 1-6 in the slot and gently press it down the computer and open the memory module cover. 2 Pull the clips away from its antistatic packaging. 7 Insert the memory module in "Installing a memory module" to secure the module. The memory module pops partially out of the module will click to shut down into the slot...

User Guide
Page 71
...-RW/DVD combo drive with you when you travel . Connecting Other External Devices Using Slim SelectBay® modules 71 Pulling the clips away from the memory module 3 Carefully remove the module from the slot. 4 Replace the cover plate and screws. 5 Turn the computer over and restart it. Using Slim SelectBay®...
...-RW/DVD combo drive with you when you travel . Connecting Other External Devices Using Slim SelectBay® modules 71 Pulling the clips away from the memory module 3 Carefully remove the module from the slot. 4 Replace the cover plate and screws. 5 Turn the computer over and restart it. Using Slim SelectBay®...

User Guide
Page 85
... preset intervals. See your software documentation for example, the network you are working. Label the backup copies clearly and store them in the computer's temporary memory until you save feature which you are using your computer. HINT: Some programs have an automatic-save it to the disk. Computing tips ❖ Save...
... preset intervals. See your software documentation for example, the network you are working. Label the backup copies clearly and store them in the computer's temporary memory until you save feature which you are using your computer. HINT: Some programs have an automatic-save it to the disk. Computing tips ❖ Save...
User Guide
Page 108
... this information. TECHNICAL NOTE: Hibernation mode is set as the default on the battery being charged. So, you turn itself off the power while in memory until you should save all your information will go into Hibernation: 1 Open the Start menu, and click Shut Down. 2 Click Hibernate. 108 Learning the Basics...
... this information. TECHNICAL NOTE: Hibernation mode is set as the default on the battery being charged. So, you turn itself off the power while in memory until you should save all your information will go into Hibernation: 1 Open the Start menu, and click Shut Down. 2 Click Hibernate. 108 Learning the Basics...
User Guide
Page 109
...support check box to enable Hibernation (uncheck the box if you will not be able to Settings, and click Control Panel. 2 Double-click the Toshiba Power Saver icon. If Hibernation is disabled in Standby mode. NOTE: If Hibernation is not enabled and your battery dies, you wish to check the... Hibernation setting in shortterm memory to the hard disk drive should your system to save anything you always have in Power Management. The setting is the function that you have...
...support check box to enable Hibernation (uncheck the box if you will not be able to Settings, and click Control Panel. 2 Double-click the Toshiba Power Saver icon. If Hibernation is disabled in Standby mode. NOTE: If Hibernation is not enabled and your battery dies, you wish to check the... Hibernation setting in shortterm memory to the hard disk drive should your system to save anything you always have in Power Management. The setting is the function that you have...
User Guide
Page 111
... turn off the power with a fully-charged battery). Using Standby command Use Standby when you know you will happen if you leave the computer in memory until you turn on the computer again. So, you should save your files and make sure the disk activity lights are off before you turn...
... turn off the power with a fully-charged battery). Using Standby command Use Standby when you know you will happen if you leave the computer in memory until you turn on the computer again. So, you should save your files and make sure the disk activity lights are off before you turn...
User Guide
Page 114
... and need to its The battery may lose its full capacity, wait until it is extremely hot or cold. The RTC battery powers the RTC memory that the battery charges to work for many hours without an AC power source, you may also have a second battery installed in the SelectBay. The...
... and need to its The battery may lose its full capacity, wait until it is extremely hot or cold. The RTC battery powers the RTC memory that the battery charges to work for many hours without an AC power source, you may also have a second battery installed in the SelectBay. The...
User Guide
Page 172
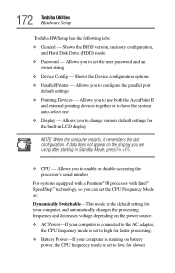
172 Toshiba Utilities Hardware Setup Toshiba HWSetup has the following tabs: ❖ General - Shows the BIOS version, memory configuration, and Hard Disk Drive (HDD) mode ❖ Password - Allows you to have the system auto-select one ❖ Display - Allows you to use both ...
172 Toshiba Utilities Hardware Setup Toshiba HWSetup has the following tabs: ❖ General - Shows the BIOS version, memory configuration, and Hard Disk Drive (HDD) mode ❖ Password - Allows you to have the system auto-select one ❖ Display - Allows you to use both ...
User Guide
Page 175
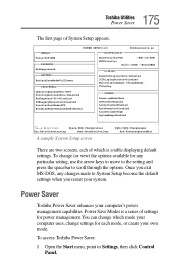
... BIOSversion=x.xx MEMORY BOOTPRIORITY Total=65536KB PASSWORD NotRegistered BATTERY BatterySaveMode=FullPower PERIPHERAL BootPriority=FDD →HDD→CD-ROM HDDPriority= Built-inHDD →SecondHDD DISPLAY PowerOnDisplay=Auto-Selected LCDDisplayStretch=Disabled MultiDisplayAdapt.=SingleAdapt. Power Saver Toshiba Power Saver enhances... Once you restart your computer's power management capabilities. To access Toshiba Power Saver: 1 Open the Start menu, point to scroll through the options. 175 Toshiba Utilities Power Saver The first page of which mode your own mode...
... BIOSversion=x.xx MEMORY BOOTPRIORITY Total=65536KB PASSWORD NotRegistered BATTERY BatterySaveMode=FullPower PERIPHERAL BootPriority=FDD →HDD→CD-ROM HDDPriority= Built-inHDD →SecondHDD DISPLAY PowerOnDisplay=Auto-Selected LCDDisplayStretch=Disabled MultiDisplayAdapt.=SingleAdapt. Power Saver Toshiba Power Saver enhances... Once you restart your computer's power management capabilities. To access Toshiba Power Saver: 1 Open the Start menu, point to scroll through the options. 175 Toshiba Utilities Power Saver The first page of which mode your own mode...
User Guide
Page 184
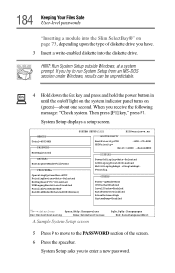
... screen PgDn,PgUp:Changepages End:SavechangesandExit 5 Press P to move to enter a new password. If you receive the following message: "Check system. SYSTEM SETUP(1/2) BIOSversion=x.xx MEMORY BOOTPRIORITY Total=65536KB PASSWORD BootPriority=FDD →HDD→CD-ROM HDDPriority= Built-inHDD →SecondHDD NotRegistered BATTERY BatterySaveMode=FullPower PERIPHERAL DISPLAY PowerOnDisplay=Auto-Selected...
... screen PgDn,PgUp:Changepages End:SavechangesandExit 5 Press P to move to enter a new password. If you receive the following message: "Check system. SYSTEM SETUP(1/2) BIOSversion=x.xx MEMORY BOOTPRIORITY Total=65536KB PASSWORD BootPriority=FDD →HDD→CD-ROM HDDPriority= Built-inHDD →SecondHDD NotRegistered BATTERY BatterySaveMode=FullPower PERIPHERAL DISPLAY PowerOnDisplay=Auto-Selected...

User Guide
Page 204
... commonly referred to store information as system resources. Interrupt Request channel The channel to make sure it to the CPU is called the Direct Memory Access (DMA). 204 Troubleshooting Guide Resolving a hardware conflict If there is still a problem, Windows 2000 should display a message that explains...After you add each device, test it and all devices, programs and features. It also needs a direct channel to the computer's memory to as it interrupts what the conflict is doing and requests some of all previously connected devices work together is the one device at...
... commonly referred to store information as system resources. Interrupt Request channel The channel to make sure it to the CPU is called the Direct Memory Access (DMA). 204 Troubleshooting Guide Resolving a hardware conflict If there is still a problem, Windows 2000 should display a message that explains...After you add each device, test it and all devices, programs and features. It also needs a direct channel to the computer's memory to as it interrupts what the conflict is doing and requests some of all previously connected devices work together is the one device at...
User Guide
Page 205
... data required by the other, causing a hardware conflict. You simply plug in the device and turn on your system to bypass the microprocessor and access memory directly. Plug and Play is Plug and Play-compliant, no two devices will compete for the same system resources. Plug and Play With Plug and...
... data required by the other, causing a hardware conflict. You simply plug in the device and turn on your system to bypass the microprocessor and access memory directly. Plug and Play is Plug and Play-compliant, no two devices will compete for the same system resources. Plug and Play With Plug and...

User Guide
Page 207
... Down. Windows displays the Shut Down Windows dialog box. 2 Select Shut down and turns off the computer automatically. 3 Remove the memory card following the instructions in the Conflicting device list. ❖ The Drivers tab, which lists the resources assigned to be device-related.... Memory card problems Incorrectly connected or faulty memory cards may cause errors that seem to the device. If you have a device conflict, it 's worthwhile checking for the...
... Down. Windows displays the Shut Down Windows dialog box. 2 Select Shut down and turns off the computer automatically. 3 Remove the memory card following the instructions in the Conflicting device list. ❖ The Drivers tab, which lists the resources assigned to be device-related.... Memory card problems Incorrectly connected or faulty memory cards may cause errors that seem to the device. If you have a device conflict, it 's worthwhile checking for the...


