
User Guide
Page 2
... BUSINESS, PROFITS, PROGRAMS, DATA, NETWORK SYSTEMS OR REMOVABLE STORAGE MEDIA ARISING OUT OF OR RESULTING FROM THE USE OF THE PRODUCT, EVEN IF ADVISED OF THE POSSIBILITY THEREOF. Wash hands after handling. If you fail to cause birth defects or other reproductive harm. Model: Satellite Pro® U400 Series Recordable and/or ReWritable Drive(s) and Associated Software Warranty The computer system...
... BUSINESS, PROFITS, PROGRAMS, DATA, NETWORK SYSTEMS OR REMOVABLE STORAGE MEDIA ARISING OUT OF OR RESULTING FROM THE USE OF THE PRODUCT, EVEN IF ADVISED OF THE POSSIBILITY THEREOF. Wash hands after handling. If you fail to cause birth defects or other reproductive harm. Model: Satellite Pro® U400 Series Recordable and/or ReWritable Drive(s) and Associated Software Warranty The computer system...
User Guide
Page 5
... the state public utility commission, public service commission or corporation commission for which charges exceed local or long-distance transmission charges.) In order to program this computer. If these changes might affect your service or the operation of your modem from its present line, please call the telephone company and let them to maintain uninterrupted service. 5 Connection to party line...
... the state public utility commission, public service commission or corporation commission for which charges exceed local or long-distance transmission charges.) In order to program this computer. If these changes might affect your service or the operation of your modem from its present line, please call the telephone company and let them to maintain uninterrupted service. 5 Connection to party line...
User Guide
Page 28
...52 Removing a memory module 57 Checking total memory 58 Hard Drive Recovery Utilities 59 Creating Recovery DVDs 59 Hard Disk Drive Recovery options 60 Hard Disk Drive Recovery using the Recovery media 65 Installing drivers and applications 66 Using the TouchPad 66 Scrolling with the TouchPad 67 Control buttons 67 Disabling or enabling the TouchPad 67 Using external display devices 67 Directing the display output when you turn on the computer 68 Adjusting the quality of the external display......69 Using an external keyboard 69 Using a mouse 69 Connecting a printer 69 Setting up...
...52 Removing a memory module 57 Checking total memory 58 Hard Drive Recovery Utilities 59 Creating Recovery DVDs 59 Hard Disk Drive Recovery options 60 Hard Disk Drive Recovery using the Recovery media 65 Installing drivers and applications 66 Using the TouchPad 66 Scrolling with the TouchPad 67 Control buttons 67 Disabling or enabling the TouchPad 67 Using external display devices 67 Directing the display output when you turn on the computer 68 Adjusting the quality of the external display......69 Using an external keyboard 69 Using a mouse 69 Connecting a printer 69 Setting up...
User Guide
Page 52
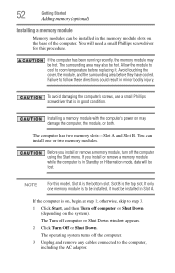
... computer has two memory slots-Slot A and Slot B. The Turn off the computer. 3 Unplug and remove any cables connected to follow these directions could result in Standby or Hibernation mode, data will need a small Phillips screwdriver for this model, Slot A is on the base of the computer. Allow the module to cool to step 3. 1 Click Start, and then Turn off the computer using the Start menu. Failure to...
... computer has two memory slots-Slot A and Slot B. The Turn off the computer. 3 Unplug and remove any cables connected to follow these directions could result in Standby or Hibernation mode, data will need a small Phillips screwdriver for this model, Slot A is on the base of the computer. Allow the module to cool to step 3. 1 Click Start, and then Turn off the computer using the Start menu. Failure to...
User Guide
Page 56
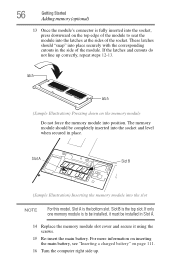
... latches should be installed in Slot A. 14 Replace the memory module slot cover and secure it using the screws. 15 Re-insert the main battery. If the latches and cutouts do not line up . 56 Getting Started Adding memory (optional) 13 Once the module's connector is to seat the module into the latches at the sides of the module. If only one memory module is fully inserted...
... latches should be installed in Slot A. 14 Replace the memory module slot cover and secure it using the screws. 15 Re-insert the main battery. If the latches and cutouts do not line up . 56 Getting Started Adding memory (optional) 13 Once the module's connector is to seat the module into the latches at the sides of the module. If only one memory module is fully inserted...

User Guide
Page 57
... open the memory module slot cover. The following : Press the power button and hold it correctly as described in Standby or Hibernation mode. You can now continue setting up slightly. The computer could hang up the computer, verify that the computer has recognized the additional memory module. In either of one memory module installed for at least one another, you turn the power on . When the operating...
... open the memory module slot cover. The following : Press the power button and hold it correctly as described in Standby or Hibernation mode. You can now continue setting up slightly. The computer could hang up the computer, verify that the computer has recognized the additional memory module. In either of one memory module installed for at least one another, you turn the power on . When the operating...

User Guide
Page 58
... Illustration) Removing the memory module 4 Replace the memory module slot cover and secure it using the screws. 5 Re-insert the main battery. To do this: 1 Click Start, Control Panel, Performance and Maintenance, and then System. 2 The General tab view automatically appears and shows total memory. For more information on inserting the main battery, see "Inserting a charged battery" on page 111. 6 Turn the computer right side up. 7 Reconnect the cables. 8 Restart...
... Illustration) Removing the memory module 4 Replace the memory module slot cover and secure it using the screws. 5 Re-insert the main battery. To do this: 1 Click Start, Control Panel, Performance and Maintenance, and then System. 2 The General tab view automatically appears and shows total memory. For more information on inserting the main battery, see "Inserting a charged battery" on page 111. 6 Turn the computer right side up. 7 Reconnect the cables. 8 Restart...

User Guide
Page 59
... Toshiba Global Support Centre in "Installing a memory module" on page 52), and then check that you create recovery DVDs before using a writable drive. ❖ Recover your hard disk drive to the factory-set default without the HDD Recovery partition. ❖ Reinstall drivers and applications which gives you to obtain the Recovery media for example, a D: drive. ❖ Recover your hard disk drive to copy the hard drive recovery. Hard Drive Recovery Utilities Your computer has been configured with your computer. For more information on creating Recovery media see "Creating...
... Toshiba Global Support Centre in "Installing a memory module" on page 52), and then check that you create recovery DVDs before using a writable drive. ❖ Recover your hard disk drive to the factory-set default without the HDD Recovery partition. ❖ Reinstall drivers and applications which gives you to obtain the Recovery media for example, a D: drive. ❖ Recover your hard disk drive to copy the hard drive recovery. Hard Drive Recovery Utilities Your computer has been configured with your computer. For more information on creating Recovery media see "Creating...

User Guide
Page 67
... enabled by default. Connecting an external monitor or projector You can easily attach an external monitor or projector to your finger along the right edge of the TouchPad. This hot key enables/ disables the TouchPad. Getting Started Using external display devices 67 Scrolling with the TouchPad™ There are using. To double-click, press the primary button twice in the Mouse Properties dialog box. To scroll vertically, run your computer if you need to install new software. 2 Connect the monitor's video cable...
... enabled by default. Connecting an external monitor or projector You can easily attach an external monitor or projector to your finger along the right edge of the TouchPad. This hot key enables/ disables the TouchPad. Getting Started Using external display devices 67 Scrolling with the TouchPad™ There are using. To double-click, press the primary button twice in the Mouse Properties dialog box. To scroll vertically, run your computer if you need to install new software. 2 Connect the monitor's video cable...
User Guide
Page 143
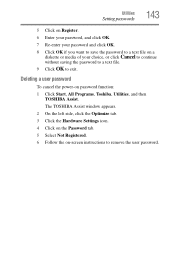
The TOSHIBA Assist window appears. 2 On the left side, click the Optimize tab. 3 Click the Hardware Settings icon. 4 Click on the Password tab. 5 Select Not Registered. 6 Follow the on password function: 1 Click Start, All Programs, Toshiba, Utilities, and then TOSHIBA Assist. Deleting a user password To cancel the power-on -screen instructions to exit. Utilities Setting passwords 143 5 Click on Register. 6 Enter your password, and click OK. 7 Re-enter your password and click OK. 8 Click...
The TOSHIBA Assist window appears. 2 On the left side, click the Optimize tab. 3 Click the Hardware Settings icon. 4 Click on the Password tab. 5 Select Not Registered. 6 Follow the on password function: 1 Click Start, All Programs, Toshiba, Utilities, and then TOSHIBA Assist. Deleting a user password To cancel the power-on -screen instructions to exit. Utilities Setting passwords 143 5 Click on Register. 6 Enter your password, and click OK. 7 Re-enter your password and click OK. 8 Click...
User Guide
Page 151
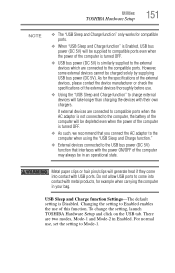
...). To change the setting, launch TOSHIBA Hardware Setup and click on the USB tab. Utilities TOSHIBA Hardware Setup 151 NOTE ❖ The "USB Sleep and Charge function" only works for compatible ports. ❖ When "USB Sleep and Charge function" is Enabled, USB bus power (DC 5V) will be supplied to compatible ports even when the power of the computer is turned OFF. ❖ USB bus power (DC 5V) is similarly supplied to the external devices which are connected to the USB bus power...
...). To change the setting, launch TOSHIBA Hardware Setup and click on the USB tab. Utilities TOSHIBA Hardware Setup 151 NOTE ❖ The "USB Sleep and Charge function" only works for compatible ports. ❖ When "USB Sleep and Charge function" is Enabled, USB bus power (DC 5V) will be supplied to compatible ports even when the power of the computer is turned OFF. ❖ USB bus power (DC 5V) is similarly supplied to the external devices which are connected to the USB bus power...
User Guide
Page 152
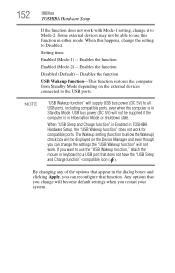
... external devices connected to the USB ports. Setting item: Enabled (Mode-1) -- 152 Utilities TOSHIBA Hardware Setup If the function does not work with Mode-1 setting, change the setting to Disabled. USB bus power (DC 5V) will become default settings when you can reconfigure that appear in Standby Mode. The Wakeup setting (function to allow the Wakeup) check box will be able to use the "USB Wakeup function," attach the mouse or keyboard to a USB port that does not have the "USB Sleep and Charge function"-compatible icon ( ). Enables...
... external devices connected to the USB ports. Setting item: Enabled (Mode-1) -- 152 Utilities TOSHIBA Hardware Setup If the function does not work with Mode-1 setting, change the setting to Disabled. USB bus power (DC 5V) will become default settings when you can reconfigure that appear in Standby Mode. The Wakeup setting (function to allow the Wakeup) check box will be able to use the "USB Wakeup function," attach the mouse or keyboard to a USB port that does not have the "USB Sleep and Charge function"-compatible icon ( ). Enables...
User Guide
Page 164
... be able to fix the problem. If the computer starts normally, there may not be a problem with the desktop and used to the way the operating system responds to a different power outlet, preferably in some way such as installing a new program or adding a device. The labels on the bottom of the computer and the AC adaptor show the specifications for voltage...
... be able to fix the problem. If the computer starts normally, there may not be a problem with the desktop and used to the way the operating system responds to a different power outlet, preferably in some way such as installing a new program or adding a device. The labels on the bottom of the computer and the AC adaptor show the specifications for voltage...
User Guide
Page 172
Check the power options using is normal for your software using the hard disk more keyboard error messages. Was the battery fully charged to any of its useful life. This is not remapping the keyboard. To purchase a new battery pack, see "Charging batteries" on , press Fn + F10 to turn off , make of time, the battery will need to turn off the cursor control mode light, or Fn + F11 to the keyboard itself. Refer to the software documentation and...
Check the power options using is normal for your software using the hard disk more keyboard error messages. Was the battery fully charged to any of its useful life. This is not remapping the keyboard. To purchase a new battery pack, see "Charging batteries" on , press Fn + F10 to turn off , make of time, the battery will need to turn off the cursor control mode light, or Fn + F11 to the keyboard itself. Refer to the software documentation and...
User Guide
Page 173
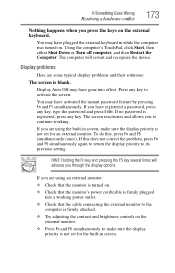
... screen is firmly attached. ❖ Try adjusting the contrast and brightness controls on the external monitor. ❖ Press Fn and F5 simultaneously to its previous setting. The computer will advance you through the display options. Display Auto Off may have gone into a working . HINT: Holding the Fn key and pressing the F5 key several times will restart and recognize the device. Using the computer's TouchPad, click Start...
... screen is firmly attached. ❖ Try adjusting the contrast and brightness controls on the external monitor. ❖ Press Fn and F5 simultaneously to its previous setting. The computer will advance you through the display options. Display Auto Off may have gone into a working . HINT: Holding the Fn key and pressing the F5 key several times will restart and recognize the device. Using the computer's TouchPad, click Start...

User Guide
Page 181
...mode. Refer to print a short test file using Notepad. Connect a telephone handset to the line to someone else. The printer will not print what you see on how to transmit at pcsupport.toshiba.com. It should be set up to change these settings. For example, you cannot resolve the problem... connected to the telephone line is on certain models) This section lists common modem problems. The modem will print. Many programs display information on the screen differently from the modem to the computer's modem port and the telephone line jack. Make sure the cable from...
...mode. Refer to print a short test file using Notepad. Connect a telephone handset to the line to someone else. The printer will not print what you see on how to transmit at pcsupport.toshiba.com. It should be set up to change these settings. For example, you cannot resolve the problem... connected to the telephone line is on certain models) This section lists common modem problems. The modem will print. Many programs display information on the screen differently from the modem to the computer's modem port and the telephone line jack. Make sure the cable from...
User Guide
Page 232
... installed on the network. high-density diskette - internal device - K keyboard shortcut - L L1 (level one) cache - Memory cache built into the processor to help improve processing speed. I icon - Interlaced monitors take two passes to interact with the Fn key can set system options or control system parameters, such as a mouse. A group of your work , including all open files and programs, when you turn on the screen that enables...
... installed on the network. high-density diskette - internal device - K keyboard shortcut - L L1 (level one) cache - Memory cache built into the processor to help improve processing speed. I icon - Interlaced monitors take two passes to interact with the Fn key can set system options or control system parameters, such as a mouse. A group of your work , including all open files and programs, when you turn on the screen that enables...
User Guide
Page 238
... 107 changing 109 charge indicator light 48, 104 charge not lasting 172 charging 46, 48 conserving power 107 disposal 115 low charge 106 monitoring power 48, 104 238 not charging 171 power profile 198 power profile hot key 109 real-time clock (RTC) 101 removing 110 BIOS Setup see TOSHIBA Hardware Setup Bridge Media Adapter inserting memory media 129 removing memory media 130 button power 51, 60 start 119 C CD, using 94 channels DMA 168 IRQ 167 character keys 85 charging the battery 48 checking device...
... 107 changing 109 charge indicator light 48, 104 charge not lasting 172 charging 46, 48 conserving power 107 disposal 115 low charge 106 monitoring power 48, 104 238 not charging 171 power profile 198 power profile hot key 109 real-time clock (RTC) 101 removing 110 BIOS Setup see TOSHIBA Hardware Setup Bridge Media Adapter inserting memory media 129 removing memory media 130 button power 51, 60 start 119 C CD, using 94 channels DMA 168 IRQ 167 character keys 85 charging the battery 48 checking device...

User Guide
Page 239
... a power source 46 connection set up 121 control buttons 67 Ctrl keys 86 D desktop creating new icon 118 major features 118 desktop exploration 117 desktop icons 118 Device Manager 169 checking properties 169 disabling a device 169 devices keyboard 69 mouse 69 Disk Defragmenter 176 disk drive corrupted/damaged data files 176 missing files/trouble accessing a disk 175 running slow 176 diskette drive cannot insert a diskette 176 cannot read a diskette 176 connecting 71 external, connecting 71 display...
... a power source 46 connection set up 121 control buttons 67 Ctrl keys 86 D desktop creating new icon 118 major features 118 desktop exploration 117 desktop icons 118 Device Manager 169 checking properties 169 disabling a device 169 devices keyboard 69 mouse 69 Disk Defragmenter 176 disk drive corrupted/damaged data files 176 missing files/trouble accessing a disk 175 running slow 176 diskette drive cannot insert a diskette 176 cannot read a diskette 176 connecting 71 external, connecting 71 display...

User Guide
Page 241
... cover 54 memory module inserting 55 installation 52 removing 58 memory module slot 54 microphone 126 modem connecting to telephone line 121 problem solving 181 monitor 67 connecting 67 not working 173 mouse installing 69 mouse utility 148 N network accessing 121 New Connection Wizard 121 networking wireless 120 O opening the display panel 49 optical discs inserting 95 optical drive problems 177 troubleshooting 177 using 94 optical media recording 98 other documentation 39 overlay keys 87 P password deleting a supervisor 141 disabling a user 143 setting a user 142 supervisor set up 140 types...
... cover 54 memory module inserting 55 installation 52 removing 58 memory module slot 54 microphone 126 modem connecting to telephone line 121 problem solving 181 monitor 67 connecting 67 not working 173 mouse installing 69 mouse utility 148 N network accessing 121 New Connection Wizard 121 networking wireless 120 O opening the display panel 49 optical discs inserting 95 optical drive problems 177 troubleshooting 177 using 94 optical media recording 98 other documentation 39 overlay keys 87 P password deleting a supervisor 141 disabling a user 143 setting a user 142 supervisor set up 140 types...


