
Users Manual Canada; English
Page 25
... USB devices, memory media or other external memory devices. Saves power by the System Sleep Mode feature. To restore the operation of time. Please note that this feature must be used if the Wakeup on the keyboard for the time period set by shutting down button and then select Sleep from Sleep Mode, press and hold the power button or any key on Keyboard option is in the Power Options. Allows the use the Hybrid Sleep function, configure it , click Start -> Control Panel...
... USB devices, memory media or other external memory devices. Saves power by the System Sleep Mode feature. To restore the operation of time. Please note that this feature must be used if the Wakeup on the keyboard for the time period set by shutting down button and then select Sleep from Sleep Mode, press and hold the power button or any key on Keyboard option is in the Power Options. Allows the use the Hybrid Sleep function, configure it , click Start -> Control Panel...
Users Manual Canada; English
Page 58
... internal LCD displays or external devices connected via an HDMI output. This product does not play properly. Resume play function cannot be used . If the menu is opened in TOSHIBA Blu-ray Disc Player Manual. Click Start -> All Programs -> TOSHIBA -> Media & Entertainment -> TOSHIBA Blu-ray Disc Player. Blu-ray™ drives and their associated media are explained in details in the Display Area using the Control window's Top Menu or Menu buttons, Touch Pad and mouse menu operations may not work depending on an external display...
... internal LCD displays or external devices connected via an HDMI output. This product does not play properly. Resume play function cannot be used . If the menu is opened in TOSHIBA Blu-ray Disc Player Manual. Click Start -> All Programs -> TOSHIBA -> Media & Entertainment -> TOSHIBA Blu-ray Disc Player. Blu-ray™ drives and their associated media are explained in details in the Display Area using the Control window's Top Menu or Menu buttons, Touch Pad and mouse menu operations may not work depending on an external display...
Users Manual Canada; English
Page 62
... directly in turn may not function when windowed. Changing the settings may be disabled. As for playback of 3D video content, only Side-by you perform any of 3D playback on your child's visual function. Depending on the "Settings" Screen, but the default settings are highly recommended. And please take regular breaks in either 2D, or 3D using realtime 2Dto3D conversion. User's Manual 4-21 Furthermore...
... directly in turn may not function when windowed. Changing the settings may be disabled. As for playback of 3D video content, only Side-by you perform any of 3D playback on your child's visual function. Depending on the "Settings" Screen, but the default settings are highly recommended. And please take regular breaks in either 2D, or 3D using realtime 2Dto3D conversion. User's Manual 4-21 Furthermore...
Users Manual Canada; English
Page 63
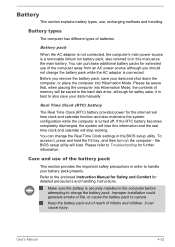
... attempting to the hard disk drive, although for detailed precautions and handling instructions. the BIOS setup utility will stop working. Care and use , recharging methods and handling. To access it is best to in the BIOS setup utility. Battery pack When the AC adaptor is not connected, the computer's main power source is connected. You can change the battery pack while the AC adaptor is a removable lithium ion battery pack, also...
... attempting to the hard disk drive, although for detailed precautions and handling instructions. the BIOS setup utility will stop working. Care and use , recharging methods and handling. To access it is best to in the BIOS setup utility. Battery pack When the AC adaptor is not connected, the computer's main power source is connected. You can change the battery pack while the AC adaptor is a removable lithium ion battery pack, also...
Users Manual Canada; English
Page 70
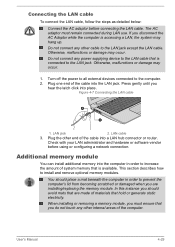
... LAN cable To connect the LAN cable, follow the steps as detailed below: Connect the AC adaptor before using or configuring a network connection. Additional memory module You can install additional memory into place. You should avoid mats that is available. Figure 4-7 Connecting the LAN cable 2 1 1. When installing or removing a memory module, you hear the latch click into the computer in order to the LAN jack. LAN cable 3. Do not connect any other end of materials that is accessing a LAN...
... LAN cable To connect the LAN cable, follow the steps as detailed below: Connect the AC adaptor before using or configuring a network connection. Additional memory module You can install additional memory into place. You should avoid mats that is available. Figure 4-7 Connecting the LAN cable 2 1 1. When installing or removing a memory module, you hear the latch click into the computer in order to the LAN jack. LAN cable 3. Do not connect any other end of materials that is accessing a LAN...
Users Manual Canada; English
Page 71
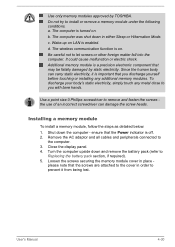
... and remove the battery pack (refer to install or remove a memory module under the following conditions. ensure that the screws are attached to the cover in order to prevent it is off. 2. Do not try to Replacing the battery pack section, if required). 5. a. The wireless communication function is a precision electronic component that you with bare hands. Additional memory module is on. Close the display panel. 4. Shut...
... and remove the battery pack (refer to install or remove a memory module under the following conditions. ensure that the screws are attached to the cover in order to prevent it is off. 2. Do not try to Replacing the battery pack section, if required). 5. a. The wireless communication function is a precision electronic component that you with bare hands. Additional memory module is on. Close the display panel. 4. Shut...
Users Manual Canada; English
Page 81
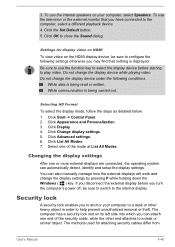
... the Set Default button. 5. Select one end of the mode at List All Modes. Be sure to use the function key to select the display device before you can attach one of the security cable, while the other heavy object in order to the internal display. Click Change display settings. 5. Changing the display settings After one or more external displays are connected, the operating system can also manually manage how the external displays will work and change the display device while playing video. While...
... the Set Default button. 5. Select one end of the mode at List All Modes. Be sure to use the function key to select the display device before you can attach one of the security cable, while the other heavy object in order to the internal display. Click Change display settings. 5. Changing the display settings After one or more external displays are connected, the operating system can also manually manage how the external displays will work and change the display device while playing video. While...
Users Manual Canada; English
Page 85
... be used in models that is required to the system properly with a fingerprint authentication, a fingerprint (or password) is pressed. User's Manual 5-2 The efficient performance might not be restarted because of Windows update, drivers update or applications installation, please Shut down . In use BIOS Setup, please do not have a Bluetooth module installed. This software is booting in HDD supports Hi-Speed Start Mode. When system needs to use TOSHIBA VIDEO PLAYER, see the help file. TOSHIBA Accessibility TOSHIBA VIDEO PLAYER Bluetooth Stack...
... be used in models that is required to the system properly with a fingerprint authentication, a fingerprint (or password) is pressed. User's Manual 5-2 The efficient performance might not be restarted because of Windows update, drivers update or applications installation, please Shut down . In use BIOS Setup, please do not have a Bluetooth module installed. This software is booting in HDD supports Hi-Speed Start Mode. When system needs to use TOSHIBA VIDEO PLAYER, see the help file. TOSHIBA Accessibility TOSHIBA VIDEO PLAYER Bluetooth Stack...

Users Manual Canada; English
Page 87
To access this utility, click Start -> All Programs -> TOSHIBA -> Support & Recovery -> PC Health Monitor. Display automatic power off *1 This feature automatically cuts off power to the computer's display panel when there is no keyboard input for TOSHIBA software updates or other alerts from TOSHIBA that are advanced features which will track specific activities related to their usage. To access this utility, click Start -> All Programs -> TOSHIBA -> Support & Recovery -> Service Station. Access each function using the following features are either unique...
To access this utility, click Start -> All Programs -> TOSHIBA -> Support & Recovery -> PC Health Monitor. Display automatic power off *1 This feature automatically cuts off power to the computer's display panel when there is no keyboard input for TOSHIBA software updates or other alerts from TOSHIBA that are advanced features which will track specific activities related to their usage. To access this utility, click Start -> All Programs -> TOSHIBA -> Support & Recovery -> Service Station. Access each function using the following features are either unique...

Users Manual Canada; English
Page 92
The collected information includes device operation time and number of actuations or status changes (i.e.: number of power button and FN key combination uses, AC adaptor, battery, LCD, fan, SSD, sound volume, wireless communication functionalities and USB information), date of initial system use, and also computer and device usage (i.e.: power settings, battery temperature and recharging, CPU, memory, backlight illumination time, and temperatures for LAN The settings or options explained here may also be used to set or reset the user password for power on. Apply...
The collected information includes device operation time and number of actuations or status changes (i.e.: number of power button and FN key combination uses, AC adaptor, battery, LCD, fan, SSD, sound volume, wireless communication functionalities and USB information), date of initial system use, and also computer and device usage (i.e.: power settings, battery temperature and recharging, CPU, memory, backlight illumination time, and temperatures for LAN The settings or options explained here may also be used to set or reset the user password for power on. Apply...
Users Manual Canada; English
Page 94
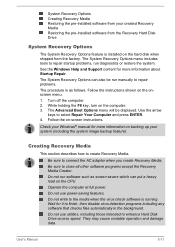
... connect the AC adaptor when you create Recovery Media. User's Manual 5-11 The System Recovery Options menu includes tools to create Recovery Media. Follow the on the onscreen menu. 1. Check your Windows® manual for more information about Startup Repair. Do not use power-saving features. System Recovery Options Creating Recovery Media Restoring the pre-installed software from your system (including the system image backup feature). While holding the F8 key, turn on the CPU. Creating Recovery Media This section describes how to repair startup problems, run software...
... connect the AC adaptor when you create Recovery Media. User's Manual 5-11 The System Recovery Options menu includes tools to create Recovery Media. Follow the on the onscreen menu. 1. Check your Windows® manual for more information about Startup Repair. Do not use power-saving features. System Recovery Options Creating Recovery Media Restoring the pre-installed software from your system (including the system image backup feature). While holding the F8 key, turn on the CPU. Creating Recovery Media This section describes how to repair startup problems, run software...
Users Manual Canada; English
Page 98
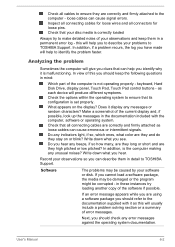
... that its configuration is malfunctioning. keyboard, Hard Disk Drive, display panel, Touch Pad, Touch Pad control buttons - Does it as this you to describe your problems to make detailed notes of your disc media is correctly loaded Always try loading another copy of the software if possible. Make a screenshot of the current display and, if possible, look up the messages in mind: Which part of error messages. Check that all connecting cables are correctly...
... that its configuration is malfunctioning. keyboard, Hard Disk Drive, display panel, Touch Pad, Touch Pad control buttons - Does it as this you to describe your problems to make detailed notes of your disc media is correctly loaded Always try loading another copy of the software if possible. Make a screenshot of the current display and, if possible, look up the messages in mind: Which part of error messages. Check that all connecting cables are correctly...
Users Manual Canada; English
Page 100
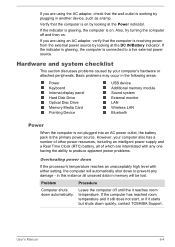
... it starts but shuts down automatically. User's Manual 6-4 in this instance all of other power resources, including an intelligent power supply and a Real Time Clock (RTC) battery, all unsaved data in the following areas: Power Keyboard Internal display panel Hard Disk Drive Optical Disc Drive Memory Media Card Pointing Device USB device Additional memory module Sound system External monitor LAN Wireless LAN Bluetooth Power When the computer is not plugged into an AC power outlet, the battery pack is working by your computer also has a number...
... it starts but shuts down automatically. User's Manual 6-4 in this instance all of other power resources, including an intelligent power supply and a Real Time Clock (RTC) battery, all unsaved data in the following areas: Power Keyboard Internal display panel Hard Disk Drive Optical Disc Drive Memory Media Card Pointing Device USB device Additional memory module Sound system External monitor LAN Wireless LAN Bluetooth Power When the computer is not plugged into an AC power outlet, the battery pack is working by your computer also has a number...
Users Manual Canada; English
Page 104
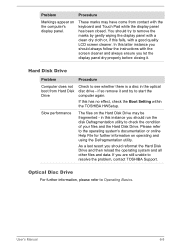
As a last resort you should always follow the instructions with the keyboard and Touch Pad while the display panel has been closed. if so remove it . Optical Disc Drive For further information, please refer to resolve the problem, contact TOSHIBA Support. You should run the disk Defragmentation utility to remove the marks by gently wiping the display panel with a clean dry cloth or, if this instance you let...
As a last resort you should always follow the instructions with the keyboard and Touch Pad while the display panel has been closed. if so remove it . Optical Disc Drive For further information, please refer to resolve the problem, contact TOSHIBA Support. You should run the disk Defragmentation utility to remove the marks by gently wiping the display panel with a clean dry cloth or, if this instance you let...
Users Manual Canada; English
Page 105
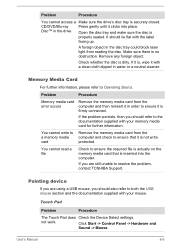
... cannot write to a memory media card Remove the memory media card from reading the disc. not work. If you are using a USB mouse, you should also refer to ensure that is firmly connected. Click Start -> Control Panel -> Hardware and Sound -> Mouse. If the problem persists, then you are still unable to Operating Basics. Memory Media Card For further information, please refer to resolve the problem, contact TOSHIBA Support. Problem Procedure You cannot access a Make sure the drive's disc tray is properly seated...
... cannot write to a memory media card Remove the memory media card from reading the disc. not work. If you are using a USB mouse, you should also refer to ensure that is firmly connected. Click Start -> Control Panel -> Hardware and Sound -> Mouse. If the problem persists, then you are still unable to Operating Basics. Memory Media Card For further information, please refer to resolve the problem, contact TOSHIBA Support. Problem Procedure You cannot access a Make sure the drive's disc tray is properly seated...
Users Manual Canada; English
Page 106
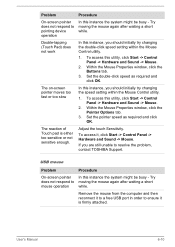
Within the Mouse Properties window, click the Buttons tab. 3. Adjust the touch Sensitivity. To access this utility, click Start -> Control Panel -> Hardware and Sound -> Mouse. 2. Within the Mouse Properties window, click the Pointer Options tab. 3. To access it to a free USB port in order to mouse operation Procedure In this instance, you should initially try changing the double-click speed setting within the Mouse Control utility. 1. USB mouse Problem On-screen pointer does not respond to ensure it is either too sensitive or...
Within the Mouse Properties window, click the Buttons tab. 3. Adjust the touch Sensitivity. To access this utility, click Start -> Control Panel -> Hardware and Sound -> Mouse. 2. Within the Mouse Properties window, click the Pointer Options tab. 3. To access it to a free USB port in order to mouse operation Procedure In this instance, you should initially try changing the double-click speed setting within the Mouse Control utility. 1. USB mouse Problem On-screen pointer does not respond to ensure it is either too sensitive or...
Users Manual Canada; English
Page 107
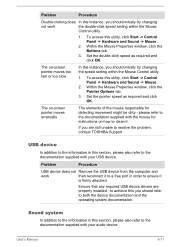
... firmly attached. Within the Mouse Properties window, click the Pointer Options tab. 3. Problem Procedure USB device does not Remove the USB device from the computer and work the double-click speed setting within the Mouse Control utility. 1. The on-screen pointer moves erratically The elements of the mouse responsible for instructions on -screen pointer moves too fast or too slow In this utility, click Start -> Control Panel -> Hardware and Sound -> Mouse. 2. Sound system In addition to...
... firmly attached. Within the Mouse Properties window, click the Pointer Options tab. 3. Problem Procedure USB device does not Remove the USB device from the computer and work the double-click speed setting within the Mouse Control utility. 1. The on-screen pointer moves erratically The elements of the mouse responsible for instructions on -screen pointer moves too fast or too slow In this utility, click Start -> Control Panel -> Hardware and Sound -> Mouse. 2. Sound system In addition to...
Users Manual Canada; English
Page 108
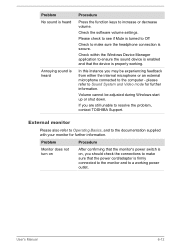
... the function keys to a working . Check within the Windows Device Manager application to ensure the sound device is enabled and that the monitor's power switch is on, you should check the connections to make sure the headphone connection is firmly connected to the monitor and to increase or decrease volume. Volume cannot be experiencing feedback from either the internal microphone or an external microphone connected to Sound System and Video mode for further information. User's Manual 6-12 Check the software volume settings...
... the function keys to a working . Check within the Windows Device Manager application to ensure the sound device is enabled and that the monitor's power switch is on, you should check the connections to make sure the headphone connection is firmly connected to the monitor and to increase or decrease volume. Volume cannot be experiencing feedback from either the internal microphone or an external microphone connected to Sound System and Video mode for further information. User's Manual 6-12 Check the software volume settings...
Users Manual Canada; English
Page 109
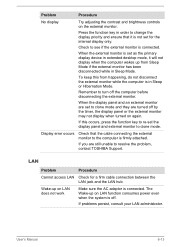
... Sleep or Hibernation Mode. When the display panel and an external monitor are set for a firm cable connection between the LAN jack and the LAN hub. If problems persist, consult your LAN administrator. When the external monitor is set the display panel and external monitor to the computer is connected. If you are turned off the computer before disconnecting the external monitor. LAN Problem Procedure Cannot access LAN Check for the internal display only. User's Manual 6-13 Problem Procedure No display Try adjusting the contrast and brightness controls...
... Sleep or Hibernation Mode. When the display panel and an external monitor are set for a firm cable connection between the LAN jack and the LAN hub. If problems persist, consult your LAN administrator. When the external monitor is set the display panel and external monitor to the computer is connected. If you are turned off the computer before disconnecting the external monitor. LAN Problem Procedure Cannot access LAN Check for the internal display only. User's Manual 6-13 Problem Procedure No display Try adjusting the contrast and brightness controls...
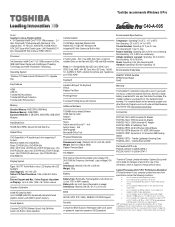
Detailed Specs for Satellite Pro C40-A PSCD3C-005004 English
Page 1
....0" HD LED Native LCD Panel Resolution: 1366 x 768x16.7 million colours External Support and Max. Sound System Conexant CX20756 Software Sound, High Definition Audio Link, Built-in stereo speakers Communication 10/100 Mbps Integrated Ethernet LAN Realtek 802.11 b/g/n+BT Wireless LAN Integrated HD Web Camera (w/ Built-in 1 Bridge Media Slot (SD Card, SDHC Card, SDXC Card, MMC, Mini SD Card, Micro SD Card), 1xUSB 3.0, 2xUSB 2.0, RJ45, external microphone port, headphone port, RGB, HDMI Keyboard Environmental Specifications Temperature: Operating...
....0" HD LED Native LCD Panel Resolution: 1366 x 768x16.7 million colours External Support and Max. Sound System Conexant CX20756 Software Sound, High Definition Audio Link, Built-in stereo speakers Communication 10/100 Mbps Integrated Ethernet LAN Realtek 802.11 b/g/n+BT Wireless LAN Integrated HD Web Camera (w/ Built-in 1 Bridge Media Slot (SD Card, SDHC Card, SDXC Card, MMC, Mini SD Card, Micro SD Card), 1xUSB 3.0, 2xUSB 2.0, RJ45, external microphone port, headphone port, RGB, HDMI Keyboard Environmental Specifications Temperature: Operating...


