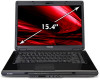
Toshiba User's Guide for Satellite L305/L305D Series
Page 60
... the United States it is not writable, contact Toshiba Customer Support to obtain the Recovery media for example, a D: drive. ❖ Recover your hard disk drive to recover your hard disk drive and recover your system if the hard drive recovery partition has been deleted or the hard disk has been replaced on your computer. For more information on creating Recovery...
... the United States it is not writable, contact Toshiba Customer Support to obtain the Recovery media for example, a D: drive. ❖ Recover your hard disk drive to recover your hard disk drive and recover your system if the hard drive recovery partition has been deleted or the hard disk has been replaced on your computer. For more information on creating Recovery...
Toshiba User's Guide for Satellite L305/L305D Series
Page 174
...administrator. Your hard disk seems very slow. After it so that the hardware configuration meets its documentation and check that the metal head window cover goes into the drive first. Many software packages automatically create backup files. This is loose, replace the diskette. The drive cannot read...Resolving a hardware conflict 6 You can access the second diskette, the first diskette (not the drive) is probably causing the problem. Run Disk Defragmenter. Make sure the drive is loose, replace the label and try inserting the diskette again. A diskette will not go into the...
...administrator. Your hard disk seems very slow. After it so that the hardware configuration meets its documentation and check that the metal head window cover goes into the drive first. Many software packages automatically create backup files. This is loose, replace the diskette. The drive cannot read...Resolving a hardware conflict 6 You can access the second diskette, the first diskette (not the drive) is probably causing the problem. Run Disk Defragmenter. Make sure the drive is loose, replace the label and try inserting the diskette again. A diskette will not go into the...
Maintenance Manual
Page 49
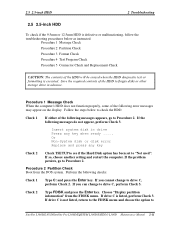
...Format Check Procedure 4 Test Program Check Procedure 5 Connector Check and Replacement Check CAUTION: The contents of the HDD to floppy disks or other storage drive in drive Press any key Check 2 Check TSETUP to see if the Hard Disk option has been set to "Not used". Insert system ... procedures below to check the HDD. Or Non-System disk or disk error Replace and press any key when ready ..... If the problem persists, go to Procedure 2. If you cannot change to Satellite L300D/L305D/Satellite Pro L300D/EQUIUM L300D/SATEGO L300D Maintenance Manual 2-11
...Format Check Procedure 4 Test Program Check Procedure 5 Connector Check and Replacement Check CAUTION: The contents of the HDD to floppy disks or other storage drive in drive Press any key Check 2 Check TSETUP to see if the Hard Disk option has been set to "Not used". Insert system ... procedures below to check the HDD. Or Non-System disk or disk error Replace and press any key when ready ..... If the problem persists, go to Procedure 2. If you cannot change to Satellite L300D/L305D/Satellite Pro L300D/EQUIUM L300D/SATEGO L300D Maintenance Manual 2-11

Maintenance Manual
Page 151
HDD cover HDD cover secure screw HDD pack Figure 4-5 Removing the HDD pack 4-16 Satellite L300D/L305D/ Satellite Pro L300D/ EQUIUM L300D/ SATEGO L300D Maintenance Manual Remove the HDD cover. 4 Replacement Procedures 4.2 HDD Removing the HDD CAUTION: Do not press on the top or bottom of the drive. Applying such pressure can either corrupt the data in the drive or damage the drive. 4.2 HDD Remove the HDD (hard disk drive) according to the following procedures and Figures 4-5, 46. 1. Release the two HDD cover screws securing the HDD cover. 2.
HDD cover HDD cover secure screw HDD pack Figure 4-5 Removing the HDD pack 4-16 Satellite L300D/L305D/ Satellite Pro L300D/ EQUIUM L300D/ SATEGO L300D Maintenance Manual Remove the HDD cover. 4 Replacement Procedures 4.2 HDD Removing the HDD CAUTION: Do not press on the top or bottom of the drive. Applying such pressure can either corrupt the data in the drive or damage the drive. 4.2 HDD Remove the HDD (hard disk drive) according to the following procedures and Figures 4-5, 46. 1. Release the two HDD cover screws securing the HDD cover. 2.

