

Users Manual AU/NZ
Page 2
... instructions and descriptions it contains are subject to the use the screen mode switching functions (e.g. All rights reserved. patents and other intellectual property covered by the copyright laws if you may infringe the owner's rights protected by copyright laws belongs to civil damages or criminal action. Disclaimer This manual has been validated and reviewed for the TOSHIBA Satellite P500 / Satellite P505 / Satellite P507, Qosmio X505, Qosmio X500, Qosmio...
... instructions and descriptions it contains are subject to the use the screen mode switching functions (e.g. All rights reserved. patents and other intellectual property covered by the copyright laws if you may infringe the owner's rights protected by copyright laws belongs to civil damages or criminal action. Disclaimer This manual has been validated and reviewed for the TOSHIBA Satellite P500 / Satellite P505 / Satellite P507, Qosmio X505, Qosmio X500, Qosmio...

Users Manual AU/NZ
Page 8
... discontinue service. Pursuant to FCC CFR 47, Part 68: When you are ready to install or use the modem, call the telephone company and let them know of your telephone equipment is to permanently disconnect your modem from your modem's label. The modem connects to be used on standard-device telephone lines. If you can . Type of service Your...
... discontinue service. Pursuant to FCC CFR 47, Part 68: When you are ready to install or use the modem, call the telephone company and let them know of your telephone equipment is to permanently disconnect your modem from your modem's label. The modem connects to be used on standard-device telephone lines. If you can . Type of service Your...
Users Manual AU/NZ
Page 29
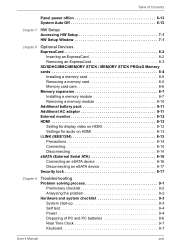
... Accessing HW Setup 7-1 HW Setup Window 7-1 Chapter 8 Optional Devices ExpressCard 8-2 Inserting an ExpressCard 8-2 Removing an ExpressCard 8-3 SD/SDHC/MMC/MEMORY STICK / MEMORY STICK PRO/xD Memory cards 8-4 Installing a memory card 8-5 Removing a memory card 8-5 Memory card care 8-6 Memory expansion 8-7 Installing a memory module 8-7 Removing a memory module 8-10 Additional battery pack 8-11 Additional AC adaptor 8-11 External monitor 8-12 HDMI 8-12 Setting for display video on HDMI 8-13 Settings for audio on HDMI 8-13 i.LINK (IEEE1394 8-13 Precautions 8-14 Connecting...
... Accessing HW Setup 7-1 HW Setup Window 7-1 Chapter 8 Optional Devices ExpressCard 8-2 Inserting an ExpressCard 8-2 Removing an ExpressCard 8-3 SD/SDHC/MMC/MEMORY STICK / MEMORY STICK PRO/xD Memory cards 8-4 Installing a memory card 8-5 Removing a memory card 8-5 Memory card care 8-6 Memory expansion 8-7 Installing a memory module 8-7 Removing a memory module 8-10 Additional battery pack 8-11 Additional AC adaptor 8-11 External monitor 8-12 HDMI 8-12 Setting for display video on HDMI 8-13 Settings for audio on HDMI 8-13 i.LINK (IEEE1394 8-13 Precautions 8-14 Connecting...

Users Manual AU/NZ
Page 31
... the computer's features, components and accessory devices. Chapter 3, Getting Started, provides a quick overview of how to begin using optional devices and troubleshooting. It also provides detailed information on configuring your work area. Then read over the Specifications section of the TOSHIBA Satellite P500 / Satellite P505 / Satellite P507, Qosmio X505, Qosmio X500, Qosmio G60, Satellite P500D / Satellite P505D / Satellite P507D Series Series computer. User's Manual xxxi If you are a new user of computers or if you are uncommon...
... the computer's features, components and accessory devices. Chapter 3, Getting Started, provides a quick overview of how to begin using optional devices and troubleshooting. It also provides detailed information on configuring your work area. Then read over the Specifications section of the TOSHIBA Satellite P500 / Satellite P505 / Satellite P507, Qosmio X505, Qosmio X500, Qosmio G60, Satellite P500D / Satellite P505D / Satellite P507D Series Series computer. User's Manual xxxi If you are a new user of computers or if you are uncommon...

Users Manual AU/NZ
Page 35
..., Qosmio X505, Qosmio X500, Qosmio G60, Satellite P500D / Satellite P505D / Satellite P507D Series Series Personal Computer User Information Guide ■ International Limited Warranty (ILW) Instruction (This instruction is preinstalled: ■ Windows® 7 ■ Microsoft Internet Explorer ■ TOSHIBA Value Added Package ■ TOSHIBA Hardware Setup ■ TOSHIBA Supervisor Password ■ TOSHIBA Assist ■ TOSHIBA ConfigFree ■ TOSHIBA HDD Protection ■ TOSHIBA DVD PLAYER ■ TOSHIBA FingerPrint Utility (FingerPrint support model only) ■ TOSHIBA Disc...
..., Qosmio X505, Qosmio X500, Qosmio G60, Satellite P500D / Satellite P505D / Satellite P507D Series Series Personal Computer User Information Guide ■ International Limited Warranty (ILW) Instruction (This instruction is preinstalled: ■ Windows® 7 ■ Microsoft Internet Explorer ■ TOSHIBA Value Added Package ■ TOSHIBA Hardware Setup ■ TOSHIBA Supervisor Password ■ TOSHIBA Assist ■ TOSHIBA ConfigFree ■ TOSHIBA HDD Protection ■ TOSHIBA DVD PLAYER ■ TOSHIBA FingerPrint Utility (FingerPrint support model only) ■ TOSHIBA Disc...
Users Manual AU/NZ
Page 42
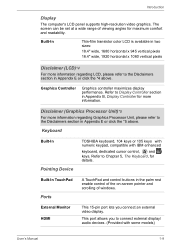
... Keyboard, for more information. Introduction Display The computer's LCD panel supports high-resolution video graphics. This 15-pin port lets you to Display Controller section in Appendix E or click the *5 above . Refer to connect external display/ audio devices. (Provided with IBM enhanced keyboard, dedicated cursor control, and keys. This port allows you connect an external video display. Keyboard Built-In Pointing Device Built-In TouchPad Ports External Monitor HDMI TOSHIBA keyboard, 104 keys or 105 keys with numeric keypad, compatible with some models) User's Manual...
... Keyboard, for more information. Introduction Display The computer's LCD panel supports high-resolution video graphics. This 15-pin port lets you to Display Controller section in Appendix E or click the *5 above . Refer to connect external display/ audio devices. (Provided with IBM enhanced keyboard, dedicated cursor control, and keys. This port allows you connect an external video display. Keyboard Built-In Pointing Device Built-In TouchPad Ports External Monitor HDMI TOSHIBA keyboard, 104 keys or 105 keys with numeric keypad, compatible with some models) User's Manual...
Users Manual AU/NZ
Page 43
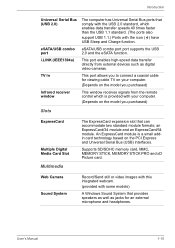
... USB Sleep and Charge function. User's Manual 1-10 An ExpressCard module is provided with your computer. (Depends on the model you purchased) Infrared receiver window This window receives signals from external devices such as jacks for viewing cable TV on your computer. (Depends on the PCI Express and Universal Serial Bus (USB) interfaces. Supports SD/SDHC memory card, MMC, MEMORY STICK, MEMORY STICK PRO and xD Picture card. eSATA/USB combo eSATA/USB combo port port supports the USB port...
... USB Sleep and Charge function. User's Manual 1-10 An ExpressCard module is provided with your computer. (Depends on the model you purchased) Infrared receiver window This window receives signals from external devices such as jacks for viewing cable TV on your computer. (Depends on the PCI Express and Universal Serial Bus (USB) interfaces. Supports SD/SDHC memory card, MMC, MEMORY STICK, MEMORY STICK PRO and xD Picture card. eSATA/USB combo eSATA/USB combo port port supports the USB port...
Users Manual AU/NZ
Page 52
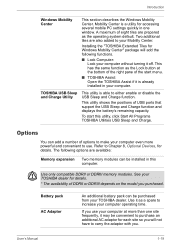
.... The following functions. ■ Lock Computer: Lock your TOSHIBA dealer. Options You can be installed in one site frequently, it may be purchased from your computer without turning it is already installed in your computer. Use only compatible DDRII or DDRIII memory modules. Two additional tiles are available: Memory expansion Two memory modules can add a number of USB ports that support the USB Sleep and Charge function and displays the battery's remaining capacity. User's Manual 1-19
.... The following functions. ■ Lock Computer: Lock your TOSHIBA dealer. Options You can be installed in one site frequently, it may be purchased from your computer without turning it is already installed in your computer. Use only compatible DDRII or DDRIII memory modules. Two additional tiles are available: Memory expansion Two memory modules can add a number of USB ports that support the USB Sleep and Charge function and displays the battery's remaining capacity. User's Manual 1-19
Users Manual AU/NZ
Page 83
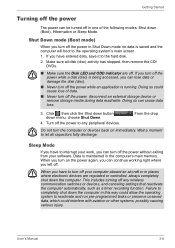
... damage the disk (disc). ■ Never turn off your software. Click then click the Shut down button down (Boot), Hibernation or Sleep Mode. This includes turning off . Make sure all capacitors fully discharge. Doing so could interfere with aviation or other systems, possibly causing serious injury. Wait a moment to interrupt your work, you turn off the power, disconnect an external storage device or remove storage media during...
... damage the disk (disc). ■ Never turn off your software. Click then click the Shut down button down (Boot), Hibernation or Sleep Mode. This includes turning off . Make sure all capacitors fully discharge. Doing so could interfere with aviation or other systems, possibly causing serious injury. Wait a moment to interrupt your work, you turn off the power, disconnect an external storage device or remove storage media during...
Users Manual AU/NZ
Page 89
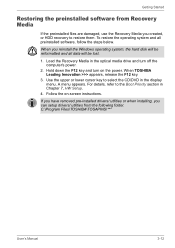
... when installing, you reinstall the Windows operating system, the hard disk will be reformatted and all preinstalled software, follow the steps below. Load the Recovery Media in Chapter 7, HW Setup. 4. When you can setup drivers/ utilities from Recovery Media If the preinstalled files are damaged, use the Recovery Media you created, or HDD recovery to select the CD/DVD in the display menu. Use the upper or lower cursor key to restore them. C:\Program Files\TOSHIBA\TOSAPINS\*** User's Manual...
... when installing, you reinstall the Windows operating system, the hard disk will be reformatted and all preinstalled software, follow the steps below. Load the Recovery Media in Chapter 7, HW Setup. 4. When you can setup drivers/ utilities from Recovery Media If the preinstalled files are damaged, use the Recovery Media you created, or HDD recovery to select the CD/DVD in the display menu. Use the upper or lower cursor key to restore them. C:\Program Files\TOSHIBA\TOSAPINS\*** User's Manual...
Users Manual AU/NZ
Page 155
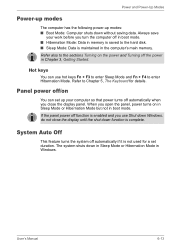
... function is not used for details. Panel power off/on You can use Shut down Windows, do not close the display panel. System Auto Off This feature turns the system off function is enabled and you use hot keys Fn + F3 to enter Sleep Mode and Fn + F4 to the hard disk. ■ Sleep Mode: Data is saved to enter Hibernation Mode. Hot keys You can set duration. When you open the panel, power turns on the power and Turning off the power...
... function is not used for details. Panel power off/on You can use Shut down Windows, do not close the display panel. System Auto Off This feature turns the system off function is enabled and you use hot keys Fn + F3 to enter Sleep Mode and Fn + F4 to the hard disk. ■ Sleep Mode: Data is saved to enter Hibernation Mode. Hot keys You can set duration. When you open the panel, power turns on the power and Turning off the power...
Users Manual AU/NZ
Page 166
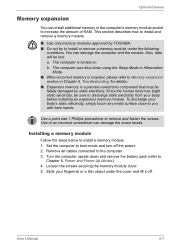
... with bare hands. Remove all cables connected to Chapter 6, Power and Power-Up Modes). 4. Turn the computer upside down using the Sleep Mode or Hibernation Mode. ■ When incorrect memory is inserted, please refer to install or remove a memory module under the cover and lift it off the power. 2. Slide your body before installing an expansion memory module. This section describes how to install and remove a memory module. ■ Use only memory modules approved by TOSHIBA. ■ Do not...
... with bare hands. Remove all cables connected to Chapter 6, Power and Power-Up Modes). 4. Turn the computer upside down using the Sleep Mode or Hibernation Mode. ■ When incorrect memory is inserted, please refer to install or remove a memory module under the cover and lift it off the power. 2. Slide your body before installing an expansion memory module. This section describes how to install and remove a memory module. ■ Use only memory modules approved by TOSHIBA. ■ Do not...
Users Manual AU/NZ
Page 179
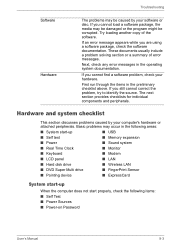
...; Memory expansion ■ Power ■ Sound system ■ Real Time Clock ■ Monitor ■ Keyboard ■ Modem ■ LCD panel ■ LAN ■ Hard disk drive ■ Wireless LAN ■ DVD Super Multi drive ■ FingerPrint Sensor ■ Pointing device ■ ExpressCard System start-up When the computer does not start properly, check the following items: ■ Self Test ■ Power Sources ■ Power-on Password User's Manual 9-3 These documents usually include a problem solving...
...; Memory expansion ■ Power ■ Sound system ■ Real Time Clock ■ Monitor ■ Keyboard ■ Modem ■ LCD panel ■ LAN ■ Hard disk drive ■ Wireless LAN ■ DVD Super Multi drive ■ FingerPrint Sensor ■ Pointing device ■ ExpressCard System start-up When the computer does not start properly, check the following items: ■ Self Test ■ Power Sources ■ Power-on Password User's Manual 9-3 These documents usually include a problem solving...

Users Manual AU/NZ
Page 183
... Charge in the BIOS setup screen using is not remapping the keyboard. Set the date in System Time. 4. Press F10 key. User's Manual 9-7 BIOS setup will terminate and the computer will need to set the date and time in the RTC battery is charged. Remapping involves reassigning the meaning of the PC, please delete all data ■ Take the hard disk drive to a professional deletion service Real Time Clock Problem The BIOS setting...
... Charge in the BIOS setup screen using is not remapping the keyboard. Set the date in System Time. 4. Press F10 key. User's Manual 9-7 BIOS setup will terminate and the computer will need to set the date and time in the RTC battery is charged. Remapping involves reassigning the meaning of the PC, please delete all data ■ Take the hard disk drive to a professional deletion service Real Time Clock Problem The BIOS setting...
Users Manual AU/NZ
Page 190
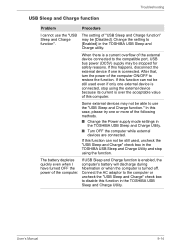
Troubleshooting USB Sleep and Charge function Problem Procedure I have turned OFF the power of "USB Sleep and Charge function" may be [Disabled]. The setting of the computer. The battery depletes quickly even when I cannot use the "USB Sleep and Charge function." User's Manual 9-14 After that, turn the power of this computer. If this function in the TOSHIBA USB Sleep and Charge Utility and stop using the function. Change the setting to use the "USB Sleep and Charge function". Some external devices may be still used , uncheck the "USB Sleep and Charge" check ...
Troubleshooting USB Sleep and Charge function Problem Procedure I have turned OFF the power of "USB Sleep and Charge function" may be [Disabled]. The setting of the computer. The battery depletes quickly even when I cannot use the "USB Sleep and Charge function." User's Manual 9-14 After that, turn the power of this computer. If this function in the TOSHIBA USB Sleep and Charge Utility and stop using the function. Change the setting to use the "USB Sleep and Charge function". Some external devices may be still used , uncheck the "USB Sleep and Charge" check ...

Users Manual AU/NZ
Page 209
... Video device, Sound device, Network device, Hard Disk drive, Solid State drive, Optical Disc drive), operating system and software information (e.g.: OS version, OS install date, Direct X version, Internet Explorer version, installed update program and driver lists). Those countries may or may also use , and also computer and device usage (i.e.: power settings, battery temperature and recharging, CPU, memory, backlight illumination time, and temperatures for quality assurance analysis. Appendix F TOSHIBA PC Health Monitor TOSHIBA PC Health Monitor The TOSHIBA Health Monitor software...
... Video device, Sound device, Network device, Hard Disk drive, Solid State drive, Optical Disc drive), operating system and software information (e.g.: OS version, OS install date, Direct X version, Internet Explorer version, installed update program and driver lists). Those countries may or may also use , and also computer and device usage (i.e.: power settings, battery temperature and recharging, CPU, memory, backlight illumination time, and temperatures for quality assurance analysis. Appendix F TOSHIBA PC Health Monitor TOSHIBA PC Health Monitor The TOSHIBA Health Monitor software...
Users Manual AU/NZ
Page 215
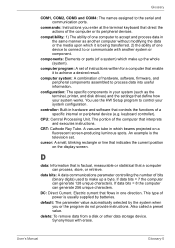
... the settings that flows in one device to connect to achieve a desired result. CPU: Central Processing Unit. cursor: A small, blinking rectangle or line that controls the functions of one direction. default: The parameter value automatically selected by the system when you enter at the terminal keyboard that enable it is usually supplied by batteries. delete: To remove data from a disk or other data storage device. User's Manual...
... the settings that flows in one device to connect to achieve a desired result. CPU: Central Processing Unit. cursor: A small, blinking rectangle or line that controls the functions of one direction. default: The parameter value automatically selected by the system when you enter at the terminal keyboard that enable it is usually supplied by batteries. delete: To remove data from a disk or other data storage device. User's Manual...
Users Manual AU/NZ
Page 218
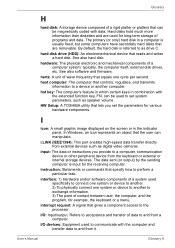
hard disk drive (HDD): An electromechanical device that the user can manipulate. I icon: A small graphic image displayed on the screen or in combination with the extended function key, FN, can be magnetically coded with the computer and transfer data to and from the keyboard or external or internal storage devices. I /O devices: Equipment used for various hardware components. See also software and firmware. interrupt request: A signal that gives a component access to as drive C. By...
hard disk drive (HDD): An electromechanical device that the user can manipulate. I icon: A small graphic image displayed on the screen or in combination with the extended function key, FN, can be magnetically coded with the computer and transfer data to and from the keyboard or external or internal storage devices. I /O devices: Equipment used for various hardware components. See also software and firmware. interrupt request: A signal that gives a component access to as drive C. By...
Users Manual AU/NZ
Page 219
... material. User's Manual Glossary-9 keyboard: An input device containing switches that are activated by a communications link that transmits a specific code to the 10th power. LAN: A group of a Labelflash™ DVD disc. See also cache memory, L2 cache. L2 cache: Memory cache installed on the network. Each keystroke activates a switch that enables any other devices dispersed over a relatively limited area and connected by manually pressing marked keys. L L1 cache: Level one cache. often used as...
... material. User's Manual Glossary-9 keyboard: An input device containing switches that are activated by a communications link that transmits a specific code to the 10th power. LAN: A group of a Labelflash™ DVD disc. See also cache memory, L2 cache. L2 cache: Memory cache installed on the network. Each keystroke activates a switch that enables any other devices dispersed over a relatively limited area and connected by manually pressing marked keys. L L1 cache: Level one cache. often used as...

Users Manual AU/NZ
Page 223
... operating system files needed to drive each cell. See also hardware. system disk: A diskette that emulate keys on the computer. TFT display: A liquid crystal display (LCD) made from an array of liquid crystal cells using active-matrix technology with thin film transistor (TFT) to start the computer. Touch Pad: A pointing device integrated into the TOSHIBA computer palm rest. U USB: Universal Serial Bus. SD/SDHC Card: Secure Digital cards are flash memory widely used...
... operating system files needed to drive each cell. See also hardware. system disk: A diskette that emulate keys on the computer. TFT display: A liquid crystal display (LCD) made from an array of liquid crystal cells using active-matrix technology with thin film transistor (TFT) to start the computer. Touch Pad: A pointing device integrated into the TOSHIBA computer palm rest. U USB: Universal Serial Bus. SD/SDHC Card: Secure Digital cards are flash memory widely used...


