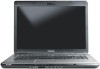
User Manual
Page 2
... Mobility Radeon are registered trademarks and Windows Vista is a registered trademark of Advanced Micro Devices, Inc. ii User's Manual Please comply with respect to the use of copyright or author's rights and is subject to digital format, alteration, transfer of copied material and distribution on a network) without the permission of the copyright owner is a registered trademark, and IBM PC...
... Mobility Radeon are registered trademarks and Windows Vista is a registered trademark of Advanced Micro Devices, Inc. ii User's Manual Please comply with respect to the use of copyright or author's rights and is subject to digital format, alteration, transfer of copied material and distribution on a network) without the permission of the copyright owner is a registered trademark, and IBM PC...

User Manual
Page 10
... Keyboard Typewriter keys 5-1 Function keys: F1 ... F12 5-2 Soft keys: FN key combinations 5-2 Windows special keys 5-5 Keypad overlay 5-6 Generating ASCII characters 5-7 Chapter 6 Power and Power-up Modes Power conditions 6-1 Power indicators 6-2 Battery types 6-3 Care and use of the battery pack 6-5 Replacing the battery pack 6-11 Starting the computer by password 6-13 Power-up modes 6-13 Chapter 7 HW Setup and Passwords HW Setup 7-1 Chapter 8 Optional Devices PC Card/ExpressCard 8-2 Multiple digital media card slot (optional 8-3 Memory expansion 8-6 Additional battery...
... Keyboard Typewriter keys 5-1 Function keys: F1 ... F12 5-2 Soft keys: FN key combinations 5-2 Windows special keys 5-5 Keypad overlay 5-6 Generating ASCII characters 5-7 Chapter 6 Power and Power-up Modes Power conditions 6-1 Power indicators 6-2 Battery types 6-3 Care and use of the battery pack 6-5 Replacing the battery pack 6-11 Starting the computer by password 6-13 Power-up modes 6-13 Chapter 7 HW Setup and Passwords HW Setup 7-1 Chapter 8 Optional Devices PC Card/ExpressCard 8-2 Multiple digital media card slot (optional 8-3 Memory expansion 8-6 Additional battery...
User Manual
Page 26
... and Australia - L300/L300D series Modem Wireless communication switch Security Security lock slot Software Operating system TOSHIBA Utilities Plug and Play Some models are preinstalled to make the necessary configurations automatically. 1-8 User's Manual Microsoft® Windows Vista™ is supported in this chapter. When you connect an external device to the computer or when you install a component, Plug and Play capability enables the system to recognize the connection and make your computer more convenient...
... and Australia - L300/L300D series Modem Wireless communication switch Security Security lock slot Software Operating system TOSHIBA Utilities Plug and Play Some models are preinstalled to make the necessary configurations automatically. 1-8 User's Manual Microsoft® Windows Vista™ is supported in this chapter. When you connect an external device to the computer or when you install a component, Plug and Play capability enables the system to recognize the connection and make your computer more convenient...
User Manual
Page 27
... Power Options This feature allows you quickly modify the system configuration directly from an AC adaptor. Instant security A hot key function blanks the screen and disables the computer providing data security. To access the Power Options, click Start -> Control Panel -> System and Maintenance -> Power Options. Power is restored when any key is accessed. This can be specified in sleep mode or hibernation mode when there is no input or hardware access for a time specified. Power is restored when the hard disk...
... Power Options This feature allows you quickly modify the system configuration directly from an AC adaptor. Instant security A hot key function blanks the screen and disables the computer providing data security. To access the Power Options, click Start -> Control Panel -> System and Maintenance -> Power Options. Power is restored when any key is accessed. This can be specified in sleep mode or hibernation mode when there is no input or hardware access for a time specified. Power is restored when the hard disk...
User Manual
Page 34
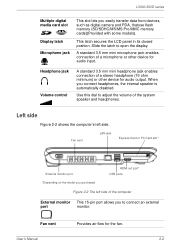
...) or other device for audio input. Fan vent LAN jack Express Card or PC Card slot * External monitor port *Depending on the model you to connect an external port monitor. A standard 3.5 mm mini microphone jack enables connection of the system speaker and headphones. L300/L300D series Multiple digital media card slot Display latch Microphone jack This slot lets you connect headphones, the internal speaker is automatically disabled. This latch secures the LCD panel in its closed position. Use this dial to open the display. When you...
...) or other device for audio input. Fan vent LAN jack Express Card or PC Card slot * External monitor port *Depending on the model you to connect an external port monitor. A standard 3.5 mm mini microphone jack enables connection of the system speaker and headphones. L300/L300D series Multiple digital media card slot Display latch Microphone jack This slot lets you connect headphones, the internal speaker is automatically disabled. This latch secures the LCD panel in its closed position. Use this dial to open the display. When you...
User Manual
Page 54
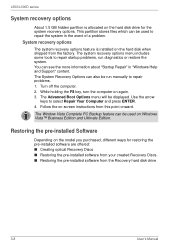
... created Recovery Discs. ■ Restoring the pre-installed software from this point onward. Use the arrow keys to repair problems. 1. L300/L300D series System recovery options About 1.5 GB hidden partition is installed on the hard disk when shipped from the factory. This partition stores files which can be used on Windows Vista™ Business Edition and Ultimate Edition. The system recovery options menu includes some tools to repair startup problems, run manually to select Repair Your Computer and press ENTER. 4. System recovery options...
... created Recovery Discs. ■ Restoring the pre-installed software from this point onward. Use the arrow keys to repair problems. 1. L300/L300D series System recovery options About 1.5 GB hidden partition is installed on the hard disk when shipped from the factory. This partition stores files which can be used on Windows Vista™ Business Edition and Ultimate Edition. The system recovery options menu includes some tools to repair startup problems, run manually to select Repair Your Computer and press ENTER. 4. System recovery options...
User Manual
Page 66
... as a SD/SDHC memory card, PC card/ExpressCard, Memory Stick/ Memory Stick Pro, MultiMediaCard, USB device, external monitor, or an optical digital device. ■ Use the Audio/Video control button to close all other than TOSHIBA Disc Creator is running. Writing is finished if you write or rewrite to a CD-R/-RW, DVD-R/-R DL/-RW/-RAM or DVD+R/+R DL/+RW disc. ■ Do not perform any of a mouse or touchpad, closing/opening the LCD panel. ■ Start a communication application...
... as a SD/SDHC memory card, PC card/ExpressCard, Memory Stick/ Memory Stick Pro, MultiMediaCard, USB device, external monitor, or an optical digital device. ■ Use the Audio/Video control button to close all other than TOSHIBA Disc Creator is running. Writing is finished if you write or rewrite to a CD-R/-RW, DVD-R/-R DL/-RW/-RAM or DVD+R/+R DL/+RW disc. ■ Do not perform any of a mouse or touchpad, closing/opening the LCD panel. ■ Start a communication application...
User Manual
Page 70
...; Open the DVD drive. ■ Install, remove or connect external devices, including such items as a SD/SDHC memory card, PC Card/ExpressCard, Memory Stick/Memory Stick Pro, MultiMediaCard, USB device, external monitor, or an optical digital device. ■ Please verify your computer is running on AC power when using a mouse or touchpad, or closing/opening the display panel. ■ Bump or cause vibration to the computer. ■ Use the Mode control button and Audio/Video control button to output VCD and SVCD format. 4-12 User's Manual However...
...; Open the DVD drive. ■ Install, remove or connect external devices, including such items as a SD/SDHC memory card, PC Card/ExpressCard, Memory Stick/Memory Stick Pro, MultiMediaCard, USB device, external monitor, or an optical digital device. ■ Please verify your computer is running on AC power when using a mouse or touchpad, or closing/opening the display panel. ■ Bump or cause vibration to the computer. ■ Use the Mode control button and Audio/Video control button to output VCD and SVCD format. 4-12 User's Manual However...
User Manual
Page 86
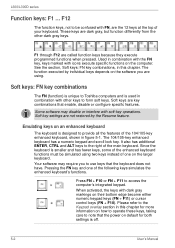
... key settings are not restored by individual keys depends on default for both settings is smaller and has fewer keys, some of the enhanced keyboard functions must be confused with soft-key operations. F1 through F12 are key combinations that enable, disable or configure specific features. Soft keys are called function keys because they execute programmed functions when pressed. The 104/105-key enhanced keyboard has a numeric keypad and scroll lock key. Your software may disable or...
... key settings are not restored by individual keys depends on default for both settings is smaller and has fewer keys, some of the enhanced keyboard functions must be confused with soft-key operations. F1 through F12 are key combinations that enable, disable or configure specific features. Soft keys are called function keys because they execute programmed functions when pressed. The 104/105-key enhanced keyboard has a numeric keypad and scroll lock key. Your software may disable or...
User Manual
Page 109
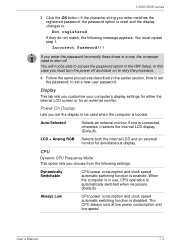
... set the password, to set a new user password. If you must repeat step 1. LCD + Analog RGB Selects both the internal LCD and an external monitor for an external monitor. In this case you enter the password incorrectly three times in use, CPU operation is automatically switched when necessary. (Default) Always Low CPU power consumption and clock speed automatic switching function is booted. When the computer is reset and the display changes to retry the procedure. 4. Click the OK button. User's Manual...
... set the password, to set a new user password. If you must repeat step 1. LCD + Analog RGB Selects both the internal LCD and an external monitor for an external monitor. In this case you enter the password incorrectly three times in use, CPU operation is automatically switched when necessary. (Default) Always Low CPU power consumption and clock speed automatic switching function is booted. When the computer is reset and the display changes to retry the procedure. 4. Click the OK button. User's Manual...
User Manual
Page 111
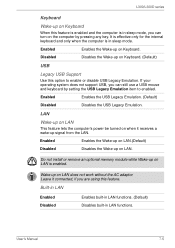
... not support USB, you can turn on the computer by setting the USB Legacy Emulation item to enable or disable USB Legacy Emulation. LAN Wake-up on LAN This feature lets the computer's power be turned on when it connected, if you are using this option to enabled. Do not install or remove an optional memory module while Wake-up on LAN is in sleep mode. Wake-up signal from the LAN. User's Manual 7-5 L300/L300D series Keyboard Wake...
... not support USB, you can turn on the computer by setting the USB Legacy Emulation item to enable or disable USB Legacy Emulation. LAN Wake-up on LAN This feature lets the computer's power be turned on when it connected, if you are using this option to enabled. Do not install or remove an optional memory module while Wake-up on LAN is in sleep mode. Wake-up signal from the LAN. User's Manual 7-5 L300/L300D series Keyboard Wake...
User Manual
Page 118
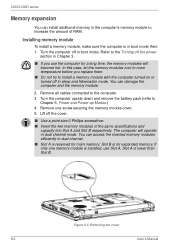
... the memory module cover. 5. Slot B is reserved for a long time, the memory modules will operate in boot mode then: 1. Remove all cables connected to Chapter 6, Power and Power-up Modes.) 4. Turn the computer off the cover. ■ Use a point size 0 Phillips screwdriver. ■ Insert the two memory modules of RAM. You can access the inserted memory modules efficiently in Chapter 3. ■ If you replace them. ■ Do not try to room temperature before you use Slot A. Installing memory module To install a memory module, make...
... the memory module cover. 5. Slot B is reserved for a long time, the memory modules will operate in boot mode then: 1. Remove all cables connected to Chapter 6, Power and Power-up Modes.) 4. Turn the computer off the cover. ■ Use a point size 0 Phillips screwdriver. ■ Insert the two memory modules of RAM. You can access the inserted memory modules efficiently in Chapter 3. ■ If you replace them. ■ Do not try to room temperature before you use Slot A. Installing memory module To install a memory module, make...
User Manual
Page 120
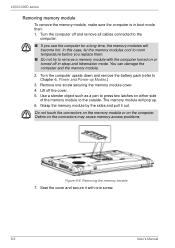
... off and remove all cables connected to the computer. ■ If you replace them. ■ Do not try to the outside. Grasp the memory module by the sides and pull it with the computer turned on either side of the memory module to remove a memory module with one screw securing the memory module cover. 4. L300/L300D series Removing memory module To remove the memory module, make sure the computer is in sleep and hibernation mode.
... off and remove all cables connected to the computer. ■ If you replace them. ■ Do not try to the outside. Grasp the memory module by the sides and pull it with the computer turned on either side of the memory module to remove a memory module with one screw securing the memory module cover. 4. L300/L300D series Removing memory module To remove the memory module, make sure the computer is in sleep and hibernation mode.
User Manual
Page 135
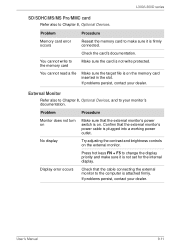
... Memory card error occurs Reseat the memory card to change the display priority and make sure it is not set for the internal display. Press hot keys FN + F5 to make sure it is plugged into a working power outlet. If problems persist, contact your dealer. User's Manual 9-11 Check the card's documentation. Problem Procedure Monitor does not turn on . Confirm that the external monitor's power switch is not write protected. Display error occurs Check that the cable connecting the external monitor to the memory card Make...
... Memory card error occurs Reseat the memory card to change the display priority and make sure it is not set for the internal display. Press hot keys FN + F5 to make sure it is plugged into a working power outlet. If problems persist, contact your dealer. User's Manual 9-11 Check the card's documentation. Problem Procedure Monitor does not turn on . Confirm that the external monitor's power switch is not write protected. Display error occurs Check that the cable connecting the external monitor to the memory card Make...
User Manual
Page 161
... Current. default: The parameter value automatically selected by batteries. Also called a preset value. L300/L300D series components: Elements or parts (of a system) which beams projected on a fluorescent screen-producing luminous spots. from a disk or other data storage device. computer system: A combination of hardware, software, firmware, and peripheral components assembled to make up a byte. You use the HW Setup program to transmit images, e.g. keyboard controller). CPU: Central...
... Current. default: The parameter value automatically selected by batteries. Also called a preset value. L300/L300D series components: Elements or parts (of a system) which beams projected on a fluorescent screen-producing luminous spots. from a disk or other data storage device. computer system: A combination of hardware, software, firmware, and peripheral components assembled to make up a byte. You use the HW Setup program to transmit images, e.g. keyboard controller). CPU: Central...
User Manual
Page 164
... set the parameters for servicing. interface: 1) Hardware and/or software components of wave frequency that reads and writes a hard disk. Refers to acceptance and transfer of contact between user, the computer, and the program, for the receiving computer. See also software and firmware. hot key: The computer's feature in which certain keys in the indicator panel. L300/L300D series H hard disk: A non-removable disk usually referred to as digital video cameras. hard disk drive (HDD...
... set the parameters for servicing. interface: 1) Hardware and/or software components of wave frequency that reads and writes a hard disk. Refers to acceptance and transfer of contact between user, the computer, and the program, for the receiving computer. See also software and firmware. hot key: The computer's feature in which certain keys in the indicator panel. L300/L300D series H hard disk: A non-removable disk usually referred to as digital video cameras. hard disk drive (HDD...
User Manual
Page 165
... the main parts of the computer. User's Manual Glossary-9 See also byte and kilobyte. keyboard: An input device containing switches that carries out instructions. See also byte and megabyte. Applying a voltage between two sheets of glass coated with leads that extend to the 10th power. microprocessor: A hardware component contained in turn, representative of the (ASCII) character marked on the screen. menu: A software interface...
... the main parts of the computer. User's Manual Glossary-9 See also byte and kilobyte. keyboard: An input device containing switches that carries out instructions. See also byte and megabyte. Applying a voltage between two sheets of glass coated with leads that extend to the 10th power. microprocessor: A hardware component contained in turn, representative of the (ASCII) character marked on the screen. menu: A software interface...
User Manual
Page 168
... jack. RJ45: A modular LAN jack. You cannot access or change some configuration options, stop bit: One or more bits of brightness. S S-Video: Short for Super-Video, a type of peripheral devices. See also hardware. subpixel: Three elements, one red, one after another. synchronous: Having a constant time interval between successive bits, characters or events. Glossary-12 User's Manual See also boot. SD Card: Secure Digital cards are flash memory widely used in France. serial...
... jack. RJ45: A modular LAN jack. You cannot access or change some configuration options, stop bit: One or more bits of brightness. S S-Video: Short for Super-Video, a type of peripheral devices. See also hardware. subpixel: Three elements, one red, one after another. synchronous: Having a constant time interval between successive bits, characters or events. Glossary-12 User's Manual See also boot. SD Card: Secure Digital cards are flash memory widely used in France. serial...
User Manual
Page 173
...lock M Main battery, See Battery pack Memory, 1-3, 10-2 expansion, 1-13, 8-6 installing module, 8-6 removing module, 8-8 Microphone, 1-6 problems, 9-12 using, 4-15 Microprocessor, See Processor L300/L300D series Modem, 1-8, 4-19, A-2 connecting, 4-21 disconnecting, 4-21 problems, 9-13 properties menu, 4-20 region selection, 4-19 Moving the computer, 4-25 Multiple digital media card slot using, 8-3 N Numeric keypad, See Keypad overlay O Optical disc drives using, 4-2 P Password power on, 1-9 problems, 9-6 starting the computer with, 6-13 user, 7-2 PC card location of slots, 2-2 Pointing device...
...lock M Main battery, See Battery pack Memory, 1-3, 10-2 expansion, 1-13, 8-6 installing module, 8-6 removing module, 8-8 Microphone, 1-6 problems, 9-12 using, 4-15 Microprocessor, See Processor L300/L300D series Modem, 1-8, 4-19, A-2 connecting, 4-21 disconnecting, 4-21 problems, 9-13 properties menu, 4-20 region selection, 4-19 Moving the computer, 4-25 Multiple digital media card slot using, 8-3 N Numeric keypad, See Keypad overlay O Optical disc drives using, 4-2 P Password power on, 1-9 problems, 9-6 starting the computer with, 6-13 user, 7-2 PC card location of slots, 2-2 Pointing device...
User Manual
Page 174
... system start-up, 9-3 TOSHIBA support, 9-15 touchpad, 9-9 USB, 9-12 USB mouse, 9-10 Wireless LAN, 9-14 Processor, 1-2 R Real Time Clock battery, See Battery Recovery Discs, 3-10 Recovery hard disk drive, 3-8, 3-10 Restarting the computer, 3-7 S Security lock attaching, 8-11 location, 2-4 Sleep mode, 1-10 problems, 9-14 setting, 3-6 Soft keys emulating keys on enhanced keyboard, 5-2 ENTER, 5-3 right ALT key, 5-3 right CTRL key, 5-3 scroll lock, 5-3 Sound system, 1-7 headphone, 1-6, 2-2 microphone, 2-2 speaker, 2-7 volume control, 2-2 T TOSHIBA Assist, 1-12 TOSHIBA Disc Creator, 4-9 TOSHIBA PC...
... system start-up, 9-3 TOSHIBA support, 9-15 touchpad, 9-9 USB, 9-12 USB mouse, 9-10 Wireless LAN, 9-14 Processor, 1-2 R Real Time Clock battery, See Battery Recovery Discs, 3-10 Recovery hard disk drive, 3-8, 3-10 Restarting the computer, 3-7 S Security lock attaching, 8-11 location, 2-4 Sleep mode, 1-10 problems, 9-14 setting, 3-6 Soft keys emulating keys on enhanced keyboard, 5-2 ENTER, 5-3 right ALT key, 5-3 right CTRL key, 5-3 scroll lock, 5-3 Sound system, 1-7 headphone, 1-6, 2-2 microphone, 2-2 speaker, 2-7 volume control, 2-2 T TOSHIBA Assist, 1-12 TOSHIBA Disc Creator, 4-9 TOSHIBA PC...


