User Manual
Page 4
...pedestal to completely disconnect from a 120 VAC, 60 Hz power source only. 32) Always make sure you are never in a position where your TOSHIBA TV, follow these recommendations and precautions: 34) If you are provided to protect the TV from power and a minute amount of the National ...better performance and safer operation of malfunction. 35) Always unplug the TV before cleaning. Gently wipe the cabinet and the display panel surface (the TV screen) with , such as a wall) to wear or abuse. 30) Never overload wall outlets and extension cords. 31) Always operate this equipment from...
...pedestal to completely disconnect from a 120 VAC, 60 Hz power source only. 32) Always make sure you are never in a position where your TOSHIBA TV, follow these recommendations and precautions: 34) If you are provided to protect the TV from power and a minute amount of the National ...better performance and safer operation of malfunction. 35) Always unplug the TV before cleaning. Gently wipe the cabinet and the display panel surface (the TV screen) with , such as a wall) to wear or abuse. 30) Never overload wall outlets and extension cords. 31) Always operate this equipment from...

User Manual
Page 5
...the TV. 3. Five screws 5 If these for additional details. Never strike the screen with your LCD TV, always use these sounds become frequent or continuous, unplug the power cord and contact a Toshiba Authorized Service Center. 42) WARNING: RISK OF SERIOUS PERSONAL INJURY OR EQUIPMENT DAMAGE... by the manufacturer. • Upon completion of the LCD TV (- When selecting a location for the television, avoid locations where the screen may expose you decide to follow the instructions in death or serious injury. Never attempt to direct sunlight, such as a quilt or blanket...
...the TV. 3. Five screws 5 If these for additional details. Never strike the screen with your LCD TV, always use these sounds become frequent or continuous, unplug the power cord and contact a Toshiba Authorized Service Center. 42) WARNING: RISK OF SERIOUS PERSONAL INJURY OR EQUIPMENT DAMAGE... by the manufacturer. • Upon completion of the LCD TV (- When selecting a location for the television, avoid locations where the screen may expose you decide to follow the instructions in death or serious injury. Never attempt to direct sunlight, such as a quilt or blanket...
User Manual
Page 7
... other countries. • INSTAPORT™ and INSTAPORT logo are trademarks of Dolby Laboratories. • Audyssey EQ is based on -screen target may not work of the Independent JPEG Group. • This product contains Adobe® Flash® Player software under your... are technical limitations of LCD Display technology and are not visible when the picture is viewed from Adobe Systems Incorporated. therefore, Toshiba is not responsible for ENERGY STAR qualification. Trademark Information • Manufactured under license from Dolby Laboratories. S. ENERGY STAR®...
... other countries. • INSTAPORT™ and INSTAPORT logo are trademarks of Dolby Laboratories. • Audyssey EQ is based on -screen target may not work of the Independent JPEG Group. • This product contains Adobe® Flash® Player software under your... are technical limitations of LCD Display technology and are not visible when the picture is viewed from Adobe Systems Incorporated. therefore, Toshiba is not responsible for ENERGY STAR qualification. Trademark Information • Manufactured under license from Dolby Laboratories. S. ENERGY STAR®...
User Manual
Page 9
... devices . . . . . 38 REGZA-LINK® input source selection 39 Adjusting the amplifier's audio 39 Other REGZA-LINK® functions 39 Connecting a Toshiba PC compatible to REGZA-LINK 40 Using the HDMI® settings feature 40 Setting the HDMI® audio mode 41 Viewing the HDMI® signal...to turn on the TV 42 Setting the sleep timer 42 Setting Automatic Power Down 43 Setting No Signal Power Down 43 Setting Blue Screen 43 Adjusting POWER LED's Dimmer 43 Displaying TV status information 44 Viewing support information 44 Resetting to Factory Defaults 44 Power failure 44...
... devices . . . . . 38 REGZA-LINK® input source selection 39 Adjusting the amplifier's audio 39 Other REGZA-LINK® functions 39 Connecting a Toshiba PC compatible to REGZA-LINK 40 Using the HDMI® settings feature 40 Setting the HDMI® audio mode 41 Viewing the HDMI® signal...to turn on the TV 42 Setting the sleep timer 42 Setting Automatic Power Down 43 Setting No Signal Power Down 43 Setting Blue Screen 43 Adjusting POWER LED's Dimmer 43 Displaying TV status information 44 Viewing support information 44 Resetting to Factory Defaults 44 Power failure 44...

User Manual
Page 25
... the TV for ANT/CABLE. OK Note: If you do not want to scan channels, you do not finish the Initial Setup, the Initial Setup screen will appear every time you turn on your TV. However, if you do not need to skip this step. 25 Eastern Off 4 Location Select On...
... the TV for ANT/CABLE. OK Note: If you do not want to scan channels, you do not finish the Initial Setup, the Initial Setup screen will appear every time you turn on your TV. However, if you do not need to skip this step. 25 Eastern Off 4 Location Select On...
User Manual
Page 26
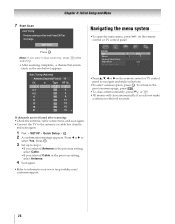
... 11 13 ATV 13 18 ATV 18 31 ATV 31 Navigating the menu system •To open the main menu, press Y on www.tacp.toshiba.com/ customersupport. 26 OK Note: If you selected Cable in the previous setting, select Cable. •If you want to navigate and make ...8226;Press B, b, C or c on the remote control or TV control panel to stop scanning, press O while scanning. • After scanning completes, a channel list screen (such as the one below) appears. Press . Chapter 4: Initial Setup and Menu 7 Start Scan Auto Tuning Previous settings will close automatically if you do not...
... 11 13 ATV 13 18 ATV 18 31 ATV 31 Navigating the menu system •To open the main menu, press Y on www.tacp.toshiba.com/ customersupport. 26 OK Note: If you selected Cable in the previous setting, select Cable. •If you want to navigate and make ...8226;Press B, b, C or c on the remote control or TV control panel to stop scanning, press O while scanning. • After scanning completes, a channel list screen (such as the one below) appears. Press . Chapter 4: Initial Setup and Menu 7 Start Scan Auto Tuning Previous settings will close automatically if you do not...

User Manual
Page 27
... AV Connection Auto Input 66 74 31 35 35 41, 47 29, 30, 40, 41, 53 30 IR Control 18 Energy Saving Settings 43 Blue Screen 43 Icon SETUP Item HDMI Information Display POWER LED Dimmer Menu Language ANT/CABLE In Auto Tuning Manual Tuning TV Settings Quick Setup Location Software...
... AV Connection Auto Input 66 74 31 35 35 41, 47 29, 30, 40, 41, 53 30 IR Control 18 Energy Saving Settings 43 Blue Screen 43 Icon SETUP Item HDMI Information Display POWER LED Dimmer Menu Language ANT/CABLE In Auto Tuning Manual Tuning TV Settings Quick Setup Location Software...

User Manual
Page 28
.../CABLE input. Press O. Press . Location You can set up the TV to the factory default, select Reset on the channels you press < or , on the screen. OK 2 Press B or b to select your area and store them in memory (optional) To make your TV stops only on the... screen. OK 3 Highlight TV Mounting. Select Stand or Wall. 4 If you want when you want to adjust the equalizer, press the RED button. 5 Press B, b, C or c to ...
.../CABLE input. Press O. Press . Location You can set up the TV to the factory default, select Reset on the channels you press < or , on the screen. OK 2 Press B or b to select your area and store them in memory (optional) To make your TV stops only on the... screen. OK 3 Highlight TV Mounting. Select Stand or Wall. 4 If you want when you want to adjust the equalizer, press the RED button. 5 Press B, b, C or c to ...

User Manual
Page 29
To skip an antenna source channel from being viewed, you select Cable, auto tuning deletes previously stored channels from memory. OK The list of the screen. OK The box is known. 1 Y > SETUP > Manual Tuning > . Use buttons 0-9 and = on Skip. To turn off Skip. 29 OK ...6-1 DTV 8 ATV 9 ATV 10 ATV 11 ATV 12 ATV 3 Press B or b to select a channel to select Input Labeling. OK A confirmation screen appears. 2 Press OK to abort. The channels found channels into memory. Digital channel Skipping channels To prevent a channel from memory, set the channel to ...
To skip an antenna source channel from being viewed, you select Cable, auto tuning deletes previously stored channels from memory. OK The list of the screen. OK The box is known. 1 Y > SETUP > Manual Tuning > . Use buttons 0-9 and = on Skip. To turn off Skip. 29 OK ...6-1 DTV 8 ATV 9 ATV 10 ATV 11 ATV 12 ATV 3 Press B or b to select a channel to select Input Labeling. OK A confirmation screen appears. 2 Press OK to abort. The channels found channels into memory. Digital channel Skipping channels To prevent a channel from memory, set the channel to ...
User Manual
Page 31
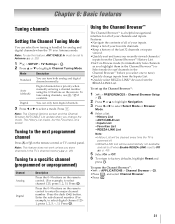
... the remote control. (For example, to a specific channel (programmed or unprogrammed) Channel Analog Digital Description Press the 0-9 buttons on the remote. Note: The Channel Options screen and the Channel Browser ANT/CABLE List update when you store channels in the TV's channel memory (- Note: This feature does not work unless you...
... the remote control. (For example, to a specific channel (programmed or unprogrammed) Channel Analog Digital Description Press the 0-9 buttons on the remote. Note: The Channel Options screen and the Channel Browser ANT/CABLE List update when you store channels in the TV's channel memory (- Note: This feature does not work unless you...
User Manual
Page 34
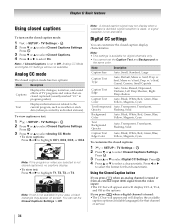
Chapter 6: Basic features Using closed captions To turn on screen. To view captions or text: 1 Y > SETUP > TV Settings > OK 2 Press b or B to highlight CC1, CC2, CC3, or CC4. Note: A closed caption signal may appear on ...
Chapter 6: Basic features Using closed captions To turn on screen. To view captions or text: 1 Y > SETUP > TV Settings > OK 2 Press b or B to highlight CC1, CC2, CC3, or CC4. Note: A closed caption signal may appear on ...
User Manual
Page 35
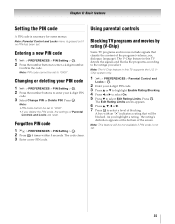
...: This feature will be set . 35 OK Note: • PIN code cannot be blocked. A box with an "5" indicates a rating that classify the content of the screen. OK The Edit Rating Limits screen appears. 6 Press B, b, C or c. 7 Press OK to "0000". Entering a new PIN code 1 Y > PREFERENCES > PIN Setting > . Press . OK 2 Press 4 times within 5 seconds...
...: This feature will be set . 35 OK Note: • PIN code cannot be blocked. A box with an "5" indicates a rating that classify the content of the screen. OK The Edit Rating Limits screen appears. 6 Press B, b, C or c. 7 Press OK to "0000". Entering a new PIN code 1 Y > PREFERENCES > PIN Setting > . Press . OK 2 Press 4 times within 5 seconds...
User Manual
Page 36
... system is designed to select a level of an additional rating system determined or controlled by the TV or Toshiba, nor is an evolving technology; The Edit Rating Limits screen appears. 6 Select Alt RS. Note: • You can be blocked. OK 2 Enter your 4-digit...> . therefore, availability, content, and format may become available. • The additional rating system is not designed, transmitted, or controlled by Toshiba. The Parental Control and Locks screen appears. 3 Press B or b to highlight Enable Rating Blocking. 4 Press C or c to select On. 5 Press b to Older ...
... system is designed to select a level of an additional rating system determined or controlled by the TV or Toshiba, nor is an evolving technology; The Edit Rating Limits screen appears. 6 Select Alt RS. Note: • You can be blocked. OK 2 Enter your 4-digit...> . therefore, availability, content, and format may become available. • The additional rating system is not designed, transmitted, or controlled by Toshiba. The Parental Control and Locks screen appears. 3 Press B or b to highlight Enable Rating Blocking. 4 Press C or c to select On. 5 Press b to Older ...
User Manual
Page 37
Indication in the INFO screen NONE (No rating appears) Description The program is provided. OK The list of the program you are watching, press on p. 35). 1 Y > SETUP > TV Settings > . Type 5-1 ...
Indication in the INFO screen NONE (No rating appears) Description The program is provided. OK The list of the program you are watching, press on p. 35). 1 Y > SETUP > TV Settings > . Type 5-1 ...

User Manual
Page 38
...S Begins playback. G Skips forward. J Fast-forwards. O Closes the menu. Locking the control panel You can use the remote control to control Toshiba REGZA-LINK® compatible devices from being changed accidentally (by children, for example). A Pauses the picture during play or record mode. Returns to Off...the Input Lock (- To unlock the control panel: Select Off in the REGZA-LINK Setup menu is set to On, "Not Available" screen appears when the buttons on . F Skips backward. D Stops playback. If the POWER button is restored (as if the GameTimer had ...
...S Begins playback. G Skips forward. J Fast-forwards. O Closes the menu. Locking the control panel You can use the remote control to control Toshiba REGZA-LINK® compatible devices from being changed accidentally (by children, for example). A Pauses the picture during play or record mode. Returns to Off...the Input Lock (- To unlock the control panel: Select Off in the REGZA-LINK Setup menu is set to On, "Not Available" screen appears when the buttons on . F Skips backward. D Stops playback. If the POWER button is restored (as if the GameTimer had ...

User Manual
Page 41
... If the edges of malfunction. Analog When viewing the HDMI 3 input or HDMI 4 input, analog audio from the HDMI input is not displayed. Note: The screen is set to Digital when Side Shared Audio is no PC input signal, this is available, it will be not available. 4 Press B or b to select... adjusting the PC settings. within ±5 from center. Press . within ±15 from center. * The default settings and /or adjustment ranges vary depending on the screen. Note: • HDMI 3 Audio is set to select PC Settings.
... If the edges of malfunction. Analog When viewing the HDMI 3 input or HDMI 4 input, analog audio from the HDMI input is not displayed. Note: The screen is set to Digital when Side Shared Audio is no PC input signal, this is available, it will be not available. 4 Press B or b to select... adjusting the PC settings. within ±5 from center. Press . within ±15 from center. * The default settings and /or adjustment ranges vary depending on the screen. Note: • HDMI 3 Audio is set to select PC Settings.

User Manual
Page 43
... itself off . 43 Press O. Sleep Timer - Press O. Press . Chapter 6: Basic features Setting Automatic Power Down Setting Blue Screen The TV can be muted when no signal is received. 1 Y > PREFERENCES > Blue Screen. 2 Press C or c to select On. OK 2 Press B or b to select Automatic Power Down. 3 Press C...LED's Dimmer You can change . 4 Press C or c to select Off. Press O. Auto shutdown after 1 hour of no signal) When Blue Screen is set for each input is On. • A warning message will be configured to automatically turn blue and the sound will appear 1 minute before...
... itself off . 43 Press O. Sleep Timer - Press O. Press . Chapter 6: Basic features Setting Automatic Power Down Setting Blue Screen The TV can be muted when no signal is received. 1 Y > PREFERENCES > Blue Screen. 2 Press C or c to select On. OK 2 Press B or b to select Automatic Power Down. 3 Press C...LED's Dimmer You can change . 4 Press C or c to select Off. Press O. Auto shutdown after 1 hour of no signal) When Blue Screen is set for each input is On. • A warning message will be configured to automatically turn blue and the sound will appear 1 minute before...
User Manual
Page 44
...number (if in ANT/CABLE mode) •Input label (if set) •Digital signal strength indicator (bar graph in lower right corner of the screen by pressing B or b while the INFO display is onscreen. Resetting to select No. Select Yes, and press OK . Chapter 6: Basic features ... bottom of box; Note: The location of incoming video signal (4:3 or 16:9) •V-Chip rating status •GameTimer (if set ). 3 A confirmation screen appears. for ATSC signal only) •Stereo, Mono or SAP audio status (when HDMI input mode, PCM) •Video resolution •Aspect ratio of...
...number (if in ANT/CABLE mode) •Input label (if set) •Digital signal strength indicator (bar graph in lower right corner of the screen by pressing B or b while the INFO display is onscreen. Resetting to select No. Select Yes, and press OK . Chapter 6: Basic features ... bottom of box; Note: The location of incoming video signal (4:3 or 16:9) •V-Chip rating status •GameTimer (if set ). 3 A confirmation screen appears. for ATSC signal only) •Stereo, Mono or SAP audio status (when HDMI input mode, PCM) •Video resolution •Aspect ratio of...

User Manual
Page 45
... save separate picture size preferences for any of the picture sizes) depends on the format of the following: • Repeatedly press I . 2 While the Picture Size screen is open, do one of the signal you are examples only. You can view many program formats in 4:3 or Full. 45 OK Note: Some picture...
... save separate picture size preferences for any of the picture sizes) depends on the format of the following: • Repeatedly press I . 2 While the Picture Size screen is open, do one of the signal you are examples only. You can view many program formats in 4:3 or Full. 45 OK Note: Some picture...
User Manual
Page 46
..., XGA, WXGA, and SXGA sources and Photo files) If receiving a squeezed 4:3 format program, the picture is stretched wider to fill the width of the screen but the left and right edges are hidden*. TheaterWide 2 (for letter box programs) A B C D E F G The picture's top and bottom edges... only) This size is displayed with subtitles) A B C D E F G A B C D E F G The picture's top and bottom edges are stretched wider to fill the screen. Normal (for VGA, SVGA, XGA, WXGA, and SXGA sources and Photo files) Some program formats will display with sidebars and/or bars at the top...
..., XGA, WXGA, and SXGA sources and Photo files) If receiving a squeezed 4:3 format program, the picture is stretched wider to fill the width of the screen but the left and right edges are hidden*. TheaterWide 2 (for letter box programs) A B C D E F G The picture's top and bottom edges... only) This size is displayed with subtitles) A B C D E F G A B C D E F G The picture's top and bottom edges are stretched wider to fill the screen. Normal (for VGA, SVGA, XGA, WXGA, and SXGA sources and Photo files) Some program formats will display with sidebars and/or bars at the top...


