User Manual
Page 9
...Connecting a HDMI audio system 20 Connecting a PC 21 Connecting to a home network 22 Chapter 3: Using the remote control 23 Controlling other devices 23 Installing batteries 23 The remote's buttons 24 Chapter 4: Initial Setup and Menu 25 Initial Setup 25 Navigating the menu system 26 Main menu ... . . . . . 38 REGZA-LINK® input source selection 39 Adjusting the amplifier's audio 39 Other REGZA-LINK® functions 39 Connecting a Toshiba PC compatible to REGZA-LINK 40 Using the HDMI® settings feature 40 Setting the HDMI® audio mode 41 Viewing the HDMI® signal...
...Connecting a HDMI audio system 20 Connecting a PC 21 Connecting to a home network 22 Chapter 3: Using the remote control 23 Controlling other devices 23 Installing batteries 23 The remote's buttons 24 Chapter 4: Initial Setup and Menu 25 Initial Setup 25 Navigating the menu system 26 Main menu ... . . . . . 38 REGZA-LINK® input source selection 39 Adjusting the amplifier's audio 39 Other REGZA-LINK® functions 39 Connecting a Toshiba PC compatible to REGZA-LINK 40 Using the HDMI® settings feature 40 Setting the HDMI® audio mode 41 Viewing the HDMI® signal...
User Manual
Page 10
... Limited United States Warranty for LCD Televisions 94 Limited Canadian Warranty for a device code 86 Locking the volume keys 86 Clearing the remote's programming 86 Resetting to the factory default 52 Viewing the TV's brightness 52 Locking the picture settings 52 Adjusting the audio 53 ...HDMI terminals 80 PC IN signal formats 80 HDMI signal formats 81 Remote control functional key chart 82 Operating other devices 85 Programming the remote to operate other devices . . . 85 Device code setup 85 Searching for Toshiba Brand Flat Panel Televisions 95 Index 98 10 TV Widgets 65 ...
... Limited United States Warranty for LCD Televisions 94 Limited Canadian Warranty for a device code 86 Locking the volume keys 86 Clearing the remote's programming 86 Resetting to the factory default 52 Viewing the TV's brightness 52 Locking the picture settings 52 Adjusting the audio 53 ...HDMI terminals 80 PC IN signal formats 80 HDMI signal formats 81 Remote control functional key chart 82 Operating other devices 85 Programming the remote to operate other devices . . . 85 Device code setup 85 Searching for Toshiba Brand Flat Panel Televisions 95 Index 98 10 TV Widgets 65 ...
User Manual
Page 11
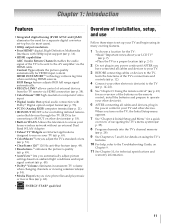
...; qualified Overview of the TV's connections and controls (- p. 12). 4 Connect your LCD TV" (- p. 14-22). 5 See "Chapter 3: Using the remote control" (- p. 18). •Built-in WLAN Allows the television to access your TV. 3 BEFORE connecting cables or devices to the TV, learn the functions...connection with 1080p input support (- Content Type adjusts the picture quality automatically for a quick overview of external devices from the TV remote via the HDMI cable. HDMI INSTAPORT™ technology reduces lag time when switching HDMI sources. When you adjust the TV's ...
...; qualified Overview of the TV's connections and controls (- p. 12). 4 Connect your LCD TV" (- p. 14-22). 5 See "Chapter 3: Using the remote control" (- p. 18). •Built-in WLAN Allows the television to access your TV. 3 BEFORE connecting cables or devices to the TV, learn the functions...connection with 1080p input support (- Content Type adjusts the picture quality automatically for a quick overview of external devices from the TV remote via the HDMI cable. HDMI INSTAPORT™ technology reduces lag time when switching HDMI sources. When you adjust the TV's ...

User Manual
Page 12
TV front Remote Sensor* * Effective range: 16.4 ft (5m) On Timer LED Smart Sensor Touch Sensor See p. 42. Touch key function: - To turn the TV on the TV's ...
TV front Remote Sensor* * Effective range: 16.4 ft (5m) On Timer LED Smart Sensor Touch Sensor See p. 42. Touch key function: - To turn the TV on the TV's ...
User Manual
Page 14
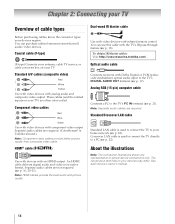
... are not required (- Note: HDMI cables provide the best audio and picture quality. To obtain IR blaster cables: Visit http://ceaccessories.toshiba.com/ . The input/output terminals on your TV. Chapter 2: Connecting your TV Overview of typical device connections only. Separate audio cables... are required. You can purchase cables from most stores that sell audio/video devices. You can use this cable with infrared remote control. Separate audio cables are often color-coded. p. 21). Coaxial cable (F-type) (F-type) Connects your antenna, cable TV ...
... are not required (- Note: HDMI cables provide the best audio and picture quality. To obtain IR blaster cables: Visit http://ceaccessories.toshiba.com/ . The input/output terminals on your TV. Chapter 2: Connecting your TV Overview of typical device connections only. Separate audio cables... are required. You can purchase cables from most stores that sell audio/video devices. You can use this cable with infrared remote control. Separate audio cables are often color-coded. p. 21). Coaxial cable (F-type) (F-type) Connects your antenna, cable TV ...

User Manual
Page 16
... need a High Speed HDMI cable. To connect an HDMI device, you will need: •one HDMI cable per HDMI device - Note: To program the TV remote control to Off (- Configuration is only available on HDMI 3 and HDMI 4. Supported signal formats: VGA, SVGA, XGA, WXGA, SXGA, 480i (60Hz), 480p (60Hz), 720p (60Hz...
... need a High Speed HDMI cable. To connect an HDMI device, you will need: •one HDMI cable per HDMI device - Note: To program the TV remote control to Off (- Configuration is only available on HDMI 3 and HDMI 4. Supported signal formats: VGA, SVGA, XGA, WXGA, SXGA, 480i (60Hz), 480p (60Hz), 720p (60Hz...
User Manual
Page 17
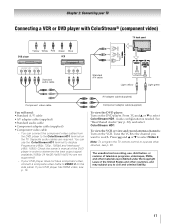
... configuration is prohibited under the Copyright Laws of the DVD player in order to watch. p. 30), and select ColorStream HD1. Note: To program the TV remote control to display Progressive (480p, 720p, 1080p) and Interlaced (480i, 1080i). G Component adapter cable (supplied) To view the DVD player: Turn on the TV. The...
... configuration is prohibited under the Copyright Laws of the DVD player in order to watch. p. 30), and select ColorStream HD1. Note: To program the TV remote control to display Progressive (480p, 720p, 1080p) and Interlaced (480i, 1080i). G Component adapter cable (supplied) To view the DVD player: Turn on the TV. The...

User Manual
Page 18
... press POWER again. 5 Repeat the previous steps if necessary. p. 14) •Other cables as required to connect the device(s) to remotely operate many infrared remote-controlled devices enclosed in a similar manner. Chapter 3) toward the front of the TV and press the button for this step.) 3 If...player (for example) Front of IR-controlled audio device (for example) Infrared sensor To control the device(s): Point either the device's remote control or the TV remote control (that you cannot locate the device's infrared sensor: 1 Turn off the device. 2 Starting at the device's lower-left ...
... press POWER again. 5 Repeat the previous steps if necessary. p. 14) •Other cables as required to connect the device(s) to remotely operate many infrared remote-controlled devices enclosed in a similar manner. Chapter 3) toward the front of the TV and press the button for this step.) 3 If...player (for example) Front of IR-controlled audio device (for example) Infrared sensor To control the device(s): Point either the device's remote control or the TV remote control (that you cannot locate the device's infrared sensor: 1 Turn off the device. 2 Starting at the device's lower-left ...
User Manual
Page 19
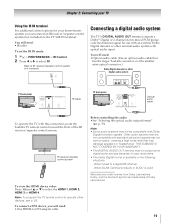
...the larger TosLink connector, not the smaller mini-optical connector.) Dolby Digital decoder or other external audio system with this connection, point the Toshiba TV remote control toward the front of the IR receiver/repeater control system. You will need : •IR cable To set the IR IN ...back panel Optical audio cable To operate the TV with optical audio input. Manufactured under license from Dolby Laboratories. Note: To program the TV remote control to a digital RF channel. - To connect a DVI device, you can connect an IR receiver/repeater control system (not included)...
...the larger TosLink connector, not the smaller mini-optical connector.) Dolby Digital decoder or other external audio system with this connection, point the Toshiba TV remote control toward the front of the IR receiver/repeater control system. You will need : •IR cable To set the IR IN ...back panel Optical audio cable To operate the TV with optical audio input. Manufactured under license from Dolby Laboratories. Note: To program the TV remote control to a digital RF channel. - To connect a DVI device, you can connect an IR receiver/repeater control system (not included)...
User Manual
Page 20
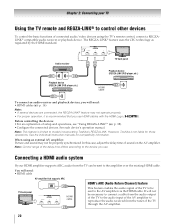
...use HDMI cables with the HDMI Logo ( ). Before controlling the devices: •For an explanation of sound on the AV amplifier. However, Toshiba is recommended that supports ARC HDMI's ARC (Audio Return Channel) feature TV back panel HDMI cable This feature enables the audio signal of the AV...-LINK® feature uses the CEC technology as regulated by the HDMI standard. See each device's operation manual. When using the TV's remote control, connect a REGZALINK® compatible audio receiver or playback device. Connecting a HDMI audio system If your TV Using the TV...
...use HDMI cables with the HDMI Logo ( ). Before controlling the devices: •For an explanation of sound on the AV amplifier. However, Toshiba is recommended that supports ARC HDMI's ARC (Audio Return Channel) feature TV back panel HDMI cable This feature enables the audio signal of the AV...-LINK® feature uses the CEC technology as regulated by the HDMI standard. See each device's operation manual. When using the TV's remote control, connect a REGZALINK® compatible audio receiver or playback device. Connecting a HDMI audio system If your TV Using the TV...
User Manual
Page 23
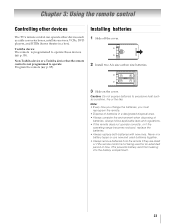
... programmed to operate: Program the remote (- p. 85). Non-Toshiba device or a Toshiba device that the remote control is not being used for an extended period of time. Caution: Do not expose batteries to excessive heat such as cable converter ...HTIBs (home theater in a designated disposal area. • Always consider the environment when disposing of batteries in a box). Chapter 3: Using the remote control Controlling other devices The TV's remote control can operate other devices such as sunshine, fire or the like. Always follow applicable laws and regulations. • If the...
... programmed to operate: Program the remote (- p. 85). Non-Toshiba device or a Toshiba device that the remote control is not being used for an extended period of time. Caution: Do not expose batteries to excessive heat such as cable converter ...HTIBs (home theater in a designated disposal area. • Always consider the environment when disposing of batteries in a box). Chapter 3: Using the remote control Controlling other devices The TV's remote control can operate other devices such as sunshine, fire or the like. Always follow applicable laws and regulations. • If the...

User Manual
Page 24
...61). Adjusts the volume level. The = button is not available. 24 Selects the audio mode. For the REGZA-LINK functions, see "Remote control functional key chart" (- p. 82-84). When the Auto Input feature is pressed. p. 30). Accesses the Favorites List in ...47). Reduces or turns off . Closes onscreen menus. p. 33). Chapter 3: Using the remote control The remote's buttons The buttons described in this section operate the TV only. For a complete list of the remote's functions, see "Using REGZA-LINK®" (- Opens the closed caption selector (- p....
...61). Adjusts the volume level. The = button is not available. 24 Selects the audio mode. For the REGZA-LINK functions, see "Remote control functional key chart" (- p. 82-84). When the Auto Input feature is pressed. p. 30). Accesses the Favorites List in ...47). Reduces or turns off . Closes onscreen menus. p. 33). Chapter 3: Using the remote control The remote's buttons The buttons described in this section operate the TV only. For a complete list of the remote's functions, see "Using REGZA-LINK®" (- Opens the closed caption selector (- p....
User Manual
Page 26
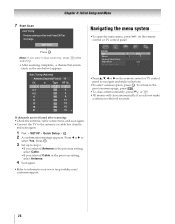
... the TV to select Yes. OK Note: If you selected Cable in the previous setting, select Cable. •If you want to information on the remote control or TV control panel. Press C or c to the antenna or cable box directly and scan again. 1 Y > SETUP > Quick Setup > . OK 3 Set up to ... ATV 11 13 ATV 13 18 ATV 18 31 ATV 31 Navigating the menu system •To open the main menu, press Y on www.tacp.toshiba.com/ customersupport. 26 Chapter 4: Initial Setup and Menu 7 Start Scan Auto Tuning Previous settings will close a menu instantly, press Y or O. •All menus will be...
... the TV to select Yes. OK Note: If you selected Cable in the previous setting, select Cable. •If you want to information on the remote control or TV control panel. Press C or c to the antenna or cable box directly and scan again. 1 Y > SETUP > Quick Setup > . OK 3 Set up to ... ATV 11 13 ATV 13 18 ATV 18 31 ATV 31 Navigating the menu system •To open the main menu, press Y on www.tacp.toshiba.com/ customersupport. 26 Chapter 4: Initial Setup and Menu 7 Start Scan Auto Tuning Previous settings will close a menu instantly, press Y or O. •All menus will be...

User Manual
Page 27
Note: Quick menu items are different depending on the remote control or TV control panel. Quick menu Item PICTURE Picture Mode Picture Size Photo Frame Sort Repeat SOUND Background Music Speakers Channel Browser Media Player ...
Note: Quick menu items are different depending on the remote control or TV control panel. Quick menu Item PICTURE Picture Mode Picture Size Photo Frame Sort Repeat SOUND Background Music Speakers Channel Browser Media Player ...

User Manual
Page 28
... them in the TV's memory. Press O Smart Sound Equalizer You can choose from memory. 28 To cancel the selection or adjustment, select Cancel on the remote control or the control panel, store those channels in its memory. OK 3 Select an option: • Time Zone • Daylight Saving Time 4 Press C or c to...
... them in the TV's memory. Press O Smart Sound Equalizer You can choose from memory. 28 To cancel the selection or adjustment, select Cancel on the remote control or the control panel, store those channels in its memory. OK 3 Select an option: • Time Zone • Daylight Saving Time 4 Press C or c to...

User Manual
Page 29
... select a channel to be skipped over when selecting inputs in memory, use buttons 0-9 and = on the remote control to start Auto Tuning or O to repeat the setup unless your TV Option Cable Antenna Description Note:... into memory. Press the RED button to turn on the remote control. Press the RED button to turn off Skip. 29 See "Skipping channels". OK 2 Use buttons 0-9... on the remote control. 1 Y > SETUP > Auto Tuning > . OK 3 Press OK to enter the channel number (for ...
... select a channel to be skipped over when selecting inputs in memory, use buttons 0-9 and = on the remote control to start Auto Tuning or O to repeat the setup unless your TV Option Cable Antenna Description Note:... into memory. Press the RED button to turn on the remote control. Press the RED button to turn off Skip. 29 See "Skipping channels". OK 2 Use buttons 0-9... on the remote control. 1 Y > SETUP > Auto Tuning > . OK 3 Press OK to enter the channel number (for ...

User Manual
Page 30
... inputs The input labels are shown in the input selector, and in step 2. You can change TV inputs using the MODE SELECT buttons on the remote control: TV, CABLE/SAT, BD, DVD, VCR/PVR, AUX. OK 2 Press B or b to select User Input. Press C or c to select --, Amplifier, Cable, DVD, Game, PC...
... inputs The input labels are shown in the input selector, and in step 2. You can change TV inputs using the MODE SELECT buttons on the remote control: TV, CABLE/SAT, BD, DVD, VCR/PVR, AUX. OK 2 Press B or b to select User Input. Press C or c to select --, Amplifier, Cable, DVD, Game, PC...
User Manual
Page 31
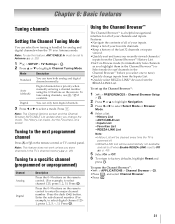
...is powered off when Enable REGZA-LINK is set to enter the major channel number. Press O. OK Press the 0-9 buttons on the remote control or TV control panel. Features: •Navigate the contents of all of the last 32 channels or inputs viewed. •...8226;Y > APPLICATIONS > Channel Browser > . OK •Press , and select Channel Browser. •Press . 31 Tuning to the next programmed channel Press < or , on the remote control to Off (- Tuning to select channel 125, press 1, 2, 5.) Press . Note: To use < / , if available. OK 2 Press B or b to factory defaults,...
...is powered off when Enable REGZA-LINK is set to enter the major channel number. Press O. OK Press the 0-9 buttons on the remote control or TV control panel. Features: •Navigate the contents of all of the last 32 channels or inputs viewed. •...8226;Y > APPLICATIONS > Channel Browser > . OK •Press , and select Channel Browser. •Press . 31 Tuning to the next programmed channel Press < or , on the remote control to Off (- Tuning to select channel 125, press 1, 2, 5.) Press . Note: To use < / , if available. OK 2 Press B or b to factory defaults,...

User Manual
Page 32
... Channel Browser™ Favorites list regardless of the Channel Browser™. Note: Additions are tuned for at least 5 seconds using the numeric buttons on the remote control. •Channels that are added to the History List and displays it to the beginning of the Favorites list on the right side of...
... Channel Browser™ Favorites list regardless of the Channel Browser™. Note: Additions are tuned for at least 5 seconds using the numeric buttons on the remote control. •Channels that are added to the History List and displays it to the beginning of the Favorites list on the right side of...

User Manual
Page 33
... After pressing and then changing channels again, the memory is set to the TV (- p. 30). In this case, the label (- "Labeling video inputs" on the remote control or TV control panel. 2 Change the input: •Press 0-8. •Repeatedly press B or b. The channel has been programmed to select a HDMI input. 2... message "Memorized" appears. To select a REGZA-LINK® device: 1 Press B or b to the button. 3 You can select a video input source in the remote control by repeatedly pressing + or B or b. The list of REGZA-LINK® devices for external inputs.
... After pressing and then changing channels again, the memory is set to the TV (- p. 30). In this case, the label (- "Labeling video inputs" on the remote control or TV control panel. 2 Change the input: •Press 0-8. •Repeatedly press B or b. The channel has been programmed to select a HDMI input. 2... message "Memorized" appears. To select a REGZA-LINK® device: 1 Press B or b to the button. 3 You can select a video input source in the remote control by repeatedly pressing + or B or b. The list of REGZA-LINK® devices for external inputs.


