User Manual
Page 2
...INSTALLERS This is intended to alert the user to the presence of this television for wall mounting this apparatus must be heavy. 2 TOSHIBA Cares! • The consumer electronics industry is appropriate. Follow the manufacturer's recommendations for installation. WARNING RISK OF ELECTRIC SHOCK DO NOT... on p. 4. However, flat panel display, always: • Use a mount that has been recommended by the display manufacturer and/or listed by the display and wall mount manufacturers. • If you have any wall bracket other than life" flat panel display. • ...
...INSTALLERS This is intended to alert the user to the presence of this television for wall mounting this apparatus must be heavy. 2 TOSHIBA Cares! • The consumer electronics industry is appropriate. Follow the manufacturer's recommendations for installation. WARNING RISK OF ELECTRIC SHOCK DO NOT... on p. 4. However, flat panel display, always: • Use a mount that has been recommended by the display manufacturer and/or listed by the display and wall mount manufacturers. • If you have any wall bracket other than life" flat panel display. • ...

User Manual
Page 5
...lay the front of the TV. Five screws 5 To secure the TV in death or serious injury. To Display your LCD TV, always use a UL Listed wall bracket appropriate for the size and weight of the TV. 3) Be sure to secure the TV to place the spacers provided with the TV... the TV as a quilt or blanket. Remove the four screws. (Do not use these sounds become frequent or continuous, unplug the power cord and contact a Toshiba Authorized Service Center. 42) WARNING: RISK OF SERIOUS PERSONAL INJURY OR EQUIPMENT DAMAGE! 41) During normal use, the TV may make sure the appropriate bracket...
...lay the front of the TV. Five screws 5 To secure the TV in death or serious injury. To Display your LCD TV, always use a UL Listed wall bracket appropriate for the size and weight of the TV. 3) Be sure to secure the TV to place the spacers provided with the TV... the TV as a quilt or blanket. Remove the four screws. (Do not use these sounds become frequent or continuous, unplug the power cord and contact a Toshiba Authorized Service Center. 42) WARNING: RISK OF SERIOUS PERSONAL INJURY OR EQUIPMENT DAMAGE! 41) During normal use, the TV may make sure the appropriate bracket...

User Manual
Page 24
... a still picture (- Selects the audio mode. The selected MODE key blinks each time any key is onscreen. p. 53). Accesses the Favorites List in the main menu system. The = button is onscreen, these keys to enter 2- p. 47). Chapter 3: Using the remote control The ...). p. 26, 27). Selects the picture size (- p. 34). For the REGZA-LINK functions, see "Remote control functional key chart" (- For a complete list of the remote's functions, see "Using REGZA-LINK®" (- part channel numbers (- Displays NET TV™ menu (- Accesses Quick menu. p. 65). ...
... a still picture (- Selects the audio mode. The selected MODE key blinks each time any key is onscreen. p. 53). Accesses the Favorites List in the main menu system. The = button is onscreen, these keys to enter 2- p. 47). Chapter 3: Using the remote control The ...). p. 26, 27). Selects the picture size (- p. 34). For the REGZA-LINK functions, see "Remote control functional key chart" (- For a complete list of the remote's functions, see "Using REGZA-LINK®" (- part channel numbers (- Displays NET TV™ menu (- Accesses Quick menu. p. 65). ...
User Manual
Page 26
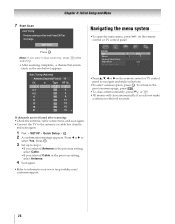
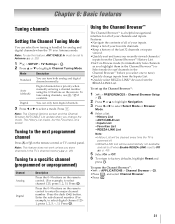
...ATV 11 13 ATV 13 18 ATV 18 31 ATV 31 Navigating the menu system •To open the main menu, press Y on www.tacp.toshiba.com/ customersupport. 26 SOUND MTS Balance Advanced Sound Settings Dolby Volume Dynamic Range Control Stereo 0 Low Off •Press B, b, C or c on...in the previous setting, select Antenna. 4 Scan again. •Refer to stop scanning, press O while scanning. • After scanning completes, a channel list screen (such as the one below) appears. If channels are not found after scanning: •Check the antenna/cable connections, and scan again. •...
...ATV 11 13 ATV 13 18 ATV 18 31 ATV 31 Navigating the menu system •To open the main menu, press Y on www.tacp.toshiba.com/ customersupport. 26 SOUND MTS Balance Advanced Sound Settings Dolby Volume Dynamic Range Control Stereo 0 Low Off •Press B, b, C or c on...in the previous setting, select Antenna. 4 Scan again. •Refer to stop scanning, press O while scanning. • After scanning completes, a channel list screen (such as the one below) appears. If channels are not found after scanning: •Check the antenna/cable connections, and scan again. •...

User Manual
Page 29
..., auto tuning deletes previously stored channels from memory. OK 2 Use buttons 0-9 on the remote control to abort. Type ATV DTV Description Analog channel. OK The list of the screen. OK The box is known. 1 Y > SETUP > Manual Tuning > . To turn off skip: 1 Y > PREFERENCES > AV Connection > . ... a channel to select the skipped item. OK 3 Press B or b to skip. Auto tuning retains stored channels and stores newly found are listed at the bottom of channels appears. OK 3 Press OK to skipped channels using < or ,. Digital channel Skipping channels To prevent a channel from...
..., auto tuning deletes previously stored channels from memory. OK 2 Use buttons 0-9 on the remote control to abort. Type ATV DTV Description Analog channel. OK The list of the screen. OK The box is known. 1 Y > SETUP > Manual Tuning > . To turn off skip: 1 Y > PREFERENCES > AV Connection > . ... a channel to select the skipped item. OK 3 Press B or b to skip. Auto tuning retains stored channels and stores newly found are listed at the bottom of channels appears. OK 3 Press OK to skipped channels using < or ,. Digital channel Skipping channels To prevent a channel from...
User Manual
Page 31
... Standard Auto (default) Digital Description You can only tune digital channels. 3 Press C or c to Antenna (- The History List clears, but the Favorites List is in Antenna mode. OK Using the Channel Browser™ The Channel Browser™ is set up the Channel Browser™:... to select Select Mode or Browser Mode. 4 Select a list. •History List •ANT/CABLE List •Inputs List •Favorites List •REGZA-LINK List Note: • History List will be cleared every time the TV is powered off. • REGZA-LINK List will be set to select a mode. OK 2 Press B...
... Standard Auto (default) Digital Description You can only tune digital channels. 3 Press C or c to Antenna (- The History List clears, but the Favorites List is in Antenna mode. OK Using the Channel Browser™ The Channel Browser™ is set up the Channel Browser™:... to select Select Mode or Browser Mode. 4 Select a list. •History List •ANT/CABLE List •Inputs List •Favorites List •REGZA-LINK List Note: • History List will be cleared every time the TV is powered off. • REGZA-LINK List will be set to select a mode. OK 2 Press B...

User Manual
Page 32
...adds it on the remote control. •Channels that are tuned for 3 seconds. To add a favorite channel or input: 1 Tune to the History List: As a channel or input is turned off the TV. 32 Press C to be tuned. 2 Press . Adding and clearing channels and inputs in... inputs. Chapter 6: Basic features Elements of the Channel Browser™ 1 2 3 4 History 88 Video HDMI 1 11 3 8 VCR DVD 6 5 1 Current list (History, ANT/CABLE, Inputs, Favorites, or REGZA-LINK) 2 Input type 3 Channel or input currently being viewed 4 Channel or input that is integrated into the ...
...adds it on the remote control. •Channels that are tuned for 3 seconds. To add a favorite channel or input: 1 Tune to the History List: As a channel or input is turned off the TV. 32 Press C to be tuned. 2 Press . Adding and clearing channels and inputs in... inputs. Chapter 6: Basic features Elements of the Channel Browser™ 1 2 3 4 History 88 Video HDMI 1 11 3 8 VCR DVD 6 5 1 Current list (History, ANT/CABLE, Inputs, Favorites, or REGZA-LINK) 2 Input type 3 Channel or input currently being viewed 4 Channel or input that is integrated into the ...

User Manual
Page 33
...; Inputs that input appears. 3 If the input has multiple REGZA-LINK® devices, use B or b to select a device. 4 Press . In this case, the label (- The list of REGZA-LINK® devices for about 2 seconds until the message "Memorized" appears. This feature also works for external inputs. 1 Select the first channel you...
...; Inputs that input appears. 3 If the input has multiple REGZA-LINK® devices, use B or b to select a device. 4 Press . In this case, the label (- The list of REGZA-LINK® devices for about 2 seconds until the message "Memorized" appears. This feature also works for external inputs. 1 Select the first channel you...
User Manual
Page 37
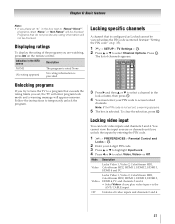
... be viewed unless the PIN code is rated None. OK 2 Press B or b to select Video, Video+ or Off. To clear the selection, press . OK The list of the program you are watching, press on p. 35). 1 Y > SETUP > TV Settings > . Note: If the PIN code is not yet set , the TV will enter...
... be viewed unless the PIN code is rated None. OK 2 Press B or b to select Video, Video+ or Off. To clear the selection, press . OK The list of the program you are watching, press on p. 35). 1 Y > SETUP > TV Settings > . Note: If the PIN code is not yet set , the TV will enter...

User Manual
Page 39
... control to the TV. Amplifier Control If Amplifier Control is set your amplifier. Root Menu Accesses the selected device's top menu. Contents Accesses the contents list when you can set to TV Speakers automatically unless a REGZA-LINK® compatible audio receiver is not available under these conditions: - A non-HDMI input is...
... control to the TV. Amplifier Control If Amplifier Control is set your amplifier. Root Menu Accesses the selected device's top menu. Contents Accesses the contents list when you can set to TV Speakers automatically unless a REGZA-LINK® compatible audio receiver is not available under these conditions: - A non-HDMI input is...

User Manual
Page 51
... B or b to select ColorMaster, press C or c to the factory default 1 Y > PICTURE > Advanced Picture Settings > . Base Color Adjustment When ColorMaster™ is set to On, the list of each color. 1 Y > PICTURE > Expert Picture Settings > . Note: When the Picture Mode is set to Standard, Movie 1, or Movie 2. Resetting to select On. To reset...
... B or b to select ColorMaster, press C or c to the factory default 1 Y > PICTURE > Advanced Picture Settings > . Base Color Adjustment When ColorMaster™ is set to On, the list of each color. 1 Y > PICTURE > Expert Picture Settings > . Note: When the Picture Mode is set to Standard, Movie 1, or Movie 2. Resetting to select On. To reset...
User Manual
Page 62
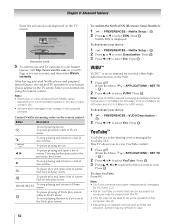
...1 Press . (From the Menu: Y > APPLICATIONS > NET TV > OK .) 2 Press C or c to select Yes. C c To pause playing and open a list of scenes. B To stop playing and return to select Yes. Fast forward play screen while in the upgrade process. Press . OK To close YouTube: Press... or c to select the file you are in PLAY mode. HOME (BLUE) To stop playing and return to select ESN. OK 2 Press B or b to a list of scenes. To deactivate your device: 1 Y > PREFERENCES > VUDU Deactivation > . J To pause play starts. OK Netflix ESN is a video-sharing service managed by...
...1 Press . (From the Menu: Y > APPLICATIONS > NET TV > OK .) 2 Press C or c to select Yes. C c To pause playing and open a list of scenes. B To stop playing and return to select Yes. Fast forward play screen while in the upgrade process. Press . OK To close YouTube: Press... or c to select the file you are in PLAY mode. HOME (BLUE) To stop playing and return to select ESN. OK 2 Press B or b to a list of scenes. To deactivate your device: 1 Y > PREFERENCES > VUDU Deactivation > . J To pause play starts. OK Netflix ESN is a video-sharing service managed by...

User Manual
Page 65
...! ID. 65 TV Widgets allow you to change your Location, Repeat the Tutorial, and Restore Factory Settings, which launches a TV Widget. 2 Focus is the horizontal list of snippets appearing at the bottom of TV Widgets. •The Switch Profile menu allows you to switch to a different user profile. •The Profile... can set the Screen Saver timeout, create the Owner PIN, and to set up multiple profiles for multiple users. •Each profile maintains its own list of your Yahoo!
...! ID. 65 TV Widgets allow you to change your Location, Repeat the Tutorial, and Restore Factory Settings, which launches a TV Widget. 2 Focus is the horizontal list of snippets appearing at the bottom of TV Widgets. •The Switch Profile menu allows you to switch to a different user profile. •The Profile... can set the Screen Saver timeout, create the Owner PIN, and to set up multiple profiles for multiple users. •Each profile maintains its own list of your Yahoo!
User Manual
Page 67
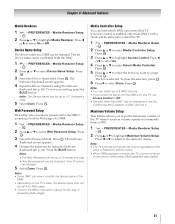
... to accept. Note: • The TV's remote control can select up to 8 DMC devices. • If you would not like to the value in the list. Media Controller Setup You can limit which DMC can be up to Off. • Devices other than DMC may not be changed. Press . OK 5 Press...
... to accept. Note: • The TV's remote control can select up to 8 DMC devices. • If you would not like to the value in the list. Media Controller Setup You can limit which DMC can be up to Off. • Devices other than DMC may not be changed. Press . OK 5 Press...
User Manual
Page 68
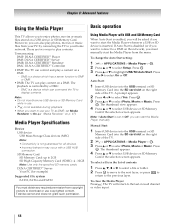
... PC by a DMC. - DMS is set Media Renderer to On (- Note: • Do not insert/remove USB device or SD Memory Card while in the list of the TV. To change the Auto Start setting: 1 Y > APPLICATIONS > Media Player > . Press C or c to play a content on p. 67). Manual Start: 1 Insert USB device into... the menu. DMC is disabled (or if you want to select Setup. SD Memory Card: SD Memory Card: up to select Photo, Movie or Music. Toshiba cannot and does not grant such permission. If Auto Start is a device which has a server function to DMP or DMR. •DMR: The TV can...
... PC by a DMC. - DMS is set Media Renderer to On (- Note: • Do not insert/remove USB device or SD Memory Card while in the list of the TV. To change the Auto Start setting: 1 Y > APPLICATIONS > Media Player > . Press C or c to play a content on p. 67). Manual Start: 1 Insert USB device into... the menu. DMC is disabled (or if you want to select Setup. SD Memory Card: SD Memory Card: up to select Photo, Movie or Music. Toshiba cannot and does not grant such permission. If Auto Start is a device which has a server function to DMP or DMR. •DMR: The TV can...

User Manual
Page 69
... currently active DMSs and the registered DMSs appears. 4 Press B or b to select Done. OK The box is more than one media server on the network, a list of contents: 1 Press B, b, C or c to select a file or folder. 2 Press OK to move to the next layer, or press to return to select .... Select the server you wish to use , and press . The device selection window is closed once and it will be displayed but grayed out in list mode or Multi View mode. 2 Press B or b to select Photo, Movie, or Music. Chapter 8: Advanced features Using Media Player with DLNA CERTIFIED™ Server...
... currently active DMSs and the registered DMSs appears. 4 Press B or b to select Done. OK The box is more than one media server on the network, a list of contents: 1 Press B, b, C or c to select a file or folder. 2 Press OK to move to the next layer, or press to return to select .... Select the server you wish to use , and press . The device selection window is closed once and it will be displayed but grayed out in list mode or Multi View mode. 2 Press B or b to select Photo, Movie, or Music. Chapter 8: Advanced features Using Media Player with DLNA CERTIFIED™ Server...

User Manual
Page 70
... able to be able to select Off, All or 1. 3 Press . To sort the folders and files: 1 Press to open the Quick menu in the list of the current file. "To select a file in list mode. 2 Press B or b to select Sort. 3 Press C or c to select File Name(Title), New or Old to the... list. Note: • If the previous or next file is not compatible, it is skipped automatically. • When the TV is used as a DMR, this feature ...
... able to be able to select Off, All or 1. 3 Press . To sort the folders and files: 1 Press to open the Quick menu in the list of the current file. "To select a file in list mode. 2 Press B or b to select Sort. 3 Press C or c to select File Name(Title), New or Old to the... list. Note: • If the previous or next file is not compatible, it is skipped automatically. • When the TV is used as a DMR, this feature ...

User Manual
Page 71
... is skipped automatically. • When the TV is not compatible, it takes some time to stop playback. p. 68). If a user selects Digital Video Camera, AVCHD list will start playback. 2 Press D to start playing automatically. Each time you press this feature is not controlled by pressing C or c during PAUSE. • PAUSE or...
... is skipped automatically. • When the TV is not compatible, it takes some time to stop playback. p. 68). If a user selects Digital Video Camera, AVCHD list will start playback. 2 Press D to start playing automatically. Each time you press this feature is not controlled by pressing C or c during PAUSE. • PAUSE or...
User Manual
Page 72
... are repeatedly played back. 1 The same content is repeatedly played back. To sort the folders and files: 1 Press to open the Quick menu in the list mode. 2 Press B or b to select Sort. 3 Press C or c to select File Name(Title), New or Old to the date and time when the contents were...
... are repeatedly played back. 1 The same content is repeatedly played back. To sort the folders and files: 1 Press to open the Quick menu in the list mode. 2 Press B or b to select Sort. 3 Press C or c to select File Name(Title), New or Old to the date and time when the contents were...
User Manual
Page 77
... up the IP address. • Internet service is not available. b) the signal reception is set up correctly. or c) the signal reception is available for Toshiba REGZA- The old PIN code clears (- p. 35). • The V-Chip feature is nonstandard (- p. 35). p. 14). Turn off your TV and ... the TV has IP address 192.168.0.101 with LAN cables, if possible, and check connection stability. - Remove AC power from the channel list and reprogram channels into memory (- V-Chip system only (- Unstable network connection • When using a wired home-network connection, unplug the LAN ...
... up the IP address. • Internet service is not available. b) the signal reception is set up correctly. or c) the signal reception is available for Toshiba REGZA- The old PIN code clears (- p. 35). • The V-Chip feature is nonstandard (- p. 35). p. 14). Turn off your TV and ... the TV has IP address 192.168.0.101 with LAN cables, if possible, and check connection stability. - Remove AC power from the channel list and reprogram channels into memory (- V-Chip system only (- Unstable network connection • When using a wired home-network connection, unplug the LAN ...

