
User Manual
Page 13
Contents Introduction 23 This guide 23 Safety icons 24 Other icons used 25 Other documentation 25 Service options 26 Chapter 1: Finding Your Way Around 27 Making sure you have everything 27 Front with the display closed 28 Back 29 Right side 30 Left side 32 Front with the display open 34 Keyboard indicator panel 36 System indicator panel 37 CD/DVD control buttons 38 Underside 39 13
Contents Introduction 23 This guide 23 Safety icons 24 Other icons used 25 Other documentation 25 Service options 26 Chapter 1: Finding Your Way Around 27 Making sure you have everything 27 Front with the display closed 28 Back 29 Right side 30 Left side 32 Front with the display open 34 Keyboard indicator panel 36 System indicator panel 37 CD/DVD control buttons 38 Underside 39 13
User Manual
Page 14
...-friendly environment....... 41 Keeping yourself comfortable 42 Precautions 45 Setting up your computer 46 Setting up your software 47 Registering your computer with Toshiba ......... 48 Installing additional memory (optional 49 Connecting a mouse 53 Connecting a printer 53 Connecting a USB printer 53 Using external display ...on the computer 54 Adjusting the quality of the external display..... 55 Connecting an external diskette drive 55 Using an external keyboard 56 Connecting the AC adapter 56 Charging the battery 58 Using the computer for the first time 59 Opening the display ...
...-friendly environment....... 41 Keeping yourself comfortable 42 Precautions 45 Setting up your computer 46 Setting up your software 47 Registering your computer with Toshiba ......... 48 Installing additional memory (optional 49 Connecting a mouse 53 Connecting a printer 53 Connecting a USB printer 53 Using external display ...on the computer 54 Adjusting the quality of the external display..... 55 Connecting an external diskette drive 55 Using an external keyboard 56 Connecting the AC adapter 56 Charging the battery 58 Using the computer for the first time 59 Opening the display ...
User Manual
Page 15
... Character keys 88 Ctrl, Fn, and Alt keys 89 Function keys 89 Windows® special keys 89 Overlay keys 90 Emulating a full-size keyboard 92 TOSHIBA Console button 92 Starting a program 93 Saving your work 93 Printing your work 94 Using diskettes 95 Inserting and removing diskettes 96 Caring for diskettes ...
... Character keys 88 Ctrl, Fn, and Alt keys 89 Function keys 89 Windows® special keys 89 Overlay keys 90 Emulating a full-size keyboard 92 TOSHIBA Console button 92 Starting a program 93 Saving your work 93 Printing your work 94 Using diskettes 95 Inserting and removing diskettes 96 Caring for diskettes ...

User Manual
Page 20
20 Contents Power Management 215 Toshiba Hardware Setup 218 cPad Properties 220 Chapter 8: WinDVD 221 Playing DVDs 221 Using the WinDVD slider bar (location) ......... 223 Using the WinDVD control panel 224 ... of action 239 Resolving hardware conflicts on your own .... 239 Fixing a problem with Device Manager .......... 240 Memory module problems 242 Power and the batteries 243 Keyboard problems 244 Display problems 245 Disk drive problems 247
20 Contents Power Management 215 Toshiba Hardware Setup 218 cPad Properties 220 Chapter 8: WinDVD 221 Playing DVDs 221 Using the WinDVD slider bar (location) ......... 223 Using the WinDVD control panel 224 ... of action 239 Resolving hardware conflicts on your own .... 239 Fixing a problem with Device Manager .......... 240 Memory module problems 242 Power and the batteries 243 Keyboard problems 244 Display problems 245 Disk drive problems 247
User Manual
Page 21
...good computing habits 261 If you need further assistance 262 Before you call 263 Contacting Toshiba 263 Other Toshiba Internet Web sites 264 Toshiba's worldwide offices 265 Appendix A: Hot Keys 268 Volume Mute 268 Instant password security... 269 Without a password 269 With a password 269 Power usage mode 270 Stand by mode 271 Hibernation mode 272 Display modes 273 Display brightness 274 Enabling a wireless device 274 Disabling or enabling the TouchPad or cPad ....... 275 Keyboard...
...good computing habits 261 If you need further assistance 262 Before you call 263 Contacting Toshiba 263 Other Toshiba Internet Web sites 264 Toshiba's worldwide offices 265 Appendix A: Hot Keys 268 Volume Mute 268 Instant password security... 269 Without a password 269 With a password 269 Power usage mode 270 Stand by mode 271 Hibernation mode 272 Display modes 273 Display brightness 274 Enabling a wireless device 274 Disabling or enabling the TouchPad or cPad ....... 275 Keyboard...
User Manual
Page 31
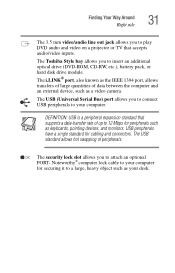
... USB is a peripheral expansion standard that accepts audio/video inputs. Noteworthy® computer lock cable to your computer for cabling and connectors. The Toshiba Style bay allows you to connect USB peripherals to your desk. The i.LINK® port, also known as the IEEE 1394 port, allows ...transfers of large quantities of up to 12 Mbps for peripherals such as keyboards, pointing devices, and monitors. USB peripherals have a single standard for securing it to a large, heavy object such as a video camera. The USB (...
... USB is a peripheral expansion standard that accepts audio/video inputs. Noteworthy® computer lock cable to your computer for cabling and connectors. The Toshiba Style bay allows you to connect USB peripherals to your desk. The i.LINK® port, also known as the IEEE 1394 port, allows ...transfers of large quantities of up to 12 Mbps for peripherals such as keyboards, pointing devices, and monitors. USB peripherals have a single standard for securing it to a large, heavy object such as a video camera. The USB (...
User Manual
Page 34
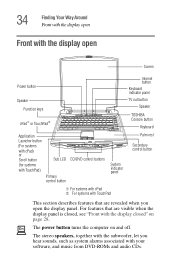
... speakers, together with the subwoofer, let you open Screen Power button Speaker Function keys cPad➀ or TouchPad➁ Internet button Keyboard indicator panel TV out button Speaker TOSHIBA Console button Keyboard Application Launcher button (For systems with cPad) or Scroll button (for systems with TouchPad) Sub LCD Primary control button CD/DVD...
... speakers, together with the subwoofer, let you open Screen Power button Speaker Function keys cPad➀ or TouchPad➁ Internet button Keyboard indicator panel TV out button Speaker TOSHIBA Console button Keyboard Application Launcher button (For systems with cPad) or Scroll button (for systems with TouchPad) Sub LCD Primary control button CD/DVD...

User Manual
Page 36
...to assist you turn on the computer" on , pressing an overlay key moves the cursor in maintaining proper posture while using the computer. Keyboard indicator panel Cursor control mode light Numeric mode light Caps lock light The cursor control mode light glows when the cursor control overlay is ...on page 54. For more information, see "TOSHIBA Console button" on page 36. The 85-key keyboard provides all the functionality of the arrow For more information, see "Directing the display output when you in the ...
...to assist you turn on the computer" on , pressing an overlay key moves the cursor in maintaining proper posture while using the computer. Keyboard indicator panel Cursor control mode light Numeric mode light Caps lock light The cursor control mode light glows when the cursor control overlay is ...on page 54. For more information, see "TOSHIBA Console button" on page 36. The 85-key keyboard provides all the functionality of the arrow For more information, see "Directing the display output when you in the ...
User Manual
Page 43
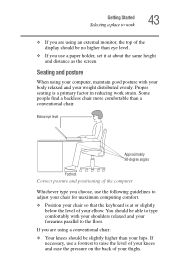
... body relaxed and your elbow. If you choose, use a footrest to adjust your chair for maximum computing comfort. ❖ Position your chair so that the keyboard is a primary factor in reducing work 43 ❖ If you use a paper holder, set it at or slightly below the level of your weight distributed...
... body relaxed and your elbow. If you choose, use a footrest to adjust your chair for maximum computing comfort. ❖ Position your chair so that the keyboard is a primary factor in reducing work 43 ❖ If you use a paper holder, set it at or slightly below the level of your weight distributed...
User Manual
Page 44
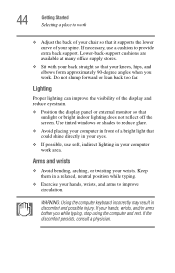
..., wrists, and arms to reduce glare. ❖ Avoid placing your computer in a relaxed, neutral position while typing. ❖ Exercise your wrists. WARNING: Using the computer keyboard incorrectly may result in your spine. If necessary, use soft, indirect lighting in discomfort and possible injury. Do not slump forward or lean back too...
..., wrists, and arms to reduce glare. ❖ Avoid placing your computer in a relaxed, neutral position while typing. ❖ Exercise your wrists. WARNING: Using the computer keyboard incorrectly may result in your spine. If necessary, use soft, indirect lighting in discomfort and possible injury. Do not slump forward or lean back too...

User Manual
Page 46
... can become hot even if only one is reading from or writing to be charged before you buy from objects that gets into the computer's keyboard. If two cards are installed, both . ❖ Keep the computer and disks away from a supplier may damage the disk, the drive, or ...become hot with prolonged use it again. ❖ Never turn off overnight to check for a long period. ❖ Avoid spilling liquids into the keyboard, turn off the computer if a drive-in its operation. Turning off the computer while it dry out before you must attach the AC adapter. Occasionally...
... can become hot even if only one is reading from or writing to be charged before you buy from objects that gets into the computer's keyboard. If two cards are installed, both . ❖ Keep the computer and disks away from a supplier may damage the disk, the drive, or ...become hot with prolonged use it again. ❖ Never turn off overnight to check for a long period. ❖ Avoid spilling liquids into the keyboard, turn off the computer if a drive-in its operation. Turning off the computer while it dry out before you must attach the AC adapter. Occasionally...
User Manual
Page 48
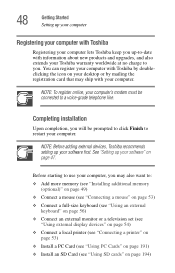
...you may ship with Toshiba by mailing the registration card that may also want to: ❖ Add more memory (see "Installing additional memory (optional)" on page 49) ❖ Connect a mouse (see "Connecting a mouse" on page 53) ❖ Connect a full-size keyboard (see "Using an external keyboard" on page 56)...Cards" on page 191) ❖ Install an SD Card (see "Using SD cards" on page 194) NOTE: Before adding external devices, Toshiba recommends setting up your software" on your computer, you will be connected to a voice-grade telephone line. Before starting to use your desktop or...
...you may ship with Toshiba by mailing the registration card that may also want to: ❖ Add more memory (see "Installing additional memory (optional)" on page 49) ❖ Connect a mouse (see "Connecting a mouse" on page 53) ❖ Connect a full-size keyboard (see "Using an external keyboard" on page 56)...Cards" on page 191) ❖ Install an SD Card (see "Using SD cards" on page 194) NOTE: Before adding external devices, Toshiba recommends setting up your software" on your computer, you will be connected to a voice-grade telephone line. Before starting to use your desktop or...

User Manual
Page 56
... cable to the AC adapter. 2 Plug the AC adapter into the DC-IN on the computer. To connect a keyboard, attach its cable to one of the computer. 56 Getting Started Using an external keyboard To connect an external USB diskette drive, connect the cable to one to your computer provided that the... The AC adapter enables you can do this after you turn on the back of the computer's USB ports. Using an external keyboard If you prefer to use a full-size keyboard, you to power the computer from an AC outlet and to charge the computer's batteries. You can attach one of the...
... cable to the AC adapter. 2 Plug the AC adapter into the DC-IN on the computer. To connect a keyboard, attach its cable to one of the computer. 56 Getting Started Using an external keyboard To connect an external USB diskette drive, connect the cable to one to your computer provided that the... The AC adapter enables you can do this after you turn on the back of the computer's USB ports. Using an external keyboard If you prefer to use a full-size keyboard, you to power the computer from an AC outlet and to charge the computer's batteries. You can attach one of the...

User Manual
Page 59
Turning on the power 1 Check that it moves easily. On 3 Turn on the computer by pressing the power button located above the keyboard. Getting Started Using the computer for the first time 59 Using the computer for the first time Opening the display panel Slide the display latch ...
Turning on the power 1 Check that it moves easily. On 3 Turn on the computer by pressing the power button located above the keyboard. Getting Started Using the computer for the first time 59 Using the computer for the first time Opening the display panel Slide the display latch ...
User Manual
Page 62
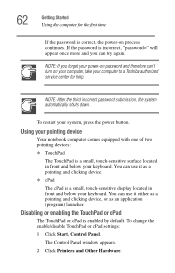
... computer comes equipped with one of two pointing devices: ❖ TouchPad The TouchPad is a small, touch-sensitive display located in front and below your keyboard. You can use it either as a pointing and clicking device, or as a pointing and clicking device. ❖ cPad The cPad is a small... password and therefore can try again. The Control Panel window appears. 2 Click Printers and Other Hardware. To restart your computer to a Toshiba authorized service center for the first time If the password is enabled by default. Disabling or enabling the TouchPad or cPad The TouchPad or ...
... computer comes equipped with one of two pointing devices: ❖ TouchPad The TouchPad is a small, touch-sensitive display located in front and below your keyboard. You can use it either as a pointing and clicking device, or as a pointing and clicking device. ❖ cPad The cPad is a small... password and therefore can try again. The Control Panel window appears. 2 Click Printers and Other Hardware. To restart your computer to a Toshiba authorized service center for the first time If the password is enabled by default. Disabling or enabling the TouchPad or cPad The TouchPad or ...

User Manual
Page 71
... appears on the note, the number "+1" changes to reach the highest-numbered note, then press the key again. You can view a note by using the keyboard. 3 Start writing or typing. The moment you are going to type using the "greater than" (>) and "less than" () on the Sticky Note screen). To delete...
... appears on the note, the number "+1" changes to reach the highest-numbered note, then press the key again. You can view a note by using the keyboard. 3 Start writing or typing. The moment you are going to type using the "greater than" (>) and "less than" () on the Sticky Note screen). To delete...
User Manual
Page 85
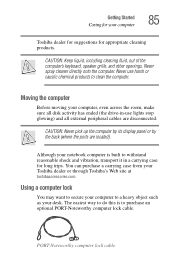
...(where the ports are disconnected. Moving the computer Before moving your notebook computer is to a heavy object such as your Toshiba dealer or through Toshiba's Web site at toshibaaccessories.com. You can purchase a carrying case from your desk. CAUTION: Keep liquid, including cleaning... fluid, out of the computer's keyboard, speaker grille, and other openings. Although your computer, even across the room, make sure all ...
...(where the ports are disconnected. Moving the computer Before moving your notebook computer is to a heavy object such as your Toshiba dealer or through Toshiba's Web site at toshibaaccessories.com. You can purchase a carrying case from your desk. CAUTION: Keep liquid, including cleaning... fluid, out of the computer's keyboard, speaker grille, and other openings. Although your computer, even across the room, make sure all ...
User Manual
Page 88
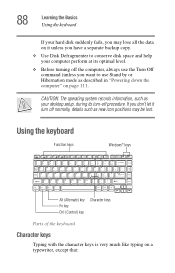
... computer perform at its turn off procedure. End 1 2 PgDn 3 + Ins 0 Del / End Alt (Alternate) key Fn key Ctrl (Control) key Character keys Parts of the keyboard Character keys Typing with the character keys is very much like typing on page 111. 88 Learning the Basics Using the... keyboard If your hard disk suddenly fails, you may be lost. If you don't let it unless you have a separate backup copy. ❖ Use Disk Defragmenter ...
... computer perform at its turn off procedure. End 1 2 PgDn 3 + Ins 0 Del / End Alt (Alternate) key Fn key Ctrl (Control) key Character keys Parts of the keyboard Character keys Typing with the character keys is very much like typing on page 111. 88 Learning the Basics Using the... keyboard If your hard disk suddenly fails, you may be lost. If you don't let it unless you have a separate backup copy. ❖ Use Disk Defragmenter ...
User Manual
Page 89
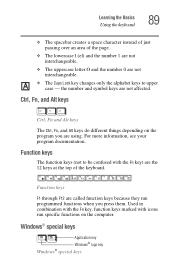
... Ctrl, Fn, and Alt keys do different things depending on the computer. Learning the Basics Using the keyboard 89 ❖ The spacebar creates a space character instead of just passing over an area of the keyboard. Used in combination with the Fn key, function keys marked with the Fn key) are the 12...
... Ctrl, Fn, and Alt keys do different things depending on the computer. Learning the Basics Using the keyboard 89 ❖ The spacebar creates a space character instead of just passing over an area of the keyboard. Used in combination with the Fn key, function keys marked with the Fn key) are the 12...

User Manual
Page 90
...form the numeric and cursor overlay. L : PgDn 3 ; + > ? . This overlay lets you would using the ten-key keypad on . Del . / / End Sample keyboard overlay keys The keys with numbers and symbols on the numeric keypad overlay, press Fn and F11 simultaneously. 90 Learning the Basics Using the... keyboard The keyboard provides two keys that have special functions in the operating system: ❖ The Windows® logo key opens the Start menu. &#...
...form the numeric and cursor overlay. L : PgDn 3 ; + > ? . This overlay lets you would using the ten-key keypad on . Del . / / End Sample keyboard overlay keys The keys with numbers and symbols on the numeric keypad overlay, press Fn and F11 simultaneously. 90 Learning the Basics Using the... keyboard The keyboard provides two keys that have special functions in the operating system: ❖ The Windows® logo key opens the Start menu. &#...

