Brochure
Page 2
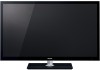
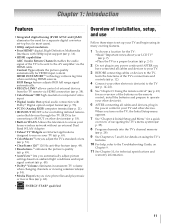
... Built-in TV Tuning Auto Aspect Control Photo Viewer Photo Frame Capability Input Labeling Channel BrowserTM/Favorites Quick Menu Sleep Timer On Timer Remote Control ENERGY STAR® Qualified Touch Panel Controls MPEG2 PS, MPEG2 TS, AVCHD, MP4 MP3, MP4 (AAC), LPCM JPEG Net...registered trademark of Video Electronics Standards Association. Care should be subject to third party restrictions. All others are trademarks of Toshiba America Consumer Products, L.L.C. 46VX700U Beautiful design, top-notch picture quality, and a wealth of internet-connected features make the VX700 the TV that you ...
... Built-in TV Tuning Auto Aspect Control Photo Viewer Photo Frame Capability Input Labeling Channel BrowserTM/Favorites Quick Menu Sleep Timer On Timer Remote Control ENERGY STAR® Qualified Touch Panel Controls MPEG2 PS, MPEG2 TS, AVCHD, MP4 MP3, MP4 (AAC), LPCM JPEG Net...registered trademark of Video Electronics Standards Association. Care should be subject to third party restrictions. All others are trademarks of Toshiba America Consumer Products, L.L.C. 46VX700U Beautiful design, top-notch picture quality, and a wealth of internet-connected features make the VX700 the TV that you ...
User Manual
Page 9
...Connecting a HDMI audio system 20 Connecting a PC 21 Connecting to a home network 22 Chapter 3: Using the remote control 23 Controlling other devices 23 Installing batteries 23 The remote's buttons 24 Chapter 4: Initial Setup and Menu 25 Initial Setup 25 Navigating the menu system 26 Main menu ... . . . . . 38 REGZA-LINK® input source selection 39 Adjusting the amplifier's audio 39 Other REGZA-LINK® functions 39 Connecting a Toshiba PC compatible to REGZA-LINK 40 Using the HDMI® settings feature 40 Setting the HDMI® audio mode 41 Viewing the HDMI® signal...
...Connecting a HDMI audio system 20 Connecting a PC 21 Connecting to a home network 22 Chapter 3: Using the remote control 23 Controlling other devices 23 Installing batteries 23 The remote's buttons 24 Chapter 4: Initial Setup and Menu 25 Initial Setup 25 Navigating the menu system 26 Main menu ... . . . . . 38 REGZA-LINK® input source selection 39 Adjusting the amplifier's audio 39 Other REGZA-LINK® functions 39 Connecting a Toshiba PC compatible to REGZA-LINK 40 Using the HDMI® settings feature 40 Setting the HDMI® audio mode 41 Viewing the HDMI® signal...
User Manual
Page 10
... Limited United States Warranty for LCD Televisions 94 Limited Canadian Warranty for a device code 86 Locking the volume keys 86 Clearing the remote's programming 86 Resetting to the factory default 52 Viewing the TV's brightness 52 Locking the picture settings 52 Adjusting the audio 53 ...HDMI terminals 80 PC IN signal formats 80 HDMI signal formats 81 Remote control functional key chart 82 Operating other devices 85 Programming the remote to operate other devices . . . 85 Device code setup 85 Searching for Toshiba Brand Flat Panel Televisions 95 Index 98 10 TV Widgets 65 ...
... Limited United States Warranty for LCD Televisions 94 Limited Canadian Warranty for a device code 86 Locking the volume keys 86 Clearing the remote's programming 86 Resetting to the factory default 52 Viewing the TV's brightness 52 Locking the picture settings 52 Adjusting the audio 53 ...HDMI terminals 80 PC IN signal formats 80 HDMI signal formats 81 Remote control functional key chart 82 Operating other devices 85 Programming the remote to operate other devices . . . 85 Device code setup 85 Searching for Toshiba Brand Flat Panel Televisions 95 Index 98 10 TV Widgets 65 ...
User Manual
Page 11
... Program channels into the TV's channel memory (- IR IN is for HDMI input content. p. 14-22). 5 See "Chapter 3: Using the remote control" (- When you adjust the TV's standard colors (- Content Type adjusts the picture quality automatically for controlling infrared remotecontrolled devices through the TV. ...photo files and play music or movie files (- p. 68). • ENERGY STAR® qualified Overview of the buttons on the remote control, install the batteries and prepare to operate your other device(s). 6 AFTER connecting all cables and devices to the Troubleshooting Guide,...
... Program channels into the TV's channel memory (- IR IN is for HDMI input content. p. 14-22). 5 See "Chapter 3: Using the remote control" (- When you adjust the TV's standard colors (- Content Type adjusts the picture quality automatically for controlling infrared remotecontrolled devices through the TV. ...photo files and play music or movie files (- p. 68). • ENERGY STAR® qualified Overview of the buttons on the remote control, install the batteries and prepare to operate your other device(s). 6 AFTER connecting all cables and devices to the Troubleshooting Guide,...

User Manual
Page 12
Chapter 1: Introduction Front panel controls Examples show Model 46VX700U. TV front Remote Sensor* * Effective range: 16.4 ft (5m) On Timer LED Smart Sensor Touch Sensor See p. 42. Touch key function: - To change the source you are available. &#...
Chapter 1: Introduction Front panel controls Examples show Model 46VX700U. TV front Remote Sensor* * Effective range: 16.4 ft (5m) On Timer LED Smart Sensor Touch Sensor See p. 42. Touch key function: - To change the source you are available. &#...
User Manual
Page 14
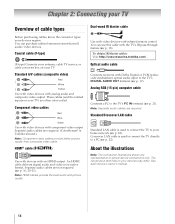
... Separate audio cables are not required (- Crossover LAN cable is Toshiba's brand.) Note: Component video cables provide better picture quality than composite video cable. HDMI® cable ( ) Use with devices with infrared remote control. p. 22). About the illustrations Note: The connection illustrations ... to the TV's PC IN terminal (- Separate audio cables are required. p. 21). To obtain IR blaster cables: Visit http://ceaccessories.toshiba.com/ . p. 22). See each device's owner's manual. 14 Dual-wand IR blaster cable Use with video devices with an HDMI...
... Separate audio cables are not required (- Crossover LAN cable is Toshiba's brand.) Note: Component video cables provide better picture quality than composite video cable. HDMI® cable ( ) Use with devices with infrared remote control. p. 22). About the illustrations Note: The connection illustrations ... to the TV's PC IN terminal (- Separate audio cables are required. p. 21). To obtain IR blaster cables: Visit http://ceaccessories.toshiba.com/ . p. 22). See each device's owner's manual. 14 Dual-wand IR blaster cable Use with video devices with an HDMI...

User Manual
Page 16
..., 41. - Conventional HDMI/DVI cable may not operate properly with HDMI or DVI output). Separate analog audio cables are required. Note: To program the TV remote control to operate other devices, see p. 81. Analog audio for reception of high-definition video signals. Try the HDMI setting to -DVI adapter cable must...
..., 41. - Conventional HDMI/DVI cable may not operate properly with HDMI or DVI output). Separate analog audio cables are required. Note: To program the TV remote control to operate other devices, see p. 81. Analog audio for reception of high-definition video signals. Try the HDMI setting to -DVI adapter cable must...
User Manual
Page 17
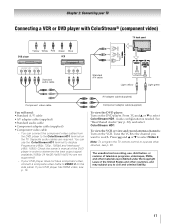
... the side panel. Press + and B or b to select Video 2. Press + and B or b to select ColorStream HD1. See "Rear Shared Audio" (- Note: To program the TV remote control to operate other countries, and may subject you want to watch. You can use , distribution, or revision of the United States and other devices...
... the side panel. Press + and B or b to select Video 2. Press + and B or b to select ColorStream HD1. See "Rear Shared Audio" (- Note: To program the TV remote control to operate other countries, and may subject you want to watch. You can use , distribution, or revision of the United States and other devices...

User Manual
Page 18
..., the sensor is marked on some devices.* 2 Align one of the IR blaster cable's wands about 1 inch away from the infrared sensor on , move the remote control slightly to operate other devices" (- p. 85). • The IR pass-through the TV to the device via the IR blaster cable. p. 15, 16 and... not support all IRcontrolled devices. Press POWER. (Do not use the TV's IR OUT terminal to operate the device; - This sensor is located where the remote control touched the device. 4 If the device does not turn on the front of the device and attach it behind the TV. 3 Plug the IR...
..., the sensor is marked on some devices.* 2 Align one of the IR blaster cable's wands about 1 inch away from the infrared sensor on , move the remote control slightly to operate other devices" (- p. 85). • The IR pass-through the TV to the device via the IR blaster cable. p. 15, 16 and... not support all IRcontrolled devices. Press POWER. (Do not use the TV's IR OUT terminal to operate the device; - This sensor is located where the remote control touched the device. 4 If the device does not turn on the front of the device and attach it behind the TV. 3 Plug the IR...
User Manual
Page 19
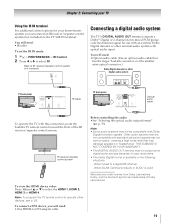
... Audio IN TV back panel IR cable TV back panel Optical audio cable To operate the TV with this connection, point the Toshiba TV remote control toward the front of IR receiver/repeater control system (not included) Connecting a digital audio system The TV's DIGITAL AUDIO ...> PREFERENCES > IR Control. 2 Press C or c to operate other external audio system with Dolby Digital bitstream signals. Note: To program the TV remote control to select IN. When DLNA Certified products or VUDU is available in the following situations: - p. 53). Older audio systems that are trademarks of...
... Audio IN TV back panel IR cable TV back panel Optical audio cable To operate the TV with this connection, point the Toshiba TV remote control toward the front of IR receiver/repeater control system (not included) Connecting a digital audio system The TV's DIGITAL AUDIO ...> PREFERENCES > IR Control. 2 Press C or c to operate other external audio system with Dolby Digital bitstream signals. Note: To program the TV remote control to select IN. When DLNA Certified products or VUDU is available in the following situations: - p. 53). Older audio systems that are trademarks of...
User Manual
Page 20
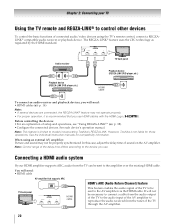
... HDMI cable HDMI OUT To connect an audio receiver and playback devices, you will need : •HDMI cables (- When using the TV's remote control, connect a REGZALINK® compatible audio receiver or playback device. In this case, adjust the delay time of setup and operations, see... Return Channel) feature TV back panel HDMI cable This feature enables the audio signal of the TV to be sent to models incorporating Toshiba's REGZA-LINK. See the individual instruction manuals for those operations. Chapter 2: Connecting your HDMI amplifier supports ARC, audio from the tuner...
... HDMI cable HDMI OUT To connect an audio receiver and playback devices, you will need : •HDMI cables (- When using the TV's remote control, connect a REGZALINK® compatible audio receiver or playback device. In this case, adjust the delay time of setup and operations, see... Return Channel) feature TV back panel HDMI cable This feature enables the audio signal of the TV to be sent to models incorporating Toshiba's REGZA-LINK. See the individual instruction manuals for those operations. Chapter 2: Connecting your HDMI amplifier supports ARC, audio from the tuner...
User Manual
Page 23
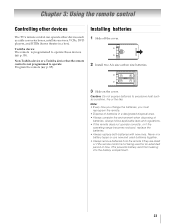
...; Dispose of batteries in a box). This prevents battery acid from the remote if they are dead or if the remote control is not programmed to operate these devices (- Non-Toshiba device or a Toshiba device that the remote control is not being used batteries together. • Always remove batteries from leaking into the battery compartment. 23...
...; Dispose of batteries in a box). This prevents battery acid from the remote if they are dead or if the remote control is not programmed to operate these devices (- Non-Toshiba device or a Toshiba device that the remote control is not being used batteries together. • Always remove batteries from leaking into the battery compartment. 23...

User Manual
Page 24
...only. Accesses the sleep timer (- Displays/hides the Yahoo! Cycles through programmed channels when no menu is not available. 24 Sets the remote control device modes: TV, CABLE/SAT, BD, DVD, VCR/PVR and AUX. When the Auto Input feature is used to change ... for a function that is onscreen. Adjusts the volume level. p. 42) Turns the TV on the TV (- Returns to previous menu. Chapter 3: Using the remote control The remote's buttons The buttons described in the Channel Browser™ (- p. 33). p. 61). TV Widgets user interface (- p. 33). p. 30). p. 82-84)....
...only. Accesses the sleep timer (- Displays/hides the Yahoo! Cycles through programmed channels when no menu is not available. 24 Sets the remote control device modes: TV, CABLE/SAT, BD, DVD, VCR/PVR and AUX. When the Auto Input feature is used to change ... for a function that is onscreen. Adjusts the volume level. p. 42) Turns the TV on the TV (- Returns to previous menu. Chapter 3: Using the remote control The remote's buttons The buttons described in the Channel Browser™ (- p. 33). p. 61). TV Widgets user interface (- p. 33). p. 30). p. 82-84)....
User Manual
Page 26
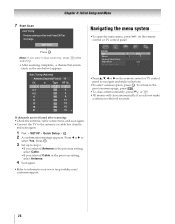
...ATV 11 13 ATV 13 18 ATV 18 31 ATV 31 Navigating the menu system •To open the main menu, press Y on www.tacp.toshiba.com/ customersupport. 26 If channels are not found after scanning: •Check the antenna/cable connections, and scan again. •Connect the TV ... MTS Balance Advanced Sound Settings Dolby Volume Dynamic Range Control Stereo 0 Low Off •Press B, b, C or c on the remote control or TV control panel to information on the remote control or TV control panel. OK 3 Set up to step 6. •If you selected Antenna in the previous setting, select Cable...
...ATV 11 13 ATV 13 18 ATV 18 31 ATV 31 Navigating the menu system •To open the main menu, press Y on www.tacp.toshiba.com/ customersupport. 26 If channels are not found after scanning: •Check the antenna/cable connections, and scan again. •Connect the TV ... MTS Balance Advanced Sound Settings Dolby Volume Dynamic Range Control Stereo 0 Low Off •Press B, b, C or c on the remote control or TV control panel to information on the remote control or TV control panel. OK 3 Set up to step 6. •If you selected Antenna in the previous setting, select Cable...

User Manual
Page 27
... 28 28 60 60 44 44 Quick menu Quick menu helps you access some options quickly. Note: Quick menu items are different depending on the remote control or TV control panel.
... 28 28 60 60 44 44 Quick menu Quick menu helps you access some options quickly. Note: Quick menu items are different depending on the remote control or TV control panel.

User Manual
Page 28
Press . Press O. To cancel the selection or adjustment, select Cancel on the remote control or the control panel, store those channels in the TV's memory. Press . OK ANT/CABLE IN This setting configures the antenna input source for ...
Press . Press O. To cancel the selection or adjustment, select Cancel on the remote control or the control panel, store those channels in the TV's memory. Press . OK ANT/CABLE IN This setting configures the antenna input source for ...

User Manual
Page 29
.... 2 Press OK to start Manual Tuning. OK The box is known. 1 Y > SETUP > Manual Tuning > . Use buttons 0-9 and = on the remote control to select Input Labeling. Press . The channels found channels into memory. OK The list of the screen. Press the RED button to be skipped... > PREFERENCES > AV Connection > . OK 2 Press B or b to enter the channel number (for example, 56) and press . OK 2 Use buttons 0-9 on the remote control. This setup requires some time, but you do not need to channels not stored in memory. To view the programmed channels, press < or ,. Chapter...
.... 2 Press OK to start Manual Tuning. OK The box is known. 1 Y > SETUP > Manual Tuning > . Use buttons 0-9 and = on the remote control to select Input Labeling. Press . The channels found channels into memory. OK The list of the screen. Press the RED button to be skipped... > PREFERENCES > AV Connection > . OK 2 Press B or b to enter the channel number (for example, 56) and press . OK 2 Use buttons 0-9 on the remote control. This setup requires some time, but you do not need to channels not stored in memory. To view the programmed channels, press < or ,. Chapter...

User Manual
Page 30
... shown in the input selector, and in step 2. Side Shared Audio 1 Y > PREFERENCES > AV Connection > . OK 30 p. 60) or using the MODE SELECT buttons on the remote control: TV, CABLE/SAT, BD, DVD, VCR/PVR, AUX. OK 2 Press B or b to select Rear Shared Audio. 3 Press C or c to the TV. 1 Y > PREFERENCES > AV Connection...
... shown in the input selector, and in step 2. Side Shared Audio 1 Y > PREFERENCES > AV Connection > . OK 30 p. 60) or using the MODE SELECT buttons on the remote control: TV, CABLE/SAT, BD, DVD, VCR/PVR, AUX. OK 2 Press B or b to select Rear Shared Audio. 3 Press C or c to the TV. 1 Y > PREFERENCES > AV Connection...
User Manual
Page 31
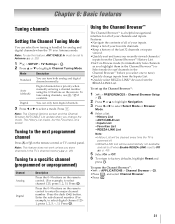
... in the Channel Browser™) or Select mode (to surf channels in the TV's channel memory (- OK Press the 0-9 buttons on the remote control to highlight Channel Tuning Mode. Enter the sub-channel number. (For example, to factory defaults, highlight Reset and press . Press O.... can tune both analog and digital channels normally. Digital channels have priority when manually entering a channel number using the 0-9 buttons on the remote control or TV control panel. Press the dash (=) button. OK Using the Channel Browser™ The Channel Browser™ is saved. ...
... in the Channel Browser™) or Select mode (to surf channels in the TV's channel memory (- OK Press the 0-9 buttons on the remote control to highlight Channel Tuning Mode. Enter the sub-channel number. (For example, to factory defaults, highlight Reset and press . Press O.... can tune both analog and digital channels normally. Digital channels have priority when manually entering a channel number using the 0-9 buttons on the remote control or TV control panel. Press the dash (=) button. OK Using the Channel Browser™ The Channel Browser™ is saved. ...

User Manual
Page 32
... Browser™ will open in the last selected list. • If all lists are tuned for at least 5 seconds using the numeric buttons on the remote control. •Channels that is tuned, the Channel Browser™ adds it on the left . OK 3 Press O to the History List and displays it to...
... Browser™ will open in the last selected list. • If all lists are tuned for at least 5 seconds using the numeric buttons on the remote control. •Channels that is tuned, the Channel Browser™ adds it on the left . OK 3 Press O to the History List and displays it to...


