Brochure
Page 2
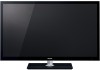
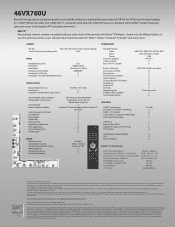
...ColorMaster, DynaLight, Net TV and TheaterLock are registered trademarks of Toshiba America Consumer Products, L.L.C. ENERGY STAR is suggested that you use the original remote control for the size and weight of the remote with Yahoo! in the United States and other countries. VESA ... Reduction Film Stabilization Channel/Input Lock TheaterLockTM 5:5 Pull-Down & Smooth Mode TheaterWide 1/2/3, Full, 4:3, Native and Dot by the U.S. 46VX700U Beautiful design, top-notch picture quality, and a wealth of Video Electronics Standards Association. VUDU™ Movies provides true 1080p HD, ...
...ColorMaster, DynaLight, Net TV and TheaterLock are registered trademarks of Toshiba America Consumer Products, L.L.C. ENERGY STAR is suggested that you use the original remote control for the size and weight of the remote with Yahoo! in the United States and other countries. VESA ... Reduction Film Stabilization Channel/Input Lock TheaterLockTM 5:5 Pull-Down & Smooth Mode TheaterWide 1/2/3, Full, 4:3, Native and Dot by the U.S. 46VX700U Beautiful design, top-notch picture quality, and a wealth of Video Electronics Standards Association. VUDU™ Movies provides true 1080p HD, ...
User Manual
Page 9
...Connecting a HDMI audio system 20 Connecting a PC 21 Connecting to a home network 22 Chapter 3: Using the remote control 23 Controlling other devices 23 Installing batteries 23 The remote's buttons 24 Chapter 4: Initial Setup and Menu 25 Initial Setup 25 Navigating the menu system 26 Main menu ... 38 Using REGZA-LINK 38 Controlling REGZA-LINK® playback devices . . . . . 38 REGZA-LINK® input source selection 39 Adjusting the amplifier's audio 39 Other REGZA-LINK® functions 39 Connecting a Toshiba PC compatible to REGZA-LINK 40 Using the HDMI® settings feature ...
...Connecting a HDMI audio system 20 Connecting a PC 21 Connecting to a home network 22 Chapter 3: Using the remote control 23 Controlling other devices 23 Installing batteries 23 The remote's buttons 24 Chapter 4: Initial Setup and Menu 25 Initial Setup 25 Navigating the menu system 26 Main menu ... 38 Using REGZA-LINK 38 Controlling REGZA-LINK® playback devices . . . . . 38 REGZA-LINK® input source selection 39 Adjusting the amplifier's audio 39 Other REGZA-LINK® functions 39 Connecting a Toshiba PC compatible to REGZA-LINK 40 Using the HDMI® settings feature ...
User Manual
Page 10
...the factory default 86 Operating TV with combination buttons 87 Remote control codes 88 Limited United States Warranty for LCD Televisions 94 Limited Canadian Warranty for a device code 86 Locking the volume keys 86 Clearing the remote's programming 86 Resetting to the factory default 52 Viewing...terminals 80 PC IN signal formats 80 HDMI signal formats 81 Remote control functional key chart 82 Operating other devices 85 Programming the remote to operate other devices . . . 85 Device code setup 85 Searching for Toshiba Brand Flat Panel Televisions 95 Index 98 10 TV Widgets ...
...the factory default 86 Operating TV with combination buttons 87 Remote control codes 88 Limited United States Warranty for LCD Televisions 94 Limited Canadian Warranty for a device code 86 Locking the volume keys 86 Clearing the remote's programming 86 Resetting to the factory default 52 Viewing...terminals 80 PC IN signal formats 80 HDMI signal formats 81 Remote control functional key chart 82 Operating other devices 85 Programming the remote to operate other devices . . . 85 Device code setup 85 Searching for Toshiba Brand Flat Panel Televisions 95 Index 98 10 TV Widgets ...
User Manual
Page 11
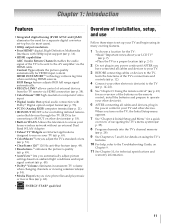
... range signal automatically. •REGZA-LINK® allows control of installation, setup, and use Follow these steps to set -top box (in the power cords for a quick overview of the buttons on the remote control, install the batteries and prepare to operate your other ...;Built-in a proper location (- TV Widgets are Internet applications designed to the TV (- p. 14-22). 5 See "Chapter 3: Using the remote control" (- When you automatically adjust picture settings based on your TV and other electronic device(s) to run on ambient light conditions and input signal content (-
... range signal automatically. •REGZA-LINK® allows control of installation, setup, and use Follow these steps to set -top box (in the power cords for a quick overview of the buttons on the remote control, install the batteries and prepare to operate your other ...;Built-in a proper location (- TV Widgets are Internet applications designed to the TV (- p. 14-22). 5 See "Chapter 3: Using the remote control" (- When you automatically adjust picture settings based on your TV and other electronic device(s) to run on ambient light conditions and input signal content (-
User Manual
Page 14
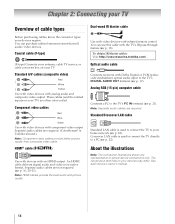
...IR pass-through feature (- p. 22). R AUDIO L Standard A/V cables (composite video) Red White Yellow Use with video devices with infrared remote control. Dual-wand IR blaster cable Use with video devices with analog audio and composite video output. Crossover LAN cable is used to connect the TV... to the TV's PC IN terminal (- Standard/Crossover LAN cable Standard LAN cable is Toshiba's brand.) Note: Component video cables provide better picture quality than composite video cable. Analog RGB (15-pin) computer cable Connects a ...
...IR pass-through feature (- p. 22). R AUDIO L Standard A/V cables (composite video) Red White Yellow Use with video devices with infrared remote control. Dual-wand IR blaster cable Use with video devices with analog audio and composite video output. Crossover LAN cable is used to connect the TV... to the TV's PC IN terminal (- Standard/Crossover LAN cable Standard LAN cable is Toshiba's brand.) Note: Component video cables provide better picture quality than composite video cable. Analog RGB (15-pin) computer cable Connects a ...

User Manual
Page 16
... -DVI adapter cable - Conventional HDMI/DVI cable may not operate properly with the HDMI Logo ( ). - For signal specifications, see p. 85. Note: To program the TV remote control to RCA Y-Cable - Recomended length: 6.6 ft (2m). •One 3.5mm Stereo to operate other devices, see p. 81. Because this is an evolving technology, it is...
... -DVI adapter cable - Conventional HDMI/DVI cable may not operate properly with the HDMI Logo ( ). - For signal specifications, see p. 85. Note: To program the TV remote control to RCA Y-Cable - Recomended length: 6.6 ft (2m). •One 3.5mm Stereo to operate other devices, see p. 81. Because this is an evolving technology, it is...
User Manual
Page 17
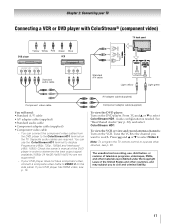
...;Component video cable - See "Rear Shared Audio" (- Tune the VCR to the channel you to civil and criminal liability. 17 Note: To program the TV remote control to the ColorStream HD1 terminal on the side panel. p. 30), and select ColorStream HD1. You can use , distribution, or revision of television programs, videotapes, DVDs...
...;Component video cable - See "Rear Shared Audio" (- Tune the VCR to the channel you to civil and criminal liability. 17 Note: To program the TV remote control to the ColorStream HD1 terminal on the side panel. p. 30), and select ColorStream HD1. You can use , distribution, or revision of television programs, videotapes, DVDs...

User Manual
Page 18
... locate the device's infrared sensor: 1 Turn off the device. 2 Starting at the device's lower-left corner, place the end of the device's remote control (with a rubber band and leave it behind the TV. 3 Plug the IR blaster cable's plug into the TV's IR OUT terminal. Satisfactory quality...is marked on some devices.* 2 Align one of the TV and press the button for example) Infrared sensor To control the device(s): Point either the device's remote control or the TV remote control (that you have a second device, coil the second wand with the infrared emitter) so it using double-sided...
... locate the device's infrared sensor: 1 Turn off the device. 2 Starting at the device's lower-left corner, place the end of the device's remote control (with a rubber band and leave it behind the TV. 3 Plug the IR blaster cable's plug into the TV's IR OUT terminal. Satisfactory quality...is marked on some devices.* 2 Align one of the TV and press the button for example) Infrared sensor To control the device(s): Point either the device's remote control or the TV remote control (that you have a second device, coil the second wand with the infrared emitter) so it using double-sided...
User Manual
Page 19
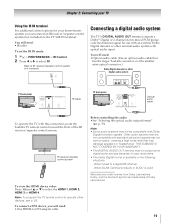
... Optical audio cable To operate the TV with optical audio input. Note: To program the TV remote control to operate other external audio system with this connection, point the Toshiba TV remote control toward the front of IR receiver/repeater control system (not included) Connecting a digital audio system The TV's DIGITAL AUDIO OUT terminal outputs a Dolby...
... Optical audio cable To operate the TV with optical audio input. Note: To program the TV remote control to operate other external audio system with this connection, point the Toshiba TV remote control toward the front of IR receiver/repeater control system (not included) Connecting a digital audio system The TV's DIGITAL AUDIO OUT terminal outputs a Dolby...
User Manual
Page 20
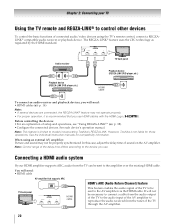
.... p. 38). •Configure the connected devices. See each device's operation manual. However, Toshiba is limited to models incorporating Toshiba's REGZA-LINK. Before controlling the devices: •For an explanation of the TV through the AV amplifier. 20 When using the TV's remote control, connect a REGZALINK® compatible audio receiver or playback device. Connecting a HDMI audio...
.... p. 38). •Configure the connected devices. See each device's operation manual. However, Toshiba is limited to models incorporating Toshiba's REGZA-LINK. Before controlling the devices: •For an explanation of the TV through the AV amplifier. 20 When using the TV's remote control, connect a REGZALINK® compatible audio receiver or playback device. Connecting a HDMI audio...
User Manual
Page 23
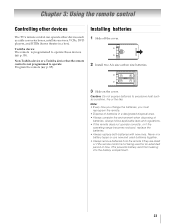
...and HTIBs (home theater in a designated disposal area. • Always consider the environment when disposing of time. Toshiba device: The remote is not being used batteries together. • Always remove batteries from leaking into the battery compartment. 23 Never ...from the remote if they are dead or if the remote control is programmed to operate: Program the remote (- Non-Toshiba device or a Toshiba device that the remote control is not programmed to operate these devices (- Chapter 3: Using the remote control Controlling other devices The TV's remote control can operate...
...and HTIBs (home theater in a designated disposal area. • Always consider the environment when disposing of time. Toshiba device: The remote is not being used batteries together. • Always remove batteries from leaking into the battery compartment. 23 Never ...from the remote if they are dead or if the remote control is programmed to operate: Program the remote (- Non-Toshiba device or a Toshiba device that the remote control is not programmed to operate these devices (- Chapter 3: Using the remote control Controlling other devices The TV's remote control can operate...

User Manual
Page 24
...volume level. Accesses the sleep timer (- TV Widgets user interface (- p. 33). Selects the audio mode. p. 34). For the REGZA-LINK functions, see "Remote control functional key chart" (- Accesses the main TV menu system (- The = button is onscreen, these keys to enter 2- p. 47). part channel numbers (- ...(- When a menu is used to change inputs on and off the sound (- p. 82-84). Chapter 3: Using the remote control The remote's buttons The buttons described in this section operate the TV only. p. 32). Reduces or turns off . p. 53).
...volume level. Accesses the sleep timer (- TV Widgets user interface (- p. 33). Selects the audio mode. p. 34). For the REGZA-LINK functions, see "Remote control functional key chart" (- Accesses the main TV menu system (- The = button is onscreen, these keys to enter 2- p. 47). part channel numbers (- ...(- When a menu is used to change inputs on and off the sound (- p. 82-84). Chapter 3: Using the remote control The remote's buttons The buttons described in this section operate the TV only. p. 32). Reduces or turns off . p. 53).
User Manual
Page 26
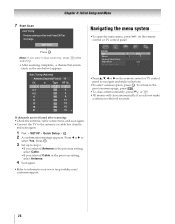
...be lost! Auto Tuning (Antenna) Antenna Channels Found: 14 Ch. SOUND MTS Balance Advanced Sound Settings Dolby Volume Dynamic Range Control Stereo 0 Low Off •Press B, b, C or c on the remote control or TV control panel. Press C or c to the antenna or cable box directly and scan again. 1 Y > SETUP > Quick ...18 ATV 18 31 ATV 31 Navigating the menu system •To open the main menu, press Y on the remote control or TV control panel to information on www.tacp.toshiba.com/ customersupport. 26 Press . OK 3 Set up to step 6. •If you selected Antenna in the previous...
...be lost! Auto Tuning (Antenna) Antenna Channels Found: 14 Ch. SOUND MTS Balance Advanced Sound Settings Dolby Volume Dynamic Range Control Stereo 0 Low Off •Press B, b, C or c on the remote control or TV control panel. Press C or c to the antenna or cable box directly and scan again. 1 Y > SETUP > Quick ...18 ATV 18 31 ATV 31 Navigating the menu system •To open the main menu, press Y on the remote control or TV control panel to information on www.tacp.toshiba.com/ customersupport. 26 Press . OK 3 Set up to step 6. •If you selected Antenna in the previous...

User Manual
Page 27
Note: Quick menu items are different depending on the remote control or TV control panel. Quick menu Item PICTURE Picture Mode Picture Size Photo Frame Sort Repeat SOUND Background Music Speakers Channel Browser Media Player REGZA-LINK Player Control Sleep Timer Interval Time Device Information Wireless Information Page 45-52 48 45 74...Setup 40 Network Setup 56 Netflix Setup 62 VUDU Deactivation 62 Media Renderer Setup Photo Frame Setup Channel Browser Setup PIN Setting Parental Control and Locks Display Settings AV Connection Auto Input 66 74 31 35 35 41, 47 29, 30, 40, 41, 53 30 IR...
Note: Quick menu items are different depending on the remote control or TV control panel. Quick menu Item PICTURE Picture Mode Picture Size Photo Frame Sort Repeat SOUND Background Music Speakers Channel Browser Media Player REGZA-LINK Player Control Sleep Timer Interval Time Device Information Wireless Information Page 45-52 48 45 74...Setup 40 Network Setup 56 Netflix Setup 62 VUDU Deactivation 62 Media Renderer Setup Photo Frame Setup Channel Browser Setup PIN Setting Parental Control and Locks Display Settings AV Connection Auto Input 66 74 31 35 35 41, 47 29, 30, 40, 41, 53 30 IR...

User Manual
Page 28
... IN This setting configures the antenna input source for the TV installation. 1 Y > SOUND > Advanced Sound Settings > . Press O. Press O. Then you press < or , on the remote control or the control panel, store those channels in memory (optional) To make your TV stops only on the screen. Press C or c to select a menu icon (PICTURE, SOUND...
... IN This setting configures the antenna input source for the TV installation. 1 Y > SOUND > Advanced Sound Settings > . Press O. Press O. Then you press < or , on the remote control or the control panel, store those channels in memory (optional) To make your TV stops only on the screen. Press C or c to select a menu icon (PICTURE, SOUND...

User Manual
Page 29
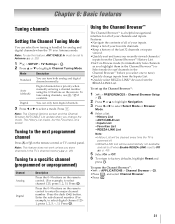
... select Cable, auto tuning deletes previously stored channels from being viewed, you want to select Input Labeling. OK 2 Use buttons 0-9 on the remote control to skip. The channels found channels into memory. OK The list of the screen. Type 5-1 DTV 6 ATV 6-1 DTV 8 ATV 9 ... 29 To turn off skip: 1 Y > PREFERENCES > AV Connection > . Press . To skip an antenna source channel from memory, set it to turn on the remote control. 1 Y > SETUP > Auto Tuning > . Type ATV DTV Description Analog channel. Press . OK 3 Press B or b to be skipped over when selecting inputs ...
... select Cable, auto tuning deletes previously stored channels from being viewed, you want to select Input Labeling. OK 2 Use buttons 0-9 on the remote control to skip. The channels found channels into memory. OK The list of the screen. Type 5-1 DTV 6 ATV 6-1 DTV 8 ATV 9 ... 29 To turn off skip: 1 Y > PREFERENCES > AV Connection > . Press . To skip an antenna source channel from memory, set it to turn on the remote control. 1 Y > SETUP > Auto Tuning > . Type ATV DTV Description Analog channel. Press . OK 3 Press B or b to be skipped over when selecting inputs ...

User Manual
Page 30
... your settings, press the BLUE button. 4 Repeat step 3 for other modes. Note: When User Input is selected by using the MODE SELECT buttons on the remote control: TV, CABLE/SAT, BD, DVD, VCR/PVR, AUX. Input the desired characters (10 characters or fewer) by pressing the GREEN button, the Software Keyboard window...
... your settings, press the BLUE button. 4 Repeat step 3 for other modes. Note: When User Input is selected by using the MODE SELECT buttons on the remote control: TV, CABLE/SAT, BD, DVD, VCR/PVR, AUX. Input the desired characters (10 characters or fewer) by pressing the GREEN button, the Software Keyboard window...
User Manual
Page 31
...Press the dash (=) button. Digital channels have priority when manually entering a channel number using the 0-9 buttons on the remote control or TV control panel. The History List clears, but the Favorites List is saved. Features: •Navigate the contents of all ... specific channel (programmed or unprogrammed) Channel Analog Digital Description Press the 0-9 buttons on the remote control to the next programmed channel Press < or , on the remote. p. 28). OK Press the 0-9 buttons on the remote control. (For example, to select digital channel 1251, press 1, 2, 5, -, 1.) Press ...
...Press the dash (=) button. Digital channels have priority when manually entering a channel number using the 0-9 buttons on the remote control or TV control panel. The History List clears, but the Favorites List is saved. Features: •Navigate the contents of all ... specific channel (programmed or unprogrammed) Channel Analog Digital Description Press the 0-9 buttons on the remote control to the next programmed channel Press < or , on the remote. p. 28). OK Press the 0-9 buttons on the remote control. (For example, to select digital channel 1251, press 1, 2, 5, -, 1.) Press ...

User Manual
Page 32
... input in the History List Adding channels to the History List: As a channel or input is tuned, the Channel Browser™ adds it on the remote control. •Channels that are added to close the Channel Browser™. OK 3 Press O to the left side of the Channel Browser™. To delete a favorite...
... input in the History List Adding channels to the History List: As a channel or input is tuned, the Channel Browser™ adds it on the remote control. •Channels that are added to close the Channel Browser™. OK 3 Press O to the left side of the Channel Browser™. To delete a favorite...

User Manual
Page 33
... 2 Select a second channel using direct number entry. • If one time only, from any other channel with . "Labeling video inputs" on the remote control or TV control panel. 2 Change the input: •Press 0-8. •Repeatedly press B or b. The channel has been programmed to the button. 3 You can skip...quickly, but one or more REGZA-LINK® devices are connected to an HDMI input, the REGZA-LINK® icon appears in the remote control by repeatedly pressing + or B or b. Chapter 6: Basic features Using Channel Return You can label the video input sources according to ...
... 2 Select a second channel using direct number entry. • If one time only, from any other channel with . "Labeling video inputs" on the remote control or TV control panel. 2 Change the input: •Press 0-8. •Repeatedly press B or b. The channel has been programmed to the button. 3 You can skip...quickly, but one or more REGZA-LINK® devices are connected to an HDMI input, the REGZA-LINK® icon appears in the remote control by repeatedly pressing + or B or b. Chapter 6: Basic features Using Channel Return You can label the video input sources according to ...


