
User Guide
Page 1
... below. For details, contact your TV. Integrated High Definition LED Television User's Guide: 19L4200U 24L4200U 32L4200U 40L5200U 46L5200U 50L5200U If you communicate with your Toshiba dealer about this guide. Record these numbers whenever you need assistance: Toshiba's Support Web site support.toshiba.com Call Toshiba Customer Support Center: Within the United States at (800) 631...
... below. For details, contact your TV. Integrated High Definition LED Television User's Guide: 19L4200U 24L4200U 32L4200U 40L5200U 46L5200U 50L5200U If you communicate with your Toshiba dealer about this guide. Record these numbers whenever you need assistance: Toshiba's Support Web site support.toshiba.com Call Toshiba Customer Support Center: Within the United States at (800) 631...
User Guide
Page 2
...4. For additional antenna grounding information, see 33) and 34) on page 5. See "To Display your LED TV, carefully read and understand all instructions supplied by curious children. TOSHIBA Cares! • The consumer electronics industry is committed to walls with steel studs or old cinder block construction... must be securely attached to safely install your flat panel display, contact your retailer about your purchase! WARNING To prevent injury, this Toshiba LED TV. The use a mounting bracket that are not designed to be used as steps, such as UL, CSA, ETL) and ...
...4. For additional antenna grounding information, see 33) and 34) on page 5. See "To Display your LED TV, carefully read and understand all instructions supplied by curious children. TOSHIBA Cares! • The consumer electronics industry is committed to walls with steel studs or old cinder block construction... must be securely attached to safely install your flat panel display, contact your retailer about your purchase! WARNING To prevent injury, this Toshiba LED TV. The use a mounting bracket that are not designed to be used as steps, such as UL, CSA, ETL) and ...
User Guide
Page 4
... may weaken and crack over time from a 120V AC, 60 Hz power source. 33) Always make sure you are never in a position where your TOSHIBA TV, follow these recommendations and precautions: 35) If you are provided to protect the TV from the hook(s) on the rear of the TV to... space such as insecticide on the back cover. Avoid contact with poor ventilation. These actions will damage internal parts. A hard cloth may vary until the LED warms up static charges (see Section 810 of the National Electric Code). 34) DANGER: RISK OF SERIOUS PERSONAL INJURY OR DEATH! • Use extreme...
... may weaken and crack over time from a 120V AC, 60 Hz power source. 33) Always make sure you are never in a position where your TOSHIBA TV, follow these recommendations and precautions: 35) If you are provided to protect the TV from the hook(s) on the rear of the TV to... space such as insecticide on the back cover. Avoid contact with poor ventilation. These actions will damage internal parts. A hard cloth may vary until the LED warms up static charges (see Section 810 of the National Electric Code). 34) DANGER: RISK OF SERIOUS PERSONAL INJURY OR DEATH! • Use extreme...
User Guide
Page 5
...8226; Upon completion of service, ask the service technician to perform routine safety checks to the wall and the back of this manual to a Toshiba Authorized Service Provider. 46) If you need to service the TV yourself. Service 45) WARNING: RISK OF ELECTRIC SHOCK! Leave the bottom ...mount manufacturer. 5) Follow the instructions provided with the pedestal. Before proceeding, make occasional snapping or popping sounds. When selecting a location for your LED TV To Display your wall bracket. CAUTION: Do not use the screws removed from the rear of the TV. 3) Remove the screws of...
...8226; Upon completion of service, ask the service technician to perform routine safety checks to the wall and the back of this manual to a Toshiba Authorized Service Provider. 46) If you need to service the TV yourself. Service 45) WARNING: RISK OF ELECTRIC SHOCK! Leave the bottom ...mount manufacturer. 5) Follow the instructions provided with the pedestal. Before proceeding, make occasional snapping or popping sounds. When selecting a location for your LED TV To Display your wall bracket. CAUTION: Do not use the screws removed from the rear of the TV. 3) Remove the screws of...
User Guide
Page 16
... HDMI® or DVI device to the TV's PC IN terminal" on page 36. ❖ HDMI® CEC-Allows control of your new Toshiba wide screen, integrated HD, LED TV: ❖ Integrated digital tuning (8VSB ATSC and QAM)- 16 Introduction Features Features The following are just a few of the many exciting features...
... HDMI® or DVI device to the TV's PC IN terminal" on page 36. ❖ HDMI® CEC-Allows control of your new Toshiba wide screen, integrated HD, LED TV: ❖ Integrated digital tuning (8VSB ATSC and QAM)- 16 Introduction Features Features The following are just a few of the many exciting features...
User Guide
Page 18
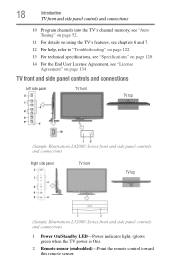
... panel controls and connections Right side panel TV front TV top (Sample Illustration) L5200U Series front and side panel controls and connections 1 Power On/Standby LED-Power indicator light, (glows green when the TV power is On). 2 Remote sensor (embedded)-Point the remote control toward this remote sensor.
... panel controls and connections Right side panel TV front TV top (Sample Illustration) L5200U Series front and side panel controls and connections 1 Power On/Standby LED-Power indicator light, (glows green when the TV power is On). 2 Remote sensor (embedded)-Point the remote control toward this remote sensor.

User Guide
Page 44
.... 9 The RECALL button displays TV status information. 10 The CH ( / arrow) buttons cycle through programmed channels (when no on-screen menu is on, the power LED indicator on the TV front glows green. 2 The PIC SIZE button cycles through the picture sizes, see "Selecting the picture size" on page 71. 3 The...
.... 9 The RECALL button displays TV status information. 10 The CH ( / arrow) buttons cycle through programmed channels (when no on-screen menu is on, the power LED indicator on the TV front glows green. 2 The PIC SIZE button cycles through the picture sizes, see "Selecting the picture size" on page 71. 3 The...


