
User Manual
Page 8
... REGZA-LINK® connection 17 Connecting a digital audio system 18 Connecting a personal computer (PC 18 Chapter 3: Using the remote control 20 Installing the remote control batteries 20 Remote control effective range 20 Learning about the remote control 21 Chapter 4: Menu layout and navigation 22 Main menu layout 22 Setup/Installation menu layout 23 Navigating... 55 Specifications 55 Acceptable signal formats for PC IN and HDMI terminals 56 Limited United States Warranty for LCD Televisions 57 Limited Canadian Warranty for Toshiba Brand Flat Panel Televisions 58
... REGZA-LINK® connection 17 Connecting a digital audio system 18 Connecting a personal computer (PC 18 Chapter 3: Using the remote control 20 Installing the remote control batteries 20 Remote control effective range 20 Learning about the remote control 21 Chapter 4: Menu layout and navigation 22 Main menu layout 22 Setup/Installation menu layout 23 Navigating... 55 Specifications 55 Acceptable signal formats for PC IN and HDMI terminals 56 Limited United States Warranty for LCD Televisions 57 Limited Canadian Warranty for Toshiba Brand Flat Panel Televisions 58
User Manual
Page 9
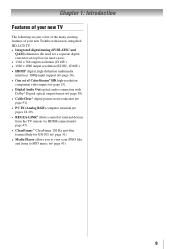
Chapter 1: Introduction Features of your new TV The following are just a few of the many exciting features of your new Toshiba widescreen, integrated HD, LCD TV: • Integrated digital tuning (8VSB ATSC and QAM) eliminates the need for a separate digital converter set-top box (... 51). • PC IN (Analog RGB) computer terminal ( pages 18-19). • REGZA-LINK® allows control of external devices from the TV remote via HDMI connection( page 47). • ClearFrame™ ClearFrame 120 Hz anti-blur feature(Only for G310U) ( page 51). • Media Player allows...
Chapter 1: Introduction Features of your new TV The following are just a few of the many exciting features of your new Toshiba widescreen, integrated HD, LCD TV: • Integrated digital tuning (8VSB ATSC and QAM) eliminates the need for a separate digital converter set-top box (... 51). • PC IN (Analog RGB) computer terminal ( pages 18-19). • REGZA-LINK® allows control of external devices from the TV remote via HDMI connection( page 47). • ClearFrame™ ClearFrame 120 Hz anti-blur feature(Only for G310U) ( page 51). • Media Player allows...
User Manual
Page 10
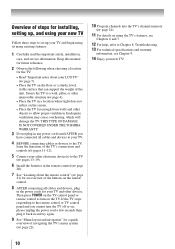
... 21) for an overview of the buttons on the remote control. 8 AFTER connecting all cables and devices to your TV. 4 BEFORE connecting cables or devices to the TV, learn the functions of the unit. THIS TYPE OF DAMAGE IS NOT COVERED UNDER THE TOSHIBA WARRANTY. 3 Do not plug in any power cords... until AFTER you cannot turn on the screen. • Place the TV far enough from walls and other objects to a wall, pillar, or other immovable structure ( page 4). • Place the TV in the remote control ( page ...
... 21) for an overview of the buttons on the remote control. 8 AFTER connecting all cables and devices to your TV. 4 BEFORE connecting cables or devices to the TV, learn the functions of the unit. THIS TYPE OF DAMAGE IS NOT COVERED UNDER THE TOSHIBA WARRANTY. 3 Do not plug in any power cords... until AFTER you cannot turn on the screen. • Place the TV far enough from walls and other objects to a wall, pillar, or other immovable structure ( page 4). • Place the TV in the remote control ( page ...
User Manual
Page 11
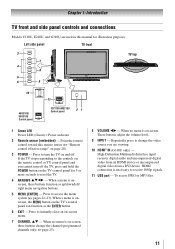
...22-23). When no menu is necessary to reset the TV. 4無 ARROWS pqtu - To access JPEG or MP3 files. 11 Point the remote control toward this manual for 5 or more seconds to receive 1080p signals. 11無 USB port - Press to turn off . Repeatedly press to... side panel TV front 3 7 4 8 5 6 9 TV top 10 46G310U/ 55G310U Control panel 11 32C110U/40E210U Control panel 21 1無 Green LED Power LED (Green) = Power indicator 2無 Remote sensor (embedded) - If the TV stops responding to the controls on the remote control or TV control panel and you are used in...
...22-23). When no menu is necessary to reset the TV. 4無 ARROWS pqtu - To access JPEG or MP3 files. 11 Point the remote control toward this manual for 5 or more seconds to receive 1080p signals. 11無 USB port - Press to turn off . Repeatedly press to... side panel TV front 3 7 4 8 5 6 9 TV top 10 46G310U/ 55G310U Control panel 11 32C110U/40E210U Control panel 21 1無 Green LED Power LED (Green) = Power indicator 2無 Remote sensor (embedded) - If the TV stops responding to the controls on the remote control or TV control panel and you are used in...
User Manual
Page 14
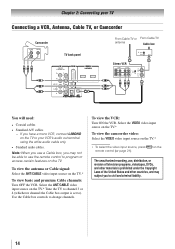
... or Cable signal: Select the ANT/CABLE video input source on the TV.* ** To select the video input source, press remote control ( page 21). on the The unauthorized recording, use the remote control to your VCR's audio out terminal using the white audio cable only. • Standard audio cables. Note: When...
... or Cable signal: Select the ANT/CABLE video input source on the TV.* ** To select the video input source, press remote control ( page 21). on the The unauthorized recording, use the remote control to your VCR's audio out terminal using the white audio cable only. • Standard audio cables. Note: When...
User Manual
Page 15
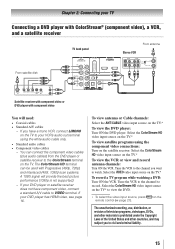
Tune the VCR to the channel to view the DVD. ** To select the video input source, press remote control ( page 21). Select the ColorStream HD video input source on the TV.* To view satellite programs using the white audio cable only. • ...
Tune the VCR to the channel to view the DVD. ** To select the video input source, press remote control ( page 21). Select the ColorStream HD video input source on the TV.* To view satellite programs using the white audio cable only. • ...
User Manual
Page 16
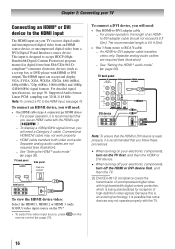
on the TV.* ** To select the video input source, press remote control ( page 21). Separate analog audio cables are not required (see illustration). −− See "Setting the HDMI ® audio mode" ( page 26). ...
on the TV.* ** To select the video input source, press remote control ( page 21). Separate analog audio cables are not required (see illustration). −− See "Setting the HDMI ® audio mode" ( page 26). ...
User Manual
Page 17
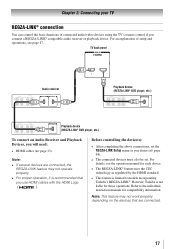
... compatibility information. Refer to models incorporating Toshiba's REGZA-LINK®. Note: This feature may not operate properly. •• For proper operation, it is recommended that are connected. 17 For details, see page 47. For an explanation of connected audio/video devices using the TV's remote control if you connect a REGZA-LINK...
... compatibility information. Refer to models incorporating Toshiba's REGZA-LINK®. Note: This feature may not operate properly. •• For proper operation, it is recommended that are connected. 17 For details, see page 47. For an explanation of connected audio/video devices using the TV's remote control if you connect a REGZA-LINK...
User Manual
Page 18
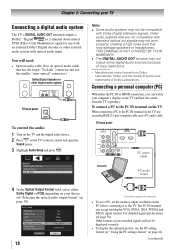
... digital audio system TV back panel To control the audio: 1無 Turn on the TV and the digital audio device. 2無 Press on the TV's remote control and open the Sound menu. 3無 Highlight Audio Setup and press . Older audio systems that may damage speakers or headphones. Connecting a personal computer (PC...
... digital audio system TV back panel To control the audio: 1無 Turn on the TV and the digital audio device. 2無 Press on the TV's remote control and open the Sound menu. 3無 Highlight Audio Setup and press . Older audio systems that may damage speakers or headphones. Connecting a personal computer (PC...
User Manual
Page 20
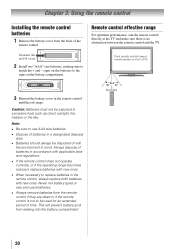
...two "AAA" size batteries, making sure to excessive heat such as direct sunlight, fire, heaters or the like. Chapter 3: Using the remote control Installing the remote control batteries 1無 Remove the battery cover from the back of time. Never mix battery types or new and used batteries. ••...sure there is not to replace batteries in mind. Caution: Batteries must not be disposed of TV. 3無 Reinsert the battery cover in the remote control until the tab snaps. Note: •• Be sure to use AAA size batteries. •• Dispose of batteries in a ...
...two "AAA" size batteries, making sure to excessive heat such as direct sunlight, fire, heaters or the like. Chapter 3: Using the remote control Installing the remote control batteries 1無 Remove the battery cover from the back of time. Never mix battery types or new and used batteries. ••...sure there is not to replace batteries in mind. Caution: Batteries must not be disposed of TV. 3無 Reinsert the battery cover in the remote control until the tab snaps. Note: •• Be sure to use AAA size batteries. •• Dispose of batteries in a ...
User Manual
Page 21
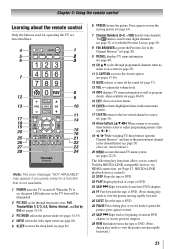
Note: The error message "NOT AVAILABLE" may appear if you to control Toshiba REGZA-LINK compatible devices via HDMI connection. ( Page 47, REGZA-LINK playback device control) 21無 STOP Stops the tape or DVD. 22無 ...; page 25). 11無 C.CAPTION accesses the closed caption ( pages 35-36). 12無 MUTE reduces or turns off . Chapter 3: Using the remote control Learning about the remote control Only the buttons used to tune digital channels ( page 31) or to edit the Favorites List ( page 29). 8無 FAV...
Note: The error message "NOT AVAILABLE" may appear if you to control Toshiba REGZA-LINK compatible devices via HDMI connection. ( Page 47, REGZA-LINK playback device control) 21無 STOP Stops the tape or DVD. 22無 ...; page 25). 11無 C.CAPTION accesses the closed caption ( pages 35-36). 12無 MUTE reduces or turns off . Chapter 3: Using the remote control Learning about the remote control Only the buttons used to tune digital channels ( page 31) or to edit the Favorites List ( page 29). 8無 FAV...
User Manual
Page 22
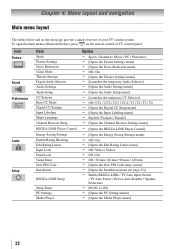
...~12:00] [Opens the PC Settings menu] [Opens the Media Player menu] 22 To open the main menus (illustrated below and on the remote control or TV control panel. Chapter 4: Menu layout and navigation Main menu layout The tables below ), press on the next page provide a quick overview of...
...~12:00] [Opens the PC Settings menu] [Opens the Media Player menu] 22 To open the main menus (illustrated below and on the remote control or TV control panel. Chapter 4: Menu layout and navigation Main menu layout The tables below ), press on the next page provide a quick overview of...
User Manual
Page 23
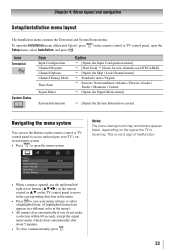
...Opens the System Information screen] Navigating the menu system You can use the up/down/left/ right arrow buttons (pqtu) on the remote control or pq on the remote control or TV control panel to access and navigate your TV's onscreen menu system. • Press to save your menu settings ...menu is receiving. Chapter 4: Menu layout and navigation Setup/Installation menu layout The Installation menu contains the Terrestrial and System Status menus. on the remote control or TV control panel, open the Installation menu (illustrated below), press Setup menu, select Installation, and press .
...Opens the System Information screen] Navigating the menu system You can use the up/down/left/ right arrow buttons (pqtu) on the remote control or pq on the remote control or TV control panel to access and navigate your TV's onscreen menu system. • Press to save your menu settings ...menu is receiving. Chapter 4: Menu layout and navigation Setup/Installation menu layout The Installation menu contains the Terrestrial and System Status menus. on the remote control or TV control panel, open the Installation menu (illustrated below), press Setup menu, select Installation, and press .
User Manual
Page 25
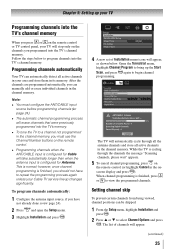
... to bring up your TV Programming channels into the TV's channel memory When you press or on the remote control or TV control panel, your TV will stop only on the remote control (or highlight Cancel in the onscreen display and press ). Follow the steps below . This is finished..., press or to select Channel Options and press . Note: •• You must use the Channel Number buttons on the remote control. •• Programming channels when the ANT/CABLE input is configured for Cable will take substantially longer than when the antenna input is cycling...
... to bring up your TV Programming channels into the TV's channel memory When you press or on the remote control or TV control panel, your TV will stop only on the remote control (or highlight Cancel in the onscreen display and press ). Follow the steps below . This is finished..., press or to select Channel Options and press . Note: •• You must use the Channel Number buttons on the remote control. •• Programming channels when the ANT/CABLE input is configured for Cable will take substantially longer than when the antenna input is cycling...
User Manual
Page 26
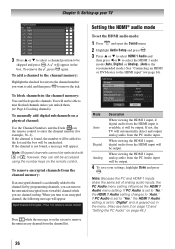
... analog audio from the HDMI input is grayed out in the menu. (Also see item 2 on page 12 and "Setting the PC Audio" on the remote control. If PC Audio is set to "Yes," the HDMI 1 Audio setting is set the HDMI audio mode: 1無 Press and open the Sound menu... channels. A will automatically detect and output analog audio from the channel list. If PC Audio is on the remote control to an encrypted channel, the following message will appear. Press 1 on remote to remove channel Press while the message is set of analog audio inputs, the PC Audio menu setting influences...
... analog audio from the HDMI input is grayed out in the menu. (Also see item 2 on page 12 and "Setting the PC Audio" on the remote control. If PC Audio is set to "Yes," the HDMI 1 Audio setting is set the HDMI audio mode: 1無 Press and open the Sound menu... channels. A will automatically detect and output analog audio from the channel list. If PC Audio is on the remote control to an encrypted channel, the following message will appear. Press 1 on remote to remove channel Press while the message is set of analog audio inputs, the PC Audio menu setting influences...
User Manual
Page 28
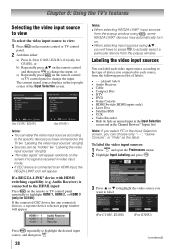
...input source to view To select the video input source to highlight the desired input source, and then press . 28 (continued) on the remote control and then press to highlight the video source you will appear. To label the video input sources: 1無 Press and open the... sources using , you want to highlight HDMI 1, HDMI 2, or HDMI 3 (only for G310U), or b) Repeatedly press on the remote control or TV control 2無 And then either: a) Press 0-5(for C110U, E210U), 0-6(only for G310U). or c) Repeatedly press on the screen if no ...
...input source to view To select the video input source to highlight the desired input source, and then press . 28 (continued) on the remote control and then press to highlight the video source you will appear. To label the video input sources: 1無 Press and open the... sources using , you want to highlight HDMI 1, HDMI 2, or HDMI 3 (only for G310U), or b) Repeatedly press on the remote control or TV control 2無 And then either: a) Press 0-5(for C110U, E210U), 0-6(only for G310U). or c) Repeatedly press on the screen if no ...
User Manual
Page 29
... input to the channel or input. 2無 Press and hold for 3 seconds. Note: Additions are added to the beginning of the Favorites list on the remote control. 5無 To save the new input labels, highlight Done and press . To delete a favorite channel/input: 1無 Press to open the Preferences menu. 2無...
... input to the channel or input. 2無 Press and hold for 3 seconds. Note: Additions are added to the beginning of the Favorites list on the remote control. 5無 To save the new input labels, highlight Done and press . To delete a favorite channel/input: 1無 Press to open the Preferences menu. 2無...
User Manual
Page 30
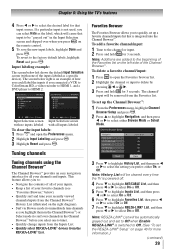
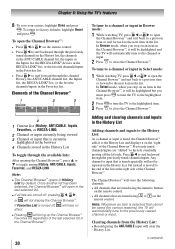
...(for various reasons), the TV will store the following channels: • All channels that are tuned using the numeric buttons on the remote control. To open in the Channel Browser™, it will be highlighted but instead is selected that is tuned repeatedly will clear the ...Inputs, Favorites, or REGZA-LINK) 2無 Channel or input currently being viewed 3無 Channel or input that are tuned using or on the remote control. • All channels that is currently highlighted in the browser 4無 Channels stored in the Favorites list. To return to close the ...
...(for various reasons), the TV will store the following channels: • All channels that are tuned using the numeric buttons on the remote control. To open in the Channel Browser™, it will be highlighted but instead is selected that is tuned repeatedly will clear the ...Inputs, Favorites, or REGZA-LINK) 2無 Channel or input currently being viewed 3無 Channel or input that are tuned using or on the remote control. • All channels that is currently highlighted in the browser 4無 Channels stored in the Favorites list. To return to close the ...
User Manual
Page 31
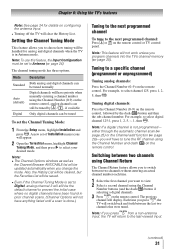
... new set to Digital, analog channel 3 will have priority when manually entering a channel number using the Channel Number and dash ( ) on the remote control. Also, the History List will be cleared, but the Favorites List will be saved. ••Even if the Channel Tuning Mode is set... 25). Switching between two channels using the Channel Number buttons (and the dash ( ) button if selecting a digital channel). 3無 Press on the remote control. Chapter 6: Using the TV's features Note: See page 24 for analog and digital channels when the TV is in prior channel scans. (Channel ...
... new set to Digital, analog channel 3 will have priority when manually entering a channel number using the Channel Number and dash ( ) on the remote control. Also, the History List will be cleared, but the Favorites List will be saved. ••Even if the Channel Tuning Mode is set... 25). Switching between two channels using the Channel Number buttons (and the dash ( ) button if selecting a digital channel). 3無 Press on the remote control. Chapter 6: Using the TV's features Note: See page 24 for analog and digital channels when the TV is in prior channel scans. (Channel ...
User Manual
Page 32
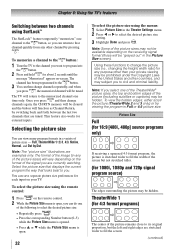
... that displays the current program the way that are examples only. To select the picture size using the remote control: 1無 Press on the receiving signal format (those will be available depending on the remote control. 2無 While the Picture Size menu is open . 32 To select the picture size using SurfLock...
... that displays the current program the way that are examples only. To select the picture size using the remote control: 1無 Press on the receiving signal format (those will be available depending on the remote control. 2無 While the Picture Size menu is open . 32 To select the picture size using SurfLock...


