
User Manual
Page 1
...contact your TV antenna installer, cable provider, or satellite provider. © 2011 TOSHIBA CORPORATION All Rights Reserved Owner's Record The model number and serial number are on the back of steps for setting up yournewTV, see page10. Model number: Serial number: Owner's Manual Integrated High... Definition LCD Television HIGH-DEFINITION TELEVISION 32C110U 40E210U 46G310U 55G310U Foran overview of your Toshiba dealer about this TV. Refer to these ...
...contact your TV antenna installer, cable provider, or satellite provider. © 2011 TOSHIBA CORPORATION All Rights Reserved Owner's Record The model number and serial number are on the back of steps for setting up yournewTV, see page10. Model number: Serial number: Owner's Manual Integrated High... Definition LCD Television HIGH-DEFINITION TELEVISION 32C110U 40E210U 46G310U 55G310U Foran overview of your Toshiba dealer about this TV. Refer to these ...

User Manual
Page 2
...in mind: The Issue • The home theater entertainment experience is committed to persons. However, flat panel displays are popular purchases. TOSHIBA Cares! • The consumer electronics industry is a growing trend and larger flat panel displays are not always supported on the proper ...the display where it nearby for installation. WARNING: If you for the safe installation and use of this Toshiba LCD TV. The lightning flash with furniture and television sets. • Don't place flat panel displays on or play with arrowhead symbol, within an equilateral triangle is...
...in mind: The Issue • The home theater entertainment experience is committed to persons. However, flat panel displays are popular purchases. TOSHIBA Cares! • The consumer electronics industry is a growing trend and larger flat panel displays are not always supported on the proper ...the display where it nearby for installation. WARNING: If you for the safe installation and use of this Toshiba LCD TV. The lightning flash with furniture and television sets. • Don't place flat panel displays on or play with arrowhead symbol, within an equilateral triangle is...
User Manual
Page 8
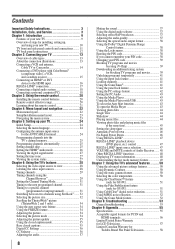
... 41 Locking channels 41 Using the GameTimer 41 Using the panel lock feature 42 Using the PC settings feature 42 Setting the PC Audio 43 Using the Media Player 43 Using the Media Player with USB 43 To ...Understanding the last mode memory feature 49 Chapter 7: Using the TV's advanced features......... 50 Using the advanced picture settings features 50 Using Dynamic Contrast 50 Using the static gamma feature 50 Selecting the color temperature 50 Using the ClearFrame... United States Warranty for LCD Televisions 57 Limited Canadian Warranty for Toshiba Brand Flat Panel Televisions 58
... 41 Locking channels 41 Using the GameTimer 41 Using the panel lock feature 42 Using the PC settings feature 42 Setting the PC Audio 43 Using the Media Player 43 Using the Media Player with USB 43 To ...Understanding the last mode memory feature 49 Chapter 7: Using the TV's advanced features......... 50 Using the advanced picture settings features 50 Using Dynamic Contrast 50 Using the static gamma feature 50 Selecting the color temperature 50 Using the ClearFrame... United States Warranty for LCD Televisions 57 Limited Canadian Warranty for Toshiba Brand Flat Panel Televisions 58
User Manual
Page 9
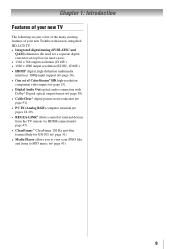
... following are just a few of the many exciting features of your new Toshiba widescreen, integrated HD, LCD TV: • Integrated digital tuning (8VSB ATSC and QAM) eliminates the need for a separate digital converter set-top box (in most cases). • 1366 x 768 output resolution ...output resolution (E210U, G310U). • HDMI® digital, high-definition multimedia interfaces 1080p input support ( page 16). • One set of ColorStream® HD high-resolution component video inputs ( page 15). • Digital Audio Out optical audio connection with Dolby® Digital...
... following are just a few of the many exciting features of your new Toshiba widescreen, integrated HD, LCD TV: • Integrated digital tuning (8VSB ATSC and QAM) eliminates the need for a separate digital converter set-top box (in most cases). • 1366 x 768 output resolution ...output resolution (E210U, G310U). • HDMI® digital, high-definition multimedia interfaces 1080p input support ( page 16). • One set of ColorStream® HD high-resolution component video inputs ( page 15). • Digital Audio Out optical audio connection with Dolby® Digital...
User Manual
Page 10
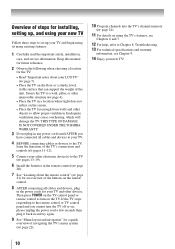
Inadequate ventilation may cause overheating, which will damage the TV. THIS TYPE OF DAMAGE IS NOT COVERED UNDER THE TOSHIBA WARRANTY. 3 Do not plug in and try again. 9 See "Menu layout and navigation" for a quick overview of navigating the TV's menu system ( page 22). ... for your TV and begin using its many exciting features. 1 Carefully read the important safety, installation, care, and service information. Overview of steps for installing, setting up, and using your new TV Follow these steps to...
Inadequate ventilation may cause overheating, which will damage the TV. THIS TYPE OF DAMAGE IS NOT COVERED UNDER THE TOSHIBA WARRANTY. 3 Do not plug in and try again. 9 See "Menu layout and navigation" for a quick overview of navigating the TV's menu system ( page 22). ... for your TV and begin using its many exciting features. 1 Carefully read the important safety, installation, care, and service information. Overview of steps for installing, setting up, and using your new TV Follow these steps to...
User Manual
Page 13
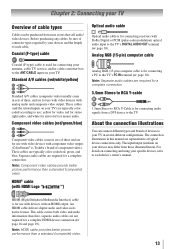
...may differ from a DVI device to the TV. HDMI® cable (with HDMI Logo " ") Optical audio cable Optical audio cable is Toshiba's brand of component video.) These cables are for use with video devices with component video output. (ColorStream® is for stereo left (... better picture performance than a standard (composite) video. 13 Standard A/V cables (red/white/yellow) Standard A/V cables (composite video) usually come in sets of three, and are for connecting a PC to the TV's PC IN terminal ( page 18). Separate audio cables are typically colorcoded according ...
...may differ from a DVI device to the TV. HDMI® cable (with HDMI Logo " ") Optical audio cable Optical audio cable is Toshiba's brand of component video.) These cables are for use with video devices with component video output. (ColorStream® is for stereo left (... better picture performance than a standard (composite) video. 13 Standard A/V cables (red/white/yellow) Standard A/V cables (composite video) usually come in sets of three, and are for connecting a PC to the TV's PC IN terminal ( page 18). Separate audio cables are typically colorcoded according ...
User Manual
Page 14
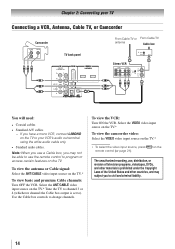
..., and may subject you have a mono VCR, connect L/MONO on the TV.* Tune the TV to channel 3 or 4 (whichever channel the Cable box output is set to your VCR's audio out terminal using the white audio cable only. • Standard audio cables.
..., and may subject you have a mono VCR, connect L/MONO on the TV.* Tune the TV to channel 3 or 4 (whichever channel the Cable box output is set to your VCR's audio out terminal using the white audio cable only. • Standard audio cables.
User Manual
Page 16
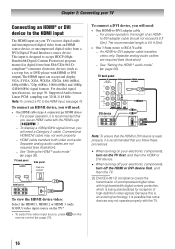
...uncompressed digital video from an HDMI source device, or uncompressed digital video from EIA/CEA-861-Dcompliant[1] consumer electronic devices (such as a set-top box or DVD player with high-bandwidth digital content protection, which is possible that you use an HDMI cable with the TV. 16... not required (see page 19. Because this is an evolving technology, it is designed to the HDMI input, see illustration). −− See "Setting the HDMI ® audio mode" ( page 26). This input is recommended that some devices may not work properly. −− HDMI cable...
...uncompressed digital video from an HDMI source device, or uncompressed digital video from EIA/CEA-861-Dcompliant[1] consumer electronic devices (such as a set-top box or DVD player with high-bandwidth digital content protection, which is possible that you use an HDMI cable with the TV. 16... not required (see page 19. Because this is an evolving technology, it is designed to the HDMI input, see illustration). −− See "Setting the HDMI ® audio mode" ( page 26). This input is recommended that some devices may not work properly. −− HDMI cable...
User Manual
Page 17
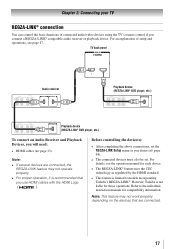
...audio/video devices using the TV's remote control if you desire ( page 48). • The connected devices must also be set the REGZA-LINK Setup menu as regulated by the HDMI standard. • This feature is limited to the individual instruction manuals for ... liable for compatibility information. For details, see page 47. Before controlling the device(s): • After completing the above connections, set . Refer to models incorporating Toshiba's REGZA-LINK®. Chapter 2: Connecting your TV REGZA-LINK® connection You can control the basic functions of setup and ...
...audio/video devices using the TV's remote control if you desire ( page 48). • The connected devices must also be set the REGZA-LINK Setup menu as regulated by the HDMI standard. • This feature is limited to the individual instruction manuals for ... liable for compatibility information. For details, see page 47. Before controlling the device(s): • After completing the above connections, set . Refer to models incorporating Toshiba's REGZA-LINK®. Chapter 2: Connecting your TV REGZA-LINK® connection You can control the basic functions of setup and ...
User Manual
Page 18
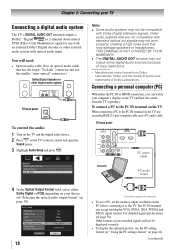
...8226;• The DIGITAL AUDIO OUT terminal may not be displayed correctly. • To display the optimum picture, use the PC setting feature ( "Using the PC settings feature" on the TV and hear the sound from Dolby Laboratories. TV back panel 1 Computer PC audio cable PC audio output 4&#... 2: Connecting your device ("Selecting the optical audio output format" on page 38). 18 Conversion adapter (if necessary) • To use a PC, set the monitor output resolution on the TV, use an analog RGB (15-pin) computer cable and a PC audio cable. Dolby, and the double-D symbol ...
...8226;• The DIGITAL AUDIO OUT terminal may not be displayed correctly. • To display the optimum picture, use the PC setting feature ( "Using the PC settings feature" on the TV and hear the sound from Dolby Laboratories. TV back panel 1 Computer PC audio cable PC audio output 4&#... 2: Connecting your device ("Selecting the optical audio output format" on page 38). 18 Conversion adapter (if necessary) • To use a PC, set the monitor output resolution on the TV, use an analog RGB (15-pin) computer cable and a PC audio cable. Dolby, and the double-D symbol ...
User Manual
Page 22
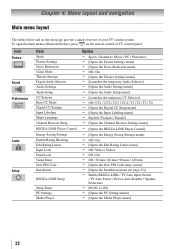
... panel. Icon Picture Sound Preferences Locks Setup Item Mode Picture Settings Noise Reduction Game Mode Theater Settings Digital Audio Selector Audio Settings Audio Setup CC Selector Base CC Mode Digital CC Settings Input Labeling Menu Language Channel Browser Setup REGZA-LINK Player Control...the Input Labeling menu] English / Français / Español [Opens the Channel Browser Settings menu] [Opens the REGZA-LINK Player Control] [Opens the Energy Saving Settings menu] Off / On [Opens the Edit Rating Limits menu] Off / Video / ...
... panel. Icon Picture Sound Preferences Locks Setup Item Mode Picture Settings Noise Reduction Game Mode Theater Settings Digital Audio Selector Audio Settings Audio Setup CC Selector Base CC Mode Digital CC Settings Input Labeling Menu Language Channel Browser Setup REGZA-LINK Player Control...the Input Labeling menu] English / Français / Español [Opens the Channel Browser Settings menu] [Opens the REGZA-LINK Player Control] [Opens the Energy Saving Settings menu] Off / On [Opens the Edit Rating Limits menu] Off / Video / ...
User Manual
Page 23
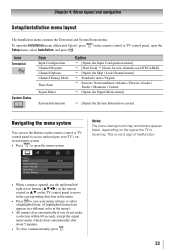
... black, depending on the remote control or TV control panel to access and navigate your TV's onscreen menu system. • Press to save your menu settings or select a highlighted item. (A highlighted menu item appears in a different color in the menu. • Press to open the menu system. on the remote control...
... black, depending on the remote control or TV control panel to access and navigate your TV's onscreen menu system. • Press to save your menu settings or select a highlighted item. (A highlighted menu item appears in a different color in the menu. • Press to open the menu system. on the remote control...

User Manual
Page 24
...when entering channel number directly, select Auto. Press to continue to Auto Tuning. 6無 Press to select Time Zone Setup and set of menus and messages. Configuring the antenna input source for the ANT/CABLE input on or reset the TV, the Initial Setup ... the ANT/CABLE input source: 1無 Press and open the Preferences menu, highlight Menu Language. 2無 Press t or u to select your original settings, highlight Cancel and press . 3無 Press to step 5 above, the Initial Setup window will appear. Open the Terrestrial menu, highlight Input Configuration, and...
...when entering channel number directly, select Auto. Press to continue to Auto Tuning. 6無 Press to select Time Zone Setup and set of menus and messages. Configuring the antenna input source for the ANT/CABLE input on or reset the TV, the Initial Setup ... the ANT/CABLE input source: 1無 Press and open the Preferences menu, highlight Menu Language. 2無 Press t or u to select your original settings, highlight Cancel and press . 3無 Press to step 5 above, the Initial Setup window will appear. Open the Terrestrial menu, highlight Input Configuration, and...
User Manual
Page 25
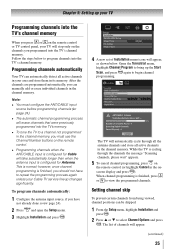
...programming process will stop only on the remote control. •• Programming channels when the ANT/CABLE input is configured for Antenna. Setting channel skip To prevent certain channels from being viewed, channel positions can be skipped. 1無 From the Setup menu, highlight Installation...; You must use the Channel Number buttons on the channels you can automatically detect all active channels in its memory. Chapter 5: Setting up the Start Scan, and press again to program channels into the TV's channel memory. however, once channel programming is normal...
...programming process will stop only on the remote control. •• Programming channels when the ANT/CABLE input is configured for Antenna. Setting channel skip To prevent certain channels from being viewed, channel positions can be skipped. 1無 From the Setup menu, highlight Installation...; You must use the Channel Number buttons on the channels you can automatically detect all active channels in its memory. Chapter 5: Setting up the Start Scan, and press again to program channels into the TV's channel memory. however, once channel programming is normal...
User Manual
Page 26
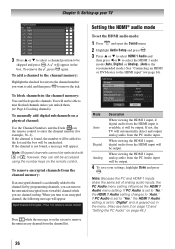
...1 input, digital audio from the PC Audio input. Note: Skipped channels cannot be skipped and press . Setting the HDMI® audio mode To set to "No," the HDMI 1 Audio setting changes to the list and the box will be output. If PC Audio is on the screen to remove... Because the PC and HDMI-1 inputs share the same set to remove the tick. If PC Audio is set to "Yes," the HDMI 1 Audio setting is set of analog audio inputs, the PC Audio menu setting influences the HDMI 1 Audio menu setting. Chapter 5: Setting up your settings, highlight Done and press . Mode Description Auto When...
...1 input, digital audio from the PC Audio input. Note: Skipped channels cannot be skipped and press . Setting the HDMI® audio mode To set to "No," the HDMI 1 Audio setting changes to the list and the box will be output. If PC Audio is on the screen to remove... Because the PC and HDMI-1 inputs share the same set to remove the tick. If PC Audio is set to "Yes," the HDMI 1 Audio setting is set of analog audio inputs, the PC Audio menu setting influences the HDMI 1 Audio menu setting. Chapter 5: Setting up your settings, highlight Done and press . Mode Description Auto When...
User Manual
Page 27
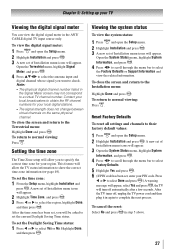
...system status To view the system status: 1無 Press and open the Setup menu. 2無 Highlight Installation and press . 3無 A new set of Installation menu icons will appear. 3無 Open the System Status menu, highlight System Information, and press . 4無 Press tu to scroll ...through the menu bar to normal viewing: Press . To set the time zone: 1無 From the Setup menu, highlight Installation and press . Open the Terrestrial menu, highlight Signal Meter, and press . 4&#...
...system status To view the system status: 1無 Press and open the Setup menu. 2無 Highlight Installation and press . 3無 A new set of Installation menu icons will appear. 3無 Open the System Status menu, highlight System Information, and press . 4無 Press tu to scroll ...through the menu bar to normal viewing: Press . To set the time zone: 1無 From the Setup menu, highlight Installation and press . Open the Terrestrial menu, highlight Signal Meter, and press . 4&#...
User Manual
Page 29
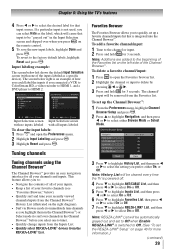
... to tune). • Quickly change inputs from the Inputs List. • Quickly select REGZA-LINK® devices from the Favorites list. To set up the Channel Browser™: 1無 From the Preferences menu, highlight Channel Browser Setup and press . 2無 Press to highlight ...select either Browse Mode or Select Mode. 3無 Press to highlight History List, and then press or to select the setting you connected a VCR to ColorStream HD, a video recorder to HDMI 1, and a DVD player to open the Preferences menu. 2無 Highlight Input Labeling ...
... to tune). • Quickly change inputs from the Inputs List. • Quickly select REGZA-LINK® devices from the Favorites list. To set up the Channel Browser™: 1無 From the Preferences menu, highlight Channel Browser Setup and press . 2無 Press to highlight ...select either Browse Mode or Select Mode. 3無 Press to highlight History List, and then press or to select the setting you connected a VCR to ColorStream HD, a video recorder to HDMI 1, and a DVD player to open the Preferences menu. 2無 Highlight Input Labeling ...
User Manual
Page 31
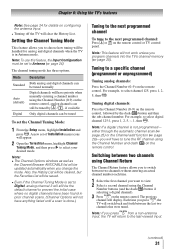
...allows you to switch between the last two channels that were tuned. Note: If you will return to select your desired mode. A new set the Channel Tuning Mode: 1無 From the Setup menu, highlight Installation and press . The previous channel will not work unless you change ...by / , if available Only digital channels can be updated automatically when you program channels into the TV's channel memory ( page 25). Setting the Channel Tuning Mode This feature allows you to choose how tuning will be handled for details on configuring the antenna input. • Turning...
...allows you to switch between the last two channels that were tuned. Note: If you will return to select your desired mode. A new set the Channel Tuning Mode: 1無 From the Setup menu, highlight Installation and press . The previous channel will not work unless you change ...by / , if available Only digital channels can be updated automatically when you program channels into the TV's channel memory ( page 25). Setting the Channel Tuning Mode This feature allows you to choose how tuning will be handled for details on configuring the antenna input. • Turning...
User Manual
Page 32
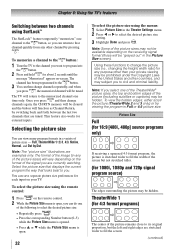
...program the way that channel quickly from any of the image (in a variety of the picture remains close to select the desired picture size setting. 3無 Highlight Done and press . You can view many program formats in any other countries, and may be cleared and the button ... sizes) will be hidden. To view the hidden edges, either scroll the picture (TheaterWide 2 and 3 only) or try viewing the program in the Theater Settings menu. 2無 Press or to its original proportion, but not stretched taller. (for each input on -screen. This feature also works...
...program the way that channel quickly from any of the image (in a variety of the picture remains close to select the desired picture size setting. 3無 Highlight Done and press . You can view many program formats in any other countries, and may be cleared and the button ... sizes) will be hidden. To view the hidden edges, either scroll the picture (TheaterWide 2 and 3 only) or try viewing the program in the Theater Settings menu. 2無 Press or to its original proportion, but not stretched taller. (for each input on -screen. This feature also works...

User Manual
Page 34
...the TV, press picture a still picture. Mode Picture Quality Sports Bright and dynamic picture (factory setting) Standard Standard picture settings (factory setting) Movie Lower contrast for darkened room (factory setting) Designed for viewing of the United States and other mode). 4無 Press to ... 1080i, 1080p, or VGA (60Hz) signal from four different modes, as needed. 6無 To save the new settings, highlight Done and press . To set to On, the TV will automatically be prohibited under "Selecting the picture size" on the auto aspect ratio feature: 1&#...
...the TV, press picture a still picture. Mode Picture Quality Sports Bright and dynamic picture (factory setting) Standard Standard picture settings (factory setting) Movie Lower contrast for darkened room (factory setting) Designed for viewing of the United States and other mode). 4無 Press to ... 1080i, 1080p, or VGA (60Hz) signal from four different modes, as needed. 6無 To save the new settings, highlight Done and press . To set to On, the TV will automatically be prohibited under "Selecting the picture size" on the auto aspect ratio feature: 1&#...


