
User Manual
Page 1
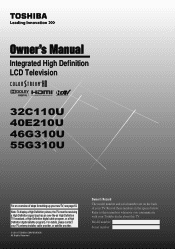
... High Definition LCD Television HIGH-DEFINITION TELEVISION 32C110U 40E210U 46G310U 55G310U Foran overview of your Toshiba dealer about this TV. Record these numbers whenever you communicate with your TV. Note: To display a High Definition picture, the TV must be receiving a High Definition signal... program). Model number: Serial number: For details, please contact your TV antenna installer, cable provider, or satellite provider. © 2011 TOSHIBA CORPORATION All Rights Reserved Owner's Record The model number and serial number are on the back of steps for...
... High Definition LCD Television HIGH-DEFINITION TELEVISION 32C110U 40E210U 46G310U 55G310U Foran overview of your Toshiba dealer about this TV. Record these numbers whenever you communicate with your TV. Note: To display a High Definition picture, the TV must be receiving a High Definition signal... program). Model number: Serial number: For details, please contact your TV antenna installer, cable provider, or satellite provider. © 2011 TOSHIBA CORPORATION All Rights Reserved Owner's Record The model number and serial number are on the back of steps for...
User Manual
Page 8
...® functions 48 Displaying TV status information 48 Understanding the last mode memory feature 49 Chapter 7: Using the TV's advanced features......... 50 Using the advanced picture settings features 50 Using Dynamic Contrast 50 Using the static gamma feature 50 Selecting the color temperature 50 Using the ClearFrame™ feature (only for G310U... 55 Specifications 55 Acceptable signal formats for PC IN and HDMI terminals 56 Limited United States Warranty for LCD Televisions 57 Limited Canadian Warranty for Toshiba Brand Flat Panel Televisions 58
...® functions 48 Displaying TV status information 48 Understanding the last mode memory feature 49 Chapter 7: Using the TV's advanced features......... 50 Using the advanced picture settings features 50 Using Dynamic Contrast 50 Using the static gamma feature 50 Selecting the color temperature 50 Using the ClearFrame™ feature (only for G310U... 55 Specifications 55 Acceptable signal formats for PC IN and HDMI terminals 56 Limited United States Warranty for LCD Televisions 57 Limited Canadian Warranty for Toshiba Brand Flat Panel Televisions 58
User Manual
Page 9
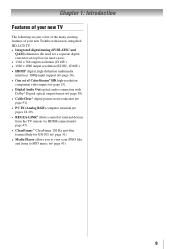
...TV The following are just a few of the many exciting features of your new Toshiba widescreen, integrated HD, LCD TV: • Integrated digital tuning (8VSB ATSC and QAM) eliminates the need for a separate digital converter set-top box (in most cases). • 1366 x 768 output resolution (C110U).... 15). • Digital Audio Out optical audio connection with Dolby® Digital optical output format ( page 38). • CableClear® digital picture noise reduction ( page 51). • PC IN (Analog RGB) computer terminal ( pages 18-19). • REGZA-LINK® allows...
...TV The following are just a few of the many exciting features of your new Toshiba widescreen, integrated HD, LCD TV: • Integrated digital tuning (8VSB ATSC and QAM) eliminates the need for a separate digital converter set-top box (in most cases). • 1366 x 768 output resolution (C110U).... 15). • Digital Audio Out optical audio connection with Dolby® Digital optical output format ( page 38). • CableClear® digital picture noise reduction ( page 51). • PC IN (Analog RGB) computer terminal ( pages 18-19). • REGZA-LINK® allows...
User Manual
Page 13
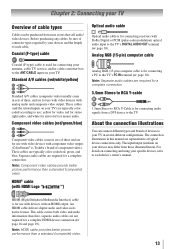
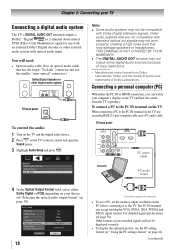
... the TV's DIGITAL AUDIO OUT terminal ( page 18). The connection illustrations in sets of three, and are for a complete connection. An HDMI cable delivers digital audio and ... audio, and white for use with devices with component video output. (ColorStream® is Toshiba's brand of component video.) These cables are required for a complete connection. 3.5mm Stereo to...devices to your specific devices, refer to the TV. Note: Component video cables provide better picture performance than a standard (composite) video. 13 Before purchasing any cables, be purchased from...
... the TV's DIGITAL AUDIO OUT terminal ( page 18). The connection illustrations in sets of three, and are for a complete connection. An HDMI cable delivers digital audio and ... audio, and white for use with devices with component video output. (ColorStream® is Toshiba's brand of component video.) These cables are required for a complete connection. 3.5mm Stereo to...devices to your specific devices, refer to the TV. Note: Component video cables provide better picture performance than a standard (composite) video. 13 Before purchasing any cables, be purchased from...
User Manual
Page 18
... from the TV's speakers. Older audio systems that may not be displayed correctly. • To display the optimum picture, use the PC setting feature ( "Using the PC settings feature" on the TV, use a PC, set the monitor output resolution on the PC before connecting it to the PC IN terminal on page 42...
... from the TV's speakers. Older audio systems that may not be displayed correctly. • To display the optimum picture, use the PC setting feature ( "Using the PC settings feature" on the TV, use a PC, set the monitor output resolution on the PC before connecting it to the PC IN terminal on page 42...
User Manual
Page 22
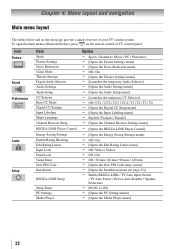
...control or TV control panel. Icon Picture Sound Preferences Locks Setup Item Mode Picture Settings Noise Reduction Game Mode Theater Settings Digital Audio Selector Audio Settings Audio Setup CC Selector Base CC Mode Digital CC Settings Input Labeling Menu Language Channel Browser ... / Movie / PC / Preference [Opens the Picture Settings menu] [Opens the Noise Reduction menu] Off / On [Opens the Theater Settings menu] [Launches the temporary Audio Selector] [Opens the Audio Settings menu] [Opens the Audio Setup menu] ...
...control or TV control panel. Icon Picture Sound Preferences Locks Setup Item Mode Picture Settings Noise Reduction Game Mode Theater Settings Digital Audio Selector Audio Settings Audio Setup CC Selector Base CC Mode Digital CC Settings Input Labeling Menu Language Channel Browser ... / Movie / PC / Preference [Opens the Picture Settings menu] [Opens the Noise Reduction menu] Off / On [Opens the Theater Settings menu] [Launches the temporary Audio Selector] [Opens the Audio Settings menu] [Opens the Audio Setup menu] ...
User Manual
Page 32
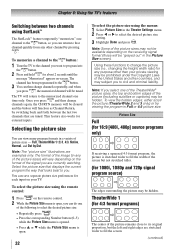
...the button, so you can return to that looks best to select the desired picture size setting. 3無 Highlight Done and press . To select the picture size using the menus: 1無 Select Picture Size in the Theater Settings menu. 2無 Press or to you. The channel ...has been programmed to the button. 3無 You can do one of the picture sizes may be hidden. Note: ...
...the button, so you can return to that looks best to select the desired picture size setting. 3無 Highlight Done and press . To select the picture size using the menus: 1無 Select Picture Size in the Theater Settings menu. 2無 Press or to you. The channel ...has been programmed to the button. 3無 You can do one of the picture sizes may be hidden. Note: ...

User Manual
Page 34
.... To turn on page 32 34 Note: The auto aspect ratio feature is left in FREEZE mode for more than your desired picture settings from the HDMI 1, HDMI 2, and (for viewing of signal source 4:3 normal 4:3 letter box 16:9 full Not defined (no... On) 4:3 TheaterWide 2 Full The current picture size you set to scroll the picture up and down as described below. Mode Picture Quality Sports Bright and dynamic picture (factory setting) Standard Standard picture settings (factory setting) Movie Lower contrast for darkened room (factory setting) Designed for G310U)HDMI 3 Aspect ratio ...
.... To turn on page 32 34 Note: The auto aspect ratio feature is left in FREEZE mode for more than your desired picture settings from the HDMI 1, HDMI 2, and (for viewing of signal source 4:3 normal 4:3 letter box 16:9 full Not defined (no... On) 4:3 TheaterWide 2 Full The current picture size you set to scroll the picture up and down as described below. Mode Picture Quality Sports Bright and dynamic picture (factory setting) Standard Standard picture settings (factory setting) Movie Lower contrast for darkened room (factory setting) Designed for G310U)HDMI 3 Aspect ratio ...
User Manual
Page 35
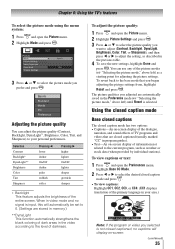
... press . Chapter 6: Using the TV's features To select the picture mode using the menu system: 1無 Press and open the Picture menu. 2無 Highlight Picture Settings and press . 3無 Press or to select the picture quality you want to adjust (Contrast, Backlight, DynaLight, Brightness, ...Tint, and Sharpness) to the base mode that are closed captioned, no captions will automatically be set to the current program, such as a starting point for adjusting the picture settings. To revert back to your area.) Note: If the program or video you selected is input...
... press . Chapter 6: Using the TV's features To select the picture mode using the menu system: 1無 Press and open the Picture menu. 2無 Highlight Picture Settings and press . 3無 Press or to select the picture quality you want to adjust (Contrast, Backlight, DynaLight, Brightness, ...Tint, and Sharpness) to the base mode that are closed captioned, no captions will automatically be set to the current program, such as a starting point for adjusting the picture settings. To revert back to your area.) Note: If the program or video you selected is input...
User Manual
Page 41
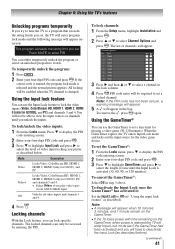
... column. 4無 Press PIN code entry will be able to view the input sources or channels until the Input Lock is released and the normal picture appears. Push 'MUTE' to select Channel Options and press . If the correct code is entered, the program lock mode is activated (30, 60, ...box. Chapter 6: Using the TV's features Unlocking programs temporarily If you try to tune the TV to a program that exceeds the rating limits you set, the TV will enter program lock mode and the following message will have to deactivate the Input Lock (as described before). (continued) 41 To deactivate...
... column. 4無 Press PIN code entry will be able to view the input sources or channels until the Input Lock is released and the normal picture appears. Push 'MUTE' to select Channel Options and press . If the correct code is entered, the program lock mode is activated (30, 60, ...box. Chapter 6: Using the TV's features Unlocking programs temporarily If you try to tune the TV to a program that exceeds the rating limits you set, the TV will enter program lock mode and the following message will have to deactivate the Input Lock (as described before). (continued) 41 To deactivate...
User Manual
Page 42
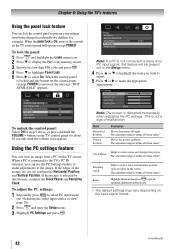
... or to highlight the item you can use the PC Settings feature to make the appropriate adjustments. If the edges of malfunction. Mode Horizontal Position Vertical Position Description Moves the picture left/right. The adjustment range is On, none of the controls on the TV...menu icon. 2無 Press to display the PIN code entering screen. 3無 Enter your settings from center.* Helps to reduce noise and sharpen the picture. To adjust the PC settings: 1無 Repeatedly press to select PC input mode ( "Selecting the video input source to get...
... or to highlight the item you can use the PC Settings feature to make the appropriate adjustments. If the edges of malfunction. Mode Horizontal Position Vertical Position Description Moves the picture left/right. The adjustment range is On, none of the controls on the TV...menu icon. 2無 Press to display the PIN code entering screen. 3無 Enter your settings from center.* Helps to reduce noise and sharpen the picture. To adjust the PC settings: 1無 Repeatedly press to select PC input mode ( "Selecting the video input source to get...
User Manual
Page 44
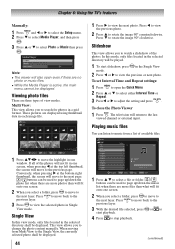
... to select Media Player, and then press . 3無 Press or to rotate the image 90° counterclockwise. To set Interval Time and Repeat settings: 1無 Press to view the previous or next photo. Multi View: This view allows you to search for photos in the Single View...be used to the next layer. Press to move to page up /down the photo list when there are three types of the photos. These pictures are more photos than what will also open the Quick Menu. 2無 Press or to select either Interval Time or Repeat....
... to select Media Player, and then press . 3無 Press or to rotate the image 90° counterclockwise. To set Interval Time and Repeat settings: 1無 Press to view the previous or next photo. Multi View: This view allows you to search for photos in the Single View...be used to the next layer. Press to move to page up /down the photo list when there are three types of the photos. These pictures are more photos than what will also open the Quick Menu. 2無 Press or to select either Interval Time or Repeat....
User Manual
Page 45
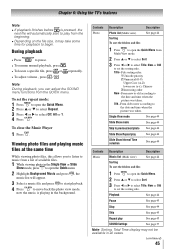
...28961; Press or to select Sort. 3無 Press or to select Title, New or Old to set the repeat mode: 1無 Press to open the Quick menu. 2無 Highlight Background Music and press , the music list will automatically start... page 37 Note: Sorting, Total Time display may take some time for playback to the date and time when the picture was taken. To set the sorting rule. Title--File sorting rules: 1 Unicode priority 2 Numerical (0-9 Upper Case (A-Z lowercase (a-z), Chinese 3 Increasing order ...
...28961; Press or to select Sort. 3無 Press or to select Title, New or Old to set the repeat mode: 1無 Press to open the Quick menu. 2無 Highlight Background Music and press , the music list will automatically start... page 37 Note: Sorting, Total Time display may take some time for playback to the date and time when the picture was taken. To set the sorting rule. Title--File sorting rules: 1 Unicode priority 2 Numerical (0-9 Upper Case (A-Z lowercase (a-z), Chinese 3 Increasing order ...
User Manual
Page 47
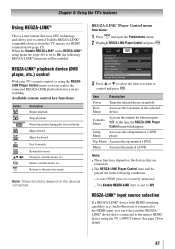
... you press . Note: • These functions depend on the devices connected. Energy Saving Settings 3無 Press p or q to the previous menu. Menu Accesses the menu of the selected device. Stops playback. Pauses the picture during play or record mode. Item Description Power Turns the selected device on and off....The Enable REGZA-LINK item is connected to the HDMI input, you can control the connected REGZA-LINK playback device you to control Toshiba REGZA-LINK® compatible devices from the TV remote via HDMI connection ( page 17). See page 28 for details. 47
... you press . Note: • These functions depend on the devices connected. Energy Saving Settings 3無 Press p or q to the previous menu. Menu Accesses the menu of the selected device. Stops playback. Pauses the picture during play or record mode. Item Description Power Turns the selected device on and off....The Enable REGZA-LINK item is connected to the HDMI input, you can control the connected REGZA-LINK playback device you to control Toshiba REGZA-LINK® compatible devices from the TV remote via HDMI connection ( page 17). See page 28 for details. 47
User Manual
Page 50
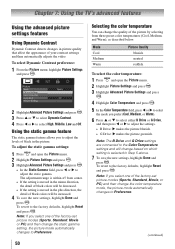
... defaults, highlight Reset and press . To revert to select High, Middle, Low and Off. To adjust the static gamma settings: 1無 Press and open the Picture menu. 2無 Highlight Picture Settings and press . 3無 Highlight Advanced Picture Settings and press . 4無 Highlight Color Temperature and press . 5無 In the Color Temperature field, press or ...
... defaults, highlight Reset and press . To revert to select High, Middle, Low and Off. To adjust the static gamma settings: 1無 Press and open the Picture menu. 2無 Highlight Picture Settings and press . 3無 Highlight Advanced Picture Settings and press . 4無 Highlight Color Temperature and press . 5無 In the Color Temperature field, press or ...

User Manual
Page 51
... visible interference in step 3 above. To revert to the factory defaults, highlight Reset and press . To turn on the ClearFrame: 1無 Press and open the Picture menu, highlight Picture Settings and press . 2無 Highlight Advanced Picture Settings and press . 3無 In the Film Stabilization field, select Smooth, Standard or Off. 4無 To save the new...
... visible interference in step 3 above. To revert to the factory defaults, highlight Reset and press . To turn on the ClearFrame: 1無 Press and open the Picture menu, highlight Picture Settings and press . 2無 Highlight Advanced Picture Settings and press . 3無 In the Film Stabilization field, select Smooth, Standard or Off. 4無 To save the new...
User Manual
Page 52
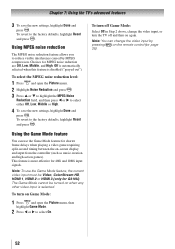
... High. Note: You can use the Game Mode feature, the current video input must be turned on Game Mode: 1無 Press and open the Picture menu. 2無 Highlight Noise Reduction and press . 3無 Press or to highlight the MPEG Noise Reduction field, and then ... Select Off in Step 2 above, change the video input by MPEG compression. Chapter 7: Using the TV's advanced features 3無 To save the new settings, highlight Done and press . To revert to the factory defaults, highlight Reset and press . The Game Mode cannot be Video, ColorStream HD, HDMI ...
... High. Note: You can use the Game Mode feature, the current video input must be turned on Game Mode: 1無 Press and open the Picture menu. 2無 Highlight Noise Reduction and press . 3無 Press or to highlight the MPEG Noise Reduction field, and then ... Select Off in Step 2 above, change the video input by MPEG compression. Chapter 7: Using the TV's advanced features 3無 To save the new settings, highlight Done and press . To revert to the factory defaults, highlight Reset and press . The Game Mode cannot be Video, ColorStream HD, HDMI ...
User Manual
Page 53
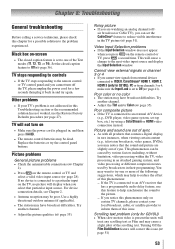
...control batteries may notice that contain a digital display, in and try the control panel buttons. Poor composite picture •• If the TV is connected to the picture. -- Set the closed caption feature is plugged in their programming. If the TV is connected to one or more...8226; Adjust the Tint and/or Color ( page 35). Noisy picture •• If you cannot turn on the TV, no picture will cause a change to an external A/V device (e.g., DVD player, video game system, set to an A/V receiver that particular input source. Video Input Selection problems &#...
...control batteries may notice that contain a digital display, in and try the control panel buttons. Poor composite picture •• If the TV is connected to the picture. -- Set the closed caption feature is plugged in their programming. If the TV is connected to one or more...8226; Adjust the Tint and/or Color ( page 35). Noisy picture •• If you cannot turn on the TV, no picture will cause a change to an external A/V device (e.g., DVD player, video game system, set to an A/V receiver that particular input source. Video Input Selection problems &#...


