
User Manual
Page 2
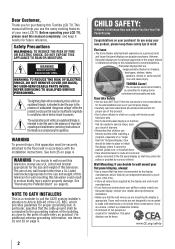
..., DO NOT EXPOSE THIS APPLIANCE TO RAIN OR MOISTURE. WARNING: If you for purchasing this Toshiba LCD TV. CHILD SAFETY: It Makes A Difference How and Where You Use Your Flat Panel Display Congratulations on a "larger than a UL Listed wall bracket appropriate for the size and ... The Issue • The home theater entertainment experience is committed to Article 820-40 of the U.S. TOSHIBA Cares! • The consumer electronics industry is a growing trend and larger flat panel displays are required for installation. WARNING: TO REDUCE THE RISK OF ELECTRIC SHOCK, DO NOT REMOVE COVER...
..., DO NOT EXPOSE THIS APPLIANCE TO RAIN OR MOISTURE. WARNING: If you for purchasing this Toshiba LCD TV. CHILD SAFETY: It Makes A Difference How and Where You Use Your Flat Panel Display Congratulations on a "larger than a UL Listed wall bracket appropriate for the size and ... The Issue • The home theater entertainment experience is committed to Article 820-40 of the U.S. TOSHIBA Cares! • The consumer electronics industry is a growing trend and larger flat panel displays are required for installation. WARNING: TO REDUCE THE RISK OF ELECTRIC SHOCK, DO NOT REMOVE COVER...
User Manual
Page 3
...; To prevent electric shock, match wide blade of the Federal Communications Commission. 23) DANGER: RISK OF SERIOUS PERSONAL INJURY, DEATH, OR EQUIPMENT DAMAGE! The LCD panel inside a wall or similar enclosed area. 22) Never modify this equipment. Important Safety Instructions 1) Read these instructions. 2) Keep these recommendations and precautions and heed all...
...; To prevent electric shock, match wide blade of the Federal Communications Commission. 23) DANGER: RISK OF SERIOUS PERSONAL INJURY, DEATH, OR EQUIPMENT DAMAGE! The LCD panel inside a wall or similar enclosed area. 22) Never modify this equipment. Important Safety Instructions 1) Read these instructions. 2) Keep these recommendations and precautions and heed all...
User Manual
Page 4
...is not a sign of time. 39) ALWAYS unplug the TV to completely disconnect from mains power. Care For better performance and safer operation of your TOSHIBA TV, follow these recommendations and precautions: 34) If you use a sturdy strap from the hook(s) on or roll over the power cord, and ...cords. 31) Always operate this product, never place or store the TV in cabinet, or any other place with poor ventilation. Gently wipe the display panel surface (the TV screen) using the on the floor or a sturdy, level, stable surface that can accidentally touch overhead power lines. Avoid contact ...
...is not a sign of time. 39) ALWAYS unplug the TV to completely disconnect from mains power. Care For better performance and safer operation of your TOSHIBA TV, follow these recommendations and precautions: 34) If you use a sturdy strap from the hook(s) on or roll over the power cord, and ...cords. 31) Always operate this product, never place or store the TV in cabinet, or any other place with poor ventilation. Gently wipe the display panel surface (the TV screen) using the on the floor or a sturdy, level, stable surface that can accidentally touch overhead power lines. Avoid contact ...
User Manual
Page 5
...technician to properly dispose of the TV as indicated below. If these sounds become frequent or continuous, unplug the power cord and contact a Toshiba Authorized Service Provider. 41) DANGER: RISK OF SERIOUS PERSONAL INJURY OR DEATH! When selecting a location for your LCD TV on the included... fluorescent lamp in this product contain mercury. Service 43) WARNING: RISK OF ELECTRIC SHOCK! Refer all servicing not specified in the LCD panel contains a small amount of the TV, remove the pedestal stand from the TV as a quilt or blanket. For disposal or recycling ...
...technician to properly dispose of the TV as indicated below. If these sounds become frequent or continuous, unplug the power cord and contact a Toshiba Authorized Service Provider. 41) DANGER: RISK OF SERIOUS PERSONAL INJURY OR DEATH! When selecting a location for your LCD TV on the included... fluorescent lamp in this product contain mercury. Service 43) WARNING: RISK OF ELECTRIC SHOCK! Refer all servicing not specified in the LCD panel contains a small amount of the TV, remove the pedestal stand from the TV as a quilt or blanket. For disposal or recycling ...

User Manual
Page 6
..., remove the pedestal stand from the hook(s) on the rear of the unit. Make sure the strap is tight, secure, and parallel to the LCD panel. 2) Remove the four screws shown in the below diagram. To secure the TV, use a sturdy strap from the TV. 32" TV VESA Mounting Pattern 40...
..., remove the pedestal stand from the hook(s) on the rear of the unit. Make sure the strap is tight, secure, and parallel to the LCD panel. 2) Remove the four screws shown in the below diagram. To secure the TV, use a sturdy strap from the TV. 32" TV VESA Mounting Pattern 40...

User Manual
Page 7
... interference will disappear in a short period of time. 2) The LCD panel contained in a residential installation. FCC Declaration of Conformity Compliance Statement (Part 15): Toshiba 32C110U, 40E210U, 46G310U and 55G310U Television models comply with the instructions, may cause harmful interference to...type of joystick at an onscreen target may cause undesired operation. Trademark Information • Manufactured under your warranty. therefore, Toshiba is connected. • Consult the dealer or an experienced radio/TV technician for compliance to correct the interference by one ...
... interference will disappear in a short period of time. 2) The LCD panel contained in a residential installation. FCC Declaration of Conformity Compliance Statement (Part 15): Toshiba 32C110U, 40E210U, 46G310U and 55G310U Television models comply with the instructions, may cause harmful interference to...type of joystick at an onscreen target may cause undesired operation. Trademark Information • Manufactured under your warranty. therefore, Toshiba is connected. • Consult the dealer or an experienced radio/TV technician for compliance to correct the interference by one ...
User Manual
Page 8
...Overview of steps for installing, setting up, and using your new TV 10 TV front and side panel controls and connections......... 11 TV back panel connections 12 Chapter 2: Connecting your TV 13 Overview of cable types 13 About the connection illustrations 13... programs temporarily 41 Using the input lock feature 41 Locking channels 41 Using the GameTimer 41 Using the panel lock feature 42 Using the PC settings feature 42 Setting the PC Audio 43 Using the Media Player... United States Warranty for LCD Televisions 57 Limited Canadian Warranty for Toshiba Brand Flat Panel Televisions 58
...Overview of steps for installing, setting up, and using your new TV 10 TV front and side panel controls and connections......... 11 TV back panel connections 12 Chapter 2: Connecting your TV 13 Overview of cable types 13 About the connection illustrations 13... programs temporarily 41 Using the input lock feature 41 Locking channels 41 Using the GameTimer 41 Using the panel lock feature 42 Using the PC settings feature 42 Setting the PC Audio 43 Using the Media Player... United States Warranty for LCD Televisions 57 Limited Canadian Warranty for Toshiba Brand Flat Panel Televisions 58
User Manual
Page 10
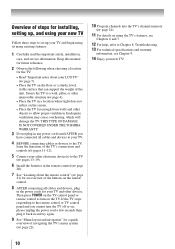
...level, stable surface that can support the weight of the unit. Then press POWER on the TV control panel or remote control to turn the TV off or on, please unplug the power cord a few seconds ... cables or devices to set up your new TV! 10 THIS TYPE OF DAMAGE IS NOT COVERED UNDER THE TOSHIBA WARRANTY. 3 Do not plug in any power cords until AFTER you cannot turn on the screen. •... light does not reflect on the TV. If the TV stops responding to the remote control or TV control panel and you have connected all cables and devices, plug in the remote control ( page 20). 7 See...
...level, stable surface that can support the weight of the unit. Then press POWER on the TV control panel or remote control to turn the TV off or on, please unplug the power cord a few seconds ... cables or devices to set up your new TV! 10 THIS TYPE OF DAMAGE IS NOT COVERED UNDER THE TOSHIBA WARRANTY. 3 Do not plug in any power cords until AFTER you cannot turn on the screen. •... light does not reflect on the TV. If the TV stops responding to the remote control or TV control panel and you have connected all cables and devices, plug in the remote control ( page 20). 7 See...
User Manual
Page 11
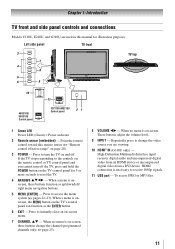
...audio and uncompressed digital video from an HDMI device or uncompressed digital video from a DVI device. Left side panel TV front 3 7 4 8 5 6 9 TV top 10 46G310U/ 55G310U Control panel 11 32C110U/40E210U Control panel 21 1無 Green LED Power LED (Green) = Power indicator 2無 Remote sensor (embedded) - When...on-screen menu. 7無 CHANNEL pq - Press to the controls on the remote control or TV control panel and you cannot turn the TV on the TV's control panel can function as up/down/left/ right menu navigation buttons. 5無 MENU (ENTER) - These buttons ...
...audio and uncompressed digital video from an HDMI device or uncompressed digital video from a DVI device. Left side panel TV front 3 7 4 8 5 6 9 TV top 10 46G310U/ 55G310U Control panel 11 32C110U/40E210U Control panel 21 1無 Green LED Power LED (Green) = Power indicator 2無 Remote sensor (embedded) - When...on-screen menu. 7無 CHANNEL pq - Press to the controls on the remote control or TV control panel and you cannot turn the TV on the TV's control panel can function as up/down/left/ right menu navigation buttons. 5無 MENU (ENTER) - These buttons ...
User Manual
Page 12
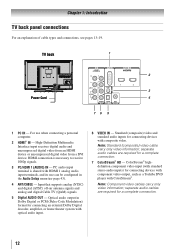
... - For use can be configured in Dolby Digital or PCM (Pulse-Code Modulation) format for connecting devices with component video output, such as a Toshiba DVD player with HDMI 1 analog audio input terminals, and its use when connecting a personal computer. 2無 HDMI® IN - ColorStream®... optical audio input. 6無 VIDEO IN - TV back 1 Power Cord 2 1 3 4 76 5 1無 PC IN - Chapter 1: Introduction TV back panel connections For an explanation of cable types and connections, see pages 13-19. PC audio input terminal is necessary to receive 1080p signals. 3無 PC...
... - For use can be configured in Dolby Digital or PCM (Pulse-Code Modulation) format for connecting devices with component video output, such as a Toshiba DVD player with HDMI 1 analog audio input terminals, and its use when connecting a personal computer. 2無 HDMI® IN - ColorStream®... optical audio input. 6無 VIDEO IN - TV back 1 Power Cord 2 1 3 4 76 5 1無 PC IN - Chapter 1: Introduction TV back panel connections For an explanation of cable types and connections, see pages 13-19. PC audio input terminal is necessary to receive 1080p signals. 3無 PC...
User Manual
Page 14
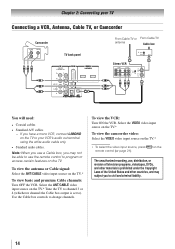
... white audio cable only. • Standard audio cables. Chapter 2: Connecting your TV Connecting a VCR, Antenna, Cable TV, or Camcorder Camcorder AUDIO OUT L R VIDEO TV back panel 1 From Cable TV or From Cable TV antenna Cable box IN CH 3 CH 4 OUT Stereo VCR VIDEO AUDIO L R IN CH 3 CH 4 OUT L R IN from ANT...
... white audio cable only. • Standard audio cables. Chapter 2: Connecting your TV Connecting a VCR, Antenna, Cable TV, or Camcorder Camcorder AUDIO OUT L R VIDEO TV back panel 1 From Cable TV or From Cable TV antenna Cable box IN CH 3 CH 4 OUT Stereo VCR VIDEO AUDIO L R IN CH 3 CH 4 OUT L R IN from ANT...
User Manual
Page 15
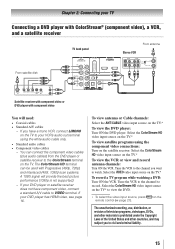
... source on the TV. Chapter 2: Connecting your TV Connecting a DVD player with ColorStream® (component video), a VCR, and a satellite receiver From satellite dish TV back panel 1 From antenna Stereo VCR VIDEO AUDIO L R IN CH 3 CH 4 OUT L R IN from ANT OUT to TV Y PB PR Satellite IN COMPONENT VIDEO S-VIDEO VIDEO OUT...
... source on the TV. Chapter 2: Connecting your TV Connecting a DVD player with ColorStream® (component video), a VCR, and a satellite receiver From satellite dish TV back panel 1 From antenna Stereo VCR VIDEO AUDIO L R IN CH 3 CH 4 OUT L R IN from ANT OUT to TV Y PB PR Satellite IN COMPONENT VIDEO S-VIDEO VIDEO OUT...
User Manual
Page 16
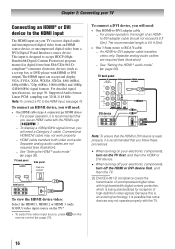
... analog audio cables are not required (see illustration). −− See "Setting the HDMI ® audio mode" ( page 26). TV back panel Side panel Only for reception of uncompressed digital video with the HDMI Logo ( ). −− To display a 1080p/60Hz signal format, you will need: &#...-to-DVI adapter cable −− For proper operation, the length of an HDMIto-DVI adapter cable should not exceed 9.8 ft (3m). TV back panel 1 DVI device VIDEO AUDIO L R IN IN OUT L R DVI / HDCP OUT Note: To ensure that some devices may not work properly. &#...
... analog audio cables are not required (see illustration). −− See "Setting the HDMI ® audio mode" ( page 26). TV back panel Side panel Only for reception of uncompressed digital video with the HDMI Logo ( ). −− To display a 1080p/60Hz signal format, you will need: &#...-to-DVI adapter cable −− For proper operation, the length of an HDMIto-DVI adapter cable should not exceed 9.8 ft (3m). TV back panel 1 DVI device VIDEO AUDIO L R IN IN OUT L R DVI / HDCP OUT Note: To ensure that some devices may not work properly. &#...
User Manual
Page 17
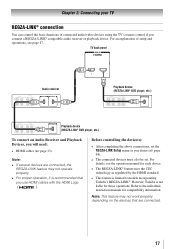
... a REGZA-LINK® compatible audio receiver or playback device. For details, see page 47. However, Toshiba is not liable for compatibility information. Refer to models incorporating Toshiba's REGZA-LINK®. Chapter 2: Connecting your TV REGZA-LINK® connection You can control the basic functions... menu as regulated by the HDMI standard. • This feature is limited to the individual instruction manuals for those operations. TV back panel Audio receiver Playback device (REGZA-LINK® DVD player, etc.) Playback device (REGZA-LINK® DVD player, etc.) To connect...
... a REGZA-LINK® compatible audio receiver or playback device. For details, see page 47. However, Toshiba is not liable for compatibility information. Refer to models incorporating Toshiba's REGZA-LINK®. Chapter 2: Connecting your TV REGZA-LINK® connection You can control the basic functions... menu as regulated by the HDMI standard. • This feature is limited to the individual instruction manuals for those operations. TV back panel Audio receiver Playback device (REGZA-LINK® DVD player, etc.) Playback device (REGZA-LINK® DVD player, etc.) To connect...
User Manual
Page 18
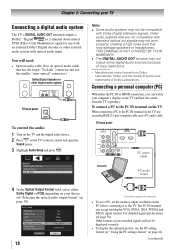
... 2-channel down-mixed PCM (Pulse-Code Modulation) signal for use with an external Dolby® Digital decoder or other digital audio system TV back panel To control the audio: 1無 Turn on the TV and the digital audio device. 2無 Press on the TV's remote control and open...larger "TosLink" connector and not the smaller "mini-optical" connector.) Dolby Digital decoder or other external audio system with optical audio input. TV back panel 1 Computer PC audio cable PC audio output 4無 In the Optical Output Format field, select either the PC IN or HDMI connection, you can...
... 2-channel down-mixed PCM (Pulse-Code Modulation) signal for use with an external Dolby® Digital decoder or other digital audio system TV back panel To control the audio: 1無 Turn on the TV and the digital audio device. 2無 Press on the TV's remote control and open...larger "TosLink" connector and not the smaller "mini-optical" connector.) Dolby Digital decoder or other external audio system with optical audio input. TV back panel 1 Computer PC audio cable PC audio output 4無 In the Optical Output Format field, select either the PC IN or HDMI connection, you can...
User Manual
Page 19
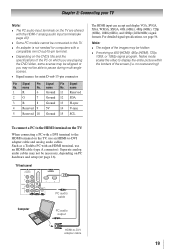
... models cannot be connected to this TV. •• An adapter is not needed for mini D-sub 15-pin connector Pin Signal No. TV back panel 1 Computer PC audio cable PC audio output HDMI-to -DVI adapter cable and analog audio cables. no overscanning). name 1R Pin Signal No. Chapter 2: Connecting... (HDMI), 720p, 1080i, or 1080p signal program, Native mode scales the video to display the entire picture within the borders of the screen (i.e. Such as a Toshiba PC with an HDMI terminal, use an HDMI-to -DVI adapter cable 19 For detailed signal specifications, see page 56.
... models cannot be connected to this TV. •• An adapter is not needed for mini D-sub 15-pin connector Pin Signal No. TV back panel 1 Computer PC audio cable PC audio output HDMI-to -DVI adapter cable and analog audio cables. no overscanning). name 1R Pin Signal No. Chapter 2: Connecting... (HDMI), 720p, 1080i, or 1080p signal program, Native mode scales the video to display the entire picture within the borders of the screen (i.e. Such as a Toshiba PC with an HDMI terminal, use an HDMI-to -DVI adapter cable 19 For detailed signal specifications, see page 56.
User Manual
Page 22
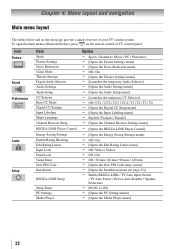
... Digital CC Settings Input Labeling Menu Language Channel Browser Setup REGZA-LINK Player Control Energy Saving Settings Enable Rating Blocking Edit Rating Limits Input Lock Panel Lock GameTimer New PIN Code Installation REGZA-LINK Setup Sleep Timer PC Settings Media Player Option Sports / Standard / Movie / PC / Preference [Opens the... next page provide a quick overview of your TV's menu system. To open the main menus (illustrated below and on the remote control or TV control panel.
... Digital CC Settings Input Labeling Menu Language Channel Browser Setup REGZA-LINK Player Control Energy Saving Settings Enable Rating Blocking Edit Rating Limits Input Lock Panel Lock GameTimer New PIN Code Installation REGZA-LINK Setup Sleep Timer PC Settings Media Player Option Sports / Standard / Movie / PC / Preference [Opens the... next page provide a quick overview of your TV's menu system. To open the main menus (illustrated below and on the remote control or TV control panel.
User Manual
Page 23
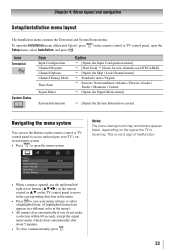
... system You can use the up/down/left/ right arrow buttons (pqtu) on the remote control or pq on the remote control or TV control panel to open the Installation menu (illustrated below), press Setup menu, select Installation, and press . Note: The menu background may sometimes appear black, depending ...on the signal the TV is opened, use the buttons on the TV control panel to move in the corresponding direction in the menu. • Press to save your TV's onscreen menu system. • Press to access and navigate...
... system You can use the up/down/left/ right arrow buttons (pqtu) on the remote control or pq on the remote control or TV control panel to open the Installation menu (illustrated below), press Setup menu, select Installation, and press . Note: The menu background may sometimes appear black, depending ...on the signal the TV is opened, use the buttons on the TV control panel to move in the corresponding direction in the menu. • Press to save your TV's onscreen menu system. • Press to access and navigate...
User Manual
Page 25
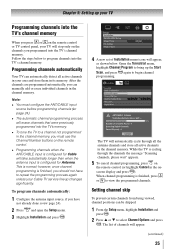
...; Press p or q to bring up your TV Programming channels into the TV's channel memory When you press or on the remote control or TV control panel, your TV will appear. (continued) 25 Chapter 5: Setting up the Start Scan, and press again to begin channel programming. Follow the steps below . Open the...
...; Press p or q to bring up your TV Programming channels into the TV's channel memory When you press or on the remote control or TV control panel, your TV will appear. (continued) 25 Chapter 5: Setting up the Start Scan, and press again to begin channel programming. Follow the steps below . Open the...
User Manual
Page 28
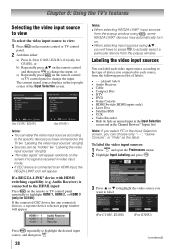
... to each source, from the popup window using , some REGZA-LINK® devices may automatically turn on the remote control or TV control panel to label. or c) Repeatedly press on . ••When selecting input sources using , you have to press to the ... window. If the connected CEC device has any connected devices, a separate device selection popup window will appear randomly on the remote or TV control panel repeatedly to highlight the desired input source, and then press . 28 (continued) If a REGZA-LINK® device with HDMI switching capability (e.g....
... to each source, from the popup window using , some REGZA-LINK® devices may automatically turn on the remote control or TV control panel to label. or c) Repeatedly press on . ••When selecting input sources using , you have to press to the ... window. If the connected CEC device has any connected devices, a separate device selection popup window will appear randomly on the remote or TV control panel repeatedly to highlight the desired input source, and then press . 28 (continued) If a REGZA-LINK® device with HDMI switching capability (e.g....

