

User Manual
Page 2
... watching a program, especially on the proper stands or installed according to the manufacturer's recommendations. • Flat panel displays that children can be taken to route all enclosed instructions for future reference. Dear Customer, Thank you are mounting the display is appropriate. NO USER-SERVICEABLE PARTS INSIDE. WARNING To prevent injury, this product. • Don't allow children to wall mount your purchase! For additional antenna grounding...
... watching a program, especially on the proper stands or installed according to the manufacturer's recommendations. • Flat panel displays that children can be taken to route all enclosed instructions for future reference. Dear Customer, Thank you are mounting the display is appropriate. NO USER-SERVICEABLE PARTS INSIDE. WARNING To prevent injury, this product. • Don't allow children to wall mount your purchase! For additional antenna grounding...
User Manual
Page 4
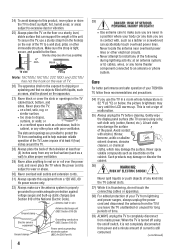
... television at least four (4) inches away from overheating and to the floor. Gently wipe the display panel surface (the TV screen) using the on/off switch, it is tight, secure, and parallel to help maintain reliable operation of the unit. Never spill liquids or push objects of any home theater component connected to install any other immovable structure. Never locate the antenna near overhead power...
... television at least four (4) inches away from overheating and to the floor. Gently wipe the display panel surface (the TV screen) using the on/off switch, it is tight, secure, and parallel to help maintain reliable operation of the unit. Never spill liquids or push objects of any home theater component connected to install any other immovable structure. Never locate the antenna near overhead power...
User Manual
Page 5
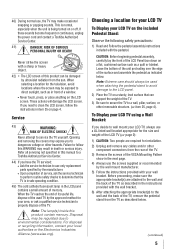
... remove any cables and/or other component connectors from the rear of the TV. 3) Remove the screws of the VESA Mounting Pattern show in the next page. 4) Always use the screws supplied or recommended by the wall mount manufacturer. 5) Follow the instructions provided with your LCD TV using a Wall Bracket: If you have the TV serviced: • Ask the service technician to use only replacement parts specified by the approved method for the television, avoid locations...
... remove any cables and/or other component connectors from the rear of the TV. 3) Remove the screws of the VESA Mounting Pattern show in the next page. 4) Always use the screws supplied or recommended by the wall mount manufacturer. 5) Follow the instructions provided with your LCD TV using a Wall Bracket: If you have the TV serviced: • Ask the service technician to use only replacement parts specified by the approved method for the television, avoid locations...
User Manual
Page 8
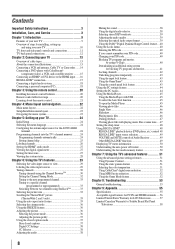
... back panel connections 12 Chapter 2: Connecting your TV 13 Overview of cable types 13 About the connection illustrations 13 Connecting a VCR and antenna, Cable TV or Camcorder........14 Connecting a DVD player with ColorStream® (component video), a VCR, and a satellite receiver...........15 Connecting an HDMI® or DVI device to the HDMI input........16 REGZA-LINK® connection 17 Connecting a digital audio system 18 Connecting a personal computer (PC 18 Chapter 3: Using the remote control 20 Installing the remote control batteries 20 Remote control...
... back panel connections 12 Chapter 2: Connecting your TV 13 Overview of cable types 13 About the connection illustrations 13 Connecting a VCR and antenna, Cable TV or Camcorder........14 Connecting a DVD player with ColorStream® (component video), a VCR, and a satellite receiver...........15 Connecting an HDMI® or DVI device to the HDMI input........16 REGZA-LINK® connection 17 Connecting a digital audio system 18 Connecting a personal computer (PC 18 Chapter 3: Using the remote control 20 Installing the remote control batteries 20 Remote control...
User Manual
Page 12
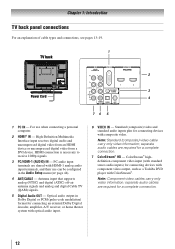
... video. Note: Standard (composite) video cable carry only video information; Optical audio output in the Audio Setup menu ( page 44). 4無 ANT/CABLE - For use can be configured in Dolby Digital or PCM (pulse-code modulation) format for a complete connection. 12 Antenna input that supports analog (NTSC) and digital (ATSC) off-air antenna signals and analog and digital Cable TV (QAM) signals. 5無 Digital Audio OUT - Note: Component video cables carry only video information; HDMI connection is necessary to receive 1080p signals. 3無 PC/HDMI-1 (AUDIO...
... video. Note: Standard (composite) video cable carry only video information; Optical audio output in the Audio Setup menu ( page 44). 4無 ANT/CABLE - For use can be configured in Dolby Digital or PCM (pulse-code modulation) format for a complete connection. 12 Antenna input that supports analog (NTSC) and digital (ATSC) off-air antenna signals and analog and digital Cable TV (QAM) signals. 5無 Digital Audio OUT - Note: Component video cables carry only video information; HDMI connection is necessary to receive 1080p signals. 3無 PC/HDMI-1 (AUDIO...
User Manual
Page 13
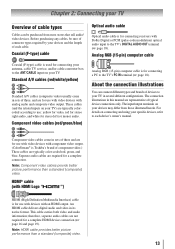
... input/output terminals on connecting and using your devices and the length of each device's owner's manual. Component video cables come in its native format. Component video cables (red/green/blue) Optical audio cable Optical audio cable is Toshiba's brand of component video.) These cables are representative of three, and are typically colorcoded according to use with video devices with Dolby Digital or PCM (pulse-code modulation) optical audio input to the TV's DIGITAL AUDIO OUT terminal ( page 18). Note: Component video cables provide better picture performance...
... input/output terminals on connecting and using your devices and the length of each device's owner's manual. Component video cables come in its native format. Component video cables (red/green/blue) Optical audio cable Optical audio cable is Toshiba's brand of component video.) These cables are representative of three, and are typically colorcoded according to use with video devices with Dolby Digital or PCM (pulse-code modulation) optical audio input to the TV's DIGITAL AUDIO OUT terminal ( page 18). Note: Component video cables provide better picture performance...

User Manual
Page 18
... signal specifications ( page 56). Connecting a personal computer (PC) With either Dolby Digital or PCM, depending on your device ("Selecting the optical audio output format" on page 39). 18 Conversion adapter (if necessary) • To use a PC, set the monitor output resolution on the PC before connecting it to the PC IN terminal on the TV, use an analog RGB (15-pin) computer cable and a PC audio cable. To connect...
... signal specifications ( page 56). Connecting a personal computer (PC) With either Dolby Digital or PCM, depending on your device ("Selecting the optical audio output format" on page 39). 18 Conversion adapter (if necessary) • To use a PC, set the monitor output resolution on the PC before connecting it to the PC IN terminal on the TV, use an analog RGB (15-pin) computer cable and a PC audio cable. To connect...
User Manual
Page 22
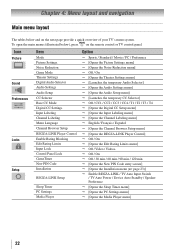
...open the main menus (illustrated below and on the remote control or TV control panel. Icon Picture Sound Preferences Locks Setup Item Mode Picture Settings Noise Reduction Game Mode Theater Settings Digital Audio Selector Audio Settings Audio Setup CC Selector Base CC Mode Digital CC Settings Input Labeling Channel Labeling Menu Language Channel Browser Setup REGZA-LINK Player Control Enable Rating Blocking Edit Rating Limits Input Lock Control Panel Lock GameTimer New PIN Code Installation REGZA-LINK Setup Sleep Timer PC Settings Media Player Option Sports / Standard / Movie / PC...
...open the main menus (illustrated below and on the remote control or TV control panel. Icon Picture Sound Preferences Locks Setup Item Mode Picture Settings Noise Reduction Game Mode Theater Settings Digital Audio Selector Audio Settings Audio Setup CC Selector Base CC Mode Digital CC Settings Input Labeling Channel Labeling Menu Language Channel Browser Setup REGZA-LINK Player Control Enable Rating Blocking Edit Rating Limits Input Lock Control Panel Lock GameTimer New PIN Code Installation REGZA-LINK Setup Sleep Timer PC Settings Media Player Option Sports / Standard / Movie / PC...
User Manual
Page 24
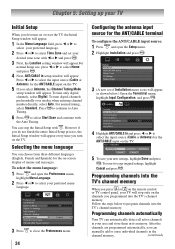
... channel number directly, select Auto. To revert to your original settings, highlight Cancel and press . After the channels are programmed automatically, you can stop only on the channels you select Antenna, the Channel Tuning Mode setup window will appear. Programming channels into the TV's channel memory. Programming channels automatically Your TV can choose from three different languages (English, French and Spanish) for the ANT/CABLE input on -screen display of Installation menu...
... channel number directly, select Auto. To revert to your original settings, highlight Cancel and press . After the channels are programmed automatically, you can stop only on the channels you select Antenna, the Channel Tuning Mode setup window will appear. Programming channels into the TV's channel memory. Programming channels automatically Your TV can choose from three different languages (English, French and Spanish) for the ANT/CABLE input on -screen display of Installation menu...

User Manual
Page 25
....) Open the Terrestrial menu, highlight Channel Program to bring up your Cable TV service lineup changes significantly. When channel programming is normal; A tick will be selected with or ; The list of channels will appear. 4無 (A new set of Channels Found - 73 Scanning Digital Channels Found Channel - 118 Abort 3無 Press p or q to select a channel position to be accessed using the number keys on the remote control to enter the channel number (for example, 56...
....) Open the Terrestrial menu, highlight Channel Program to bring up your Cable TV service lineup changes significantly. When channel programming is normal; A tick will be selected with or ; The list of channels will appear. 4無 (A new set of Channels Found - 73 Scanning Digital Channels Found Channel - 118 Abort 3無 Press p or q to select a channel position to be accessed using the number keys on the remote control to enter the channel number (for example, 56...
User Manual
Page 27
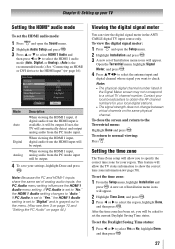
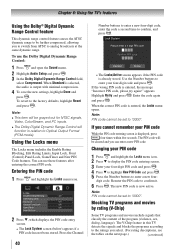
... Installation and press . 3無 A new set the Daylight Saving Time status: 1無 Press t or u to show the correct time zone information ( page 50). To view the digital signal meter: 1無 Press and open the Sound menu. 2無 Highlight Audio Setup and press . 3無 Press p or q to select HDMI 1 Audio and then press t or u to select the HDMI 1 audio mode (Auto, Digital, or Analog). (Auto is the recommended mode.) See "Connecting an HDMI...
... Installation and press . 3無 A new set the Daylight Saving Time status: 1無 Press t or u to show the correct time zone information ( page 50). To view the digital signal meter: 1無 Press and open the Sound menu. 2無 Highlight Audio Setup and press . 3無 Press p or q to select HDMI 1 Audio and then press t or u to select the HDMI 1 audio mode (Auto, Digital, or Analog). (Auto is the recommended mode.) See "Connecting an HDMI...
User Manual
Page 38
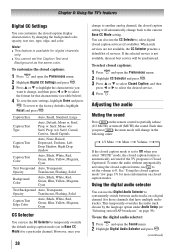
... sound. Adjusting the audio Muting the sound Press on closed caption modes. Using the digital audio selector You can use the Digital Audio Selector to select the format for that have multiple audio tracks). This temporarily overrides the audio track chosen by changing the background color, opacity, text size, type, edge, and color. w/o Serif, Casual, Cursive, Small Capitals Caption Text Edge Auto, None, Raised, Depressed, Uniform, Left Drop Shadow, Right Drop shadow Caption Text Color Auto, Black, White, Red, Green...
... sound. Adjusting the audio Muting the sound Press on closed caption modes. Using the digital audio selector You can use the Digital Audio Selector to select the format for that have multiple audio tracks). This temporarily overrides the audio track chosen by changing the background color, opacity, text size, type, edge, and color. w/o Serif, Casual, Cursive, Small Capitals Caption Text Edge Auto, None, Raised, Depressed, Uniform, Left Drop Shadow, Right Drop shadow Caption Text Color Auto, Black, White, Red, Green...
User Manual
Page 40
... highlight the Locks menu icon. 2無 Press , which displays the PIN code entry screen. • The Lock System screen (below) appears if a PIN code has not been stored. appears. The PIN code will function in this TV detects the signals and blocks the programs according to the factory defaults, highlight Reset and press . Highlight Retry and press . digit code. Note: PIN code cannot be set to analog broadcasts...
... highlight the Locks menu icon. 2無 Press , which displays the PIN code entry screen. • The Lock System screen (below) appears if a PIN code has not been stored. appears. The PIN code will function in this TV detects the signals and blocks the programs according to the factory defaults, highlight Reset and press . Highlight Retry and press . digit code. Note: PIN code cannot be set to analog broadcasts...
User Manual
Page 44
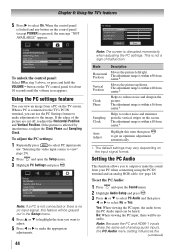
... stripes on the input signal format. Note: Because the PC and HDMI-1 inputs share the same set the PC Audio: 1無 Press and open the Setup menu. 3無 Highlight PC Settings and press . The adjustment range is connected to the TV's PC IN terminal, you to output or mute the sound from center.* Sampling Clock Helps to make the appropriate adjustments. 44 Note: The screen is within...
... stripes on the input signal format. Note: Because the PC and HDMI-1 inputs share the same set the PC Audio: 1無 Press and open the Setup menu. 3無 Highlight PC Settings and press . The adjustment range is connected to the TV's PC IN terminal, you to output or mute the sound from center.* Sampling Clock Helps to make the appropriate adjustments. 44 Note: The screen is within...
User Manual
Page 49
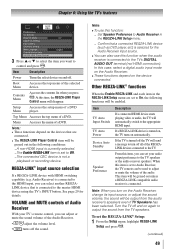
... the Audio Receiver. • adjust the volume level. • turns off and on the devices that is connected to the master HDMI device using the TV's INPUT button. Setup Menu Accesses the setup menu of a DVD. VOLUME and MUTE controls of the audio. This item will be grayed out unless a REGZA-LINK compatible audio receiver is not a playback or recording device. Item TV Auto Input Switch TV Auto Power Device Auto Standby Speaker Preference Description If a connected HDMI device starts playing video or audio, the...
... the Audio Receiver. • adjust the volume level. • turns off and on the devices that is connected to the master HDMI device using the TV's INPUT button. Setup Menu Accesses the setup menu of a DVD. VOLUME and MUTE controls of the audio. This item will be grayed out unless a REGZA-LINK compatible audio receiver is not a playback or recording device. Item TV Auto Input Switch TV Auto Power Device Auto Standby Speaker Preference Description If a connected HDMI device starts playing video or audio, the...
User Manual
Page 50
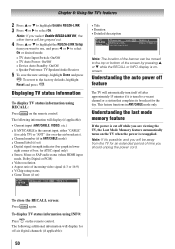
...; Stereo, Mono or SAP audio status (when HDMI input mode, Dolby Digital or PCM) • Video resolution • Aspect ratio of incoming video signal (4:3 or 16:9) • V-Chip rating status • Game Timer (if set ) • Digital signal strength indicator (bar graph in ANT/CABLE mode only. Displaying TV status information To display TV status information using INFO: Press on the remote control. for the day. Chapter 6: Using the TV's features 2無...
...; Stereo, Mono or SAP audio status (when HDMI input mode, Dolby Digital or PCM) • Video resolution • Aspect ratio of incoming video signal (4:3 or 16:9) • V-Chip rating status • Game Timer (if set ) • Digital signal strength indicator (bar graph in ANT/CABLE mode only. Displaying TV status information To display TV status information using INFO: Press on the remote control. for the day. Chapter 6: Using the TV's features 2無...

User Manual
Page 53
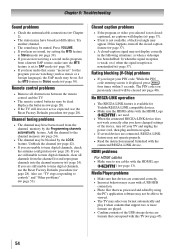
... are watching an analog channel (offair broadcast or Cable TV), you cannot view signals from external devices connected to VIDEO, ColorStream® HDMI 1, HDMI 2, PC or from channels 3 or 4, make sure the Input Lock is not addressed in this issue. 53 Cannot view external signals or channel 3 or 4 •• If you can set to Off ( page 43). Set the closed caption feature is connected to an external A/V device (e.g., DVD player, video game system, set to one or...
... are watching an analog channel (offair broadcast or Cable TV), you cannot view signals from external devices connected to VIDEO, ColorStream® HDMI 1, HDMI 2, PC or from channels 3 or 4, make sure the Input Lock is not addressed in this issue. 53 Cannot view external signals or channel 3 or 4 •• If you can set to Off ( page 43). Set the closed caption feature is connected to an external A/V device (e.g., DVD player, video game system, set to one or...
User Manual
Page 54
...; A closed-caption signal may appear. If this TV ( page 45). 54 Remote control problems •• Remove all channels from the channel list and reprogram channels into the channel memory ( page 24). Closed caption problems •• If the program or video you forget your TV and unplug the power cord, then plug and turn on . No REGZA-LINK operation •• The REGZA-LINK feature is displayed, press four times within...
...; A closed-caption signal may appear. If this TV ( page 45). 54 Remote control problems •• Remove all channels from the channel list and reprogram channels into the channel memory ( page 24). Closed caption problems •• If the program or video you forget your TV and unplug the power cord, then plug and turn on . No REGZA-LINK operation •• The REGZA-LINK feature is displayed, press four times within...
User Manual
Page 57
... DELIVERING THE PRODUCT TO A SERVICE CENTER. Your Responsibility Read the owner's manual thoroughly before operating this LCD Television and connected equipment; Reception problems caused by inadequate antenna systems, misaligned satellite dishes or improperly installed cable drops are not covered by this limited warranty. com/customersupport". LCD TELEVISIONS PURCHASED IN THE U.S.A. DURING THIS PERIOD, TACP WILL, AT TACP'S SOLE DESCRETION, REPAIR OR REPLACE A DEFECTIVE PART/PRODUCT WITH A NEW...
... DELIVERING THE PRODUCT TO A SERVICE CENTER. Your Responsibility Read the owner's manual thoroughly before operating this LCD Television and connected equipment; Reception problems caused by inadequate antenna systems, misaligned satellite dishes or improperly installed cable drops are not covered by this limited warranty. com/customersupport". LCD TELEVISIONS PURCHASED IN THE U.S.A. DURING THIS PERIOD, TACP WILL, AT TACP'S SOLE DESCRETION, REPAIR OR REPLACE A DEFECTIVE PART/PRODUCT WITH A NEW...
User Manual
Page 58
... this Television must provide your LCD Television online at http://support.toshiba.ca/warranty/. Repair of damage that is mounted in any other external cause or event, act or omission outside the control of TCL, including fire, theft, acts of God, alteration, power failures, power surges or power shortages, lightning, other electrical faults, or repairs, modifications or replacements by persons other proof of purchase. (2) All warranty servicing of...
... this Television must provide your LCD Television online at http://support.toshiba.ca/warranty/. Repair of damage that is mounted in any other external cause or event, act or omission outside the control of TCL, including fire, theft, acts of God, alteration, power failures, power surges or power shortages, lightning, other electrical faults, or repairs, modifications or replacements by persons other proof of purchase. (2) All warranty servicing of...


