Owner's Manual - English
Page 1
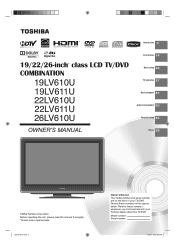
... in the spaces below. Introduction 4 19/22/26-inch* class LCD TV/DVD COMBINATION 19LV610U 19LV611U 22LV610U 22LV611U 26LV610U OWNER'S MANUAL Connections 14 Basic setup 22 TV operation 27 Basic playback 47 Advanced playback 50 Function setup 63 Others 69 ©2009 Toshiba Corporation Before operating the unit, please read this manual thoroughly. *Screen...
... in the spaces below. Introduction 4 19/22/26-inch* class LCD TV/DVD COMBINATION 19LV610U 19LV611U 22LV610U 22LV611U 26LV610U OWNER'S MANUAL Connections 14 Basic setup 22 TV operation 27 Basic playback 47 Advanced playback 50 Function setup 63 Others 69 ©2009 Toshiba Corporation Before operating the unit, please read this manual thoroughly. *Screen...
Owner's Manual - English
Page 2
...Wash hands after handling. 2 CHILD SAFETY: It Makes A Difference How and Where You Use Your Flat Panel Display Congratulations on your LCD TV" (Pg.6). TO PREVENT THE SPREAD OF FIRE, KEEP CANDLES OR OPEN FLAMES AWAY FROM THIS PRODUCT AT TIMES. REFER SERVICING TO...harm. If you are unsure, contact a professional installer. • A minimum of your flat panel display. • Carefully read this Toshiba LCD TV or TV/DVD Combination television. Flat panel displays can become excited while watching a program, especially on page 5. However, flat panel displays are not always...
...Wash hands after handling. 2 CHILD SAFETY: It Makes A Difference How and Where You Use Your Flat Panel Display Congratulations on your LCD TV" (Pg.6). TO PREVENT THE SPREAD OF FIRE, KEEP CANDLES OR OPEN FLAMES AWAY FROM THIS PRODUCT AT TIMES. REFER SERVICING TO...harm. If you are unsure, contact a professional installer. • A minimum of your flat panel display. • Carefully read this Toshiba LCD TV or TV/DVD Combination television. Flat panel displays can become excited while watching a program, especially on page 5. However, flat panel displays are not always...
Owner's Manual - English
Page 3
.... Increase the separation between the equipment and the receiver. - Consult the dealer or an experienced radio/TV technician for compliance to Part 15 of Conformity Compliance Statement (Part 15): The Toshiba 19LV610U, 19LV611U, 22LV610U, 22LV611U, 26LV610U LCD TV/DVD Combination complies with the limits for a Class B digital device, pursuant to these rules is encouraged...
.... Increase the separation between the equipment and the receiver. - Consult the dealer or an experienced radio/TV technician for compliance to Part 15 of Conformity Compliance Statement (Part 15): The Toshiba 19LV610U, 19LV611U, 22LV610U, 22LV611U, 26LV610U LCD TV/DVD Combination complies with the limits for a Class B digital device, pursuant to these rules is encouraged...
Owner's Manual - English
Page 4
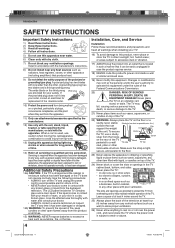
Install in case the product requires service. 18) NEVER route the productʼs power cord inside the TV contains glass and a toxic liquid. A polarized ...instructions. 8) Do not install near water. 6) Clean only with liquid, or candles on top of the TV. Introduction SAFETY INSTRUCTIONS Important Safety Instructions 1) Read these instructions. 2) Keep these recommendations and precautions and heed...on the floor or a sturdy, level, stable Sturdy tie (as short as possible; The LCD panel inside a wall or similar enclosed area. 19) Never modify this product at all warnings when...
Install in case the product requires service. 18) NEVER route the productʼs power cord inside the TV contains glass and a toxic liquid. A polarized ...instructions. 8) Do not install near water. 6) Clean only with liquid, or candles on top of the TV. Introduction SAFETY INSTRUCTIONS Important Safety Instructions 1) Read these instructions. 2) Keep these recommendations and precautions and heed...on the floor or a sturdy, level, stable Sturdy tie (as short as possible; The LCD panel inside a wall or similar enclosed area. 19) Never modify this product at all warnings when...
Owner's Manual - English
Page 5
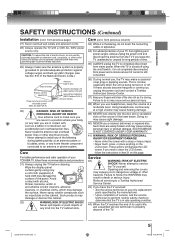
.... Failure to do not touch the connecting cables or apparatus. 34) For added protection of your TOSHIBA TV, follow this page. These actions will damage the LCD screen If you are easily broken and may damage the surface. Opening and removing the covers may cause...to follow these sounds become frequent or continuous, unplug the power cord and contact a Toshiba Authorized Service Center. 37) Keep your body (or any home theater component connected to service the TV yourself. Introduction SAFETY INSTRUCTIONS (Continued) Installation (cont. from previous column) 33) While ...
.... Failure to do not touch the connecting cables or apparatus. 34) For added protection of your TOSHIBA TV, follow this page. These actions will damage the LCD screen If you are easily broken and may damage the surface. Opening and removing the covers may cause...to follow these sounds become frequent or continuous, unplug the power cord and contact a Toshiba Authorized Service Center. 37) Keep your body (or any home theater component connected to service the TV yourself. Introduction SAFETY INSTRUCTIONS (Continued) Installation (cont. from previous column) 33) While ...
Owner's Manual - English
Page 6
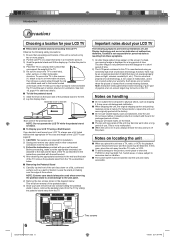
...lift the display up. hot, humid areas; Introduction Precautions Choosing a location for your LCD TV ■ Retractable pedestal stand and locating the LCD TV Observe the following symptoms are technical limitations of LCD Display technology and are not an indication of time. Before proceeding, make sure the appropriate... VCR. ■ To avoid damage to the wall and the back of the TV as described below . therefore, Toshiba is not responsible for ventilation. Such pixels are attached to this unit near a TV, radio, or VCR, the playback picture may become warm after a long period of...
...lift the display up. hot, humid areas; Introduction Precautions Choosing a location for your LCD TV ■ Retractable pedestal stand and locating the LCD TV Observe the following symptoms are technical limitations of LCD Display technology and are not an indication of time. Before proceeding, make sure the appropriate... VCR. ■ To avoid damage to the wall and the back of the TV as described below . therefore, Toshiba is not responsible for ventilation. Such pixels are attached to this unit near a TV, radio, or VCR, the playback picture may become warm after a long period of...
Owner's Manual - English
Page 7
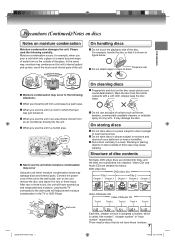
... or near heat sources. Do not use the unit in which is shown in places subject to discs. Store discs vertically in the TV or DVD Player. Leaving the TV connected to the wall outlet, turn on moisture condensation Moisture condensation damages the unit. Exacmopnldeeonfsmatoioisnt!ure Optical pick-up lens, one of...
... or near heat sources. Do not use the unit in which is shown in places subject to discs. Store discs vertically in the TV or DVD Player. Leaving the TV connected to the wall outlet, turn on moisture condensation Moisture condensation damages the unit. Exacmopnldeeonfsmatoioisnt!ure Optical pick-up lens, one of...
Owner's Manual - English
Page 8
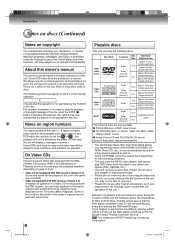
...DivX® quality 8 cm The following discs. You may be played back depending on the TV screen (Menu Playback). If you can be subject to instruction notes of DVD and CD discs, Toshiba cannot assure that the DVD player contained in this ownerʼs manual may also indicate that ... during playback. ROM, Photo CD, etc., or non standardized discs even if they may not be able to operation of this TV, please contact Toshiba Customer Service. About this ownerʼs manual This ownerʼs manual explains the basic instructions of a Video CD not equipped with PBC function (...
...DivX® quality 8 cm The following discs. You may be played back depending on the TV screen (Menu Playback). If you can be subject to instruction notes of DVD and CD discs, Toshiba cannot assure that the DVD player contained in this ownerʼs manual may also indicate that ... during playback. ROM, Photo CD, etc., or non standardized discs even if they may not be able to operation of this TV, please contact Toshiba Customer Service. About this ownerʼs manual This ownerʼs manual explains the basic instructions of a Video CD not equipped with PBC function (...
Owner's Manual - English
Page 9
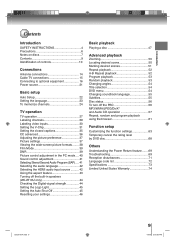
... 15 Connecting to optional equipment 16 Power source 21 Basic setup Auto Setup 22 Setting the language 23 To memorize channels 24 TV operation TV operation 27 Labeling channels 29 Labeling video inputs 30 Setting the V-Chip 31 Setting the closed captions 35 CC advanced 36 Adjusting the picture preference ...
... 15 Connecting to optional equipment 16 Power source 21 Basic setup Auto Setup 22 Setting the language 23 To memorize channels 24 TV operation TV operation 27 Labeling channels 29 Labeling video inputs 30 Setting the V-Chip 31 Setting the closed captions 35 CC advanced 36 Adjusting the picture preference ...

Owner's Manual - English
Page 10
Hold the base of the TV-screen for 3° forward or for 10° backward from vertical angle. Introduction Identification of controls Front Remote sensor 13 POWER indicator 22 Speaker Side Left Side Disc slot 47 Adjusting the angle of the base (except 26LV610U) Approx. 10° Approx. 3° EJECT button 48 VOLUME (+/-) buttons 27 CHANNEL 27 PLAY button 47 CHANNEL 27 ■ STOP button 47 MENU button 23 63 INPUT/ENTER button 16 POWER button 22 You can adjust the angle of the TV while adjusting the angle. 10 52G0101A.indb 10 1/5/09 3:02:03 PM
Hold the base of the TV-screen for 3° forward or for 10° backward from vertical angle. Introduction Identification of controls Front Remote sensor 13 POWER indicator 22 Speaker Side Left Side Disc slot 47 Adjusting the angle of the base (except 26LV610U) Approx. 10° Approx. 3° EJECT button 48 VOLUME (+/-) buttons 27 CHANNEL 27 PLAY button 47 CHANNEL 27 ■ STOP button 47 MENU button 23 63 INPUT/ENTER button 16 POWER button 22 You can adjust the angle of the TV while adjusting the angle. 10 52G0101A.indb 10 1/5/09 3:02:03 PM

Owner's Manual - English
Page 12
... a menu, follow the instructions in for details. See the page in "DVD menu." 54 12 52G0101A.indb 12 1/5/09 3:02:08 PM EJECT button 48 TV/DVD button 47 Direct channel selection buttons (0-9) 27 Numbered buttons (0-9) 31 DISPLAY button 28 56 CH / button 27 SUBTITLE button 55 INPUT button 16 ZOOM...
... a menu, follow the instructions in for details. See the page in "DVD menu." 54 12 52G0101A.indb 12 1/5/09 3:02:08 PM EJECT button 48 TV/DVD button 47 Direct channel selection buttons (0-9) 27 Numbered buttons (0-9) 31 DISPLAY button 28 56 CH / button 27 SUBTITLE button 55 INPUT button 16 ZOOM...
Owner's Manual - English
Page 14
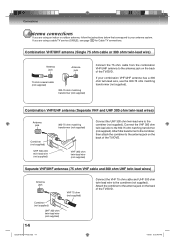
Attach the transformer to the combiner, then attach the combiner to the antenna jack on the back of the TV/DVD. Connect the VHF 300 ohm twin-lead wire to the combiner (not supplied). Separate VHF/UHF antennas (75 ohm VHF cable and 300 ohm ... system. If you are using an indoor or outdoor antenna, follow the instructions below that correspond to the antenna jack on the back of the TV/DVD. 1/5/09 3:02:49 PM Combination VHF/UHF antenna (Single 75 ohm cable or 300 ohm twin-lead wire) Antenna jack Antenna jack 75 ohm...
Attach the transformer to the combiner, then attach the combiner to the antenna jack on the back of the TV/DVD. Connect the VHF 300 ohm twin-lead wire to the combiner (not supplied). Separate VHF/UHF antennas (75 ohm VHF cable and 300 ohm ... system. If you are using an indoor or outdoor antenna, follow the instructions below that correspond to the antenna jack on the back of the TV/DVD. 1/5/09 3:02:49 PM Combination VHF/UHF antenna (Single 75 ohm cable or 300 ohm twin-lead wire) Antenna jack Antenna jack 75 ohm...
Owner's Manual - English
Page 15
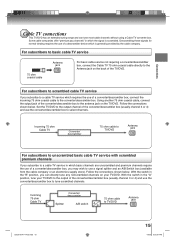
... may wish to the converter/descrambler box. Follow the connections shown below . With the switch in the "A" position, tune your TV/DVD. Incoming 75 ohm Cable TV Converter/ descrambler 75 ohm cable Splitter A/B switch A B to select channels. Follow the connections shown below . With the switch in... tune scrambled channels. Descrambling these signals for normal viewing requires the use the converter/descrambler box to the Antenna jack on the TV/DVD. Using another 75 ohm coaxial cable, connect the output jack of the converter/descrambler box to the antenna jack on the...
... may wish to the converter/descrambler box. Follow the connections shown below . With the switch in the "A" position, tune your TV/DVD. Incoming 75 ohm Cable TV Converter/ descrambler 75 ohm cable Splitter A/B switch A B to select channels. Follow the connections shown below . With the switch in... tune scrambled channels. Descrambling these signals for normal viewing requires the use the converter/descrambler box to the Antenna jack on the TV/DVD. Using another 75 ohm coaxial cable, connect the output jack of the converter/descrambler box to the antenna jack on the...
Owner's Manual - English
Page 16
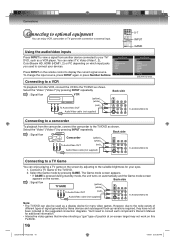
...Video cable (not supplied) Back side To AUDIO/VIDEO IN Connecting to a camcorder To playback from the camcorder, connect the camcorder to the TV/DVD as shown. Connections Connecting to optional equipment You can also be used to connect your devices. Select the "Video" ("Video1") by ...hook-up variations required, they have not all been included in the suggested connection diagrams. Youʼll need to the TV/DVD as shown. Connect a TV Game to your TV/ DVD, such as a display device for additional information. • Interactive video games that involve shooting a "gun" type...
...Video cable (not supplied) Back side To AUDIO/VIDEO IN Connecting to a camcorder To playback from the camcorder, connect the camcorder to the TV/DVD as shown. Connections Connecting to optional equipment You can also be used to connect your devices. Select the "Video" ("Video1") by ...hook-up variations required, they have not all been included in the suggested connection diagrams. Youʼll need to the TV/DVD as shown. Connect a TV Game to your TV/ DVD, such as a display device for additional information. • Interactive video games that involve shooting a "gun" type...

Owner's Manual - English
Page 17
...the unit to other equipment, be sure to turn off the power and unplug all of the TV/DVD, you must be distorted. Connecting an optional equipment with ColorStream® (Component video) output Your TV/DVD is separated. Select the "ColorStream HD" by pressing INPUT repeatedly. : Signal flow...the S-Video cable and the standard video cable are for use with devices that output 480i, 1080i inter- Connecting your TV/DVD to a component video compatible DVD player, such as a Toshiba DVD player with Component video : Signal flow To COLORSTREAM HD (Y, Pb, Pr) IN Back side To Audio ...
...the unit to other equipment, be sure to turn off the power and unplug all of the TV/DVD, you must be distorted. Connecting an optional equipment with ColorStream® (Component video) output Your TV/DVD is separated. Select the "ColorStream HD" by pressing INPUT repeatedly. : Signal flow...the S-Video cable and the standard video cable are for use with devices that output 480i, 1080i inter- Connecting your TV/DVD to a component video compatible DVD player, such as a Toshiba DVD player with Component video : Signal flow To COLORSTREAM HD (Y, Pb, Pr) IN Back side To Audio ...
Owner's Manual - English
Page 18
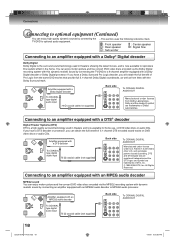
Amplifier equipped with the Dolby Surround mark. Connections Connecting to optional equipment (Continued) You can enjoy high quality dynamic sounds by connecting the TV/DVD to optional audio equipment. * This section uses the following reference mark. : Front speaker : Rear speaker : Sub woofer : Center speaker : Signal flow Connecting ... with an MPEG2 audio decoder Back side To COAXIAL DIGITAL AUDIO OUT To COAXIAL type digital audio input 75 Ω coaxial cable (not supplied) 18 52G0101A P14-29.indd 18 1/5/09 3:02:55 PM Patent #: 5,451,942 & other U.S.
Amplifier equipped with the Dolby Surround mark. Connections Connecting to optional equipment (Continued) You can enjoy high quality dynamic sounds by connecting the TV/DVD to optional audio equipment. * This section uses the following reference mark. : Front speaker : Rear speaker : Sub woofer : Center speaker : Signal flow Connecting ... with an MPEG2 audio decoder Back side To COAXIAL DIGITAL AUDIO OUT To COAXIAL type digital audio input 75 Ω coaxial cable (not supplied) 18 52G0101A P14-29.indd 18 1/5/09 3:02:55 PM Patent #: 5,451,942 & other U.S.
Owner's Manual - English
Page 19
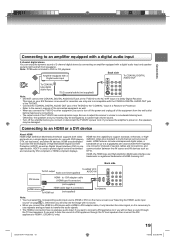
...To COAXIAL type digital audio input 75 Ω coaxial cable (not supplied) Note: • DO NOT connect the COAXIAL DIGITAL AUDIO OUT jack of the TV/DVD to the AC-3 RF input of a Dolby Digital Receiver. Connecting to an HDMI or a DVI device About HDMI HDMI (High Definition ...1/PC To DVI output Audio cord (not supplied) AUDIO IN DVI device HDMI - If you want to hear the sound of a DVI appliance through the TV loud speakers. HDMI was developed to multi-channel surround-sound audio. HDMI has the capability to support standard, enhanced, or highdefinition video plus...
...To COAXIAL type digital audio input 75 Ω coaxial cable (not supplied) Note: • DO NOT connect the COAXIAL DIGITAL AUDIO OUT jack of the TV/DVD to the AC-3 RF input of a Dolby Digital Receiver. Connecting to an HDMI or a DVI device About HDMI HDMI (High Definition ...1/PC To DVI output Audio cord (not supplied) AUDIO IN DVI device HDMI - If you want to hear the sound of a DVI appliance through the TV loud speakers. HDMI was developed to multi-channel surround-sound audio. HDMI has the capability to support standard, enhanced, or highdefinition video plus...

Owner's Manual - English
Page 20
... (When you don't have to -DVI adapter cable (not supplied) Note: • The on-screen displays will have a different appearance in PC mode than in TV mode. • If there is no video signal from the PC when the unit is in speakers" on the computer. In case of a Multimedia computer... audio: Turn on the plug. Switch on page 44 .) Note: To hear sound when using an external audio amplifier, the volume of the TV/DVD. Turn off the TV's built-in speakers (see "Turning off the built-in PC mode, "No signal" will appear on the rear of your Multimedia computer and...
... (When you don't have to -DVI adapter cable (not supplied) Note: • The on-screen displays will have a different appearance in PC mode than in TV mode. • If there is no video signal from the PC when the unit is in speakers" on the computer. In case of a Multimedia computer... audio: Turn on the plug. Switch on page 44 .) Note: To hear sound when using an external audio amplifier, the volume of the TV/DVD. Turn off the TV's built-in speakers (see "Turning off the built-in PC mode, "No signal" will appear on the rear of your Multimedia computer and...
Owner's Manual - English
Page 21
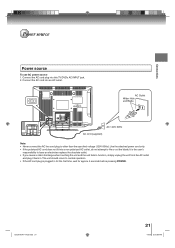
... approx. 5 seconds before pressing POWER. 52G0101A P14-29.indd 21 21 1/5/09 3:02:58 PM It is plugged in . Connect the AC cord into this TV/DVD's AC INPUT jack. 2. The unit should return to file or cut the blade. Connect the AC cord plug into an AC outlet. Use the...
... approx. 5 seconds before pressing POWER. 52G0101A P14-29.indd 21 21 1/5/09 3:02:58 PM It is plugged in . Connect the AC cord into this TV/DVD's AC INPUT jack. 2. The unit should return to file or cut the blade. Connect the AC cord plug into an AC outlet. Use the...
Owner's Manual - English
Page 22
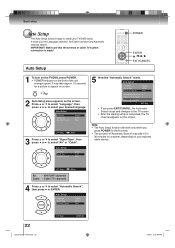
...press ◀ or ▶ to complete, depending on the screen. Auto Setup POWER ENTER / / / EXIT/CANCEL 1 To turn on the TV/DVD, press POWER. • POWER indicator on the front of "Automatic Search" may take 15 to 30 minutes to select your regional cable service.... Type Automatic Search English Cable Start 5 Now the "Automatic Search" starts. IMPORTANT: Make sure that the antenna or cable TV system connection is completed, the TV channel appears on your desired language. Auto Setup Language Signal Type Automatic Search English Cable Start : Select : Adjust 3 Press...
...press ◀ or ▶ to complete, depending on the screen. Auto Setup POWER ENTER / / / EXIT/CANCEL 1 To turn on the TV/DVD, press POWER. • POWER indicator on the front of "Automatic Search" may take 15 to 30 minutes to select your regional cable service.... Type Automatic Search English Cable Start 5 Now the "Automatic Search" starts. IMPORTANT: Make sure that the antenna or cable TV system connection is completed, the TV channel appears on your desired language. Auto Setup Language Signal Type Automatic Search English Cable Start : Select : Adjust 3 Press...


