Datasheet
Page 1
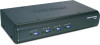
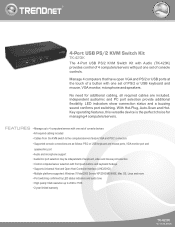
... Controller Interface (UHCI/OHCI) • Multiple platforms supported: Windows 7/Vista/2003 Server/ XP/2000/ME/98SE, Mac OS, Linux and more • Port switching confirmed by LED status indicators and audio tone • High quality VGA resolution up to the computers/servers feature VGA and PS/2 connectors • Supported console connections are included. kvm 4-Port USB PS/2 KVM Switch Kit TK-423K The 4-Port USB PS/2 KVM Switch Kit with Audio (TK-423K) provides control of 4 computers/servers with just one set of PS/2 or USB...
... Controller Interface (UHCI/OHCI) • Multiple platforms supported: Windows 7/Vista/2003 Server/ XP/2000/ME/98SE, Mac OS, Linux and more • Port switching confirmed by LED status indicators and audio tone • High quality VGA resolution up to the computers/servers feature VGA and PS/2 connectors • Supported console connections are included. kvm 4-Port USB PS/2 KVM Switch Kit TK-423K The 4-Port USB PS/2 KVM Switch Kit with Audio (TK-423K) provides control of 4 computers/servers with just one set of PS/2 or USB...
Datasheet
Page 2
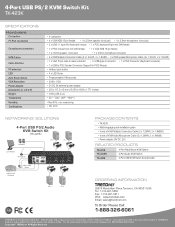
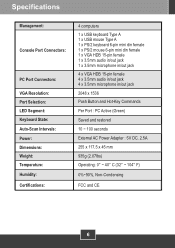
... in /out jack • 4 x KVM Multiple Connection Cable (2 x 1.2m/4ft., 2 x 1.8m/6ft) • 4 x KVM speaker/Microphone Cable (2 x 1.2m/4ft., 2 x 1.8m/6ft) • 1 x VGA 15 pin male to male connector • 1 x USB type A connector • 1 x PS/2 Connector (Keyboard connector) • 1 x USB to change at any time, without notice. 4-Port USB PS/2 KVM Switch Kit TK-423K SPECIFICATIONS Hardware Connection PC Port connection Console port connectors KVM Cables Cable Interface PC selection LED Auto Scan Interval VGA Resolution Power Adapter Dimensions (L x W x H) Weight Temperature...
... in /out jack • 4 x KVM Multiple Connection Cable (2 x 1.2m/4ft., 2 x 1.8m/6ft) • 4 x KVM speaker/Microphone Cable (2 x 1.2m/4ft., 2 x 1.8m/6ft) • 1 x VGA 15 pin male to male connector • 1 x USB type A connector • 1 x PS/2 Connector (Keyboard connector) • 1 x USB to change at any time, without notice. 4-Port USB PS/2 KVM Switch Kit TK-423K SPECIFICATIONS Hardware Connection PC Port connection Console port connectors KVM Cables Cable Interface PC selection LED Auto Scan Interval VGA Resolution Power Adapter Dimensions (L x W x H) Weight Temperature...
Quick Installation Guide
Page 2
How to Install 2 3. Operation 4 Specifications 6 Troubleshooting 7 Version 09.02.2008 TTaablbe olef CoonfteCntos ntents English ...1 1. Before You Start 1 2.
How to Install 2 3. Operation 4 Specifications 6 Troubleshooting 7 Version 09.02.2008 TTaablbe olef CoonfteCntos ntents English ...1 1. Before You Start 1 2.
Quick Installation Guide
Page 3
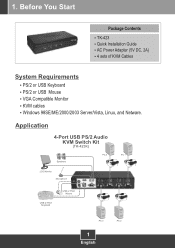
1. AC Power Adapter (5V DC, 2A) ? 4 sets of KVM Cables System Requirements ? PS/2 or USB Mouse ? Application 4-Port USB PS/2 Audio KVM Switch Kit (TK-423K) Speakers PC 3 PC 1 LCD Monitor Microphone USB or PS/2 Keyboard USB or PS/2 Mouse PC 4 PC 2 1 English TK-423 ? Quick Installation Guide ? VGA Compatible Monitor ? KVM cables ? Before You Start Package Contents ? Windows 98SE/ME/2000/2003 Server/Vista, Linux, and Netware. PS/2 or USB Keyboard ?
1. AC Power Adapter (5V DC, 2A) ? 4 sets of KVM Cables System Requirements ? PS/2 or USB Mouse ? Application 4-Port USB PS/2 Audio KVM Switch Kit (TK-423K) Speakers PC 3 PC 1 LCD Monitor Microphone USB or PS/2 Keyboard USB or PS/2 Mouse PC 4 PC 2 1 English TK-423 ? Quick Installation Guide ? VGA Compatible Monitor ? KVM cables ? Before You Start Package Contents ? Windows 98SE/ME/2000/2003 Server/Vista, Linux, and Netware. PS/2 or USB Keyboard ?
Quick Installation Guide
Page 4
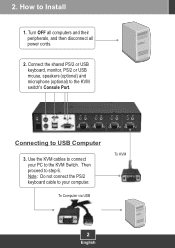
Note: Do not connect the PS/2 keyboard cable to Install 1. How to your PC to step 6. Connect the shared PS/2 or USB keyboard, monitor, PS/2 or USB mouse, speakers (optional) and microphone (optional) to USB Computer 3. Connecting to the KVM switch's Console Port. Turn OFF all computers and their peripherals, and then disconnect all power cords. 2. Then proceed to the KVM Switch. 2. Use the KVM cables to connect your computer. To Computer via USB To KVM 2 English
Note: Do not connect the PS/2 keyboard cable to Install 1. How to your PC to step 6. Connect the shared PS/2 or USB keyboard, monitor, PS/2 or USB mouse, speakers (optional) and microphone (optional) to USB Computer 3. Connecting to the KVM switch's Console Port. Turn OFF all computers and their peripherals, and then disconnect all power cords. 2. Then proceed to the KVM Switch. 2. Use the KVM cables to connect your computer. To Computer via USB To KVM 2 English
Quick Installation Guide
Page 5
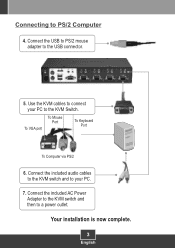
Use the KVM cables to connect your PC. 7. Connecting to the USB connector. 5. Your installation is now complete. 3 English Connect the included audio cables to the KVM switch and to your PC to a power outlet. Connect the USB to PS/2 mouse adapter to PS/2 Computer 4. To VGA port To Mouse Port To Keyboard Port To Computer via PS/2 6. Connect the included AC Power Adapter to the KVM switch and then to the KVM Switch.
Use the KVM cables to connect your PC. 7. Connecting to the USB connector. 5. Your installation is now complete. 3 English Connect the included audio cables to the KVM switch and to your PC to a power outlet. Connect the USB to PS/2 mouse adapter to PS/2 Computer 4. To VGA port To Mouse Port To Keyboard Port To Computer via PS/2 6. Connect the included AC Power Adapter to the KVM switch and then to the KVM Switch.
Quick Installation Guide
Page 6
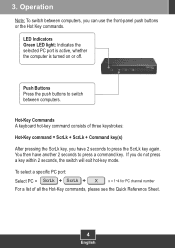
...-Key commands, please see the Quick Reference Sheet. 4 English To select a specific PC port: Select PC = ScrLk + ScrLk + X x = 1~4 for PC channel number For a list of three keystrokes: Hot-Key command = ScrLk + ScrLk + Command key(s) After pressing the ScrLk key, you have another 2 seconds to press a command key. If you can use the front-panel push buttons or the Hot Key commands. Operation Note: To switch between computers. Push Buttons Press the push buttons...
...-Key commands, please see the Quick Reference Sheet. 4 English To select a specific PC port: Select PC = ScrLk + ScrLk + X x = 1~4 for PC channel number For a list of three keystrokes: Hot-Key command = ScrLk + ScrLk + Command key(s) After pressing the ScrLk key, you have another 2 seconds to press a command key. If you can use the front-panel push buttons or the Hot Key commands. Operation Note: To switch between computers. Push Buttons Press the push buttons...
Quick Installation Guide
Page 7
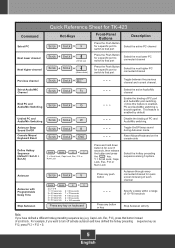
... Autoscan mode. This feature is bound together. Disable the binding of scroll lock. Caps Lock, Esc, F12), press that button instead of PC and Audio/Mic switching. Command Select PC Next lower channel Next higher channel Quick Reference Sheet for TK-423 Hot-Keys ScrLk + ScrLk + X Front-Panel Buttons Press the Push Button for a specific port to switch to that port Description Select the active PC channel ScrLk...
... Autoscan mode. This feature is bound together. Disable the binding of scroll lock. Caps Lock, Esc, F12), press that button instead of PC and Audio/Mic switching. Command Select PC Next lower channel Next higher channel Quick Reference Sheet for TK-423 Hot-Keys ScrLk + ScrLk + X Front-Panel Buttons Press the Push Button for a specific port to switch to that port Description Select the active PC channel ScrLk...
Quick Installation Guide
Page 8
... Type A 1 x USB mouse Type A 1 x PS/2 keyboard 6-pin mini din female 1 x PS/2 mouse 6-pin mini din female 1 x VGA HDB 15-pin female 1 x 3.5mm audio in/out jack 1 x 3.5mm microphone in/out jack 4 x VGA HDB 15-pin female 4 x 3.5mm audio in/out jack 4 x 3.5mm microphone in/out jack 2048 x 1536 Push Button and Hot-Key Commands Per Port : PC Active (Green) Saved and restored...
... Type A 1 x USB mouse Type A 1 x PS/2 keyboard 6-pin mini din female 1 x PS/2 mouse 6-pin mini din female 1 x VGA HDB 15-pin female 1 x 3.5mm audio in/out jack 1 x 3.5mm microphone in/out jack 4 x VGA HDB 15-pin female 4 x 3.5mm audio in/out jack 4 x 3.5mm microphone in/out jack 2048 x 1536 Push Button and Hot-Key Commands Per Port : PC Active (Green) Saved and restored...
Quick Installation Guide
Page 9
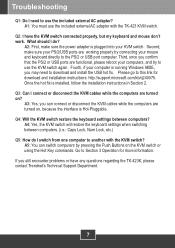
... PS/2 or USB port computer. A5: You can connect or disconnect the KVM cables while the computers are turned on the KVM switch or using the Hot Key commands. Second, make sure the power adapter is installed, follow the installation instructions in Section 2. Please go to Section 3 Operation for download and installation instructions: http://support.microsoft.com/kb/q240075. Q2: I connect or disconnect the KVM cables while the computers are turned on, because the interface is running Windows...
... PS/2 or USB port computer. A5: You can connect or disconnect the KVM cables while the computers are turned on the KVM switch or using the Hot Key commands. Second, make sure the power adapter is installed, follow the installation instructions in Section 2. Please go to Section 3 Operation for download and installation instructions: http://support.microsoft.com/kb/q240075. Q2: I connect or disconnect the KVM cables while the computers are turned on, because the interface is running Windows...

Quick Installation Guide
Page 10
... proof of TRENDnet. Do not remove or attempt to service the product by any unauthorized service center, (ii) the product was subject to accident, abuse, or improper use and service, for a Return Material Authorization (RMA) number, accompanied by any unauthorized service center. There are replaced will become the property of the purchase. All products that are no user serviceable parts inside the...
... proof of TRENDnet. Do not remove or attempt to service the product by any unauthorized service center, (ii) the product was subject to accident, abuse, or improper use and service, for a Return Material Authorization (RMA) number, accompanied by any unauthorized service center. There are replaced will become the property of the purchase. All products that are no user serviceable parts inside the...

Quick Installation Guide
Page 11
... ARISING OUT OF OR IN CONNECTION WITH THE SALE, INSTALLATION, MAINTENANCE, USE, PERFORMANCE, FAILURE, OR INTERRUPTION OF THE POSSIBILITY OF SUCH DAMAGES, AND LIMITS ITS LIABILITY TO REPAIR, REPLACEMENT, OR REFUND OF THE PURCHASE PRICE PAID, AT TRENDnet'S OPTION. THIS DISCLAIMER OF ... PERSON'S MISUSE, NEGLECT, IMPROPER INSTALLATION OR TESTING, UNAUTHORIZED ATTEMPTS TO REPAIR OR MODIFY, OR ANY OTHER CAUSE BEYOND THE RANGE OF THE INTENDED USE, OR BY ACCIDENT, FIRE, LIGHTNING, OR OTHER HAZARD. AC/DC Power Adapter, Cooling Fan,Power Supply, and Cables carry a 9 THE FOREGOING WARRANTIES...
... ARISING OUT OF OR IN CONNECTION WITH THE SALE, INSTALLATION, MAINTENANCE, USE, PERFORMANCE, FAILURE, OR INTERRUPTION OF THE POSSIBILITY OF SUCH DAMAGES, AND LIMITS ITS LIABILITY TO REPAIR, REPLACEMENT, OR REFUND OF THE PURCHASE PRICE PAID, AT TRENDnet'S OPTION. THIS DISCLAIMER OF ... PERSON'S MISUSE, NEGLECT, IMPROPER INSTALLATION OR TESTING, UNAUTHORIZED ATTEMPTS TO REPAIR OR MODIFY, OR ANY OTHER CAUSE BEYOND THE RANGE OF THE INTENDED USE, OR BY ACCIDENT, FIRE, LIGHTNING, OR OTHER HAZARD. AC/DC Power Adapter, Cooling Fan,Power Supply, and Cables carry a 9 THE FOREGOING WARRANTIES...
Quick Installation Guide
Page 12
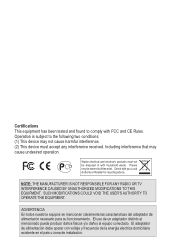
...SUCH MODIFICATIONS COULD VOID THE USER'S AUTHORITY TO OPERATE THE EQUIPMENT. Waste electrical and electronic products must accept any interference received. Check with FCC and CE Rules. El adaptador de alimentación debe operar con voltaje y frecuencia de la energia electrica domiciliaria existente ...en el pais o zona de instalación. Certifications This equipment has been ...
...SUCH MODIFICATIONS COULD VOID THE USER'S AUTHORITY TO OPERATE THE EQUIPMENT. Waste electrical and electronic products must accept any interference received. Check with FCC and CE Rules. El adaptador de alimentación debe operar con voltaje y frecuencia de la energia electrica domiciliaria existente ...en el pais o zona de instalación. Certifications This equipment has been ...

Quick Installation Guide
Page 13
Go to register your product online. All Rights Reserved. TRENDnet. Product Warranty Registration Please take a moment to TRENDnet's website at http://www.trendnet.com/register 20675 Manhattan Place Torrance, CA 90501 USA Copyright ©2008.
Go to register your product online. All Rights Reserved. TRENDnet. Product Warranty Registration Please take a moment to TRENDnet's website at http://www.trendnet.com/register 20675 Manhattan Place Torrance, CA 90501 USA Copyright ©2008.


