TRENDnet TK-802R Support and Manuals
Get Help and Manuals for this TRENDnet item
View All Support Options Below
Free TRENDnet TK-802R manuals!
Problems with TRENDnet TK-802R?
Ask a Question
Free TRENDnet TK-802R manuals!
Problems with TRENDnet TK-802R?
Ask a Question
Popular TRENDnet TK-802R Manual Pages
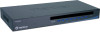
Data Sheet - Page 1
... number (when daisy-chaining) • Built-in daisy-chain port • Hot-key or push button switching • Plug & Play and Hot-Pluggable • Standard 19" (1U) rack mount design • 2-Year Limited Warranty
TK-802R
rev:09.09.2009 up to 1920 x 1440 resolution • Support password protection • Stackable up to 8 units together to control...
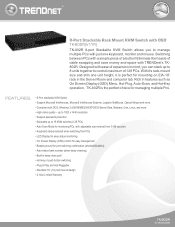
Data Sheet - Page 2
...TRENDnet. 8-Port Stackable Rack Mount KVM Switch with OSD
TK-802R
SPECIFICATIONS
Hardware
Management PC Port (all female) Console Port (all female) Daisy Chain Port (all female) Cable Supported...PC 8
PC 6
PC 4
PC 2 8-Port PS/2 Rack Mount
KVM Switch with OSD
(TK-802R)
RELATED PRODUCTS
• TK-802R • Multi-Language Quick Installation Guide • Daisy Chain Cable • Power ...
Quick Installation Guide - Page 2
Table of Contents
English
1
1. Before You Start
1
2. How to Install
2
3. Operation
5
Troubleshooting
9
Version 08.31.2009
Quick Installation Guide - Page 4
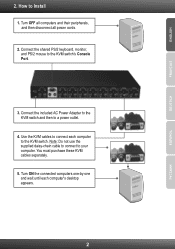
... the included AC Power Adapter to the KVM switch and then to your computer. You must purchase these KVM cables separately.
5. Turn OFF all computers and their peripherals, and then disconnect all power cords.
2. Connect the shared PS/2 keyboard, monitor, and PS/2 mouse to Install
1. ENGLISH
FRANÇAIS
DEUTSCH
2. How to the KVM switch's Console Port.
3.
Quick Installation Guide - Page 5
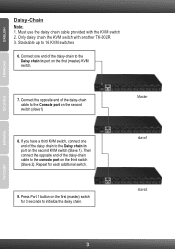
... one end of the daisy-chain cable to the Daisy chain in port on the first (master) switch for each additional switch.
9. Master slave1 slave2
ESPAÑOL
3 Press Port 1 button on the second KVM switch (Slave 1). Connect the opposite end of the daisy chain to 16 KVM switches
6. Must use the daisy chain cable provided with another TK-802R 3.
Quick Installation Guide - Page 6
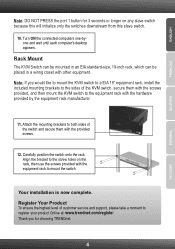
... service and support, please take a moment to register your product Online at: www.trendnet.com/register Thank you would like to mount the KVM switch to a EIA 19" equipment rack, install the included mounting brackets to the sides of the switch and secure them with the screws provided, and then mount the KVM switch to both sides of the KVM switch...
Quick Installation Guide - Page 7
...
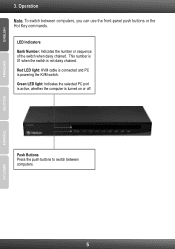
3. Push Buttons Press the push buttons to switch between computers, you can use the front-panel push buttons or the Hot Key commands. Green LED light: Indicates the selected PC port is active, whether the computer is powering the KVM switch. This number is 01 when the switch is not daisy chained. Operation Note: To...
Quick Installation Guide - Page 8
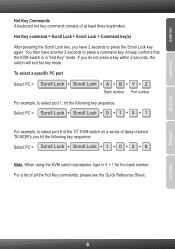
To select a specific PC port Select PC = Scroll Lock + Scroll Lock + A + B + Y + Z
Bank number Port number For example, to select port 1, hit the following key sequence:
Select PC = Scroll Lock + Scroll Lock + 0 + 1 + 0 + 1
For example, to select port 8 of the 10th KVM switch on a series of daisy chained TK-802R's you do not press a key within 2 seconds, the switch will exit hot key...
Quick Installation Guide - Page 9
ENGLISH
FRANÇAIS
DEUTSCH
ESPAÑOL
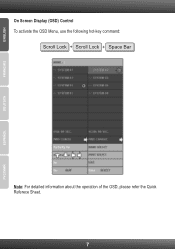
On Screen Display (OSD) Control To activate the OSD Menu, use the following hot-key command:
Scroll Lock + Scroll Lock + Space Bar
Note: For detailed information about the operation of the OSD, please refer the Quick Referece Sheet.
7
Quick Installation Guide - Page 10
...
- - -
- - -
- - -
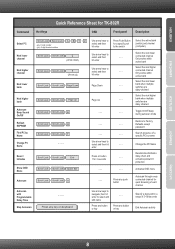
Reset / Initialize
Show OSD Menu
Autoscan
Scroll Lock + Scroll Lock + End Scroll Lock + Scroll Lock + Space Bar Scroll Lock + Scroll Lock + S
Autoscan with Programmable Delay Time
Stop Autoscan
- - -
Press any push
button
Use arrow keys to
select and then hit
- - -
ENGLISH
FRANÇAIS
DEUTSCH
Quick Reference Sheet for TK-802R
Command Hot Keys
OSD...
Quick Installation Guide - Page 11
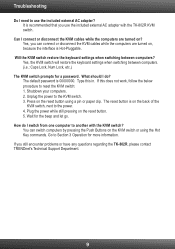
... follow the below procedure to reset the KVM switch: 1. The reset button is recommended that you still encounter problems or have any questions regarding the TK-802R, please contact TRENDnet's Technical Support Department.
9
How do ? Go to the power. 4. Troubleshooting
Do I switch from one computer to another with the TK-802R KVM switch. Yes, you can switch computers by pressing the Push...
Quick Installation Guide - Page 12
... of customer contained in the manual. TRENDnet shall not be obtained by any unauthorized service center. TRENDnet does not issue refunds or credit. Do not remove or attempt to , duty, tax, and other fees.
10 All products that are no user serviceable parts inside the product.
Limited Warranty TRENDnet warrants its expense, to repair or replace the defective product or...
Quick Installation Guide - Page 13
....txt or http://www.gnu.org/licenses/lgpl.txt for these codes.
PWP05202009v2
11
TRENDnet does not provide technical support for specific terms of California.
WARRANTIES EXCLUSIVE: IF THE TRENDNET PRODUCT DOES NOT OPERATE AS WARRANTED ABOVE, THE CUSTOMER'S SOLE REMEDY SHALL BE, AT TRENDNET'S OPTION, REPAIR OR REPLACE. THIS DISCLAIMER OF LIABILITY FOR DAMAGES WILL NOT BE AFFECTED...
Quick Installation Guide - Page 15
Product Warranty Registration
Please take a moment to TRENDnet's website at http://www.trendnet.com/register
Copyright ©2009. TRENDnet. All Rights Reserved. Go to register your product online.
TRENDnet TK-802R Reviews
We have not received any reviews for TRENDnet yet.