Data Sheet
Page 1
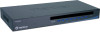
... to control maximum of a button! Designed with ease of cable swapping and save money and space with TRENDnet's TK802R. kvm 8-Port Stackable Rack Mount KVM Switch with OSD TK-802R(V1.1R) TK-802R 8-port Stackable KVM Switch allows you can stack up to 16 KVM switches (128 PCs) • Auto-Scan Mode for monitoring PCs, with adjustable scan interval from 5~99 seconds • Keyboard status restored when switching from...
... to control maximum of a button! Designed with ease of cable swapping and save money and space with TRENDnet's TK802R. kvm 8-Port Stackable Rack Mount KVM Switch with OSD TK-802R(V1.1R) TK-802R 8-port Stackable KVM Switch allows you can stack up to 16 KVM switches (128 PCs) • Auto-Scan Mode for monitoring PCs, with adjustable scan interval from 5~99 seconds • Keyboard status restored when switching from...
Data Sheet
Page 2
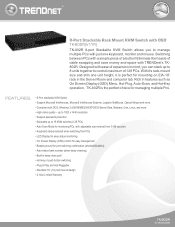
... 5 PC 3 PC 1 RELATED PRODUCTS TK-801R TK-803R TK-1602R 8-Port PC/2 Rack Mount KVM Switch 8-Port USB/PC/2 Rack Mount KVM Switch 16-Port Stackable Rack Mount KVM Switch with OSD TK-802R SPECIFICATIONS Hardware Management PC Port (all female) Console Port (all female) Daisy Chain Port (all female) Cable Supported OS PC Selection Daisy Chain Level Auto-Scan Interval LED Keyboard Status Power Adapter Dimensions Weight Temperature Operating Humidity Certifications • 8 computers • 8 x PS/2 Mouse 6-pin Mini Din • 8 x PS...
... 5 PC 3 PC 1 RELATED PRODUCTS TK-801R TK-803R TK-1602R 8-Port PC/2 Rack Mount KVM Switch 8-Port USB/PC/2 Rack Mount KVM Switch 16-Port Stackable Rack Mount KVM Switch with OSD TK-802R SPECIFICATIONS Hardware Management PC Port (all female) Console Port (all female) Daisy Chain Port (all female) Cable Supported OS PC Selection Daisy Chain Level Auto-Scan Interval LED Keyboard Status Power Adapter Dimensions Weight Temperature Operating Humidity Certifications • 8 computers • 8 x PS/2 Mouse 6-pin Mini Din • 8 x PS...
Quick Installation Guide
Page 2
Before You Start 1 2. Operation 5 Troubleshooting 9 Version 08.31.2009 How to Install 2 3. Table of Contents English 1 1.
Before You Start 1 2. Operation 5 Troubleshooting 9 Version 08.31.2009 How to Install 2 3. Table of Contents English 1 1.
Quick Installation Guide
Page 4
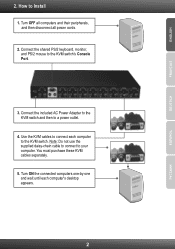
... Power Adapter to the KVM switch and then to Install 1. Turn OFF all computers and their peripherals, and then disconnect all power cords. 2. How to a power outlet. 4. You must purchase these KVM cables separately. 5. Turn ON the connected computers one-by-one and wait until each computer to your computer. Note: Do not use the supplied daisy-chain cable to connect to the KVM switch. Use...
... Power Adapter to the KVM switch and then to Install 1. Turn OFF all computers and their peripherals, and then disconnect all power cords. 2. How to a power outlet. 4. You must purchase these KVM cables separately. 5. Turn ON the connected computers one-by-one and wait until each computer to your computer. Note: Do not use the supplied daisy-chain cable to connect to the KVM switch. Use...
Quick Installation Guide
Page 5
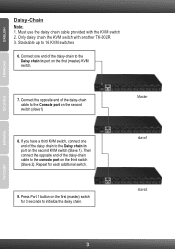
...chain in port on the second KVM switch (Slave 1). Stackable up to the Console port on the first (master) switch for each additional switch. 9. Connect one end of the daisy-chain cable to 16 KVM switches 6. Press Port 1 button on the second switch (slave1...connect the opposite end of the daisy-chain to the Daisy chain in port on the third switch (Slave 2). Only daisy chain the KVM switch with the KVM switch 2. Must use the daisy chain cable provided with another TK-802R 3. ENGLISH FRANÇAIS DEUTSCH Daisy-Chain Note: 1. Repeat for 3 seconds to the console port...
...chain in port on the second KVM switch (Slave 1). Stackable up to the Console port on the first (master) switch for each additional switch. 9. Connect one end of the daisy-chain cable to 16 KVM switches 6. Press Port 1 button on the second switch (slave1...connect the opposite end of the daisy-chain to the Daisy chain in port on the third switch (Slave 2). Only daisy chain the KVM switch with the KVM switch 2. Must use the daisy chain cable provided with another TK-802R 3. ENGLISH FRANÇAIS DEUTSCH Daisy-Chain Note: 1. Repeat for 3 seconds to the console port...
Quick Installation Guide
Page 6
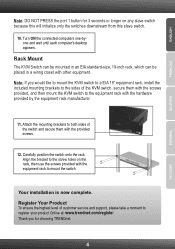
... KVM switch to mount the switch. Note: If you for 3 seconds or longer on the rack, then use the screws provided with other equipment. Your installation is now complete. Turn ON the connected computers one-byone and wait until each computer's desktop appears. ENGLISH FRANÇAIS DEUTSCH ESPAÑOL Note: DO NOT PRESS the port 1 button for choosing TRENDnet. 4
... KVM switch to mount the switch. Note: If you for 3 seconds or longer on the rack, then use the screws provided with other equipment. Your installation is now complete. Turn ON the connected computers one-byone and wait until each computer's desktop appears. ENGLISH FRANÇAIS DEUTSCH ESPAÑOL Note: DO NOT PRESS the port 1 button for choosing TRENDnet. 4
Quick Installation Guide
Page 7
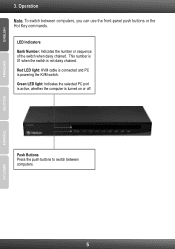
This number is 01 when the switch is powering the KVM switch. ENGLISH FRANÇAIS DEUTSCH 3. Push Buttons Press the push buttons to switch between computers, you can use the front-panel push buttons or the Hot Key commands. Red LED light: KVM cable is connected and PC is not daisy chained. LED Indicators Bank Number: Indicates the number or sequence of the switch when daisy chained. Green LED light: Indicates the selected PC port is active, whether the computer is turned on or off. Operation Note: To switch between computers. 5 ESPAÑOL
This number is 01 when the switch is powering the KVM switch. ENGLISH FRANÇAIS DEUTSCH 3. Push Buttons Press the push buttons to switch between computers, you can use the front-panel push buttons or the Hot Key commands. Red LED light: KVM cable is connected and PC is not daisy chained. LED Indicators Bank Number: Indicates the number or sequence of the switch when daisy chained. Green LED light: Indicates the selected PC port is active, whether the computer is turned on or off. Operation Note: To switch between computers. 5 ESPAÑOL
Quick Installation Guide
Page 8
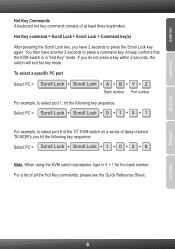
... bank number. For a list of daisy chained TK-802R's you hit the following key sequence: Select PC = Scroll Lock + Scroll Lock + 0 + 1 + 0 + 1 For example, to press a command key. To select a specific PC port Select PC = Scroll Lock + Scroll Lock + A + B + Y + Z Bank number Port number For example, to select port 1, hit the following key sequence: Select PC = Scroll Lock + Scroll Lock + 1 + 0 + 0 + 8 Note: When using the KVM switch standalone, type in "Hot Key" mode. You...
... bank number. For a list of daisy chained TK-802R's you hit the following key sequence: Select PC = Scroll Lock + Scroll Lock + 0 + 1 + 0 + 1 For example, to press a command key. To select a specific PC port Select PC = Scroll Lock + Scroll Lock + A + B + Y + Z Bank number Port number For example, to select port 1, hit the following key sequence: Select PC = Scroll Lock + Scroll Lock + 1 + 0 + 0 + 8 Note: When using the KVM switch standalone, type in "Hot Key" mode. You...
Quick Installation Guide
Page 9
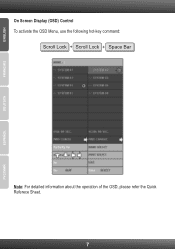
ENGLISH FRANÇAIS DEUTSCH ESPAÑOL On Screen Display (OSD) Control To activate the OSD Menu, use the following hot-key command: Scroll Lock + Scroll Lock + Space Bar Note: For detailed information about the operation of the OSD, please refer the Quick Referece Sheet. 7
ENGLISH FRANÇAIS DEUTSCH ESPAÑOL On Screen Display (OSD) Control To activate the OSD Menu, use the following hot-key command: Scroll Lock + Scroll Lock + Space Bar Note: For detailed information about the operation of the OSD, please refer the Quick Referece Sheet. 7
Quick Installation Guide
Page 10
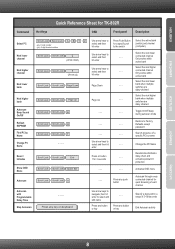
... multiple switches are daisy chained - - - - - - ENGLISH FRANÇAIS DEUTSCH Quick Reference Sheet for 3 seconds Restore to Factory Defaults except password Search presence of 5~99 seconds End Autoscan activity ESPAÑOL 8 Press any push button Use arrow keys to navigate, then hit - - - Press any key on button - - - 1 for TK-802R Command Hot Keys OSD Front-panel Description Select PC Next lower channel Scroll Lock + Scroll Lock + A + B + Y + Z (ab) = bank number...
... multiple switches are daisy chained - - - - - - ENGLISH FRANÇAIS DEUTSCH Quick Reference Sheet for 3 seconds Restore to Factory Defaults except password Search presence of 5~99 seconds End Autoscan activity ESPAÑOL 8 Press any push button Use arrow keys to navigate, then hit - - - Press any key on button - - - 1 for TK-802R Command Hot Keys OSD Front-panel Description Select PC Next lower channel Scroll Lock + Scroll Lock + A + B + Y + Z (ab) = bank number...
Quick Installation Guide
Page 11
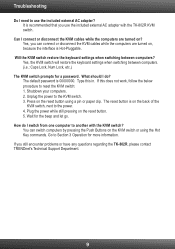
... the reset button. 5. Troubleshooting Do I do I connect or disconnect the KVM cables while the computers are turned on ? Press on the KVM switch or using a pin or paper clip. How do ? Yes, you can switch computers by pressing the Push Buttons on the reset button using the Hot Key commands. The default password is recommended that you still encounter problems or have any questions regarding the TK-802R, please contact TRENDnet's Technical Support...
... the reset button. 5. Troubleshooting Do I do I connect or disconnect the KVM cables while the computers are turned on ? Press on the KVM switch or using a pin or paper clip. How do ? Yes, you can switch computers by pressing the Push Buttons on the reset button using the Hot Key commands. The default password is recommended that you still encounter problems or have any questions regarding the TK-802R, please contact TRENDnet's Technical Support...

Quick Installation Guide
Page 12
...in the manual. Products that are responsible for all TRENDnet products. Limited Warranty TRENDnet warrants its expense, to repair or replace the defective product or part and deliver an equivalent product or part to service the product by any unauthorized service center, (...point-of-purchase for the following lengths of time from outside of purchase. Warranty service may be obtained by contacting TRENDnet within the applicable warranty period and providing a copy of the dated proof of purchase. TK-802R - 2 Year Limited Warranty AC/DC Power Adapter, Cooling Fan and Power Supply...
...in the manual. Products that are responsible for all TRENDnet products. Limited Warranty TRENDnet warrants its expense, to repair or replace the defective product or part and deliver an equivalent product or part to service the product by any unauthorized service center, (...point-of-purchase for the following lengths of time from outside of purchase. Warranty service may be obtained by contacting TRENDnet within the applicable warranty period and providing a copy of the dated proof of purchase. TK-802R - 2 Year Limited Warranty AC/DC Power Adapter, Cooling Fan and Power Supply...

Quick Installation Guide
Page 13
... ITS LIABILITY TO REPAIR, REPLACEMENT, OR REFUND OF THE PURCHASE PRICE PAID, AT TRENDNET'S OPTION. These codes are subject to the GNU General Public License ("GPL") or GNU Lesser General Public License ("LGPL"). These codes are distributed WITHOUT WARRANTY and are subject to the copyrights of the developers. TRENDnet does not provide technical support for specific terms of...
... ITS LIABILITY TO REPAIR, REPLACEMENT, OR REFUND OF THE PURCHASE PRICE PAID, AT TRENDNET'S OPTION. These codes are subject to the GNU General Public License ("GPL") or GNU Lesser General Public License ("LGPL"). These codes are distributed WITHOUT WARRANTY and are subject to the copyrights of the developers. TRENDnet does not provide technical support for specific terms of...

Quick Installation Guide
Page 14
...distinto al mencionado puede producir daños fisicos y/o daños al equipo conectado. Please recycle where facilities exist. Check with household waste. El adaptador de alimentación debe operar con voltaje y frecuencia de la energia electrica domiciliaria existente en... THE USER'S AUTHORITY TO OPERATE THE EQUIPMENT. ADVERTENCIA En todos nuestros equipos se mencionan claramente las caracteristicas del adaptador de alimentacón necesario para su funcionamiento. Certifications This equipment has been tested and found to the following two conditions: (1) This device may ...
...distinto al mencionado puede producir daños fisicos y/o daños al equipo conectado. Please recycle where facilities exist. Check with household waste. El adaptador de alimentación debe operar con voltaje y frecuencia de la energia electrica domiciliaria existente en... THE USER'S AUTHORITY TO OPERATE THE EQUIPMENT. ADVERTENCIA En todos nuestros equipos se mencionan claramente las caracteristicas del adaptador de alimentacón necesario para su funcionamiento. Certifications This equipment has been tested and found to the following two conditions: (1) This device may ...

Quick Installation Guide
Page 15
All Rights Reserved. Go to register your product online. Product Warranty Registration Please take a moment to TRENDnet's website at http://www.trendnet.com/register Copyright ©2009. TRENDnet.
All Rights Reserved. Go to register your product online. Product Warranty Registration Please take a moment to TRENDnet's website at http://www.trendnet.com/register Copyright ©2009. TRENDnet.


