
User Guide
Page 2
Installation 3 4. Operation 4 Specifications 5 Troubleshooting 6 Introduction 2 3. Table of Contents English 1 1. Prepare for Installation 1 2.
Installation 3 4. Operation 4 Specifications 5 Troubleshooting 6 Introduction 2 3. Table of Contents English 1 1. Prepare for Installation 1 2.

User Guide
Page 3
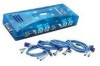
... purchasing TRENDnet's TK-200KITK-400K KVM Switch Kit. Following the installation instructions should be quick and easy. Verify Package Contents Please make sure you run into problems, please refer to have everything in the box: CI (O 4:altar "grisly TK-200K/1X-400K User's Guide The TK-200K 2-Port or TK-400K 4-Port PS/2 KVM Switch is compatible with virtually all computers and operating systems. You only need further technical support, please visit www.TRENDNET.com...
... purchasing TRENDnet's TK-200KITK-400K KVM Switch Kit. Following the installation instructions should be quick and easy. Verify Package Contents Please make sure you run into problems, please refer to have everything in the box: CI (O 4:altar "grisly TK-200K/1X-400K User's Guide The TK-200K 2-Port or TK-400K 4-Port PS/2 KVM Switch is compatible with virtually all computers and operating systems. You only need further technical support, please visit www.TRENDNET.com...
User Guide
Page 4
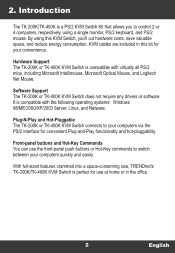
.../TK-400K is compatible with the following operating systems: Windows 98/ME/2000/XP/2003 Server, Linux, and Netware. Plug-N-Play and Hot-Pluggable The TK-200K or TK-400K KVM Switch connects to your computers via the PS/2 interface for use the front-panel push buttons or Hot-Key commands to control 2 or 4 computers, respectively, using this kit for your computers quickly and easily. Hardware Support The TK-200K or TK-400K KVM Switch is a PS/2 KVM Switch...
.../TK-400K is compatible with the following operating systems: Windows 98/ME/2000/XP/2003 Server, Linux, and Netware. Plug-N-Play and Hot-Pluggable The TK-200K or TK-400K KVM Switch connects to your computers via the PS/2 interface for use the front-panel push buttons or Hot-Key commands to control 2 or 4 computers, respectively, using this kit for your computers quickly and easily. Hardware Support The TK-200K or TK-400K KVM Switch is a PS/2 KVM Switch...
User Guide
Page 5
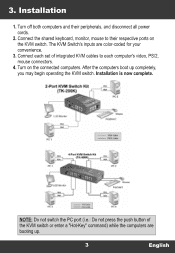
... set of the KVM switch or enter a "Hot-Key" command) while the computers are color-coded for your convenience. 3. Turn off both computers and their respective ports on the connected computers. Turn on the KVM switch. Connect each computer's video, PS/2, mouse connectors. 4. Installation is now complete. 2-Port KVM Switch Kit (TK-200K) LCC Monitor VGA PC1 Mouse Keyboard VGA Gable PS/2 Gable PC I 4-Port KVM Switch Kit (TK-400K), PC2 CO Monitor P& VGA PC 3 rota ADI9 PS* cable...
... set of the KVM switch or enter a "Hot-Key" command) while the computers are color-coded for your convenience. 3. Turn off both computers and their respective ports on the connected computers. Turn on the KVM switch. Connect each computer's video, PS/2, mouse connectors. 4. Installation is now complete. 2-Port KVM Switch Kit (TK-200K) LCC Monitor VGA PC1 Mouse Keyboard VGA Gable PS/2 Gable PC I 4-Port KVM Switch Kit (TK-400K), PC2 CO Monitor P& VGA PC 3 rota ADI9 PS* cable...
User Guide
Page 6
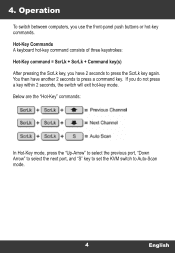
... use the front-panel push buttons or hot-key commands. You then have 2 seconds to press the ScrLk key again. Below are the "Hot-Key" commands: L -1I1I^ ScrLk + ScrLk = Previous Channel ScrLk ) + ScrLk ) + ScrLk ScrLk -5- = Next Channel S )= Auto Scan In Hot-Key mode, press the "Up-Arrow" to select the previous port, "Down Arrow" to select the next port, and "S" key to set the KVM switch to press a command key...
... use the front-panel push buttons or hot-key commands. You then have 2 seconds to press the ScrLk key again. Below are the "Hot-Key" commands: L -1I1I^ ScrLk + ScrLk = Previous Channel ScrLk ) + ScrLk ) + ScrLk ScrLk -5- = Next Channel S )= Auto Scan In Hot-Key mode, press the "Up-Arrow" to select the previous port, "Down Arrow" to select the next port, and "S" key to set the KVM switch to press a command key...
User Guide
Page 7
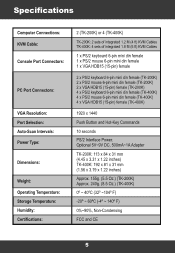
Specifications Computer Connections: KVM Cable: Console Port Connectors: PC Port Connectors: VGA Resolution: Port Selection: Auto-Scan Intervals: Power Type: Dimensions: Weight: Operating Temperature: Storage Temperature: Humidity: Certifications: 2 (TK-200K) or 4 (TK-400K) TK-200K: 2 sets of integrated 1.2 M (4 ft) KVM Cables TK-400K: 4 sets of integrated 1.8 M (6 ft) KVM Cables 1 x PS/2 keyboard 6-pin mini din female 1 x PS/2 mouse 6-pin mini din female 1 x VGA HDB15 (15-pin) female 2 x PS/2 keyboard 6-pin mini din female (TK-200K) 2 x PS/2 mouse 6-pin mini din...
Specifications Computer Connections: KVM Cable: Console Port Connectors: PC Port Connectors: VGA Resolution: Port Selection: Auto-Scan Intervals: Power Type: Dimensions: Weight: Operating Temperature: Storage Temperature: Humidity: Certifications: 2 (TK-200K) or 4 (TK-400K) TK-200K: 2 sets of integrated 1.2 M (4 ft) KVM Cables TK-400K: 4 sets of integrated 1.8 M (6 ft) KVM Cables 1 x PS/2 keyboard 6-pin mini din female 1 x PS/2 mouse 6-pin mini din female 1 x VGA HDB15 (15-pin) female 2 x PS/2 keyboard 6-pin mini din female (TK-200K) 2 x PS/2 mouse 6-pin mini din...

User Guide
Page 8
... can switch PCs by using the Hot-Key commands. For a complete listing of the Hot-Key commands, see the reverse-side of your KVM switch will function. I connect and disconnect the PSI2 cables while the computers are turned on? Q3: Will the KVM switch restore the keyboard settings when switching between computers such as you have further questions, please contact Trendware's Technical Support Department. Operation is the power supply? Including...
... can switch PCs by using the Hot-Key commands. For a complete listing of the Hot-Key commands, see the reverse-side of your KVM switch will function. I connect and disconnect the PSI2 cables while the computers are turned on? Q3: Will the KVM switch restore the keyboard settings when switching between computers such as you have further questions, please contact Trendware's Technical Support Department. Operation is the power supply? Including...

User Guide
Page 9
All Rights Reserved. @ TREND n TRENDware, USA What's Next in Networking Product Warranty Registration Please take a moment to TRENDware's website at http://www.TRENDNET.com M._ TRENDware International, Inc. 3135 Kashiwa Street Torrance, CA 90505 http://www.TRENDNET.com ..I Copyright ©2004. TRENDware International, Inc. Go to register your product online.
All Rights Reserved. @ TREND n TRENDware, USA What's Next in Networking Product Warranty Registration Please take a moment to TRENDware's website at http://www.TRENDNET.com M._ TRENDware International, Inc. 3135 Kashiwa Street Torrance, CA 90505 http://www.TRENDNET.com ..I Copyright ©2004. TRENDware International, Inc. Go to register your product online.

Quick Installation Guide
Page 2
TTaablbe olef CoonfteCntos ntents English ...1 1. Before You Start 1 2. Hardware Installation 3 Technical Specifications 4 Troubleshooting ...6 Version 04.02.2008
TTaablbe olef CoonfteCntos ntents English ...1 1. Before You Start 1 2. Hardware Installation 3 Technical Specifications 4 Troubleshooting ...6 Version 04.02.2008

Quick Installation Guide
Page 3
1. Before You Start Package Content TEG-S160TX/TEG-S240TX User's Guide 2 mounting brackets and screws 4 Rubber Feet AC Power Adapter Installation Requirements Computer with Network adapter installed An environment that is fairly cool and dry An environment that is free from strong electromagnetic field generators (such as motors), vibration, dust and direct exposure to sunlight Leave at least 10 cm of space at the front and rear of the Switch for ventilation EIA Standard, 19 inch rack or sturdy, level surface that can support the weight of the Switch 1 English
1. Before You Start Package Content TEG-S160TX/TEG-S240TX User's Guide 2 mounting brackets and screws 4 Rubber Feet AC Power Adapter Installation Requirements Computer with Network adapter installed An environment that is fairly cool and dry An environment that is free from strong electromagnetic field generators (such as motors), vibration, dust and direct exposure to sunlight Leave at least 10 cm of space at the front and rear of the Switch for ventilation EIA Standard, 19 inch rack or sturdy, level surface that can support the weight of the Switch 1 English
Quick Installation Guide
Page 4
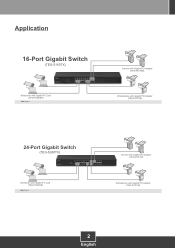
Application 16-Port Gigabit Switch (TEG-S160TX) Notebooks with Gigabit PC Card (TEG-PCBUSR) Gigabit Servers with Gigabit PCI Adapter (TEG-PCITXR) Workstations with Gigabit PCI Adapter (TEG-PCITXR) 24-Port Gigabit Switch (TEG-S240TX) Notebooks with Gigabit PC Card (TEG-PCBUSR) Gigabit Servers with Gigabit PCI Adapter (TEG-PCITXR) Workstations with Gigabit PCI Adapter (TEG-PCITXR) 2 English
Application 16-Port Gigabit Switch (TEG-S160TX) Notebooks with Gigabit PC Card (TEG-PCBUSR) Gigabit Servers with Gigabit PCI Adapter (TEG-PCITXR) Workstations with Gigabit PCI Adapter (TEG-PCITXR) 24-Port Gigabit Switch (TEG-S240TX) Notebooks with Gigabit PC Card (TEG-PCBUSR) Gigabit Servers with Gigabit PCI Adapter (TEG-PCITXR) Workstations with Gigabit PCI Adapter (TEG-PCITXR) 2 English

Quick Installation Guide
Page 5
... Your Product To ensure the highest level of the chassis and secure them with the provided screws. 4. Connect a CAT-5e or CAT-6 RJ-45 network cable from the computer to a power outlet. 2. 2. Connect the AC Power Adapter to the TEG-S160TX/TEG-S240TX and then to an available Ethernet port on the rack, then use the screws provided with other equipment. 3. Hardware Installation 1.
... Your Product To ensure the highest level of the chassis and secure them with the provided screws. 4. Connect a CAT-5e or CAT-6 RJ-45 network cable from the computer to a power outlet. 2. 2. Connect the AC Power Adapter to the TEG-S160TX/TEG-S240TX and then to an available Ethernet port on the rack, then use the screws provided with other equipment. 3. Hardware Installation 1.

Quick Installation Guide
Page 6
... 1000BASE-T IEEE 802.3x Full-Duplex Flow Control CSMA/CD Data Transfer Rate Topology Ethernet: 10Mbps (half-duplex), 20Mbps (full-duplex) Fast Ethernet: 100Mbps (half-duplex), 200Mbps (full-duplex) Gigabit Ethernet: 2000Mbps (full-duplex) Star Network Cables Ethernet: UTP/STP CAT-3, -4, -5 Fast Ethernet: UTP/STP CAT-5 Gigabit : UTP/STP CAT-5e, CAT-6 (Recommended) Number of Ports 16/24 x 10/100/1000Mbps Auto-Negotiation, Auto-MDIX Physical and Environmentalware Power 100-240V AC Universal, 50/60 Hz Internal Power Supply Power Consumption 13.5 Watts.
... 1000BASE-T IEEE 802.3x Full-Duplex Flow Control CSMA/CD Data Transfer Rate Topology Ethernet: 10Mbps (half-duplex), 20Mbps (full-duplex) Fast Ethernet: 100Mbps (half-duplex), 200Mbps (full-duplex) Gigabit Ethernet: 2000Mbps (full-duplex) Star Network Cables Ethernet: UTP/STP CAT-3, -4, -5 Fast Ethernet: UTP/STP CAT-5 Gigabit : UTP/STP CAT-5e, CAT-6 (Recommended) Number of Ports 16/24 x 10/100/1000Mbps Auto-Negotiation, Auto-MDIX Physical and Environmentalware Power 100-240V AC Universal, 50/60 Hz Internal Power Supply Power Consumption 13.5 Watts.
Quick Installation Guide
Page 8
... one computer. Second, check the network cable. Please contact Microsoft support for more information. A2: First, check the Ethernet Cable. Make sure you have any software firewall program. Fourth, verify that you are not rated to run Gigabit. A1: Check the connection of the cable is receiving power. Troubleshooting Q1: After connecting the Switch to a power outlet, the LEDs do not turn on . Also check that the power outlet is 100 meters...
... one computer. Second, check the network cable. Please contact Microsoft support for more information. A2: First, check the Ethernet Cable. Make sure you have any software firewall program. Fourth, verify that you are not rated to run Gigabit. A1: Check the connection of the cable is receiving power. Troubleshooting Q1: After connecting the Switch to a power outlet, the LEDs do not turn on . Also check that the power outlet is 100 meters...

Quick Installation Guide
Page 9
...EQUIPMENT. SUCH MODIFICATIONS COULD VOID THE USER'S AUTHORITY TO OPERATE THE EQUIPMENT. ADVERTENCIA EN CASO DE REQUERIR AC ADAPTER En todos nuestros equipos se mencionan claramente las caracteris-ticas del adaptador de alimentacón necesario para su funcionamiento El uso de un adaptador distinto al mencionado puede ...producir daños fisicos y/o daños al equipo conectado. Including interference that may not cause harmful interference. (2) This device must not be disposed of with FCC and CE Rules. Check with you Local...
...EQUIPMENT. SUCH MODIFICATIONS COULD VOID THE USER'S AUTHORITY TO OPERATE THE EQUIPMENT. ADVERTENCIA EN CASO DE REQUERIR AC ADAPTER En todos nuestros equipos se mencionan claramente las caracteris-ticas del adaptador de alimentacón necesario para su funcionamiento El uso de un adaptador distinto al mencionado puede ...producir daños fisicos y/o daños al equipo conectado. Including interference that may not cause harmful interference. (2) This device must not be disposed of with FCC and CE Rules. Check with you Local...

Quick Installation Guide
Page 10
TRENDnet Technical Support US . France . Canada 24/7 Tech Support Europe (Germany . All Rights Reserved. Italy . Switzerland . TRENDnet. Spain . Go to register your product online. UK) Toll Free Telephone: +00800 60 76 76 67 English/Espanol - 24/7 Worldwide English/Espanol - 24/7 Product Warranty Registration Please take a moment to TRENDnet's website at http://www.trendnet.com/register 20675 Manhattan Place Torrance, CA 90501 USA Copyright ©2008.
TRENDnet Technical Support US . France . Canada 24/7 Tech Support Europe (Germany . All Rights Reserved. Italy . Switzerland . TRENDnet. Spain . Go to register your product online. UK) Toll Free Telephone: +00800 60 76 76 67 English/Espanol - 24/7 Worldwide English/Espanol - 24/7 Product Warranty Registration Please take a moment to TRENDnet's website at http://www.trendnet.com/register 20675 Manhattan Place Torrance, CA 90501 USA Copyright ©2008.


