
Datasheet
Page 1
...; Channel selection by push button, keyboard hotkeys and switching software client (for Windows/Mac) • USB interface power LED indicators for easy software switching on the other. No need for managing 2 computers. With Hot-Plug, Auto-Scan and Hot-Key operating features, this versatile device is the perfect choice for additional cabling, all required cables are included. ScrollLock + ScrollLock - kvm Port DVI USB KVM Switch with Audio Kit TK-204UK(1.0R) The 2-Port DVI USB KVM Switch with Audio Kit (TK-204UK...
...; Channel selection by push button, keyboard hotkeys and switching software client (for Windows/Mac) • USB interface power LED indicators for easy software switching on the other. No need for managing 2 computers. With Hot-Plug, Auto-Scan and Hot-Key operating features, this versatile device is the perfect choice for additional cabling, all required cables are included. ScrollLock + ScrollLock - kvm Port DVI USB KVM Switch with Audio Kit TK-204UK(1.0R) The 2-Port DVI USB KVM Switch with Audio Kit (TK-204UK...
Datasheet
Page 2
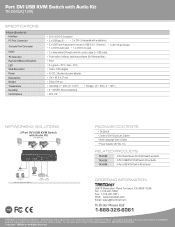
... in this document pertain to change at any time, without notice. Copyright © TRENDnet. Port DVI USB KVM Switch with Audio Kit TK-204UK(1.0R) SPECIFICATIONS Hardware Interface PC Port Connector Console Port Connector Cable PC Selection Keyboard/Mouse Emulation LED VGA Resolution Power Dimensions Weight Temperature Humidity Certifications • DVI-I & DVI-D Compliant • 2 x USB type B • 2 x DVI-I (integrated with Audio Kit (TK-204UK) PC 1 PC 2 Microphone Speakers KVM USB Monitor USB USB Keyboard Mouse DVI PACKAGE CONTENTS • TK-204UK • 2 sets of their...
... in this document pertain to change at any time, without notice. Copyright © TRENDnet. Port DVI USB KVM Switch with Audio Kit TK-204UK(1.0R) SPECIFICATIONS Hardware Interface PC Port Connector Console Port Connector Cable PC Selection Keyboard/Mouse Emulation LED VGA Resolution Power Dimensions Weight Temperature Humidity Certifications • DVI-I & DVI-D Compliant • 2 x USB type B • 2 x DVI-I (integrated with Audio Kit (TK-204UK) PC 1 PC 2 Microphone Speakers KVM USB Monitor USB USB Keyboard Mouse DVI PACKAGE CONTENTS • TK-204UK • 2 sets of their...

Quick Installation Guide
Page 2
How to Install 2 3. Using the KVM Utility 5 Specifications 8 Troubleshooting 9 Before You Start 1 2. English ...1 1. Operation 4 4.
How to Install 2 3. Using the KVM Utility 5 Specifications 8 Troubleshooting 9 Before You Start 1 2. English ...1 1. Operation 4 4.
Quick Installation Guide
Page 3
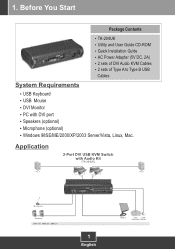
1. Microphone (optional) ? Quick Installation Guide ? AC Power Adapter (5V DC, 2A) ? 2 sets of DVI Audio KVM Cables ? 2 sets of Type A to Type B USB Cables System Requirements ? DVI Monitor ? USB Mouse ? TK-204UK ? PC with Audio Kit (TK-204UK) PC 1 PC 2 Microphone Speakers KVM USB DVI 1 English Monitor USB USB Keyboard Mouse Speakers (optional) ? Windows 98SE/ME/2000/XP/2003 Server/Vista, Linux, Mac. Application 2-Port DVI USB KVM Switch with DVI port ? USB Keyboard ? Before You Start Package Contents ? Utility and User Guide CD-ROM ?
1. Microphone (optional) ? Quick Installation Guide ? AC Power Adapter (5V DC, 2A) ? 2 sets of DVI Audio KVM Cables ? 2 sets of Type A to Type B USB Cables System Requirements ? DVI Monitor ? USB Mouse ? TK-204UK ? PC with Audio Kit (TK-204UK) PC 1 PC 2 Microphone Speakers KVM USB DVI 1 English Monitor USB USB Keyboard Mouse Speakers (optional) ? Windows 98SE/ME/2000/XP/2003 Server/Vista, Linux, Mac. Application 2-Port DVI USB KVM Switch with DVI port ? USB Keyboard ? Before You Start Package Contents ? Utility and User Guide CD-ROM ?
Quick Installation Guide
Page 4
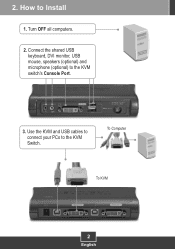
How to the KVM switch's Console Port. 3. Connect the shared USB keyboard, DVI monitor, USB mouse, speakers (optional) and microphone (optional) to Install 1. Turn OFF all computers. 2. Use the KVM and USB cables to connect your PCs to the KVM Switch. To Computer To KVM 2 English 2.
How to the KVM switch's Console Port. 3. Connect the shared USB keyboard, DVI monitor, USB mouse, speakers (optional) and microphone (optional) to Install 1. Turn OFF all computers. 2. Use the KVM and USB cables to connect your PCs to the KVM Switch. To Computer To KVM 2 English 2.
Quick Installation Guide
Page 5
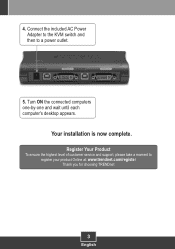
Turn ON the connected computers one-by-one and wait until each computer's desktop appears. Register Your Product To ensure the highest level of customer service and support, please take a moment to a power outlet. 5. Your installation is now complete. 4. Connect the included AC Power Adapter to the KVM switch and then to register your product Online at: www.trendnet.com/register Thank you for choosing TRENDnet 3 English
Turn ON the connected computers one-by-one and wait until each computer's desktop appears. Register Your Product To ensure the highest level of customer service and support, please take a moment to a power outlet. 5. Your installation is now complete. 4. Connect the included AC Power Adapter to the KVM switch and then to register your product Online at: www.trendnet.com/register Thank you for choosing TRENDnet 3 English
Quick Installation Guide
Page 6
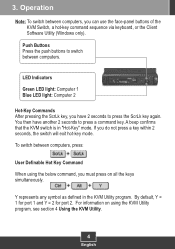
... LED light: Computer 2 Hot-Key Commands After pressing the ScrLk key, you do not press a key within 2 seconds, the switch will exit hot-key mode. If you have another 2 seconds to switch between computers, press: User Definable Hot Key Command When using the KVM Utility program, see section 4 Using the KVM Utility. 4 English For information on all the keys simultaneously. Y represents any symbol as defined in "Hot-Key" mode. Push Buttons...
... LED light: Computer 2 Hot-Key Commands After pressing the ScrLk key, you do not press a key within 2 seconds, the switch will exit hot-key mode. If you have another 2 seconds to switch between computers, press: User Definable Hot Key Command When using the KVM Utility program, see section 4 Using the KVM Utility. 4 English For information on all the keys simultaneously. Y represents any symbol as defined in "Hot-Key" mode. Push Buttons...

Quick Installation Guide
Page 7
Click Finish. 4. Using the KVM Utility For Windows Users 1. 4. Then follow the Setup Wizard instructions. 3. Click Utility Install. 2. Click Next. Double click on the KVM Utility icon. 5 English
Click Finish. 4. Using the KVM Utility For Windows Users 1. 4. Then follow the Setup Wizard instructions. 3. Click Utility Install. 2. Click Next. Double click on the KVM Utility icon. 5 English
Quick Installation Guide
Page 8
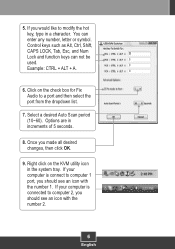
... all desired changes, then click OK. 9. Example: CTRL + ALT + A. 6. Control keys such as Alt, Ctrl, Shift, CAPS LOCK, Tab, Esc, and Num Lock and function keys can enter any number, letter or symbol. Once you would like to a port and then select the port from the dropdown list. 7. Select a desired Auto Scan period (10~60). Click on the KVM utility icon...
... all desired changes, then click OK. 9. Example: CTRL + ALT + A. 6. Control keys such as Alt, Ctrl, Shift, CAPS LOCK, Tab, Esc, and Num Lock and function keys can enter any number, letter or symbol. Once you would like to a port and then select the port from the dropdown list. 7. Select a desired Auto Scan period (10~60). Click on the KVM utility icon...
Quick Installation Guide
Page 9
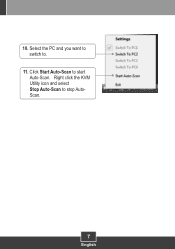
Click Start Auto-Scan to . 11. Select the PC and you want to switch to start Auto-Scan. Right click the KVM Utility icon and select Stop Auto-Scan to stop AutoScan. 7 English 10.
Click Start Auto-Scan to . 11. Select the PC and you want to switch to start Auto-Scan. Right click the KVM Utility icon and select Stop Auto-Scan to stop AutoScan. 7 English 10.

Quick Installation Guide
Page 14
...Check with you Local Authority or Retailer for recycling advice. NOTE: THE MANUFACTURER IS NOT RESPONSIBLE FOR ANY RADIO OR TV INTERFERENCE CAUSED BY UNAUTHORIZED MODIFICATIONS TO THIS EQUIPMENT. Waste electrical and electronic products must accept any interference received. El adaptador de alimentación debe operar con voltaje y frecuencia de... with FCC and CE Rules. Please recycle where facilities exist. SUCH MODIFICATIONS COULD VOID THE USER'S AUTHORITY TO OPERATE THE EQUIPMENT. El uso de un adaptador distinto al mencionado puede producir daños fisicos y/o daños al ...
...Check with you Local Authority or Retailer for recycling advice. NOTE: THE MANUFACTURER IS NOT RESPONSIBLE FOR ANY RADIO OR TV INTERFERENCE CAUSED BY UNAUTHORIZED MODIFICATIONS TO THIS EQUIPMENT. Waste electrical and electronic products must accept any interference received. El adaptador de alimentación debe operar con voltaje y frecuencia de... with FCC and CE Rules. Please recycle where facilities exist. SUCH MODIFICATIONS COULD VOID THE USER'S AUTHORITY TO OPERATE THE EQUIPMENT. El uso de un adaptador distinto al mencionado puede producir daños fisicos y/o daños al ...

Quick Installation Guide
Page 15
Go to register your product online. UK) Toll Free Telephone: +00800 60 76 76 67 English/Espanol - 24/7 Worldwide Telephone: +(31) (0) 20 504 05 35 English/Espanol - 24/7 Product Warranty Registration Please take a moment to TRENDnet's website at http://www.trendnet.com/register 20675 Manhattan Place Torrance, CA 90501 USA Copyright ©2008. Italy . Switzerland . TRENDnet. Customer Support Visit www.trendnet.com/support Email: support@trendnet.com Europe (Germany . Spain . France . All Rights Reserved.
Go to register your product online. UK) Toll Free Telephone: +00800 60 76 76 67 English/Espanol - 24/7 Worldwide Telephone: +(31) (0) 20 504 05 35 English/Espanol - 24/7 Product Warranty Registration Please take a moment to TRENDnet's website at http://www.trendnet.com/register 20675 Manhattan Place Torrance, CA 90501 USA Copyright ©2008. Italy . Switzerland . TRENDnet. Customer Support Visit www.trendnet.com/support Email: support@trendnet.com Europe (Germany . Spain . France . All Rights Reserved.


