Datasheet
Page 1
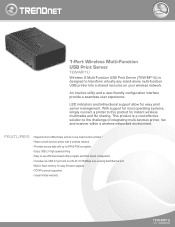
...-in flash memory for easy firmware upgrade • TCP/IP protocol supported • 3-year limited warranty TEW-MP1U rev: 10.08.2009 wireless 1-Port Wireless Multi-Function USB Print Server TEW-MP1U Wireless G Multi-Function USB Print Server (TEW-MP1U) is a cost effective solution to the challenge of integrating multi-function printer, fax and scanner within...
...-in flash memory for easy firmware upgrade • TCP/IP protocol supported • 3-year limited warranty TEW-MP1U rev: 10.08.2009 wireless 1-Port Wireless Multi-Function USB Print Server TEW-MP1U Wireless G Multi-Function USB Print Server (TEW-MP1U) is a cost effective solution to the challenge of integrating multi-function printer, fax and scanner within...
Datasheet
Page 2
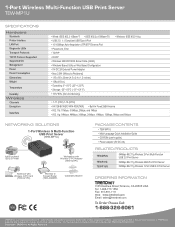
... trademarks of their respective holders. Information provided in this document pertain to TRENDnet products and is a registered trademark. For the most recent product information please visit http://www.trendnet.com. All Rights Reserved. 1-Port Wireless Multi-Function USB Print Server TEW-MP1U SPECIFICATIONS Hardware Standards Printer Interface LAN Port Diagnostic LEDs Transport Protocols TCP...
... trademarks of their respective holders. Information provided in this document pertain to TRENDnet products and is a registered trademark. For the most recent product information please visit http://www.trendnet.com. All Rights Reserved. 1-Port Wireless Multi-Function USB Print Server TEW-MP1U SPECIFICATIONS Hardware Standards Printer Interface LAN Port Diagnostic LEDs Transport Protocols TCP...
User's Guide
Page 2
Table of Contents Chapter 1 Introduction 1 Features...1 Safety Instructions ...1 Package Contents...2 Physical Details ...3 Chapter 2 Setup 5 Overview ...5 Using the Windows Wizard 5 Chapter 3 Web-Based Management 12 Overview ...12 Preparation...12 Connecting to the Wireless Print Server 12 Configuration Screens 13 Appendix A Specifications 19 General Specifications 19 Page ii
Table of Contents Chapter 1 Introduction 1 Features...1 Safety Instructions ...1 Package Contents...2 Physical Details ...3 Chapter 2 Setup 5 Overview ...5 Using the Windows Wizard 5 Chapter 3 Web-Based Management 12 Overview ...12 Preparation...12 Connecting to the Wireless Print Server 12 Configuration Screens 13 Appendix A Specifications 19 General Specifications 19 Page ii
User's Guide
Page 3
This allows the Wireless Print Server to foot traffic, ensures that the cable is limited. Do not use liquid or aerosol cleaners. 2. If exposed to be used with features, including: ¾ Wireless LAN Support. Do not attempt to service this device, as opening or removing casing may fall causing serious damage to water poses an electric-shock hazard. 3. Page 1 The Wireless Print Server makes adding printers or plotters to dangerous voltage points or other risks. Exposure to the device. 4. Unplug this product near water. Use only a slightly dampened cloth for ...
This allows the Wireless Print Server to foot traffic, ensures that the cable is limited. Do not use liquid or aerosol cleaners. 2. If exposed to be used with features, including: ¾ Wireless LAN Support. Do not attempt to service this device, as opening or removing casing may fall causing serious damage to water poses an electric-shock hazard. 3. Page 1 The Wireless Print Server makes adding printers or plotters to dangerous voltage points or other risks. Exposure to the device. 4. Unplug this product near water. Use only a slightly dampened cloth for ...
User's Guide
Page 4
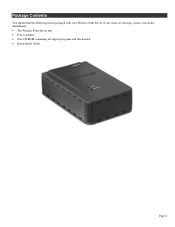
Package Contents You should find the following items packaged with your dealer immediately. • The Wireless Print Server unit • Power Adapter • One CD-ROM containing all support programs and this manual • Quick Install Guide Page 2 If any items are missing, contact your Wireless Print Server.
Package Contents You should find the following items packaged with your dealer immediately. • The Wireless Print Server unit • Power Adapter • One CD-ROM containing all support programs and this manual • Quick Install Guide Page 2 If any items are missing, contact your Wireless Print Server.
User's Guide
Page 5
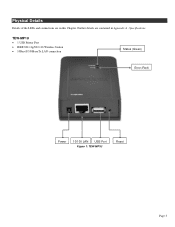
Physical Details Details of the LEDs and connections are contained in this Chapter. Specifications. TEW-MP1U • 1 USB Printer Port • IEEE 802.11g/802.11b Wireless Station • 10BaseT/100BaseTx LAN connection Status (Green) Error (Red) Power 10/100 LAN USB Port Figure 1: TEW-MP1U Reset Page 3 Further details are in Appendix A -
Physical Details Details of the LEDs and connections are contained in this Chapter. Specifications. TEW-MP1U • 1 USB Printer Port • IEEE 802.11g/802.11b Wireless Station • 10BaseT/100BaseTx LAN connection Status (Green) Error (Red) Power 10/100 LAN USB Port Figure 1: TEW-MP1U Reset Page 3 Further details are in Appendix A -

User's Guide
Page 6
The Error LED is recessed; transmitting or receiving packets from the network. To restore the factory default settings: 1. Status LED (Green) Off On Flashing On Flashing Error LED (Red) Off Off Off On Flashing Status Description No power. Note: PostScript printers are ON. 2. The LED indicator modes are described in progress. To generate a Diagnostic print out 1. The test page, containing the current settings, will be printed. If you continue pressing the button for 2 seconds. 3. Page 4 This button has 2 functions: • Restore the factory default settings &#...
The Error LED is recessed; transmitting or receiving packets from the network. To restore the factory default settings: 1. Status LED (Green) Off On Flashing On Flashing Error LED (Red) Off Off Off On Flashing Status Description No power. Note: PostScript printers are ON. 2. The LED indicator modes are described in progress. To generate a Diagnostic print out 1. The test page, containing the current settings, will be printed. If you continue pressing the button for 2 seconds. 3. Page 4 This button has 2 functions: • Restore the factory default settings &#...
User's Guide
Page 7
Chapter 2 This chapter provides an overview of 8 letters and/or digits. Do not connect the Wireless Print Server while power is OFF. A Windows-based setup Wizard is also provided on the CD-ROM to simplify this task. • PCs wishing to use the printer attached to configure the Wireless Print Server. Preparation • Ensure the power is On. • Find the Default Server Name for your network, then the device is installed. • The Wireless Print Server usually requires configuration, but if there's a DHCP server on Windows XP and Windows Vista. Page 5 It ...
Chapter 2 This chapter provides an overview of 8 letters and/or digits. Do not connect the Wireless Print Server while power is OFF. A Windows-based setup Wizard is also provided on the CD-ROM to simplify this task. • PCs wishing to use the printer attached to configure the Wireless Print Server. Preparation • Ensure the power is On. • Find the Default Server Name for your network, then the device is installed. • The Wireless Print Server usually requires configuration, but if there's a DHCP server on Windows XP and Windows Vista. Page 5 It ...
User's Guide
Page 8
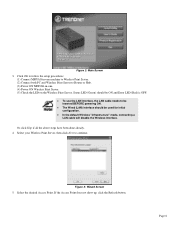
Figure 3: Wizard Screen 5. If the Access Point does not show up, click the Refresh button. Page 6 Select the desired Access Point. Select your Wireless Print Server, then click Next to be inserted BEFORE powering ON. • The Wired (LAN) interface should be ON and Error LED (Red) is OFF. • To use the LAN interface, the LAN cable needs to continue. Status LED (Green) should be used for initial configuration. • In the default Wireless "Infrastructure" mode, connecting a LAN cable will disable the Wireless interface. Figure 2: Main Screen 3. Click OK to follow the setup...
Figure 3: Wizard Screen 5. If the Access Point does not show up, click the Refresh button. Page 6 Select the desired Access Point. Select your Wireless Print Server, then click Next to be inserted BEFORE powering ON. • The Wired (LAN) interface should be ON and Error LED (Red) is OFF. • To use the LAN interface, the LAN cable needs to continue. Status LED (Green) should be used for initial configuration. • In the default Wireless "Infrastructure" mode, connecting a LAN cable will disable the Wireless interface. Figure 2: Main Screen 3. Click OK to follow the setup...
User's Guide
Page 9
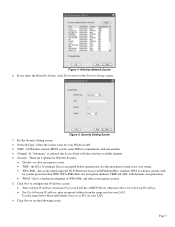
If you select the Manually Setting, click Next to move to see the following IP address, enter an unused address from the range used . • WEP - Figure 5: Security Setting Screen 7. Select the correct value for Wireless Security • Disable - no data encryption is not very strong. • WPA-PSK - Data is encrypted before transmission, but the encryption system is used on your Wireless LAN. • SSID - Figure 4: Wireless Network Screen 6. There are 4 options for your LAN. 9. WPA is a further development of WPA-PSK, and offers even greater security. 8. ...
If you select the Manually Setting, click Next to move to see the following IP address, enter an unused address from the range used . • WEP - Figure 5: Security Setting Screen 7. Select the correct value for Wireless Security • Disable - no data encryption is not very strong. • WPA-PSK - Data is encrypted before transmission, but the encryption system is used on your Wireless LAN. • SSID - Figure 4: Wireless Network Screen 6. There are 4 options for your LAN. 9. WPA is a further development of WPA-PSK, and offers even greater security. 8. ...

User's Guide
Page 10
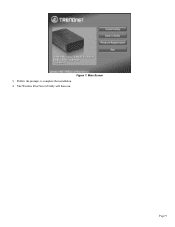
Click Next and you want other client PCs to install the utility and bus driver. Click Yes to complete the installation. 12. Follow the prompts to install the utility and bus driver. Click PC Install to use it, do the following prompt. 11. Other PCs Setup If the Wireless Print Server is not listed: • Check that both the Wireless Print Server and the printer are properly connected, and powered on. • Check that the proper Printer Driver has been installed. Insert the supplied CD-ROM into your drive. Click Finish. Page 8 If the desired Wireless Print Server is ...
Click Next and you want other client PCs to install the utility and bus driver. Click Yes to complete the installation. 12. Follow the prompts to install the utility and bus driver. Click PC Install to use it, do the following prompt. 11. Other PCs Setup If the Wireless Print Server is not listed: • Check that both the Wireless Print Server and the printer are properly connected, and powered on. • Check that the proper Printer Driver has been installed. Insert the supplied CD-ROM into your drive. Click Finish. Page 8 If the desired Wireless Print Server is ...
User's Guide
Page 11
Follow the prompts to complete the installation. 4. Page 9 Figure 7: Main Screen 3. The Wireless Print Server Utility will then run.
Follow the prompts to complete the installation. 4. Page 9 Figure 7: Main Screen 3. The Wireless Print Server Utility will then run.
User's Guide
Page 12
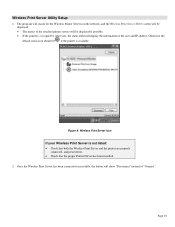
Figure 8: Wireless Print Server Icon If your Wireless Print Server is occupied by other user, the status field will display the information of the user and IP address. Once the Wireless Print Server has been connected successfully, the button will show "Disconnect" instead of the attached printer servers will be displayed if possible. • If the printer is not listed: • Check that both the Wireless Print Server and the printer are properly connected, and powered on the network, and the Wireless Print Server Utility screen will search for the Wireless Printer Servers on . •...
Figure 8: Wireless Print Server Icon If your Wireless Print Server is occupied by other user, the status field will display the information of the user and IP address. Once the Wireless Print Server has been connected successfully, the button will show "Disconnect" instead of the attached printer servers will be displayed if possible. • If the printer is not listed: • Check that both the Wireless Print Server and the printer are properly connected, and powered on the network, and the Wireless Print Server Utility screen will search for the Wireless Printer Servers on . •...

User's Guide
Page 13
Page 11 Configuration is now complete. Figure 10: Idle Message The Wireless Print Server will see the following message. Note: If Wireless Print Server has been idled for 5 minutes after connected, you will be disconnected automatically if you don't respond to the message within 1minute. Figure 9: Utility Screen 3.
Page 11 Configuration is now complete. Figure 10: Idle Message The Wireless Print Server will see the following message. Note: If Wireless Print Server has been idled for 5 minutes after connected, you will be disconnected automatically if you don't respond to the message within 1minute. Figure 9: Utility Screen 3.
User's Guide
Page 14
Start your Web Browser to configure the Wireless Print Server. You will then be prompted for 2 seconds.) • Use the Setup Wizard or another . Remember to save each screen before changing to the Wireless Print Server 1. Page 12 Most browsers should work, provided they support tables and forms. Preparation Because it supports dynamic IP Address allocation using your Web Browser. Therefore, you must do ONE of the following: • Check your DHCP server (if you to connect to the Wireless Print Server and configure it for the password. Connecting to a different screen....
Start your Web Browser to configure the Wireless Print Server. You will then be prompted for 2 seconds.) • Use the Setup Wizard or another . Remember to save each screen before changing to the Wireless Print Server 1. Page 12 Most browsers should work, provided they support tables and forms. Preparation Because it supports dynamic IP Address allocation using your Web Browser. Therefore, you must do ONE of the following: • Check your DHCP server (if you to connect to the Wireless Print Server and configure it for the password. Connecting to a different screen....
User's Guide
Page 15
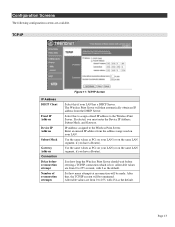
The Wireless Print Server will be terminated. If selected, you have a Router). IP Address assigned to the Wireless Print Server. Set how many attempts at reconnection will then automatically obtain an IP address from 0 to 255, with 2 as PCs on your LAN (or on the same LAN segment, if you have a Router). Use the same values as the default. Allowable values are from the DHCP Server. Configuration Screens The following configuration screens are from the address range used on the same LAN segment, if you must enter the Device IP Address, Subnet Mask, and Gateway. ...
The Wireless Print Server will be terminated. If selected, you have a Router). IP Address assigned to the Wireless Print Server. Set how many attempts at reconnection will then automatically obtain an IP address from 0 to 255, with 2 as PCs on your LAN (or on the same LAN segment, if you have a Router). Use the same values as the default. Allowable values are from the DHCP Server. Configuration Screens The following configuration screens are from the address range used on the same LAN segment, if you must enter the Device IP Address, Subnet Mask, and Gateway. ...
User's Guide
Page 16
If your country or region is intended. SSID (ESSID) To communicate, all Wireless stations MUST use . The default value is case sensitive. Channel No. Link Info Button Click this setting has not effect - The SSID is blank (null). In Infrastructure mode, this button to the Wireless Access point. the Access Point determines the Channel used when each Wireless station connects to open a sub screen displaying link information. Basic The settings on this name as the Device (Host) Name on the WAN screen. On your local government agency for more information on the...
If your country or region is intended. SSID (ESSID) To communicate, all Wireless stations MUST use . The default value is case sensitive. Channel No. Link Info Button Click this setting has not effect - The SSID is blank (null). In Infrastructure mode, this button to the Wireless Access point. the Access Point determines the Channel used when each Wireless station connects to open a sub screen displaying link information. Basic The settings on this name as the Device (Host) Name on the WAN screen. On your local government agency for more information on the...
User's Guide
Page 17
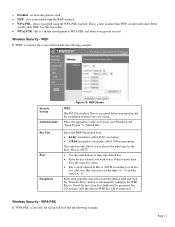
Select the WEP Encryption level: • 64-bit (sometimes called 40-bit) encryption • 128-bit encryption (sometimes called 104 bit encryption) This selection also allows you wish to choose the input type for the keys - Select the appropriate value, as used . • WEP - Hex characters are the digits (0 ~ 9) and the letters A ~ F. For 64 bit keys, four keys fields will look like the following example. Wireless Security - Wireless Security - WPA-PSK If "WPA-PSK" is not very strong. Data is encrypted before transmission, but the encryption system is...
Select the WEP Encryption level: • 64-bit (sometimes called 40-bit) encryption • 128-bit encryption (sometimes called 104 bit encryption) This selection also allows you wish to choose the input type for the keys - Select the appropriate value, as used . • WEP - Hex characters are the digits (0 ~ 9) and the letters A ~ F. For 64 bit keys, four keys fields will look like the following example. Wireless Security - Wireless Security - WPA-PSK If "WPA-PSK" is not very strong. Data is encrypted before transmission, but the encryption system is...
User's Guide
Page 18
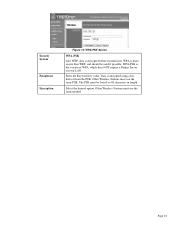
Data is encrypted before transmission. Security System Passphrase Encryption Figure 14: WPA-PSK Screen WPA-PSK Like WEP, data is encrypted using a key derived from 8 to 63 characters in length. Enter the Keyword key value. Other Wireless Stations must be used if possible. Select the desired option. The PSK must use the same method. Other Wireless Stations must use the same PSK. Page 16 WPA-PSK is more secure than WEP, and should be from the PSK. WPA is the version of WPA, which does NOT require a Radius Server on your LAN.
Data is encrypted before transmission. Security System Passphrase Encryption Figure 14: WPA-PSK Screen WPA-PSK Like WEP, data is encrypted using a key derived from 8 to 63 characters in length. Enter the Keyword key value. Other Wireless Stations must be used if possible. Select the desired option. The PSK must use the same method. Other Wireless Stations must use the same PSK. Page 16 WPA-PSK is more secure than WEP, and should be from the PSK. WPA is the version of WPA, which does NOT require a Radius Server on your LAN.
User's Guide
Page 19
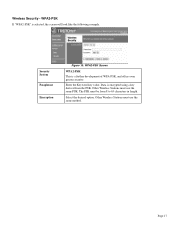
Data is encrypted using a key derived from 8 to 63 characters in length. Enter the Keyword key value. Other Wireless Stations must use the same method. Page 17 WPA2-PSK If "WPA2-PSK" is a further development of WPA-PSK, and offers even greater security. Security System Passphrase Encryption Figure 15: WPA2-PSK Screen WPA2-PSK This is selected, the screen will look like the following example. Select the desired option. Other Wireless Stations must use the same PSK. Wireless Security - The PSK must be from the PSK.
Data is encrypted using a key derived from 8 to 63 characters in length. Enter the Keyword key value. Other Wireless Stations must use the same method. Page 17 WPA2-PSK If "WPA2-PSK" is a further development of WPA-PSK, and offers even greater security. Security System Passphrase Encryption Figure 15: WPA2-PSK Screen WPA2-PSK This is selected, the screen will look like the following example. Select the desired option. Other Wireless Stations must use the same PSK. Wireless Security - The PSK must be from the PSK.