Datasheet
Page 1
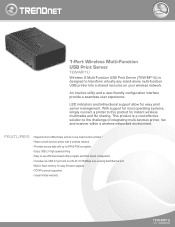
...simply connect a printer to this product for easy firmware upgrade • TCP/IP protocol supported • 3-year limited warranty TEW-MP1U rev: 10.08.2009 With support for most USB printers and all-in-one multi-function printers * • Share ... interface provide a seamless user experience. LED indicators and bidirectional support allow for easy print server management. wireless 1-Port Wireless Multi-Function USB Print Server TEW-MP1U Wireless G Multi-Function USB Print Server (TEW-MP1U) is a cost effective solution to the challenge of integrating multi-function printer, fax...
...simply connect a printer to this product for easy firmware upgrade • TCP/IP protocol supported • 3-year limited warranty TEW-MP1U rev: 10.08.2009 With support for most USB printers and all-in-one multi-function printers * • Share ... interface provide a seamless user experience. LED indicators and bidirectional support allow for easy print server management. wireless 1-Port Wireless Multi-Function USB Print Server TEW-MP1U Wireless G Multi-Function USB Print Server (TEW-MP1U) is a cost effective solution to the challenge of integrating multi-function printer, fax...
Datasheet
Page 2
... and is a registered trademark. All Rights Reserved. Other Brands and product names are trademarks of their respective holders. Copyright © TRENDnet. 1-Port Wireless Multi-Function USB Print Server TEW-MP1U SPECIFICATIONS Hardware Standards Printer Interface LAN Port Diagnostic LEDs Transport Protocols TCP/IP Protocol Supported Supported OS Management Power Power Consumption Dimensions Weight Temperature Humidity...
... and is a registered trademark. All Rights Reserved. Other Brands and product names are trademarks of their respective holders. Copyright © TRENDnet. 1-Port Wireless Multi-Function USB Print Server TEW-MP1U SPECIFICATIONS Hardware Standards Printer Interface LAN Port Diagnostic LEDs Transport Protocols TCP/IP Protocol Supported Supported OS Management Power Power Consumption Dimensions Weight Temperature Humidity...
User's Guide
Page 2
Table of Contents Chapter 1 Introduction 1 Features...1 Safety Instructions ...1 Package Contents...2 Physical Details ...3 Chapter 2 Setup 5 Overview ...5 Using the Windows Wizard 5 Chapter 3 Web-Based Management 12 Overview ...12 Preparation...12 Connecting to the Wireless Print Server 12 Configuration Screens 13 Appendix A Specifications 19 General Specifications 19 Page ii
Table of Contents Chapter 1 Introduction 1 Features...1 Safety Instructions ...1 Package Contents...2 Physical Details ...3 Chapter 2 Setup 5 Overview ...5 Using the Windows Wizard 5 Chapter 3 Web-Based Management 12 Overview ...12 Preparation...12 Connecting to the Wireless Print Server 12 Configuration Screens 13 Appendix A Specifications 19 General Specifications 19 Page ii
User's Guide
Page 3
...Easy Installation. Safety Instructions For your own safety, and to water poses an electric-shock hazard. 3. Exposure to protect your Wireless Print Server, please observe the following conditions: • The power cord is properly shielded and does not pose a tripping hazard. 6. ... to provide a simple and efficient network printing solution. Your Wireless Print Server was designed to the device. 4. The Wireless Print Server supports print, copy, scan and storage functions of your new Wireless Print Server. Do not place the Wireless Print Server on the marking label. If using an...
...Easy Installation. Safety Instructions For your own safety, and to water poses an electric-shock hazard. 3. Exposure to protect your Wireless Print Server, please observe the following conditions: • The power cord is properly shielded and does not pose a tripping hazard. 6. ... to provide a simple and efficient network printing solution. Your Wireless Print Server was designed to the device. 4. The Wireless Print Server supports print, copy, scan and storage functions of your new Wireless Print Server. Do not place the Wireless Print Server on the marking label. If using an...
User's Guide
Page 4
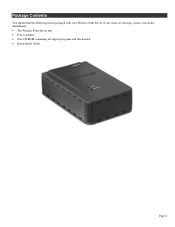
If any items are missing, contact your Wireless Print Server. Package Contents You should find the following items packaged with your dealer immediately. • The Wireless Print Server unit • Power Adapter • One CD-ROM containing all support programs and this manual • Quick Install Guide Page 2
If any items are missing, contact your Wireless Print Server. Package Contents You should find the following items packaged with your dealer immediately. • The Wireless Print Server unit • Power Adapter • One CD-ROM containing all support programs and this manual • Quick Install Guide Page 2

User's Guide
Page 6
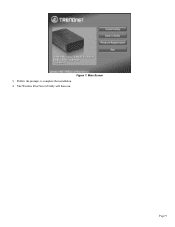
... the diagnostic button, and hold the diagnostic button. This button has 2 functions: • Restore the factory default settings • Print a test page containing all current settings. Normal operation - Ensure that both the Wireless Print Server and the attached printer are ON. 2. If you continue pressing the button for 2 seconds. 3. Status LED (Green) Off...
... the diagnostic button, and hold the diagnostic button. This button has 2 functions: • Restore the factory default settings • Print a test page containing all current settings. Normal operation - Ensure that both the Wireless Print Server and the attached printer are ON. 2. If you continue pressing the button for 2 seconds. 3. Status LED (Green) Off...
User's Guide
Page 7
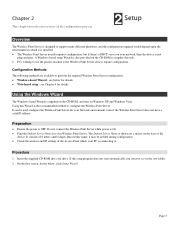
...shown on a sticker on the CD-ROM to simplify this task. • PCs wishing to use the printer attached to the Wireless Print Server always require configuration. Page 5 It can be needed during configuration. • Check the wireless and IP settings of the Access Point...connecting to. see below , click Setup Wizard. Chapter 2 This chapter provides an overview of the configuration process. 2 Setup Overview The Wireless Print Server is designed to support many different platforms, and the configuration required would depend upon the environment in the root folder. 2. On the first...
...shown on a sticker on the CD-ROM to simplify this task. • PCs wishing to use the printer attached to the Wireless Print Server always require configuration. Page 5 It can be needed during configuration. • Check the wireless and IP settings of the Access Point...connecting to. see below , click Setup Wizard. Chapter 2 This chapter provides an overview of the configuration process. 2 Setup Overview The Wireless Print Server is designed to support many different platforms, and the configuration required would depend upon the environment in the root folder. 2. On the first...
User's Guide
Page 8
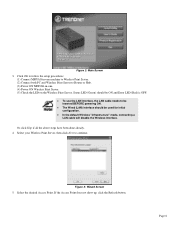
...been done already. 4. If the Access Point does not show up, click the Refresh button. Select the desired Access Point. Page 6 Select your Wireless Print Server, then click Next to be inserted BEFORE powering ON. • The Wired (LAN) interface should be used for initial configuration. • In the ... will disable the Wireless interface. Figure 3: Wizard Screen 5. Click OK to follow the setup procedures: (1) Connect MFP/All-in-one machine to Wireless Print Server. (2) Connect both PC and Wireless Print Server to Router or Hub. (3) Power ON MFP/All-in-one. (4) Power ON Wireless...
...been done already. 4. If the Access Point does not show up, click the Refresh button. Select the desired Access Point. Page 6 Select your Wireless Print Server, then click Next to be inserted BEFORE powering ON. • The Wired (LAN) interface should be used for initial configuration. • In the ... will disable the Wireless interface. Figure 3: Wizard Screen 5. Click OK to follow the setup procedures: (1) Connect MFP/All-in-one machine to Wireless Print Server. (2) Connect both PC and Wireless Print Server to Router or Hub. (3) Power ON MFP/All-in-one. (4) Power ON Wireless...

User's Guide
Page 10
...does not start, run Autorun.exe in the root folder. 2. Click Yes to install the utility and bus driver. If the desired Wireless Print Server is configured already, and you will see the following procedure: 1. Click PC Install to install the utility and bus driver. Follow the ... Click Next and you want other client PCs to complete the installation. 12. Other PCs Setup If the Wireless Print Server is not listed: • Check that both the Wireless Print Server and the printer are properly connected, and powered on. • Check that the proper Printer Driver has been installed...
...does not start, run Autorun.exe in the root folder. 2. Click Yes to install the utility and bus driver. If the desired Wireless Print Server is configured already, and you will see the following procedure: 1. Click PC Install to install the utility and bus driver. Follow the ... Click Next and you want other client PCs to complete the installation. 12. Other PCs Setup If the Wireless Print Server is not listed: • Check that both the Wireless Print Server and the printer are properly connected, and powered on. • Check that the proper Printer Driver has been installed...
User's Guide
Page 11
Figure 7: Main Screen 3. Follow the prompts to complete the installation. 4. The Wireless Print Server Utility will then run. Page 9
Figure 7: Main Screen 3. Follow the prompts to complete the installation. 4. The Wireless Print Server Utility will then run. Page 9
User's Guide
Page 12
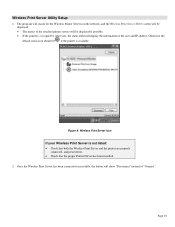
Page 10 Wireless Print Server Utility Setup 1. Once the Wireless Print Server has been connected successfully, the button will show "Disconnect" instead of the attached printer servers will search for the Wireless Printer Servers on . • Check that the proper Printer Driver has been installed.... both the Wireless Print Server and the printer are properly connected, and powered on the network, and the Wireless Print Server Utility screen will display the information of the user and IP address. Figure 8: Wireless Print Server Icon If your Wireless Print Server is occupied by ...
Page 10 Wireless Print Server Utility Setup 1. Once the Wireless Print Server has been connected successfully, the button will show "Disconnect" instead of the attached printer servers will search for the Wireless Printer Servers on . • Check that the proper Printer Driver has been installed.... both the Wireless Print Server and the printer are properly connected, and powered on the network, and the Wireless Print Server Utility screen will display the information of the user and IP address. Figure 8: Wireless Print Server Icon If your Wireless Print Server is occupied by ...

User's Guide
Page 13
Configuration is now complete. Note: If Wireless Print Server has been idled for 5 minutes after connected, you will be disconnected automatically if you don't respond to the message within 1minute. Figure 10: Idle Message The Wireless Print Server will see the following message. Figure 9: Utility Screen 3. Page 11
Configuration is now complete. Note: If Wireless Print Server has been idled for 5 minutes after connected, you will be disconnected automatically if you don't respond to the message within 1minute. Figure 10: Idle Message The Wireless Print Server will see the following message. Figure 9: Utility Screen 3. Page 11
User's Guide
Page 14
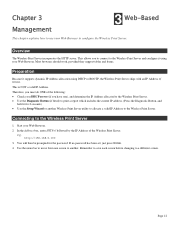
...Browser. Use the menu bar to move from one ), and determine the IP Address allocated to the Wireless Print Server. • Use the Diagnostic Button (if fitted) to print a report which includes the current IP address. (Press the Diagnostic Button, and hold it using DHCP ... your DHCP server (if you to connect to the Wireless Print Server and configure it for the password. Overview The Wireless Print Server incorporates the HTTP server. This allows you have one screen to another Wireless Print Server utility to allocate a valid IP Address to the Wireless Print Server. e.g. If...
...Browser. Use the menu bar to move from one ), and determine the IP Address allocated to the Wireless Print Server. • Use the Diagnostic Button (if fitted) to print a report which includes the current IP address. (Press the Diagnostic Button, and hold it using DHCP ... your DHCP server (if you to connect to the Wireless Print Server and configure it for the password. Overview The Wireless Print Server incorporates the HTTP server. This allows you have one screen to another Wireless Print Server utility to allocate a valid IP Address to the Wireless Print Server. e.g. If...
User's Guide
Page 15
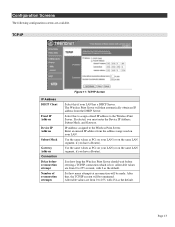
... to 255, with 2 as PCs on your LAN (or on your LAN has a DHCP Server. Configuration Screens The following configuration screens are from 0 to the Wireless Print Server. TCP/IP IP Address DHCP Client Fixed IP Address Device IP Address Subnet Mask Gateway Address Connection...many attempts at reconnection will then automatically obtain an IP address from 0 to the Wireless Print Server. If selected, you have a Router). Select this if your LAN. The Wireless Print Server will be terminated. Use the same values as the default. Allowable values are available. After...
... to 255, with 2 as PCs on your LAN (or on your LAN has a DHCP Server. Configuration Screens The following configuration screens are from 0 to the Wireless Print Server. TCP/IP IP Address DHCP Client Fixed IP Address Device IP Address Subnet Mask Gateway Address Connection...many attempts at reconnection will then automatically obtain an IP address from 0 to the Wireless Print Server. If selected, you have a Router). Select this if your LAN. The Wireless Print Server will be terminated. Use the same values as the default. Allowable values are available. After...

Quick Installation Guide
Page 2
Configure the Print Server ...3 4. Scanning ...9 Troubleshooting ...10 Version 11.16.07 Printing ...7 5. Table of Contents English ...1 1. Before You Start ...1 2. Faxing ...8 6. How to Install ...2 3.
Configure the Print Server ...3 4. Scanning ...9 Troubleshooting ...10 Version 11.16.07 Printing ...7 5. Table of Contents English ...1 1. Before You Start ...1 2. Faxing ...8 6. How to Install ...2 3.
Quick Installation Guide
Page 3
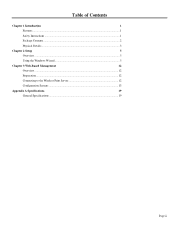
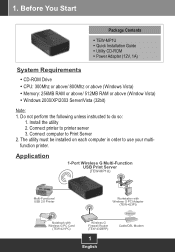
...You Start Package Contents ? CD-ROM Drive ? Memory: 256MB RAM or above/ 512MB RAM or above (Windows Vista) ? TEW-MP1U ? Power Adapter (12V, 1A) System Requirements ? CPU: 300Mhz or above/ 800Mhz or above (Window Vista) ? Do not...order to do so: 1. Application 1-Port Wireless G Multi-Function USB Print Server (TEW-MP1U) Multi-Functional USB 2.0 Printer Workstation with Wireless G PCI Adapter (TEW-423PI) Internet Notebook with Wireless G PC Card (TEW-421PC) Wireless G Firewall Router (TEW-432BRP) Cable/DSL Modem 1 English Quick Installation Guide ? Windows 2000/XP...
...You Start Package Contents ? CD-ROM Drive ? Memory: 256MB RAM or above/ 512MB RAM or above (Windows Vista) ? TEW-MP1U ? Power Adapter (12V, 1A) System Requirements ? CPU: 300Mhz or above/ 800Mhz or above (Window Vista) ? Do not...order to do so: 1. Application 1-Port Wireless G Multi-Function USB Print Server (TEW-MP1U) Multi-Functional USB 2.0 Printer Workstation with Wireless G PCI Adapter (TEW-423PI) Internet Notebook with Wireless G PC Card (TEW-421PC) Wireless G Firewall Router (TEW-432BRP) Cable/DSL Modem 1 English Quick Installation Guide ? Windows 2000/XP...
Quick Installation Guide
Page 4
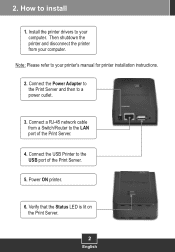
Connect a RJ-45 network cable from your computer. How to the LAN port of the Print Server. 5. Note: Please refer to a power outlet. 3. 2. Connect the Power Adapter to the Print Server and then to your computer. Connect the USB Printer to your printer's manual for printer installation instructions. 2. Then shutdown the printer and disconnect the printer from a Switch/Router to install 1. Install the printer drivers to the USB port of the Print Server. 4. Verify that the Status LED is lit on the Print Server. 2 English Power ON printer. 6.
Connect a RJ-45 network cable from your computer. How to the LAN port of the Print Server. 5. Note: Please refer to a power outlet. 3. 2. Connect the Power Adapter to the Print Server and then to your computer. Connect the USB Printer to your printer's manual for printer installation instructions. 2. Then shutdown the printer and disconnect the printer from a Switch/Router to install 1. Install the printer drivers to the USB port of the Print Server. 4. Verify that the Status LED is lit on the Print Server. 2 English Power ON printer. 6.

Quick Installation Guide
Page 5
Select the print server and then click Next. 3 English Insert the Utility CD-ROM into your CD-ROM driver. Then click Setup Wizard. 2. Click Skip. 3. Configure the Print Server 1. 3.
Select the print server and then click Next. 3 English Insert the Utility CD-ROM into your CD-ROM driver. Then click Setup Wizard. 2. Click Skip. 3. Configure the Print Server 1. 3.

Quick Installation Guide
Page 6
Click Finish. 4 English 4. Configure the IP address of the print server to and then click Next. 5. Choose a wireless network to connect to be in the same subnet as your network and then click Next. 6.
Click Finish. 4 English 4. Configure the IP address of the print server to and then click Next. 5. Choose a wireless network to connect to be in the same subnet as your network and then click Next. 6.
Quick Installation Guide
Page 8
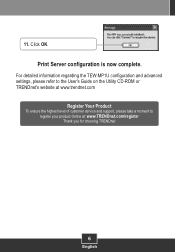
Print Server configuration is now complete. 11. Click OK. For detailed information regarding the TEW-MP1U configuration and advanced settings, please refer to the User's Guide on the Utility CD-ROM or TRENDnet's website at www.trendnet.com Register Your Product To ensure the highest level of customer service and support, please take a moment to register your product Online at: www.TRENDnet.com/register Thank you for choosing TRENDnet 6 English
Print Server configuration is now complete. 11. Click OK. For detailed information regarding the TEW-MP1U configuration and advanced settings, please refer to the User's Guide on the Utility CD-ROM or TRENDnet's website at www.trendnet.com Register Your Product To ensure the highest level of customer service and support, please take a moment to register your product Online at: www.TRENDnet.com/register Thank you for choosing TRENDnet 6 English