
User's Guide
Page 5
... SETUP 5 Unpacking ...5 Setup ...5 HARDWARE INSTALLATION 6 Front Panel ...6 Rear Panel ...7 Side Panel...8 Hanging Way ...8 Hardware connections ...9 Connecting the WLAN Router...9 Check the installation ...9 PC NETWORK TCP/IP SETTING 10 Windows 95/98/ME...10 Windows 2000 ...11 Windows XP / Vista ...12 CONFIGURATION 13 Login to the WLAN Router through Wireless LAN ...13...
... SETUP 5 Unpacking ...5 Setup ...5 HARDWARE INSTALLATION 6 Front Panel ...6 Rear Panel ...7 Side Panel...8 Hanging Way ...8 Hardware connections ...9 Connecting the WLAN Router...9 Check the installation ...9 PC NETWORK TCP/IP SETTING 10 Windows 95/98/ME...10 Windows 2000 ...11 Windows XP / Vista ...12 CONFIGURATION 13 Login to the WLAN Router through Wireless LAN ...13...

User's Guide
Page 8
...one high-speed broadband connection through an Internet sharing device can be installed and configured right out of the box. The scarcity of IP addresses and using a shared Internet connection through wireless or wired (WLAN, LAN and WAN-Internet). The local area network connects ...the Internet at least two computers. All linked computers can be easily setup. Applications: Broadband Internet access: Several computers can share one public IP address over such a device. File sharing: Exchange data, messages, and distribute files thus making good use of broadband capabilities over a ...
...one high-speed broadband connection through an Internet sharing device can be installed and configured right out of the box. The scarcity of IP addresses and using a shared Internet connection through wireless or wired (WLAN, LAN and WAN-Internet). The local area network connects ...the Internet at least two computers. All linked computers can be easily setup. Applications: Broadband Internet access: Several computers can share one public IP address over such a device. File sharing: Exchange data, messages, and distribute files thus making good use of broadband capabilities over a ...
User's Guide
Page 9
...¾ 4 x 10/100/1000Mbps Auto-MDIX LAN port and 1 x 10/100/1000Mbps WAN port (Internet) ¾ Supports Cable/DSL modems with Dynamic IP, Static IP, PPPoE, PPTP, L2TP & BigPond connection types ¾ High-speed up to 300Mbps data rate using IEEE 802.11n connection ¾ 2 x 2dBi external ...connection ¾ Universal Plug and Play (UPnP) ¾ Provides additional security of enable/disable wireless SSID, Internet Access Control (MAC Address, Domain & IP Filtering) ¾ Easy management via web browser and remote management ¾ Supports 64/128-bit WEP, WPA/WPA2 and WPA-PSK/WPA2-PSK ¾...
...¾ 4 x 10/100/1000Mbps Auto-MDIX LAN port and 1 x 10/100/1000Mbps WAN port (Internet) ¾ Supports Cable/DSL modems with Dynamic IP, Static IP, PPPoE, PPTP, L2TP & BigPond connection types ¾ High-speed up to 300Mbps data rate using IEEE 802.11n connection ¾ 2 x 2dBi external ...connection ¾ Universal Plug and Play (UPnP) ¾ Provides additional security of enable/disable wireless SSID, Internet Access Control (MAC Address, Domain & IP Filtering) ¾ Easy management via web browser and remote management ¾ Supports 64/128-bit WEP, WPA/WPA2 and WPA-PSK/WPA2-PSK ¾...

User's Guide
Page 16
Click on the "Network neighborhood" icon found on the computer's operating system (Win95/98/ME/NT/2000/XP) and are as follows. PC NETWORK TCP/IP SETTING The network TCP/IP settings differ based on the desktop. 2. Select "Properties" to enter the TCP/IP setting screen. 4. Select "Obtain an IP address automatically" on the "IP address" field. 5. Select "Disable DNS" in the "DNS" field. 10 Windows 95/98/ME 1. Click the right mouse button and a context menu will be show. 3.
Click on the "Network neighborhood" icon found on the computer's operating system (Win95/98/ME/NT/2000/XP) and are as follows. PC NETWORK TCP/IP SETTING The network TCP/IP settings differ based on the desktop. 2. Select "Properties" to enter the TCP/IP setting screen. 4. Select "Obtain an IP address automatically" on the "IP address" field. 5. Select "Disable DNS" in the "DNS" field. 10 Windows 95/98/ME 1. Click the right mouse button and a context menu will be show. 3.

User's Guide
Page 17
Select "None" for the "Gateway address" field. Set both "IP address" and "DNS" to enter the TCP/IP setting window. 1. When "My Computer" window opens, open the "Control Panel" and then open the "Network dialup connection" applet. Double click on "Properties." 2.... the "Local area network status" window, click on the "Local area network connection" icon. In the "Local area network connection" window, first select TCP/IP setting and then select "Properties." 3. 6. Select "Properties" to Automatic configuration. 11 Windows 2000 Double click on the "My Computer" icon on the desktop.
Select "None" for the "Gateway address" field. Set both "IP address" and "DNS" to enter the TCP/IP setting window. 1. When "My Computer" window opens, open the "Control Panel" and then open the "Network dialup connection" applet. Double click on "Properties." 2.... the "Local area network status" window, click on the "Local area network connection" icon. In the "Local area network connection" window, first select TCP/IP setting and then select "Properties." 3. 6. Select "Properties" to Automatic configuration. 11 Windows 2000 Double click on the "My Computer" icon on the desktop.

User's Guide
Page 18
Set "IP address" to enter the TCP/IP setting window. 1. Select "properties" to "Obtain an IP address automatically." 2. Set "DNS" to "Obtain DNS server address automatically." 12 Windows XP / Vista Point the cursor and click the right button on the "My Network Place" icon.
Set "IP address" to enter the TCP/IP setting window. 1. Select "properties" to "Obtain an IP address automatically." 2. Set "DNS" to "Obtain DNS server address automatically." 12 Windows XP / Vista Point the cursor and click the right button on the "My Network Place" icon.
User's Guide
Page 19
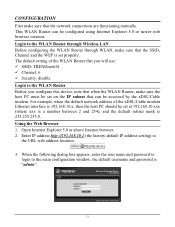
...through Wireless LAN Before configuring the WLAN Router through WLAN, make sure that the network connections are functioning normally. Enter IP address http://192.168.10.1 (the factory-default IP address setting) to the main configuration window, the default username and password is "admin". 13 Open Internet Explorer ...WLAN Router Before you configure this device, note that when the WLAN Router, make sure the host PC must be set on the IP subnet that can be configured using Internet Explorer 5.0 or newer web browser versions. The default setting of the xDSL/Cable modem Ethernet ...
...through Wireless LAN Before configuring the WLAN Router through WLAN, make sure that the network connections are functioning normally. Enter IP address http://192.168.10.1 (the factory-default IP address setting) to the main configuration window, the default username and password is "admin". 13 Open Internet Explorer ...WLAN Router Before you configure this device, note that when the WLAN Router, make sure the host PC must be set on the IP subnet that can be configured using Internet Explorer 5.0 or newer web browser versions. The default setting of the xDSL/Cable modem Ethernet ...

User's Guide
Page 21
If the user chooses to continue. Please assign the range of IP addresses in the fields of "Range start" and "Range end". The default IP is able to auto detect your Internet Connection. Step 3: Set LAN connection and DHCP server Set user's IP address and mask. Please click "Next" to enable DHCP, please click "Enable". Step 4: Set Internet connection The WLAN Router will attempt to automatically assign IP addresses. Obtain IP automatically (DHCP client): 15 DHCP enabled is 192.168.10.1.
If the user chooses to continue. Please assign the range of IP addresses in the fields of "Range start" and "Range end". The default IP is able to auto detect your Internet Connection. Step 3: Set LAN connection and DHCP server Set user's IP address and mask. Please click "Next" to enable DHCP, please click "Enable". Step 4: Set Internet connection The WLAN Router will attempt to automatically assign IP addresses. Obtain IP automatically (DHCP client): 15 DHCP enabled is 192.168.10.1.

User's Guide
Page 22
If the user has enabled DHCP server, choose "Obtain IP automatically (DHCP client)" to have the WLAN Router assign IP addresses automatically. Fixed IP Address: 16
If the user has enabled DHCP server, choose "Obtain IP automatically (DHCP client)" to have the WLAN Router assign IP addresses automatically. Fixed IP Address: 16

User's Guide
Page 23
If the Internet Service Provider (ISP) assigns a fixed IP address, choose this option and enter the assigned WAN IP Address, WAN Subnet Mask, WAN Gateway Address and DNS Server Addresses for the WLAN Router. PPPoE to obtain IP automatically: 17
If the Internet Service Provider (ISP) assigns a fixed IP address, choose this option and enter the assigned WAN IP Address, WAN Subnet Mask, WAN Gateway Address and DNS Server Addresses for the WLAN Router. PPPoE to obtain IP automatically: 17

User's Guide
Page 25
PPPoE with a fixed IP address: If connected to the Internet using a PPPoE (Dial-up xDSL) connection, and the ISP provides a User Name, Password and a Fixed IP Address, choose this option and enter the required information. 19
PPPoE with a fixed IP address: If connected to the Internet using a PPPoE (Dial-up xDSL) connection, and the ISP provides a User Name, Password and a Fixed IP Address, choose this option and enter the required information. 19

User's Guide
Page 26
PPTP: If connected to the Internet using a PPTP xDSL connection, enter your IP, Subnet Mask, Gateway, Server IP, PPTP Account and PPTP Password. 20
PPTP: If connected to the Internet using a PPTP xDSL connection, enter your IP, Subnet Mask, Gateway, Server IP, PPTP Account and PPTP Password. 20

User's Guide
Page 27
L2TP: If connected to the Internet using a L2TP (Dial-up xDSL) connection and the ISP provides a Server IP, Account and Password information, choose this option and enter the required information. 21
L2TP: If connected to the Internet using a L2TP (Dial-up xDSL) connection and the ISP provides a Server IP, Account and Password information, choose this option and enter the required information. 21

User's Guide
Page 28
Big Pond Cable(Australia): If your ISP is Big Pond Cable, the ISP will provide a User Name, Password, Authentication Server and Login Server IP (Optional). Choose this option and enter the required information. 22
Big Pond Cable(Australia): If your ISP is Big Pond Cable, the ISP will provide a User Name, Password, Authentication Server and Login Server IP (Optional). Choose this option and enter the required information. 22

User's Guide
Page 29
If you have a Static IP WAN Physical IP Address, WAN Physical Subnet Mask and WAN Physical Gateway IP Address will provide a User Name, Password. Russia PPPoE: If your ISP is Russian PPPoE, the ISP will be required. Choose this option and enter the required information. 23
If you have a Static IP WAN Physical IP Address, WAN Physical Subnet Mask and WAN Physical Gateway IP Address will provide a User Name, Password. Russia PPPoE: If your ISP is Russian PPPoE, the ISP will be required. Choose this option and enter the required information. 23

User's Guide
Page 30
Russia PPTP: If connected to the Internet using Static IP you must enter your server IP, PPTP Account and Password. If using Russian PPTP xDSL connection, enter your IP, Subnet Mask, Gateway, Server IP, PPTP Account and PPTP Password. 24
Russia PPTP: If connected to the Internet using Static IP you must enter your server IP, PPTP Account and Password. If using Russian PPTP xDSL connection, enter your IP, Subnet Mask, Gateway, Server IP, PPTP Account and PPTP Password. 24

User's Guide
Page 31
If using Russian L2TP (Dial-up xDSL) enter your IP, Subnet Mask, Gateway, Server IP, PPTP Account and PPTP Password. 25 Russia L2TP: If connected to the Internet using Static IP you must enter your server IP, PPTP Account and Password.
If using Russian L2TP (Dial-up xDSL) enter your IP, Subnet Mask, Gateway, Server IP, PPTP Account and PPTP Password. 25 Russia L2TP: If connected to the Internet using Static IP you must enter your server IP, PPTP Account and Password.

User's Guide
Page 33
LAN & DHCP Server This page allows the user to the LAN port or wirelessly. The default host name is "TEW-634GRU" IP Address: This is 192.168.10.1. Subnet Mask: Type the subnet mask for the WLAN Router in the text box. DHCP Server: Enables the DHCP ... enabled by some ISPs. The host name is 255.255.255.0. Host Name: Type the host name in the text box. The default IP address is the IP address of the screen. The default subnet mask is required by default. 27 LAN and DHCP profiles are listed in the DHCP table at...
LAN & DHCP Server This page allows the user to the LAN port or wirelessly. The default host name is "TEW-634GRU" IP Address: This is 192.168.10.1. Subnet Mask: Type the subnet mask for the WLAN Router in the text box. DHCP Server: Enables the DHCP ... enabled by some ISPs. The host name is 255.255.255.0. Host Name: Type the host name in the text box. The default IP address is the IP address of the screen. The default subnet mask is required by default. 27 LAN and DHCP profiles are listed in the DHCP table at...

User's Guide
Page 34
... the local domain name of the network in the table at the bottom of the screen, providing the host name, IP address, and MAC address of the IP range that DHCP server will use to assign IP addresses to all LAN devices connected to set up the WLAN Router's WAN connection, specify the... screen enables users to the WLAN Router. This item is optional. Lease Time: The lease time specifies the amount of the IP range that DHCP will use to assign IP addresses to all LAN devices connected to the WLAN Router. All DHCP client computers are listed in the text box. Connection Type...
... the local domain name of the network in the table at the bottom of the screen, providing the host name, IP address, and MAC address of the IP range that DHCP server will use to assign IP addresses to all LAN devices connected to set up the WLAN Router's WAN connection, specify the... screen enables users to the WLAN Router. This item is optional. Lease Time: The lease time specifies the amount of the IP range that DHCP will use to assign IP addresses to all LAN devices connected to the WLAN Router. All DHCP client computers are listed in the text box. Connection Type...

User's Guide
Page 35
...User's ISP will use to log in the text boxes. These passwords are used to gain access to obtain an IP address automatically. WAN IP: Select whether user wants to specify an IP address manually, or want to the WLAN Router interface. DNS 1-2: Type up to set administrative and user passwords. ...Address: If required by user's ISP, type the MAC address of the WLAN Router WAN interface in the text boxes. When Specify IP is selected, type the IP address, subnet mask, and default gateway in this information. The password must be typed again for confirmation. Or click on the WLAN ...
...User's ISP will use to log in the text boxes. These passwords are used to gain access to obtain an IP address automatically. WAN IP: Select whether user wants to specify an IP address manually, or want to the WLAN Router interface. DNS 1-2: Type up to set administrative and user passwords. ...Address: If required by user's ISP, type the MAC address of the WLAN Router WAN interface in the text boxes. When Specify IP is selected, type the IP address, subnet mask, and default gateway in this information. The password must be typed again for confirmation. Or click on the WLAN ...


