
User Guide
Page 5
... ...9 Windows XP ...10 CONFIGURATION 11 Login to the WLAN Router through Wireless LAN ...11 Login to the WLAN Router...11 Using the Web Browser...11 Setup Wizard...12 Advanced configuration...22 Main ...22 LAN & DHCP Server...22 WAN ...23 Password ...24 Time ...25 Dynamic DNS...26 Wireless ...27 Basic ...27 Security ...28 Advanced ...30 Wi...
... ...9 Windows XP ...10 CONFIGURATION 11 Login to the WLAN Router through Wireless LAN ...11 Login to the WLAN Router...11 Using the Web Browser...11 Setup Wizard...12 Advanced configuration...22 Main ...22 LAN & DHCP Server...22 WAN ...23 Password ...24 Time ...25 Dynamic DNS...26 Wireless ...27 Basic ...27 Security ...28 Advanced ...30 Wi...

User Guide
Page 12
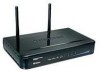
...for Internet connectivity. It will be a useful tool when the manager forgot the password to login, and needs to restore the device back to either 10Mbps or 100Mbps Ethernet connections. WAN In the four port broadband Router, there is an RJ-45 10/100Mbps Auto-MDIX port for connecting to ... the Wi-Fi Protected Setup process. Rear Panel The figure below shows the side panel of the IEEE 802.11b/g/n Wireless Home Router. Side Panel The figure below shows the rear panel of the IEEE 802.11b/g/n Wireless Home Router. WPS (side panel) Push this device to the xDSL/Cable modem for...
...for Internet connectivity. It will be a useful tool when the manager forgot the password to login, and needs to restore the device back to either 10Mbps or 100Mbps Ethernet connections. WAN In the four port broadband Router, there is an RJ-45 10/100Mbps Auto-MDIX port for connecting to ... the Wi-Fi Protected Setup process. Rear Panel The figure below shows the side panel of the IEEE 802.11b/g/n Wireless Home Router. Side Panel The figure below shows the rear panel of the IEEE 802.11b/g/n Wireless Home Router. WPS (side panel) Push this device to the xDSL/Cable modem for...
User Guide
Page 17
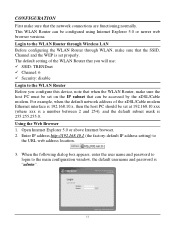
For example, when the default network address of the WLAN Router that you will use: 9 SSID: TRENDnet 9 Channel: 6 9 Security: disable Login to the WLAN Router through Wireless LAN Before configuring the WLAN Router through WLAN, make sure that the network connections are functioning normally. Using the Web Browser 1. ... IP address http://192.168.10.1 (the factory-default IP address setting) to the main configuration window, the default username and password is 255.255.255.0. The default setting of the xDSL/Cable modem Ethernet interface is 192.168.10.x, then the host PC ...
For example, when the default network address of the WLAN Router that you will use: 9 SSID: TRENDnet 9 Channel: 6 9 Security: disable Login to the WLAN Router through Wireless LAN Before configuring the WLAN Router through WLAN, make sure that the network connections are functioning normally. Using the Web Browser 1. ... IP address http://192.168.10.1 (the factory-default IP address setting) to the main configuration window, the default username and password is 255.255.255.0. The default setting of the xDSL/Cable modem Ethernet interface is 192.168.10.x, then the host PC ...

User Guide
Page 18
Setup Wizard Setup wizard is provided as part of the WLAN Router. The following screen will appear. User can simply follow the step-by-step process to get the wireless Router configuration ready to continue. Step 1: Set your new password Setting the new admin password of the web configuration utility. Step 2: Choose time zone Select the time zone from the drop down list. Please click "Next" to run in 6 easy steps by clicking on` the "Wizard" button on the function menu. Please click "Next" to continue. Please click "Next" to continue.
Setup Wizard Setup wizard is provided as part of the WLAN Router. The following screen will appear. User can simply follow the step-by-step process to get the wireless Router configuration ready to continue. Step 1: Set your new password Setting the new admin password of the web configuration utility. Step 2: Choose time zone Select the time zone from the drop down list. Please click "Next" to run in 6 easy steps by clicking on` the "Wizard" button on the function menu. Please click "Next" to continue. Please click "Next" to continue.
User Guide
Page 28
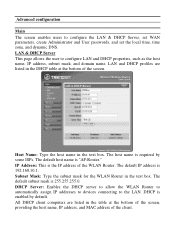
... Server This page allows the user to the LAN. DHCP Server: Enables the DHCP server to allow the WLAN Router to automatically assign IP addresses to devices connecting to configure LAN and DHCP properties, such as the host name, IP...screen, providing the host name, IP address, and MAC address of the WLAN Router. The default host name is the IP address of the client. Subnet Mask: Type the subnet mask for ...the WLAN Router in the text box. Host Name: Type the host name in the text box. Advanced configuration...
... Server This page allows the user to the LAN. DHCP Server: Enables the DHCP server to allow the WLAN Router to automatically assign IP addresses to devices connecting to configure LAN and DHCP properties, such as the host name, IP...screen, providing the host name, IP address, and MAC address of the WLAN Router. The default host name is the IP address of the client. Subnet Mask: Type the subnet mask for ...the WLAN Router in the text box. Host Name: Type the host name in the text box. Advanced configuration...
User Guide
Page 30
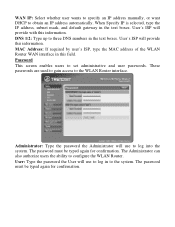
...to log in the text boxes. Password This screen enables users to the WLAN Router interface. User: Type the password the User will provide this field. These passwords are used to gain access to set administrative and user passwords. The password must be typed again for confirmation.... Administrator: Type the password the Administrator will provide with...
...to log in the text boxes. Password This screen enables users to the WLAN Router interface. User: Type the password the User will provide this field. These passwords are used to gain access to set administrative and user passwords. The password must be typed again for confirmation.... Administrator: Type the password the Administrator will provide with...

User Guide
Page 40
.... Syslog Server: Type the IP address of the SMTP account here. Notice: Displays important notices by the system administrator. SMTP Password: If the SMTP Authentication enabled, fill in the SMTP account name here. Dropped Packets: Displays information about any malicious activity on... what items will be sent to. Attacks: Displays information about packets that shows the rate of packet transmission via the WLAN Router's LAN, Wireless and WAN ports (in bytes per second). Debug Information: Displays information related to immediately send the current log. SMTP Authentication...
.... Syslog Server: Type the IP address of the SMTP account here. Notice: Displays important notices by the system administrator. SMTP Password: If the SMTP Authentication enabled, fill in the SMTP account name here. Dropped Packets: Displays information about any malicious activity on... what items will be sent to. Attacks: Displays information about packets that shows the rate of packet transmission via the WLAN Router's LAN, Wireless and WAN ports (in bytes per second). Debug Information: Displays information related to immediately send the current log. SMTP Authentication...
User Guide
Page 52
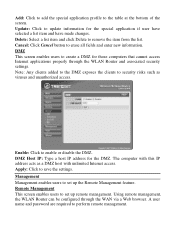
...: Click to erase all fields and enter new information. Using remote management, the WLAN Router can be configured through the WLAN Router and associated security settings. Cancel: Click Cancel button to save the settings. A user name and password are required to set up remote management. Remote Management This screen enables users to perform...
...: Click to erase all fields and enter new information. Using remote management, the WLAN Router can be configured through the WLAN Router and associated security settings. Cancel: Click Cancel button to save the settings. A user name and password are required to set up remote management. Remote Management This screen enables users to perform...

Quick Installation Guide
Page 5
Follow the Wizard instructions and continue through the remaining installation steps. When secure access to step 6. 6. If not, please continue to your router screen appears, enter a password for your router and then click Next. If this screen appears, go to Section 3. By default, the password is admin. 8. Click Next. 7. Enter a unique network name and then click Next. 3 English 5.
Follow the Wizard instructions and continue through the remaining installation steps. When secure access to step 6. 6. If not, please continue to your router screen appears, enter a password for your router and then click Next. If this screen appears, go to Section 3. By default, the password is admin. 8. Click Next. 7. Enter a unique network name and then click Next. 3 English 5.

