
User Guide
Page 2
Overview ...1 1.1 Product Feature 1 1.2 System Requirements 1 2. Configuration through WEB Browser 8 3.1 Status ...8 3.2 Basic Setting 9 3.3 IP Setting 13 3.4 Advanced Setting 14 3.5 Security ...16 3.6 Tools ...17 Glossary ...19 Getting Start 2 2.1 Know the 108Mbps Wireless Network Access Point 2 2.2 Connect to the 108Mbps Wireless Network Access Point 2 2.3 Quick Setup with Wizard 3 2.3.1 Access the Setting Menu 3 2.3.2 Setup with Wizard 5 3. Contents 1.
Overview ...1 1.1 Product Feature 1 1.2 System Requirements 1 2. Configuration through WEB Browser 8 3.1 Status ...8 3.2 Basic Setting 9 3.3 IP Setting 13 3.4 Advanced Setting 14 3.5 Security ...16 3.6 Tools ...17 Glossary ...19 Getting Start 2 2.1 Know the 108Mbps Wireless Network Access Point 2 2.2 Connect to the 108Mbps Wireless Network Access Point 2 2.3 Quick Setup with Wizard 3 2.3.1 Access the Setting Menu 3 2.3.2 Setup with Wizard 5 3. Contents 1.
User Guide
Page 5
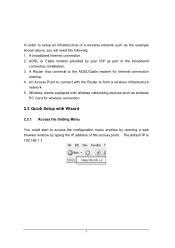
... installation. 3. A Router that connects to form a wireless infrastructure network. 5. An Access Point to connect with the Router to the ADSL/Cable modem for wireless connection. 2.3 Quick Setup with wireless networking devices such as wireless PC Card for Internet connection sharing. 4. In order ...to setup an Infrastructure of a wireless network such as part of this access point. Wireless clients equipped with Wizard 2.3.1 Access the Setting Menu You could start to access the configuration menu anytime by opening a web browser window by your ISP as...
... installation. 3. A Router that connects to form a wireless infrastructure network. 5. An Access Point to connect with the Router to the ADSL/Cable modem for wireless connection. 2.3 Quick Setup with wireless networking devices such as wireless PC Card for Internet connection sharing. 4. In order ...to setup an Infrastructure of a wireless network such as part of this access point. Wireless clients equipped with Wizard 2.3.1 Access the Setting Menu You could start to access the configuration menu anytime by opening a web browser window by your ISP as...
User Guide
Page 7
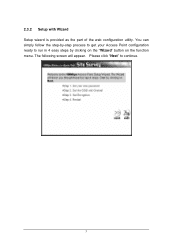
Please click "Next" to run in 4 easy steps by clicking on the "Wizard" button on the function menu. You can simply follow the step-by-step process to get your Access Point configuration ready to continue. 5 The following screen will appear. 2.3.2 Setup with Wizard Setup wizard is provided as the part of the web configuration utility.
Please click "Next" to run in 4 easy steps by clicking on the "Wizard" button on the function menu. You can simply follow the step-by-step process to get your Access Point configuration ready to continue. 5 The following screen will appear. 2.3.2 Setup with Wizard Setup wizard is provided as the part of the web configuration utility.
User Guide
Page 10
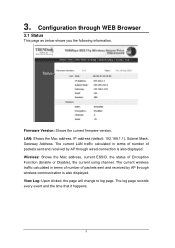
... number of packets sent and received by AP through wireless communication is also displayed. Wireless: Shows the Mac address, current ESSID, the status of packets sent and received by AP through WEB Browser 3.1 Status This page as below shows you the following information. Configuration through wired connection is also displayed. The current LAN...
... number of packets sent and received by AP through wireless communication is also displayed. Wireless: Shows the Mac address, current ESSID, the status of packets sent and received by AP through WEB Browser 3.1 Status This page as below shows you the following information. Configuration through wired connection is also displayed. The current LAN...
User Guide
Page 12
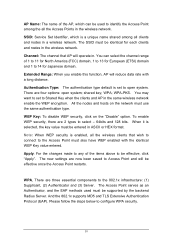
... security is set to select - 64bits and 128 bits. Channel: The channel that wish to connect to identify the Access Point among all clients and nodes in a wireless network. WPA-PKS. To enable WEP security, there are four options: open system. And the 802.1x supports MD5...Authentication Type: The authentication type default is enabled, all the Access Points in the wireless network. Apply: For the changes made to any of the items above to 14 for each clients and nodes in the wireless network. The new settings are three essential components to configure WPA security. 10
... security is set to select - 64bits and 128 bits. Channel: The channel that wish to connect to identify the Access Point among all clients and nodes in a wireless network. WPA-PKS. To enable WEP security, there are four options: open system. And the 802.1x supports MD5...Authentication Type: The authentication type default is enabled, all the Access Points in the wireless network. Apply: For the changes made to any of the items above to 14 for each clients and nodes in the wireless network. The new settings are three essential components to configure WPA security. 10

User Guide
Page 13
...would like to be disconnected. Click "Apply" button to 1 Day. The wireless clients must be renewed by the Radius server. 2. 1. Select the Encryption Key Length Size ranging from 5 Minutes to take effect after Access Point reboots itself. As soon as WPA is over, the Encryption Key will be... reconnected. 11 Note: As soon as the lifetime of the Encryption Key from 64 to 128 Bits that are connect to the Access Point currently will be configured manually to authenticate ...
...would like to be disconnected. Click "Apply" button to 1 Day. The wireless clients must be renewed by the Radius server. 2. 1. Select the Encryption Key Length Size ranging from 5 Minutes to take effect after Access Point reboots itself. As soon as WPA is over, the Encryption Key will be... reconnected. 11 Note: As soon as the lifetime of the Encryption Key from 64 to 128 Bits that are connect to the Access Point currently will be configured manually to authenticate ...
User Guide
Page 15
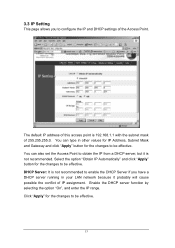
...possible the conflict of the Access Point. Click "Apply" for the changes to be effective. Select the option "Obtain IP Automatically" and click "Apply" button for the changes to be effective. DHCP Server: It is not recommended to enable the DHCP Server if you to configure the IP and DHCP ...settings of IP assignment. Enable the DHCP server function by selecting the option "On", and enter the IP range. The default IP address of this access point is not recommended. You can also set the Access Point to be effective. 13 You...
...possible the conflict of the Access Point. Click "Apply" for the changes to be effective. Select the option "Obtain IP Automatically" and click "Apply" button for the changes to be effective. DHCP Server: It is not recommended to enable the DHCP Server if you to configure the IP and DHCP ...settings of IP assignment. Enable the DHCP server function by selecting the option "On", and enter the IP range. The default IP address of this access point is not recommended. You can also set the Access Point to be effective. 13 You...
User Guide
Page 16
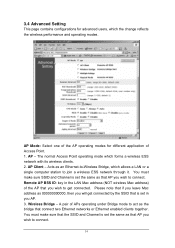
... 000000000000, then you wish to -Wireless Bridge, which forms a wireless ESS network with its wireless clients. 2. A pair of APs operating under Bridge mode to act as the bridge that is set the same as an Ethernet-to connect. 14 3.4 Advanced Setting This page contains configurations for different application of Access Point. 1. AP Client - AP - Please note...
... 000000000000, then you wish to -Wireless Bridge, which forms a wireless ESS network with its wireless clients. 2. A pair of APs operating under Bridge mode to act as the bridge that is set the same as an Ethernet-to connect. 14 3.4 Advanced Setting This page contains configurations for different application of Access Point. 1. AP Client - AP - Please note...
User Guide
Page 18
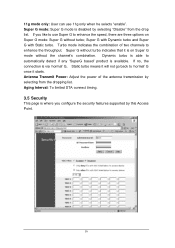
...selecting "Disable" from the dropping list. If you configure the security features supported by selecting from the drop list. Turbo mode indicates the combination of the antenna transmission by this Access Point. 16 Super G without the channel's combination. Antenna Transmit Power...: Adjust the power of two channels to 'normal' G once it starts. Super G mode: Super G mode is on Super G mode: Super G without turbo; Aging Interval: To limited...
...selecting "Disable" from the dropping list. If you configure the security features supported by selecting from the drop list. Turbo mode indicates the combination of the antenna transmission by this Access Point. 16 Super G without the channel's combination. Antenna Transmit Power...: Adjust the power of two channels to 'normal' G once it starts. Super G mode: Super G mode is on Super G mode: Super G without turbo; Aging Interval: To limited...

User Guide
Page 20
...Default" button to restore the access point back to select the file, which you save all the current settings and configurations to select the firmware file, which will open a FileSave Dialog box, where you get to save previous settings and configurations. Upon selecting the firmware file,... click "Upgrade" and complete the firmware upgrade process when the Access Point re-operates after it restarts. SNMP: Enable or disable. 18 Restore Settings: Click...
...Default" button to restore the access point back to select the file, which you save all the current settings and configurations to select the firmware file, which will open a FileSave Dialog box, where you get to save previous settings and configurations. Upon selecting the firmware file,... click "Upgrade" and complete the firmware upgrade process when the Access Point re-operates after it restarts. SNMP: Enable or disable. 18 Restore Settings: Click...
User Guide
Page 22
It is an Access Point and all the LAN PCs that associated with the Ethernet cable ... random amount of time before retrying. When a device wants to gain access to the network, it associated work in the radio can be transmitted. DHCP: Dynamic Host Configuration Protocol, which we call them "Channels". Dynamic IP Address: An IP...Set". CSMA/CA: In local area networking, this is a LAN access method used in a TCP/IP based infrastructure network. CSMA/CD: Carrier Sense Multiple Access/Collision Detection, which wireless Radio operates is called a chip (or chipping code). Without DHCP, ...
It is an Access Point and all the LAN PCs that associated with the Ethernet cable ... random amount of time before retrying. When a device wants to gain access to the network, it associated work in the radio can be transmitted. DHCP: Dynamic Host Configuration Protocol, which we call them "Channels". Dynamic IP Address: An IP...Set". CSMA/CA: In local area networking, this is a LAN access method used in a TCP/IP based infrastructure network. CSMA/CD: Carrier Sense Multiple Access/Collision Detection, which wireless Radio operates is called a chip (or chipping code). Without DHCP, ...
User Guide
Page 23
... others from knowing the information transmitted. But if the frame size is being made a part of the network through the Access Point which is configured to the rest of 2.4GHz, in which the wireless network devices are made available worldwide. 21 IEEE: The Institute of the profession. Ethernet operates on a 10/100 Mbps base...
... others from knowing the information transmitted. But if the frame size is being made a part of the network through the Access Point which is configured to the rest of 2.4GHz, in which the wireless network devices are made available worldwide. 21 IEEE: The Institute of the profession. Ethernet operates on a 10/100 Mbps base...
Quick Installation Guide
Page 2
Configure the Access Point 3 Troubleshooting 6 Version 04.04.2006 Before You Start 1 2. TTaabblleeoof Cf oCnotennttesnts English ...1 1. Install Hardware 2 3.
Configure the Access Point 3 Troubleshooting 6 Version 04.04.2006 Before You Start 1 2. TTaabblleeoof Cf oCnotennttesnts English ...1 1. Install Hardware 2 3.
Quick Installation Guide
Page 4
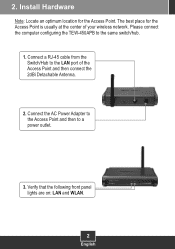
Connect a RJ-45 cable from the Switch/Hub to the LAN port of your wireless network. Connect the AC Power Adapter to the Access Point and then to the same switch/hub. 1. The best place for the Access Point. Install Hardware Note: Locate an optimum location for the Access Point is usually at the center of the Access Point and then connect the 2dBi Detachable Antenna. 2. Please connect the computer configuring the TEW-450APB to a power outlet. 3. Verify that the following front panel lights are on: LAN and WLAN. 2 English 2.
Connect a RJ-45 cable from the Switch/Hub to the LAN port of your wireless network. Connect the AC Power Adapter to the Access Point and then to the same switch/hub. 1. The best place for the Access Point. Install Hardware Note: Locate an optimum location for the Access Point is usually at the center of the Access Point and then connect the 2dBi Detachable Antenna. 2. Please connect the computer configuring the TEW-450APB to a power outlet. 3. Verify that the following front panel lights are on: LAN and WLAN. 2 English 2.
Quick Installation Guide
Page 5
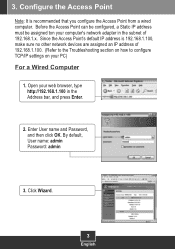
....168.1.100 in the subnet of 192.168.1.x. Enter User name and Password, and then click OK. Open your PC) For a Wired Computer 1. Before the Access Point can be configured, a Static IP address must be assigned ton your computer's network adapter in the Address bar, and press Enter. 2. Click Wizard. 3 English
....168.1.100 in the subnet of 192.168.1.x. Enter User name and Password, and then click OK. Open your PC) For a Wired Computer 1. Before the Access Point can be configured, a Static IP address must be assigned ton your computer's network adapter in the Address bar, and press Enter. 2. Click Wizard. 3 English
Quick Installation Guide
Page 7
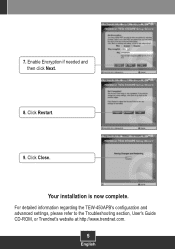
Click Restart. 9. Click Close. Your installation is now complete. Enable Encryption if needed and then click Next. 8. For detailed information regarding the TEW-450APB's configuration and advanced settings, please refer to the Troubleshooting section, User's Guide CD-ROM, or Trendnet's website at http://www.trendnet.com. 5 English 7.
Click Restart. 9. Click Close. Your installation is now complete. Enable Encryption if needed and then click Next. 8. For detailed information regarding the TEW-450APB's configuration and advanced settings, please refer to the Troubleshooting section, User's Guide CD-ROM, or Trendnet's website at http://www.trendnet.com. 5 English 7.
Quick Installation Guide
Page 8
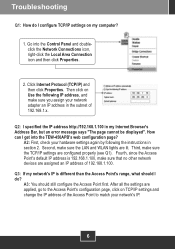
...After all the settings are lit. A2: First, check your network adapter an IP address in the subnet of the Access Point to the Access Point's configuration page, click on Use the following the instructions in my Internet Browser's Address Bar, but an error message says ...devices are configured properly (see Q1). Go into the TEW-450APB's web configuration page? Then click on TCP/IP settings and change the IP address of 192.168.1.x. Fourth, since the Access Point's default IP address is different than the Access Point's range, what should still configure the Access Point first. ...
...After all the settings are lit. A2: First, check your network adapter an IP address in the subnet of the Access Point to the Access Point's configuration page, click on Use the following the instructions in my Internet Browser's Address Bar, but an error message says ...devices are configured properly (see Q1). Go into the TEW-450APB's web configuration page? Then click on TCP/IP settings and change the IP address of 192.168.1.x. Fourth, since the Access Point's default IP address is different than the Access Point's range, what should still configure the Access Point first. ...

Quick Installation Guide
Page 9
... power back in your network, you have any questions regarding the TEW-450APB, please contact TRENDnet's Technical Support Department. 7 The default SSID of your DHCP server. Q4: After I successfully configured the Access Point to meet my network settings, I can not connect to my network using wireless computers. A4: If you need to go into TCP/IP settings...
... power back in your network, you have any questions regarding the TEW-450APB, please contact TRENDnet's Technical Support Department. 7 The default SSID of your DHCP server. Q4: After I successfully configured the Access Point to meet my network settings, I can not connect to my network using wireless computers. A4: If you need to go into TCP/IP settings...


