
Manual
Page 15
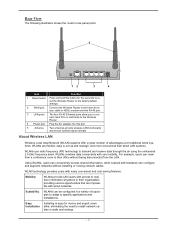
... in their office without installing or moving network cables. Easy Installation Installing is easy for five seconds to reset the Wireless Router to the factory default settings. 2 WAN port Connect the Wireless Router to the Internet via your cable or ADSL modem and this RJ-45 port. 3 LAN ports The four...
... in their office without installing or moving network cables. Easy Installation Installing is easy for five seconds to reset the Wireless Router to the factory default settings. 2 WAN port Connect the Wireless Router to the Internet via your cable or ADSL modem and this RJ-45 port. 3 LAN ports The four...
Manual
Page 24
... Windows has finished setting up the network, you are returned to the list. Type a Subnet Mask value for the information. The following screen appears: d. g. The default value is an organization that provides users with Internet access via modem or cable/DSL modem. Click the radio button next to restart the computer...
... Windows has finished setting up the network, you are returned to the list. Type a Subnet Mask value for the information. The following screen appears: d. g. The default value is an organization that provides users with Internet access via modem or cable/DSL modem. Click the radio button next to restart the computer...
Manual
Page 26
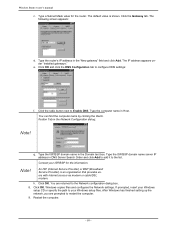
... an organization that provides users with Internet access via modem or cable/DSL modem. f. Windows NT4.0 1. Click OK. Type the router's IP address in the "Default gateway" field. Check the radio button next to the Network configuration dialog box. 6. Wireless Router user's manual d. The Control Panel opens: 2. Double-click the Network...
... an organization that provides users with Internet access via modem or cable/DSL modem. f. Windows NT4.0 1. Click OK. Type the router's IP address in the "Default gateway" field. Check the radio button next to the Network configuration dialog box. 6. Wireless Router user's manual d. The Control Panel opens: 2. Double-click the Network...
Manual
Page 27
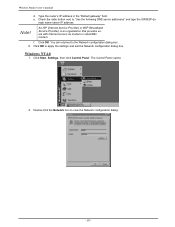
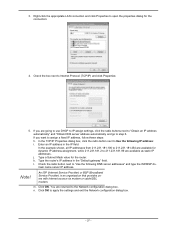
In the TCP/IP Properties dialog box, click the radio button next to 211.231.181.99 are available for the router. The default value is shown. If you are going to use DHCP to IP assign settings, click the radio buttons next to "Obtain an IP address from ... type the computer's name in the IP field. Enter an IP address in the Host name field. - 19 - Type the router's IP address in the "Default gateway" field. Click the Protocols tab: 4. Select TCP/IP Protocol, and click Properties: 5.
In the TCP/IP Properties dialog box, click the radio button next to 211.231.181.99 are available for the router. The default value is shown. If you are going to use DHCP to IP assign settings, click the radio buttons next to "Obtain an IP address from ... type the computer's name in the IP field. Enter an IP address in the Host name field. - 19 - Type the router's IP address in the "Default gateway" field. Click the Protocols tab: 4. Select TCP/IP Protocol, and click Properties: 5.
Manual
Page 29
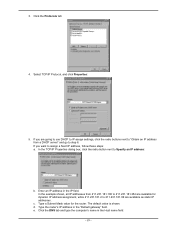
Enter an IP address in the "Default gateway" field. l. Note! n. Right-click the appropriate LAN connection and click Properties to open the properties dialog for the router. Check the box next to ...
Enter an IP address in the "Default gateway" field. l. Note! n. Right-click the appropriate LAN connection and click Properties to open the properties dialog for the router. Check the box next to ...
Manual
Page 30
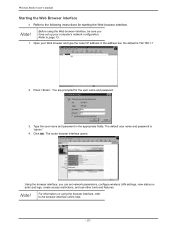
... in the appropriate fields. Wireless Router user's manual Starting the Web Browser Interface • Refer to the browser interface online help. - 22 - Click OK. The default user name and password is 192.168.1.1 2. Refer to page 13. 1. You are prompted for starting the Web browser interface. Type the user name and...
... in the appropriate fields. Wireless Router user's manual Starting the Web Browser Interface • Refer to the browser interface online help. - 22 - Click OK. The default user name and password is 192.168.1.1 2. Refer to page 13. 1. You are prompted for starting the Web browser interface. Type the user name and...

Manual
Page 31
... enables you want DHCP to automatically assign IP addresses. Open the browser interface as described in the previous section. 2. Type the LAN IP ad- The default IP address 192.168.1.1. 7. Select your time zone from the drop-down list. 5. Follow these instructions: 1. Click Next. 6.
... enables you want DHCP to automatically assign IP addresses. Open the browser interface as described in the previous section. 2. Type the LAN IP ad- The default IP address 192.168.1.1. 7. Select your time zone from the drop-down list. 5. Follow these instructions: 1. Click Next. 6.
Manual
Page 33
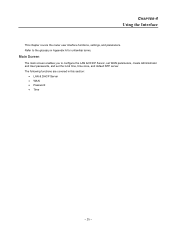
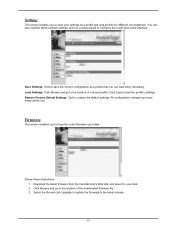
The following functions are covered in Appendix A for unfamiliar terms. Main Screen The main screen enables you to configure the LAN & DHCP Server, set WAN parameters, create Administrator and User passwords, and set the local time, time zone, and default NTP server. CHAPTER 4 Using the Interface This chapter covers the router user interface functions, settings, and parameters. Refer to the glossary in this section: • LAN & DHCP Server • WAN • Password • Time - 25 -
The following functions are covered in Appendix A for unfamiliar terms. Main Screen The main screen enables you to configure the LAN & DHCP Server, set WAN parameters, create Administrator and User passwords, and set the local time, time zone, and default NTP server. CHAPTER 4 Using the Interface This chapter covers the router user interface functions, settings, and parameters. Refer to the glossary in this section: • LAN & DHCP Server • WAN • Password • Time - 25 -
Manual
Page 34
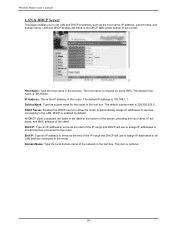
...and DHCP profiles are listed in the text box. IP Address: This is 192.168.1.1. The default IP address is the IP address of the router. Start IP: Type an IP address to...an IP address to serve as the host name, IP address, subnet mask, and domain name. DHCP is required by default. Domain Name: Type the local domain name of the network in the DHCP table at the bottom of the screen, ...will use to assign IP addresses to all LAN devices connected to the router. The default subnet mask is optional. - 26 - Subnet Mask: Type the subnet mask for the router in the text box....
...and DHCP profiles are listed in the text box. IP Address: This is 192.168.1.1. The default IP address is the IP address of the router. Start IP: Type an IP address to...an IP address to serve as the host name, IP address, subnet mask, and domain name. DHCP is required by default. Domain Name: Type the local domain name of the network in the DHCP table at the bottom of the screen, ...will use to assign IP addresses to all LAN devices connected to the router. The default subnet mask is optional. - 26 - Subnet Mask: Type the subnet mask for the router in the text box....
Manual
Page 35
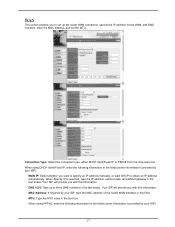
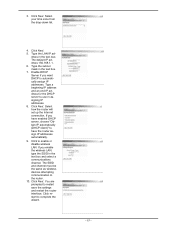
... ISP, type the MAC address of the router WAN interface in this field. When Specify IP is selected, type the IP address, subnet mask, and default gateway in the text box. MTU: Type the MTU value in the text boxes. WAN This screen enables you to three DNS numbers in the...
... ISP, type the MAC address of the router WAN interface in this field. When Specify IP is selected, type the IP address, subnet mask, and default gateway in the text box. MTU: Type the MTU value in the text boxes. WAN This screen enables you to three DNS numbers in the...
Manual
Page 36
Your ISP will elapse before the router times out of a connection. User Name: Type your default browser. When enabled, the router automatically connects to the Internet when you with this information. MTU: Type the MTU value in the text boxes. DNS 1/2/3: ...
Your ISP will elapse before the router times out of a connection. User Name: Type your default browser. When enabled, the router automatically connects to the Internet when you with this information. MTU: Type the MTU value in the text boxes. DNS 1/2/3: ...
Manual
Page 37
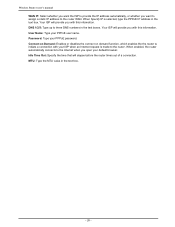
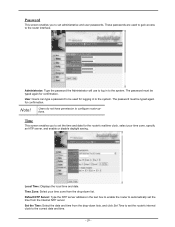
.... The password must be typed again for logging in the text box to enable the router to set the time from the Internet NTP server. Default NTP Server: Type the NTP server address in to the system. Time This screen enables you to the router interface. Set the Time: Select the...
.... The password must be typed again for logging in the text box to enable the router to set the time from the Internet NTP server. Default NTP Server: Type the NTP server address in to the system. Time This screen enables you to the router interface. Set the Time: Select the...
Manual
Page 40
..., based upon the speed of the wireless LAN receive rates, measured in megabytes per second. Authentication Type: Select the authentication type. The default beacon interval is normalized. If data flow is irregular, choose values between 256 and 2432 until packet transfer rates are minimized. The... default value is low. TX Rates (MBps): Select one of wireless adapters connected to the WLAN. Select a short preamble for better performance. Open ...
..., based upon the speed of the wireless LAN receive rates, measured in megabytes per second. Authentication Type: Select the authentication type. The default beacon interval is normalized. If data flow is irregular, choose values between 256 and 2432 until packet transfer rates are minimized. The... default value is low. TX Rates (MBps): Select one of wireless adapters connected to the WLAN. Select a short preamble for better performance. Open ...
Manual
Page 42
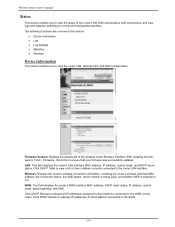
..., IP address, subnet mask, and DHCP server status. WAN: This field displays the router's WAN interface MAC address, DHCP client status, IP address, subnet mask, default gateway, and DNS. The following functions are covered in Tools - Firmware Version: Displays the latest build of the wireless router firmware interface.
..., IP address, subnet mask, and DHCP server status. WAN: This field displays the router's WAN interface MAC address, DHCP client status, IP address, subnet mask, default gateway, and DNS. The following functions are covered in Tools - Firmware Version: Displays the latest build of the wireless router firmware interface.
Manual
Page 46
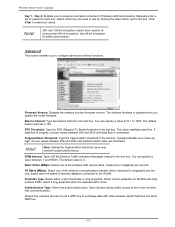
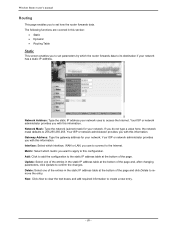
Network Address: Type the static IP address your network uses to 255.255.255.255. If you do not type a value here, the network mask defaults to access the Internet. Delete: Select one of the entries in this section: • Static • Dynamic • Routing Table Static This screen enables you ...
Network Address: Type the static IP address your network uses to 255.255.255.255. If you do not type a value here, the network mask defaults to access the Internet. Delete: Select one of the entries in this section: • Static • Dynamic • Routing Table Static This screen enables you ...
Manual
Page 56
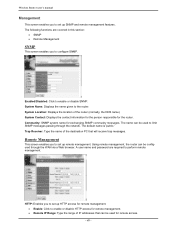
... to enable or disable HTTP access for remote access. - 48 - Remote Management This screen enables you to set up SNMP and remote management features. The default name is 'public.' The name can be used for remote management. • Remote IP Range: Type the range of IP addresses that will receive trap...
... to enable or disable HTTP access for remote access. - 48 - Remote Management This screen enables you to set up SNMP and remote management features. The default name is 'public.' The name can be used for remote management. • Remote IP Range: Type the range of IP addresses that will receive trap...
Manual
Page 57
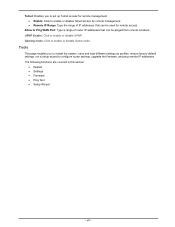
... - UPNP Enable: Click to enable or disable Game mode. Telnet: Enables you to restart the system, save and load different settings as profiles, restore factory default settings, run a setup wizard to configure router settings, upgrade the firmware, and ping remote IP addresses.
... - UPNP Enable: Click to enable or disable Game mode. Telnet: Enables you to restart the system, save and load different settings as profiles, restore factory default settings, run a setup wizard to configure router settings, upgrade the firmware, and ping remote IP addresses.
Manual
Page 59
...go to the location of a stored profile. Load Settings: Click Browse and go to the location of the downloaded firmware file. 3. Restore Factory Default Settings: Click to configure the router and router interface. Download the latest firmware from the manufacturer's Web site, and save it to your settings as... a profile that you can also load the factory default settings, and run a setup wizard to restore the default settings. Firmware This screen enables you have made will be lost.
...go to the location of a stored profile. Load Settings: Click Browse and go to the location of the downloaded firmware file. 3. Restore Factory Default Settings: Click to configure the router and router interface. Download the latest firmware from the manufacturer's Web site, and save it to your settings as... a profile that you can also load the factory default settings, and run a setup wizard to restore the default settings. Firmware This screen enables you have made will be lost.
Manual
Page 61
... in the text box. Click Next. If you want DHCP to automatically assign IP addresses. Select your time zone from the drop-down list. 4. The default IP address 192.168.1.1. 6. If you have enabled DHCP server, choose "Obtain IP automatically (DHCP client)" to enable or disable wireless LAN. Click to have...
... in the text box. Click Next. If you want DHCP to automatically assign IP addresses. Select your time zone from the drop-down list. 4. The default IP address 192.168.1.1. 6. If you have enabled DHCP server, choose "Obtain IP automatically (DHCP client)" to enable or disable wireless LAN. Click to have...
Manual
Page 69
The maximum range is 192.168.1.1. 2. Check the TCP/IP settings in the URL field is correct. The default IP address is typically 200 meters, depending on the client computer. 3. Cannot connect to the Wireless Router 1. Check that you are within range for wireless operation. Check that the IP address in the Network Control Panel on ambient noise, thickness of walls and other environmental characteristics. - 61 -
The maximum range is 192.168.1.1. 2. Check the TCP/IP settings in the URL field is correct. The default IP address is typically 200 meters, depending on the client computer. 3. Cannot connect to the Wireless Router 1. Check that you are within range for wireless operation. Check that the IP address in the Network Control Panel on ambient noise, thickness of walls and other environmental characteristics. - 61 -


