
User Guide
Page 1
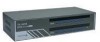
... Rights Reserved. TRENDware International, Inc. TK-802R/TK-1602R 8-Port/16-Port Stackable Rack Mount KVM Switch with OSD User's Guide Le Guide de l'utilisateur du Switch KVM Empillable Rack Mount de 8-Ports/16-Ports avec OSD Diese Benutzeranleitung 8-Port/16-Port Stapelbarer ElnbaufShlger KVM Umschalter mit OSD Esta gula del usuarlo Switch KVM Montabie en Rack y Apilable de 8/16...
... Rights Reserved. TRENDware International, Inc. TK-802R/TK-1602R 8-Port/16-Port Stackable Rack Mount KVM Switch with OSD User's Guide Le Guide de l'utilisateur du Switch KVM Empillable Rack Mount de 8-Ports/16-Ports avec OSD Diese Benutzeranleitung 8-Port/16-Port Stapelbarer ElnbaufShlger KVM Umschalter mit OSD Esta gula del usuarlo Switch KVM Montabie en Rack y Apilable de 8/16...
User Guide
Page 3
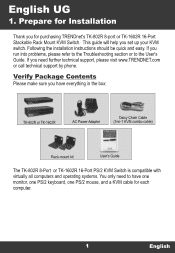
... the installation instructions should be quick and easy. Verify Package Contents Please make sure you have one monitor, one PS/2 keyboard, one PS/2 mouse, and a KVM cable for purchasing TRENDnet's TK-802R 8-port or TK-1602R 16-Port Stackable Rack Mount KVM Switch. If you for each computer. 1 English Prepare for Installation Thank you need to the User's Guide.
... the installation instructions should be quick and easy. Verify Package Contents Please make sure you have one monitor, one PS/2 keyboard, one PS/2 mouse, and a KVM cable for purchasing TRENDnet's TK-802R 8-port or TK-1602R 16-Port Stackable Rack Mount KVM Switch. If you for each computer. 1 English Prepare for Installation Thank you need to the User's Guide.
User Guide
Page 4
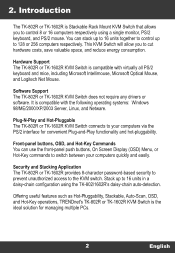
...Pluggability, Stackable, Auto-Scan, OSD, and Hot-Key operations, TRENDnet's TK-802R or TK-1602R KVM Switch is Stackable Rack Mount KVM Switch that allows you to your computers quickly and easily. Software Support The TK-802R or TK-1602R KVM Switch does not require any drivers or software. Front-panel buttons, OSD...up to 16 units together to control up to 128 or 256 computers respectively. Hardware Support The TK-802R or TK-1602R KVM Switch is compatible with virtually all PS/2 keyboard and mice, including Microsoft Intellimouse, Microsoft Optical Mouse, and Logitech Net Mouse. It ...
...Pluggability, Stackable, Auto-Scan, OSD, and Hot-Key operations, TRENDnet's TK-802R or TK-1602R KVM Switch is Stackable Rack Mount KVM Switch that allows you to your computers quickly and easily. Software Support The TK-802R or TK-1602R KVM Switch does not require any drivers or software. Front-panel buttons, OSD...up to 16 units together to control up to 128 or 256 computers respectively. Hardware Support The TK-802R or TK-1602R KVM Switch is compatible with virtually all PS/2 keyboard and mice, including Microsoft Intellimouse, Microsoft Optical Mouse, and Logitech Net Mouse. It ...
User Guide
Page 5
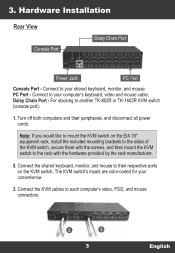
... your computers keyboard, video and mouse cable. Connect the KVM cables to another TK-802R or TK-1602R KVM switch (console port). 1. Hardware Installation Rear View Console Port Daisy Chain Port IMIE IMMINEMINt .1[Injt" 4fl it Power Jack PC Port Console Port - For stacking to each computers video, PS/2, and mouse connectors. Connect to their peripherals, and...
... your computers keyboard, video and mouse cable. Connect the KVM cables to another TK-802R or TK-1602R KVM switch (console port). 1. Hardware Installation Rear View Console Port Daisy Chain Port IMIE IMMINEMINt .1[Injt" 4fl it Power Jack PC Port Console Port - For stacking to each computers video, PS/2, and mouse connectors. Connect to their peripherals, and...
User Guide
Page 6
4. If you have another TK-802R or TK-1602R KVM switch. You can daisy-chain up to another TK-802R or TK-1602R KVM switch you have multiple TK-802R or TK-1602R KVM switches, use a single TK-802R or TK-1602R KVM Switch, skip steps 5 - 8. After the computers boot up . 4 English Do not press the push button of the third KVM switch and so on any slave switch because this will initialize only...
4. If you have another TK-802R or TK-1602R KVM switch. You can daisy-chain up to another TK-802R or TK-1602R KVM switch you have multiple TK-802R or TK-1602R KVM switches, use a single TK-802R or TK-1602R KVM Switch, skip steps 5 - 8. After the computers boot up . 4 English Do not press the push button of the third KVM switch and so on any slave switch because this will initialize only...
User Guide
Page 8
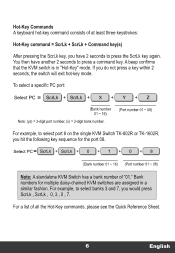
... again. You then have 2 seconds to select port 8 on the single KVM Switch TK-802R or TK-1602R, you hit the following key sequence for multiple daisy-chained KVM switches are assigned in "Hot-Key" mode. A beep confirms that the KVM switch is in a similar fashion. Hot-Key Commands A keyboard hot-key command...2 seconds to select banks 3 and 7, you would press ScrLk , ScrLk , 0, 3 , 0 , 7. Y 1+1 Z I + 0 + 8 (Bank number 01 - 16) (Port number 01 - 08) Note: A standalone KVM Switch has a bank number of all the Hot-Key commands, please see the Quick Reference Sheet. 6 English
... again. You then have 2 seconds to select port 8 on the single KVM Switch TK-802R or TK-1602R, you hit the following key sequence for multiple daisy-chained KVM switches are assigned in "Hot-Key" mode. A beep confirms that the KVM switch is in a similar fashion. Hot-Key Commands A keyboard hot-key command...2 seconds to select banks 3 and 7, you would press ScrLk , ScrLk , 0, 3 , 0 , 7. Y 1+1 Z I + 0 + 8 (Bank number 01 - 16) (Port number 01 - 08) Note: A standalone KVM Switch has a bank number of all the Hot-Key commands, please see the Quick Reference Sheet. 6 English

User Guide
Page 9
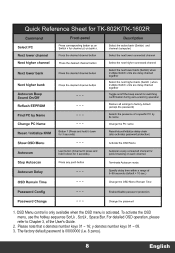
... ( ScrLk + ( F - - - Arrow keys ( 4,4) to highlight channel number, Enter to select and edit Change PC Name Reset / Initialize KVM - - Arrow keys ( 0) to navigate, Enter to select and edit Arrow keys ( $4) to navigate, Enter to select and edit Arrow keys ...4 ) (Arrow down) Arrow keys ( f+ ) to highlight channel number, Enter to edit PC name - - - Autoscan ( ScrLk + ScrLk ] + ( S - - - Quick Reference Sheet for TK-802R/TK-1602R Command Select PC Next lower channel Next higher channel Next lower bank Next higher bank Autoscan Beep Sound On/Off Reflash EEPROM Hot-Keys •...
... ( ScrLk + ( F - - - Arrow keys ( 4,4) to highlight channel number, Enter to select and edit Change PC Name Reset / Initialize KVM - - Arrow keys ( 0) to navigate, Enter to select and edit Arrow keys ( $4) to navigate, Enter to select and edit Arrow keys ...4 ) (Arrow down) Arrow keys ( f+ ) to highlight channel number, Enter to edit PC name - - - Autoscan ( ScrLk + ScrLk ] + ( S - - - Quick Reference Sheet for TK-802R/TK-1602R Command Select PC Next lower channel Next higher channel Next lower bank Next higher bank Autoscan Beep Sound On/Off Reflash EEPROM Hot-Keys •...
User Guide
Page 10
For detailed OSD operation, please refer to factory default (except the password) Search the presence of a specific PC by Name Change PC Name Reset / Initialize KVM Press the desired channel button _ _ _ - - - - - - - Stop Autoscan Press any push button Terminate Autoscan mode Autoscan Delay - - - ... note that x denotes number keys 01 - 16; Quick Reference Sheet for TK-802K/TK-1602R Command Select PC Next lower channel Next higher channel Next lower bank Front-panel Press corresponding button yz on Switch x for channel yz on /off the beep sound for quick browsing on ...
For detailed OSD operation, please refer to factory default (except the password) Search the presence of a specific PC by Name Change PC Name Reset / Initialize KVM Press the desired channel button _ _ _ - - - - - - - Stop Autoscan Press any push button Terminate Autoscan mode Autoscan Delay - - - ... note that x denotes number keys 01 - 16; Quick Reference Sheet for TK-802K/TK-1602R Command Select PC Next lower channel Next higher channel Next lower bank Front-panel Press corresponding button yz on Switch x for channel yz on /off the beep sound for quick browsing on ...

User Guide
Page 12
...turned on? Q2: Can I connect and disconnect the PS/2 cables while the computers are turned on the KVM switch or by using the Hot-Key commands. Contact Technical Support Telephone: +1-310-626-6252 Fax: +1-310-626-6267 Website: www.TRENDNET.com E-mail: [email protected] Technical Support Hours 7:00AM...been tested and found to use the included power adapter. Q3: Will the KVM switch restore the keyboard settings when switching between computers such as Cap lock, Num key, etc. Al: The TK-8O2R or TK-16O2R requires a power adapter/supply for the OSD to the following two conditions:...
...turned on? Q2: Can I connect and disconnect the PS/2 cables while the computers are turned on the KVM switch or by using the Hot-Key commands. Contact Technical Support Telephone: +1-310-626-6252 Fax: +1-310-626-6267 Website: www.TRENDNET.com E-mail: [email protected] Technical Support Hours 7:00AM...been tested and found to use the included power adapter. Q3: Will the KVM switch restore the keyboard settings when switching between computers such as Cap lock, Num key, etc. Al: The TK-8O2R or TK-16O2R requires a power adapter/supply for the OSD to the following two conditions:...
Quick Installation Guide
Page 3
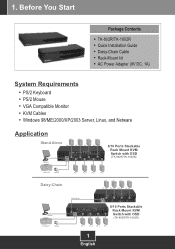
...DC, 1A) System Requirements PS/2 Keyboard PS/2 Mouse VGA Compatible Monitor KVM Cables Windows 98/ME/2000/XP/2003 Server, Linux, and Netware Application Stand Alone PC 8 PC 6 PC 4 PC 2 Monitor 8/16 Ports Stackable Rack Mount KVM Switch with OSD (TK-802R/TK-1602R) Keyboard Mouse PC 7 ...PC 5 PC 3 PC 1 Daisy-Chain PC 8 PC 6 PC 4 PC 2 Monitor Keyboard Mouse Daisy-Chain 8/16 Ports Stackable Rack Mount KVM Switch with OSD (TK-802R/TK-1602R) PC 7 PC 5 PC 3 PC 1 1...
...DC, 1A) System Requirements PS/2 Keyboard PS/2 Mouse VGA Compatible Monitor KVM Cables Windows 98/ME/2000/XP/2003 Server, Linux, and Netware Application Stand Alone PC 8 PC 6 PC 4 PC 2 Monitor 8/16 Ports Stackable Rack Mount KVM Switch with OSD (TK-802R/TK-1602R) Keyboard Mouse PC 7 ...PC 5 PC 3 PC 1 Daisy-Chain PC 8 PC 6 PC 4 PC 2 Monitor Keyboard Mouse Daisy-Chain 8/16 Ports Stackable Rack Mount KVM Switch with OSD (TK-802R/TK-1602R) PC 7 PC 5 PC 3 PC 1 1...
Quick Installation Guide
Page 4
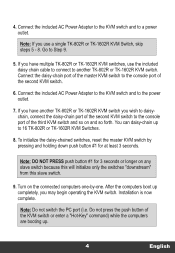
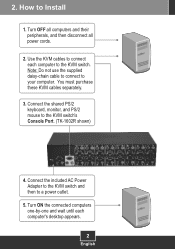
... supplied daisy-chain cable to connect to Install 1. Connect the included AC Power Adapter to the KVM switch and then to the KVM switch's Console Port. (TK-1602R shown) 4. 2. Connect the shared PS/2 keyboard, monitor, and PS/2 mouse to a power outlet. 5. Use the KVM cables to connect each computer's desktop appears. 2 English Turn ON the connected computers one-by...
... supplied daisy-chain cable to connect to Install 1. Connect the included AC Power Adapter to the KVM switch and then to the KVM switch's Console Port. (TK-1602R shown) 4. 2. Connect the shared PS/2 keyboard, monitor, and PS/2 mouse to a power outlet. 5. Use the KVM cables to connect each computer's desktop appears. 2 English Turn ON the connected computers one-by...
Quick Installation Guide
Page 5
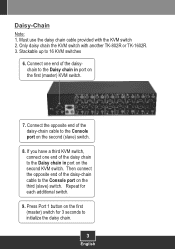
...end of the daisy-chain cable to 16 KVM switches 6. Repeat for 3 seconds to the Console port on the first (master) switch for each additional switch. 9. Press Port 1 button on the second (slave) switch. 8. If you have a third KVM switch, connect one end of the daisy chain ...to the Daisy chain in port on the first (master) KVM switch. 7. Connect one end of the daisychain to the Daisy chain in port on the second KVM switch. Must use the daisy chain cable provided with another TK-802R or TK-1602R...
...end of the daisy-chain cable to 16 KVM switches 6. Repeat for 3 seconds to the Console port on the first (master) switch for each additional switch. 9. Press Port 1 button on the second (slave) switch. 8. If you have a third KVM switch, connect one end of the daisy chain ...to the Daisy chain in port on the first (master) KVM switch. 7. Connect one end of the daisychain to the Daisy chain in port on the second KVM switch. Must use the daisy chain cable provided with another TK-802R or TK-1602R...

Quick Installation Guide
Page 8
A beep confirms that the KVM switch is in 0 + 1 for the bank number. If you hit the following key sequence: Select PC = ScrLk + ScrLk + 0 + 1 + 0 + 1 For example, to press the ScrLk key again. For a list of daisy chained TK-1602R's you do not press a key within 2 seconds, the switch will exit hot-key mode. To select a specific PC...
A beep confirms that the KVM switch is in 0 + 1 for the bank number. If you hit the following key sequence: Select PC = ScrLk + ScrLk + 0 + 1 + 0 + 1 For example, to press the ScrLk key again. For a list of daisy chained TK-1602R's you do not press a key within 2 seconds, the switch will exit hot-key mode. To select a specific PC...
Quick Installation Guide
Page 12
... use the included external AC adapter with the TK-802R/TK-1602R KVM switch. The reset button is recommended that you still encounter problems or have any questions regarding the TK-802R/TK-1602R, please contact Trendnet's Technical Support Department. 10 A1: It is on the back of the KVM switch, next to the KVM switch 3) Press on the reset button. 5) Wait for...
... use the included external AC adapter with the TK-802R/TK-1602R KVM switch. The reset button is recommended that you still encounter problems or have any questions regarding the TK-802R/TK-1602R, please contact Trendnet's Technical Support Department. 10 A1: It is on the back of the KVM switch, next to the KVM switch 3) Press on the reset button. 5) Wait for...
