
User Guide
Page 1
..., Inc. TK-802R/TK-1602R 8-Port/16-Port Stackable Rack Mount KVM Switch with OSD User's Guide Le Guide de l'utilisateur du Switch KVM Empillable Rack Mount de 8-Ports/16-Ports avec OSD Diese Benutzeranleitung 8-Port/16-Port Stapelbarer ElnbaufShlger KVM Umschalter mit OSD Esta gula del usuarlo Switch KVM Montabie en Rack y Apilable de 8/16 Puertos con OSD 8/16-nopromml KVM-zommyravop C OSD Ann mowrawa B CTOCIKO, C BOIIMICKHOCTbIO FlapaupusaHNH Pyzosoppreo nosumosavenn Version 07.23.04 ~- All Rights...
..., Inc. TK-802R/TK-1602R 8-Port/16-Port Stackable Rack Mount KVM Switch with OSD User's Guide Le Guide de l'utilisateur du Switch KVM Empillable Rack Mount de 8-Ports/16-Ports avec OSD Diese Benutzeranleitung 8-Port/16-Port Stapelbarer ElnbaufShlger KVM Umschalter mit OSD Esta gula del usuarlo Switch KVM Montabie en Rack y Apilable de 8/16 Puertos con OSD 8/16-nopromml KVM-zommyravop C OSD Ann mowrawa B CTOCIKO, C BOIIMICKHOCTbIO FlapaupusaHNH Pyzosoppreo nosumosavenn Version 07.23.04 ~- All Rights...
User Guide
Page 3
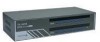
... Troubleshooting section or to have everything in the box: TK-802R or TK-1602R AC Power Adapter Daisy Chain Cable (3-in-1 KVM combo cable) Rack-mount kit User's Guide The TK-802R 8-Port or TK-1602R 16-Port PS/2 KVM Switch is compatible with virtually all computers and operating systems. You only need further technical support, please visit www.TRENDNET.com or call technical support by phone. If you set up your KVM switch...
... Troubleshooting section or to have everything in the box: TK-802R or TK-1602R AC Power Adapter Daisy Chain Cable (3-in-1 KVM combo cable) Rack-mount kit User's Guide The TK-802R 8-Port or TK-1602R 16-Port PS/2 KVM Switch is compatible with virtually all computers and operating systems. You only need further technical support, please visit www.TRENDNET.com or call technical support by phone. If you set up your KVM switch...
User Guide
Page 4
... TK-1602R KVM Switch does not require any drivers or software. Security and Stacking Application The TK-802R or TK-1602R provides 8-character password-based security to prevent unauthorized access to 16 units in a daisy-chain configuration using a single monitor, PS/2 keyboard, and PS/2 mouse. Offering useful features such as Hot-Pluggability, Stackable, Auto-Scan, OSD, and Hot-Key operations, TRENDnet's TK-802R or TK-1602R KVM Switch is Stackable Rack Mount KVM Switch that...
... TK-1602R KVM Switch does not require any drivers or software. Security and Stacking Application The TK-802R or TK-1602R provides 8-character password-based security to prevent unauthorized access to 16 units in a daisy-chain configuration using a single monitor, PS/2 keyboard, and PS/2 mouse. Offering useful features such as Hot-Pluggability, Stackable, Auto-Scan, OSD, and Hot-Key operations, TRENDnet's TK-802R or TK-1602R KVM Switch is Stackable Rack Mount KVM Switch that...
User Guide
Page 5
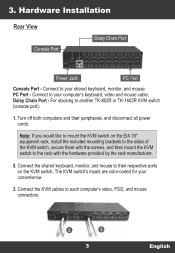
... hardware provided by the rack manufacturer. 2. Note: If you would like to mount the KVM switch on the KVM switch. Connect to their peripherals, and disconnect all power cords. Connect the shared keyboard, monitor, and mouse to your convenience. 3. Connect the KVM cables to another TK-802R or TK-1602R KVM switch (console port). 1. Hardware Installation Rear View Console Port Daisy Chain Port IMIE IMMINEMINt .1[Injt" 4fl it Power Jack PC Port Console Port - For stacking to each computers video, PS...
... hardware provided by the rack manufacturer. 2. Note: If you would like to mount the KVM switch on the KVM switch. Connect to their peripherals, and disconnect all power cords. Connect the shared keyboard, monitor, and mouse to your convenience. 3. Connect the KVM cables to another TK-802R or TK-1602R KVM switch (console port). 1. Hardware Installation Rear View Console Port Daisy Chain Port IMIE IMMINEMINt .1[Injt" 4fl it Power Jack PC Port Console Port - For stacking to each computers video, PS...
User Guide
Page 6
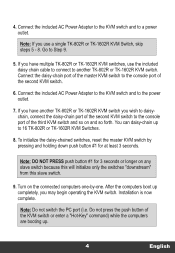
...-1602R KVM switches, use a single TK-802R or TK-1602R KVM Switch, skip steps 5 - 8. Note: DO NOT PRESS push button #1 for at least 3 seconds. After the computers boot up . 4 English Installation is now complete. Go to 16 TK-802R or TK-1602R KVM Switches. 8. Connect the daisy-chain port of the second KVM switch. 6. Connect the included AC Power Adapter to the KVM switch and to the console port of the master KVM switch to the power...
...-1602R KVM switches, use a single TK-802R or TK-1602R KVM Switch, skip steps 5 - 8. Note: DO NOT PRESS push button #1 for at least 3 seconds. After the computers boot up . 4 English Installation is now complete. Go to 16 TK-802R or TK-1602R KVM Switches. 8. Connect the daisy-chain port of the second KVM switch. 6. Connect the included AC Power Adapter to the KVM switch and to the console port of the master KVM switch to the power...

User Guide
Page 7
... whether that connected computer is turned on or off . 5 English Green LED light: Indicates the selected PC port in active, whether the computer is in a "locked mode" (passwordprotected mode) and all front-panel push button operations are disabled. Operation To switch between computers, you use the front-panel push buttons, hot-key commands, or OSD menu. Numerical LED: Indicates the bank number of the currently active channel. Note...
... whether that connected computer is turned on or off . 5 English Green LED light: Indicates the selected PC port in active, whether the computer is in a "locked mode" (passwordprotected mode) and all front-panel push button operations are disabled. Operation To switch between computers, you use the front-panel push buttons, hot-key commands, or OSD menu. Numerical LED: Indicates the bank number of the currently active channel. Note...
User Guide
Page 8
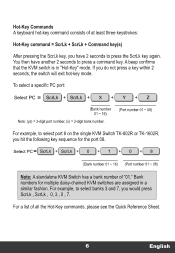
... example, to press a command key. Select PC = ScrLk ScrLk ) ) ) 0 J+ I (Port number 01 - 08) For example, to press the ScrLk key again. If you do not press a key within 2 seconds, the switch will exit hot-key mode. Bank numbers for the port 08. You then have 2 seconds to select port 8 on the single KVM Switch TK-802R or TK-1602R, you hit the following key sequence for multiple daisy-chained KVM switches...
... example, to press a command key. Select PC = ScrLk ScrLk ) ) ) 0 J+ I (Port number 01 - 08) For example, to press the ScrLk key again. If you do not press a key within 2 seconds, the switch will exit hot-key mode. Bank numbers for the port 08. You then have 2 seconds to select port 8 on the single KVM Switch TK-802R or TK-1602R, you hit the following key sequence for multiple daisy-chained KVM switches...

User Guide
Page 9
... select. ScrLk )+ ScrLk j + f (Arrow up) LacrLk ] + ScrLk + ( 4 ) (Arrow down) Arrow keys ( f+ ) to highlight channel number, Enter to select. Autoscan ( ScrLk + ScrLk ] + ( S - - - ScrLk I+ ScrLk )+ PgUp ) PgUp ScrLk + ( ScrLk )+ ( PgDn ) PgDn ( ScrLk + ScrLk ] + ( B - - - ( ScrLk + ScrLk ] + ( R - - - Stop Autoscan Autoscan Delay OSD Remain Time Password Config Password Change Esc - - - Change PC Name Reset / Initialize KVM - - Find PC by Name ScrLk )+ ( ScrLk + ( F - - - Show OSD Menu r ScrLk...
... select. ScrLk )+ ScrLk j + f (Arrow up) LacrLk ] + ScrLk + ( 4 ) (Arrow down) Arrow keys ( f+ ) to highlight channel number, Enter to select. Autoscan ( ScrLk + ScrLk ] + ( S - - - ScrLk I+ ScrLk )+ PgUp ) PgUp ScrLk + ( ScrLk )+ ( PgDn ) PgDn ( ScrLk + ScrLk ] + ( B - - - ( ScrLk + ScrLk ] + ( R - - - Stop Autoscan Autoscan Delay OSD Remain Time Password Config Password Change Esc - - - Change PC Name Reset / Initialize KVM - - Find PC by Name ScrLk )+ ( ScrLk + ( F - - - Show OSD Menu r ScrLk...
User Guide
Page 10
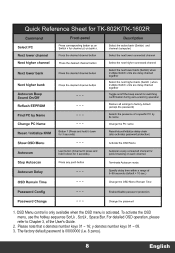
... refer to factory default (except the password) Search the presence of a specific PC by Name Change PC Name Reset / Initialize KVM Press the desired channel button _ _ _ - - - - - - - Quick Reference Sheet for TK-802K/TK-1602R Command Select PC Next lower channel Next higher channel Next lower bank Front-panel Press corresponding button yz on Switch x for channel yz on each channel. Stop Autoscan Press any push button Terminate Autoscan mode Autoscan Delay - - - Enable/disable password protection Password Change - - - Change the password...
... refer to factory default (except the password) Search the presence of a specific PC by Name Change PC Name Reset / Initialize KVM Press the desired channel button _ _ _ - - - - - - - Quick Reference Sheet for TK-802K/TK-1602R Command Select PC Next lower channel Next higher channel Next lower bank Front-panel Press corresponding button yz on Switch x for channel yz on each channel. Stop Autoscan Press any push button Terminate Autoscan mode Autoscan Delay - - - Enable/disable password protection Password Change - - - Change the password...

User Guide
Page 12
...: www.TRENDNET.com E-mail: support@trendware.com Technical Support Hours 7:00AM - 6:00PM, Monday through Friday Pacific Standard Time (except holidays) Certifications This equipment has been tested and found to comply with the KVM switch? A2: Yes, you can switch PCs by pressing the Push button on the KVM switch or by using the Hot-Key commands. Troubleshooting Ql: Do I need to use the included power adapter. Q2: Can I connect and...
...: www.TRENDNET.com E-mail: support@trendware.com Technical Support Hours 7:00AM - 6:00PM, Monday through Friday Pacific Standard Time (except holidays) Certifications This equipment has been tested and found to comply with the KVM switch? A2: Yes, you can switch PCs by pressing the Push button on the KVM switch or by using the Hot-Key commands. Troubleshooting Ql: Do I need to use the included power adapter. Q2: Can I connect and...
Quick Installation Guide
Page 3
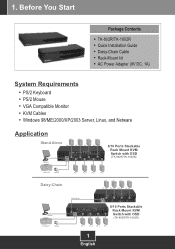
1. Before You Start Package Contents TK-802R/TK-1602R Quick Installation Guide Daisy-Chain Cable Rack-Mount kit AC Power Adapter (9V DC, 1A) System Requirements PS/2 Keyboard PS/2 Mouse VGA Compatible Monitor KVM Cables Windows 98/ME/2000/XP/2003 Server, Linux, and Netware Application Stand Alone PC 8 PC 6 PC 4 PC 2 Monitor 8/16 Ports Stackable Rack Mount KVM Switch with OSD (TK-802R/TK-1602R) Keyboard Mouse PC 7 PC 5 PC 3 PC 1 Daisy-Chain...
1. Before You Start Package Contents TK-802R/TK-1602R Quick Installation Guide Daisy-Chain Cable Rack-Mount kit AC Power Adapter (9V DC, 1A) System Requirements PS/2 Keyboard PS/2 Mouse VGA Compatible Monitor KVM Cables Windows 98/ME/2000/XP/2003 Server, Linux, and Netware Application Stand Alone PC 8 PC 6 PC 4 PC 2 Monitor 8/16 Ports Stackable Rack Mount KVM Switch with OSD (TK-802R/TK-1602R) Keyboard Mouse PC 7 PC 5 PC 3 PC 1 Daisy-Chain...
Quick Installation Guide
Page 4
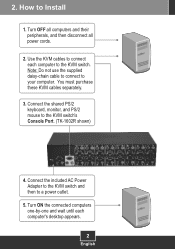
...-chain cable to connect to the KVM switch. You must purchase these KVM cables separately. 3. Turn ON the connected computers one-by-one and wait until each computer to your computer. Use the KVM cables to connect each computer's desktop appears. 2 English Connect the included AC Power Adapter to the KVM switch and then to the KVM switch's Console Port. (TK-1602R shown) 4. 2. Connect the shared PS/2 keyboard, monitor, and PS/2 mouse to a power outlet. 5. How to Install 1. Turn...
...-chain cable to connect to the KVM switch. You must purchase these KVM cables separately. 3. Turn ON the connected computers one-by-one and wait until each computer to your computer. Use the KVM cables to connect each computer's desktop appears. 2 English Connect the included AC Power Adapter to the KVM switch and then to the KVM switch's Console Port. (TK-1602R shown) 4. 2. Connect the shared PS/2 keyboard, monitor, and PS/2 mouse to a power outlet. 5. How to Install 1. Turn...
Quick Installation Guide
Page 5
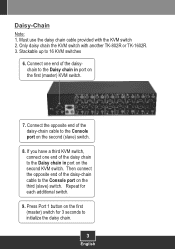
... end of the daisy-chain cable to the Console port on the first (master) switch for each additional switch. 9. If you have a third KVM switch, connect one end of the daisy chain to 16 KVM switches 6. Connect one end of the daisychain to the Console port on the second KVM switch. Must use the daisy chain cable provided with another TK-802R or TK-1602R. 3. Daisy-Chain Note...
... end of the daisy-chain cable to the Console port on the first (master) switch for each additional switch. 9. If you have a third KVM switch, connect one end of the daisy chain to 16 KVM switches 6. Connect one end of the daisychain to the Console port on the second KVM switch. Must use the daisy chain cable provided with another TK-802R or TK-1602R. 3. Daisy-Chain Note...

Quick Installation Guide
Page 6
... position the switch onto the rack. Your installation is now complete. 4 English Rack Mount The KVM Switch can be mounted in an EIA standard-size, 19-inch rack, which can be placed in a wiring closet with other equipment. Note: DO NOT PRESS the port 1 button for 3 seconds or longer on the rack, then use the screws provided with the equipment rack to mount the switch. Align the...
... position the switch onto the rack. Your installation is now complete. 4 English Rack Mount The KVM Switch can be mounted in an EIA standard-size, 19-inch rack, which can be placed in a wiring closet with other equipment. Note: DO NOT PRESS the port 1 button for 3 seconds or longer on the rack, then use the screws provided with the equipment rack to mount the switch. Align the...

Quick Installation Guide
Page 7
Push Buttons Press the push buttons to switch between computers, you can use the front-panel push buttons or the Hot Key commands. LED Indicators Bank Number: Indicates the number or sequence of the switch when daisy chained. This number is 01 when the switch is powering the KVM switch. Red LED light: KVM cable is connected and PC is not daisy chained. Green LED light: Indicates the selected PC port is active, whether the computer is turned on or off. Operation Note: To switch between computers. 5 English 3.
Push Buttons Press the push buttons to switch between computers, you can use the front-panel push buttons or the Hot Key commands. LED Indicators Bank Number: Indicates the number or sequence of the switch when daisy chained. This number is 01 when the switch is powering the KVM switch. Red LED light: KVM cable is connected and PC is not daisy chained. Green LED light: Indicates the selected PC port is active, whether the computer is turned on or off. Operation Note: To switch between computers. 5 English 3.

Quick Installation Guide
Page 8
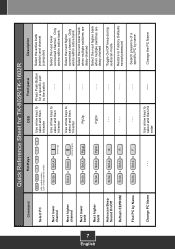
... + ScrLk + 0 + 1 + 0 + 1 For example, to select port 10 of the 10th KVM switch on a series of daisy chained TK-1602R's you hit the following key sequence: Select PC = ScrLk + ScrLk + 1 + 0 + 1 + 0 Note: When using the KVM switch standalone, type in "Hot-Key" mode. If you do not press a key within 2 seconds, the switch will exit hot-key mode. For a list of all the Hot-Key commands, please see the Quick Reference Sheet. 6 English A beep...
... + ScrLk + 0 + 1 + 0 + 1 For example, to select port 10 of the 10th KVM switch on a series of daisy chained TK-1602R's you hit the following key sequence: Select PC = ScrLk + ScrLk + 1 + 0 + 1 + 0 Note: When using the KVM switch standalone, type in "Hot-Key" mode. If you do not press a key within 2 seconds, the switch will exit hot-key mode. For a list of all the Hot-Key commands, please see the Quick Reference Sheet. 6 English A beep...
Quick Installation Guide
Page 9
... channel number Use arrow keys to select and then hit enter Press Push Button for a specific port to the switch Select the active bank (switch) and channel (computer) Next lower channel Next higher channel Next lower bank Next higher bank ScrLk + ScrLk + Use arrow keys to select and then - - - (Arrow up) hit enter ScrLk + ScrLk + Use arrow keys to - - - Restore to Factory Defaults except password 7 English Find PC by name Change...
... channel number Use arrow keys to select and then hit enter Press Push Button for a specific port to the switch Select the active bank (switch) and channel (computer) Next lower channel Next higher channel Next lower bank Next higher bank ScrLk + ScrLk + Use arrow keys to select and then - - - (Arrow up) hit enter ScrLk + ScrLk + Use arrow keys to - - - Restore to Factory Defaults except password 7 English Find PC by name Change...

Quick Installation Guide
Page 10
... every connected channel for quick browsing of each channel Specify a delay within a range of 5~99 seconds End Autoscan activity Press any key on button 1 for 3 seconds Resets/reboot/initialize - - - daisy-chain and activates password protection ScrLk + ScrLk + Space Bar ScrLk + ScrLk + S - - - 8 English Command Reset / Initialize Show OSD Menu Autoscan Autoscan with Programmable Delay Time Stop Autoscan Quick Reference Sheet for TK-802R/TK-1602R Hot-Keys...
... every connected channel for quick browsing of each channel Specify a delay within a range of 5~99 seconds End Autoscan activity Press any key on button 1 for 3 seconds Resets/reboot/initialize - - - daisy-chain and activates password protection ScrLk + ScrLk + Space Bar ScrLk + ScrLk + S - - - 8 English Command Reset / Initialize Show OSD Menu Autoscan Autoscan with Programmable Delay Time Stop Autoscan Quick Reference Sheet for TK-802R/TK-1602R Hot-Keys...
Quick Installation Guide
Page 12
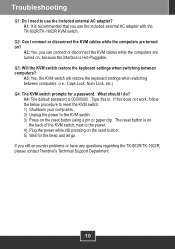
... go. A4: The default password is Hot-Pluggable. Type this does not work, follow the below procedure to reset the KVM switch: 1) Shutdown your computers 2) Unplug the power to the power. 4) Plug the power while still pressing on ? A3: Yes, the KVM switch will restore the keyboard settings when switching between computers? Q2: Can I connect or disconnect the KVM cables while the computers are turned on the reset button using a pin or...
... go. A4: The default password is Hot-Pluggable. Type this does not work, follow the below procedure to reset the KVM switch: 1) Shutdown your computers 2) Unplug the power to the power. 4) Plug the power while still pressing on ? A3: Yes, the KVM switch will restore the keyboard settings when switching between computers? Q2: Can I connect or disconnect the KVM cables while the computers are turned on the reset button using a pin or...

Quick Installation Guide
Page 13
... specified in the manual. Products returned to TRENDnet must be responsible for any unauthorized service center. Warranty service may be obtained by contacting TRENDnet office within the applicable warranty period for a Return Material Authorization (RMA) number, accompanied by any software, firmware, information, or memory data of TRENDnet. All products that are no user serviceable parts inside the product. There are replaced will become the...
... specified in the manual. Products returned to TRENDnet must be responsible for any unauthorized service center. Warranty service may be obtained by contacting TRENDnet office within the applicable warranty period for a Return Material Authorization (RMA) number, accompanied by any software, firmware, information, or memory data of TRENDnet. All products that are no user serviceable parts inside the product. There are replaced will become the...


