Surveillance Manager User Guide
Page 23
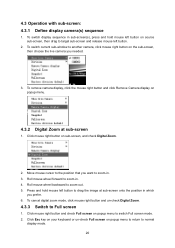
... and hold mouse left button on popup menu. 4.3.2 Digital Zoom at sub-screen onto the position in . 3. Press and hold mouse left button to normal display mode. 20 4.3 Operation with sub-screen: 4.3.1 Define display camera(s) sequence 1. To cancel digital zoom mode, click mouse right button and un-check Digital Zoom. 4.3.3 Switch to zoom-out. 5. To switch current sub-window to another camera, click mouse right button on popup menu to return to drag the image at sub...
... and hold mouse left button on popup menu. 4.3.2 Digital Zoom at sub-screen onto the position in . 3. Press and hold mouse left button to normal display mode. 20 4.3 Operation with sub-screen: 4.3.1 Define display camera(s) sequence 1. To cancel digital zoom mode, click mouse right button and un-check Digital Zoom. 4.3.3 Switch to zoom-out. 5. To switch current sub-window to another camera, click mouse right button on popup menu to return to drag the image at sub...

Surveillance Manager User Guide
Page 36
9. System will display on setting page depends on joystick driver, each button can 't find out your joystick, please check the joystick connect status and re-open setup page. 33 Preset 1~16 Change focus camera direction to preset position. ) Note: How many buttons will auto-detect joystick connect status, If you can define one function in the list above.
9. System will display on setting page depends on joystick driver, each button can 't find out your joystick, please check the joystick connect status and re-open setup page. 33 Preset 1~16 Change focus camera direction to preset position. ) Note: How many buttons will auto-detect joystick connect status, If you can define one function in the list above.
Surveillance Manager User Guide
Page 51
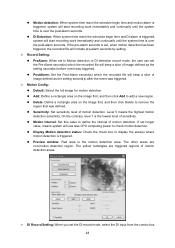
... recorded file will include pre-alarm seconds by setting. ¾ Record Setting: z PreAlarm: When set to Motion detection or DI detection record mode, the user can set the DI record mode, select the DI input from the combo box, 48 z Sensitivity: Set sensitivity level of motion detection areas. ¾ DI Record Setting: When you set the Pre-Alarm second(s) which the recorded file will start recording work immediately and continually until the system time is...
... recorded file will include pre-alarm seconds by setting. ¾ Record Setting: z PreAlarm: When set to Motion detection or DI detection record mode, the user can set the DI record mode, select the DI input from the combo box, 48 z Sensitivity: Set sensitivity level of motion detection areas. ¾ DI Record Setting: When you set the Pre-Alarm second(s) which the recorded file will start recording work immediately and continually until the system time is...
Surveillance Manager User Guide
Page 59
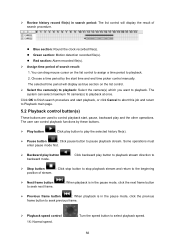
... operations must enter pause mode first. ¾ Backward play button backward mode. : Click backward play button to playback stream direction to ¾ Stop button : Click stop button to stop playback stream and return to the beginning position of search result: 1. z Green section: Motion detection recorded file(s). ¾ Review history record file(s) in the pause mode, click the previous frame button to seek previous frame. ¾ Playback speed control 1X: Normal speed. : Turn the speed button to select playback speed. 56 The selected time period will display...
... operations must enter pause mode first. ¾ Backward play button backward mode. : Click backward play button to playback stream direction to ¾ Stop button : Click stop button to stop playback stream and return to the beginning position of search result: 1. z Green section: Motion detection recorded file(s). ¾ Review history record file(s) in the pause mode, click the previous frame button to seek previous frame. ¾ Playback speed control 1X: Normal speed. : Turn the speed button to select playback speed. 56 The selected time period will display...
Surveillance Manager User Guide
Page 65
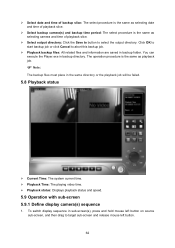
... this backup job. ¾ Playback backup files: All related files and information are saved in backup folder. You can execute the Player.exe in the same directory or the playback job will be failed. 5.8 Playback status ¾ Current Time: The system current time. ¾ Playback Time: The playing video time. ¾ Playback status: Displays playback status and speed. 5.9 Operation with sub-screen 5.9.1 Define display camera(s) sequence 1. The operation procedure is the same...
... this backup job. ¾ Playback backup files: All related files and information are saved in backup folder. You can execute the Player.exe in the same directory or the playback job will be failed. 5.8 Playback status ¾ Current Time: The system current time. ¾ Playback Time: The playing video time. ¾ Playback status: Displays playback status and speed. 5.9 Operation with sub-screen 5.9.1 Define display camera(s) sequence 1. The operation procedure is the same...
TL-SC3230 V1 QIG 7106504101
Page 1
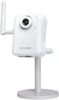
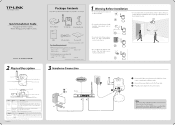
... supported: Windows 2000 Windows Vista Windows 2003 Windows 7 Windows XP The following browsers are for several seconds, the LED will light up and is powered o . If not, please refer to serve. Flash Green Data is linked to enable it . After keeping o for TL-SC3230N only. 7106504101 Package Contents The product model shown in Microphone Micro-SD Card Slot Power/Wireless LED LAN LED Power Jack LAN Port Audio Output Jack RESET Button...
... supported: Windows 2000 Windows Vista Windows 2003 Windows 7 Windows XP The following browsers are for several seconds, the LED will light up and is powered o . If not, please refer to serve. Flash Green Data is linked to enable it . After keeping o for TL-SC3230N only. 7106504101 Package Contents The product model shown in Microphone Micro-SD Card Slot Power/Wireless LED LAN LED Power Jack LAN Port Audio Output Jack RESET Button...
TL-SC3230 V1 QIG 7106504101
Page 2
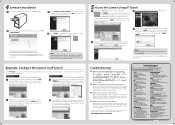
... network quickly. Modify the relative settings of IP Search on the CD for TL-SC3230N only. Click ">>" to con rm wireless setting and then submit your settings. 2 Change the login password. Click "Next" to follow the wizard steps to install the software . 5 Access the Camera Using IP Search 1 Click the icon of the selected device. 4 Software Installation 1 Insert the provided Resource CD into your CD-ROM drive. 3 Click "Install...
... network quickly. Modify the relative settings of IP Search on the CD for TL-SC3230N only. Click ">>" to con rm wireless setting and then submit your settings. 2 Change the login password. Click "Next" to follow the wizard steps to install the software . 5 Access the Camera Using IP Search 1 Click the icon of the selected device. 4 Software Installation 1 Insert the provided Resource CD into your CD-ROM drive. 3 Click "Install...
TL-SC3230N V1 User Guide
Page 7
... 8 4.1.2 View 9 4.1.3 LAN 9 4.1.4 Wireless 11 4.2 UPnP of Windows® XP, Vista or 7 13 4.3 Install the camera behind a NAT Router 14 4.4 Access the camera from the Internet Explorer for the first time 15 4.5 Logging in as a User 16 4.6 Logging in as an Administrator 16 Chapter 5 Operating the Camera 17 5.1 Monitor Image Section 17 5.2 Video Profile 17 5.3 Streaming Protocol 17 5.4 Language 17 5.5 Full Screen 18 5.6 Digital Zoom 18 5.7 2-Way Audio...
... 8 4.1.2 View 9 4.1.3 LAN 9 4.1.4 Wireless 11 4.2 UPnP of Windows® XP, Vista or 7 13 4.3 Install the camera behind a NAT Router 14 4.4 Access the camera from the Internet Explorer for the first time 15 4.5 Logging in as a User 16 4.6 Logging in as an Administrator 16 Chapter 5 Operating the Camera 17 5.1 Monitor Image Section 17 5.2 Video Profile 17 5.3 Streaming Protocol 17 5.4 Language 17 5.5 Full Screen 18 5.6 Digital Zoom 18 5.7 2-Way Audio...
TL-SC3230N V1 User Guide
Page 10
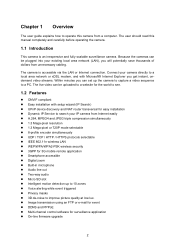
... with setup wizard (IP Search) z UPnP device discovery and NAT router transversal for easy installation z Dynamic IP Service to search your existing local area network (LAN), you can be uploaded to a website for surveillance application z On-line firmware upgrade 2 The live video can be plugged into your IP camera from unnecessary cabling. Chapter 1 Overview The user guide explains how to operate this manual completely and...
... with setup wizard (IP Search) z UPnP device discovery and NAT router transversal for easy installation z Dynamic IP Service to search your existing local area network (LAN), you can be uploaded to a website for surveillance application z On-line firmware upgrade 2 The live video can be plugged into your IP camera from unnecessary cabling. Chapter 1 Overview The user guide explains how to operate this manual completely and...
TL-SC3230N V1 User Guide
Page 13
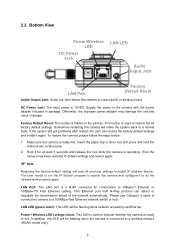
... used to a normal state. 2.2 Bottom View Power/Wireless LED DC Power Jack LAN LED Audio Output Jack LAN Port Factory Default Reset Audio Output Jack: Audio-out Jack allows this LED will be flashing while network accessing via Ethernet. Factory Default Reset: This button is 12VDC. Insert the paper clip or other tool and press and hold the button down continuously. 2. Power / Wireless LED (orange color): This LED is operating...
... used to a normal state. 2.2 Bottom View Power/Wireless LED DC Power Jack LAN LED Audio Output Jack LAN Port Factory Default Reset Audio Output Jack: Audio-out Jack allows this LED will be flashing while network accessing via Ethernet. Factory Default Reset: This button is 12VDC. Insert the paper clip or other tool and press and hold the button down continuously. 2. Power / Wireless LED (orange color): This LED is operating...
TL-SC3230N V1 User Guide
Page 15
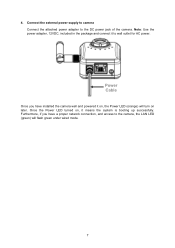
4. Power Cable Once you have installed the camera well and powered it on , it to the DC power jack of the camera. Once the Power LED turned on , the Power LED (orange) will flash green under wired mode. 7 Connect the external power supply to camera Connect the attached power adapter to wall outlet for AC power. Note: Use the power adapter, 12VDC, included in the package and connect it means the system is booting up successfully. Furthermore, if you have a proper network connection, and access to the camera, the LAN LED (green) will turn on later.
4. Power Cable Once you have installed the camera well and powered it on , it to the DC power jack of the camera. Once the Power LED turned on , the Power LED (orange) will flash green under wired mode. 7 Connect the external power supply to camera Connect the attached power adapter to wall outlet for AC power. Note: Use the power adapter, 12VDC, included in the package and connect it means the system is booting up successfully. Furthermore, if you have a proper network connection, and access to the camera, the LAN LED (green) will turn on later.
TL-SC3230N V1 User Guide
Page 30
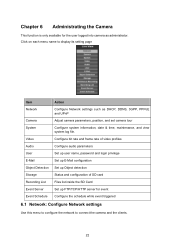
... Adjust camera parameters, position, and set camera tour Configure system information, date & time, maintenance, and view system log file. Click on each menu name to connect the camera and the clients. 22 Chapter 6 Administrating the Camera This function is only available for event Configure the schedule while event triggered 6.1 Network: Configure Network settings Use this menu to configure the network to display its setting page Item Network Camera System Video Audio User...
... Adjust camera parameters, position, and set camera tour Configure system information, date & time, maintenance, and view system log file. Click on each menu name to connect the camera and the clients. 22 Chapter 6 Administrating the Camera This function is only available for event Configure the schedule while event triggered 6.1 Network: Configure Network settings Use this menu to configure the network to display its setting page Item Network Camera System Video Audio User...
TL-SC3230N V1 User Guide
Page 36
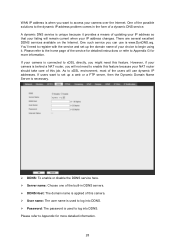
... users will not need to register with the service and set up the domain name of the service for more information. You'll need to enable this camera. ¾ User name: The user name is used to log into DDNS. Please refer to the home page of your camera over the Internet. One of the possible solutions to Appendix for detailed instructions...
... users will not need to register with the service and set up the domain name of the service for more information. You'll need to enable this camera. ¾ User name: The user name is used to log into DDNS. Please refer to the home page of your camera over the Internet. One of the possible solutions to Appendix for detailed instructions...
TL-SC3230N V1 User Guide
Page 49
... turn off the power during updating the firmware and wait for timer countdown, and then you can be displayed. The second one is 720p mode which supports video resolution up to 30fps. Please wait for finish message. The first one is 1.3 Mega mode which supports video resolution up to 30fps. Switching 1.3 Mega and 720p mode, the device will not change after firmware upgrade. 6.4 Video: Configure profile This device provides 2 modes of video...
... turn off the power during updating the firmware and wait for timer countdown, and then you can be displayed. The second one is 720p mode which supports video resolution up to 30fps. Please wait for finish message. The first one is 1.3 Mega mode which supports video resolution up to 30fps. Switching 1.3 Mega and 720p mode, the device will not change after firmware upgrade. 6.4 Video: Configure profile This device provides 2 modes of video...
TL-SC3230N V1 User Guide
Page 54
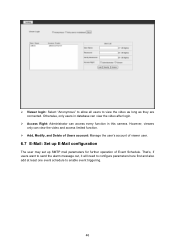
... schedule to view the video as long as they are connected. However, viewers only can access every function in database can view the video after login. ¾ Access Right: Administrator can view the video and access limited function. ¾ Add, Modify, and Delete of Users account: Manage the user's account of viewer user. 6.7 E-Mail: Set up E-Mail configuration The user may set up SMTP mail parameters for further operation of...
... schedule to view the video as long as they are connected. However, viewers only can access every function in database can view the video after login. ¾ Access Right: Administrator can view the video and access limited function. ¾ Add, Modify, and Delete of Users account: Manage the user's account of viewer user. 6.7 E-Mail: Set up E-Mail configuration The user may set up SMTP mail parameters for further operation of...
TL-SC3230N V1 User Guide
Page 61
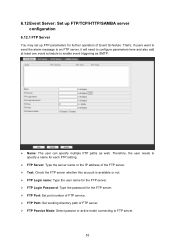
...: Type the user name for the FTP server. ¾ FTP Login Password: Type the password for further operation of FTP server. ¾ FTP Passive Mode: Select passive or active mode connecting to enable event triggering as SMTP. ¾ Name: The user can specify multiple FTP paths as wish. 6.12 Event Server: Set up...FTP Server You may set up FTP parameters for the FTP server. ¾ FTP Port: Set port number of FTP service. ¾ FTP Path: Set working directory path of Event Schedule. That's, if users want to send the alarm message to an FTP server, it will need to configure parameters here...
...: Type the user name for the FTP server. ¾ FTP Login Password: Type the password for further operation of FTP server. ¾ FTP Passive Mode: Select passive or active mode connecting to enable event triggering as SMTP. ¾ Name: The user can specify multiple FTP paths as wish. 6.12 Event Server: Set up...FTP Server You may set up FTP parameters for the FTP server. ¾ FTP Port: Set port number of FTP service. ¾ FTP Path: Set working directory path of Event Schedule. That's, if users want to send the alarm message to an FTP server, it will need to configure parameters here...

TL-SC3230N V1 User Guide
Page 70
... might be opened on the network, port 80 is not solved, the camera might disable the audio function of camera by pressing and holding password down when many users are standards for video compression and JPEG is defined as AMR for 3GPP and G.711/G.726 for ordinary data communication. Restore the factory default setting by using . Forgot the IP address of Check IP address...
... might be opened on the network, port 80 is not solved, the camera might disable the audio function of camera by pressing and holding password down when many users are standards for video compression and JPEG is defined as AMR for 3GPP and G.711/G.726 for ordinary data communication. Restore the factory default setting by using . Forgot the IP address of Check IP address...
TL-SC3230N V1 User Guide
Page 73
... the setting. If the Internet bandwidth is slower than target bit rate, the video streaming will not work properly, ask your camera. not work . (including Click to support streaming audio from the camera. z Adjust White Balance. z The traffic of the network and the object of Internet connection. Blank screen or very slow video when audio is bad. Use the operating system of corner. z Ethernet switching hub can degrade the image...
... the setting. If the Internet bandwidth is slower than target bit rate, the video streaming will not work properly, ask your camera. not work . (including Click to support streaming audio from the camera. z Adjust White Balance. z The traffic of the network and the object of Internet connection. Blank screen or very slow video when audio is bad. Use the operating system of corner. z Ethernet switching hub can degrade the image...

TL-SC3230N V1 User Guide
Page 74
The video images might be noisy if the camera is located in a very low light environment. Miscellaneous Cannot play the recorded ASF file Have installed Microsoft®'s DirectX 9.0 or later and use the Windows Media Player 11.0 or later to play the AVI filed recorded by the camera. 66 Make the condition around the camera brighter. Noisy images occur. around the camera brighter or turn the White-light LED on.
The video images might be noisy if the camera is located in a very low light environment. Miscellaneous Cannot play the recorded ASF file Have installed Microsoft®'s DirectX 9.0 or later and use the Windows Media Player 11.0 or later to play the AVI filed recorded by the camera. 66 Make the condition around the camera brighter. Noisy images occur. around the camera brighter or turn the White-light LED on.
TL-SC3230N V1 User Guide
Page 79
... is used with Your Web browser The following page the WAN IP Address will be set up . Appendix E: Configure Port Forwarding Manually The camera can change from the WAN, its IP address needs to be set up as an example to any router that allows it to the Status screen on your ISP. The TP-LINK TL-WR841ND is , go to access...
... is used with Your Web browser The following page the WAN IP Address will be set up . Appendix E: Configure Port Forwarding Manually The camera can change from the WAN, its IP address needs to be set up as an example to any router that allows it to the Status screen on your ISP. The TP-LINK TL-WR841ND is , go to access...


