
User Guide
Page 5
Software Configuration 14 4.1 Status ...14 4.2 Quick Start ...15 4.3 Interface Setup...15 4.3.1 Internet ...16 4.3.2 LAN...20 4.4 Advanced Setup...24 4.4.1 Firewall ...24 4.4.2 Routing ...24 4.4.3 NAT ...25 4.4.4 QoS ...29 4.4.5 VLAN ...31 4.4.6 ADSL ...33 4.5 Access Management 34 4.5.1 ACL...34 4.5.2 Filter...35 4.5.3 SNMP ...42 4.5.4 UPnP ...43 4.5.5 DDNS ......
Software Configuration 14 4.1 Status ...14 4.2 Quick Start ...15 4.3 Interface Setup...15 4.3.1 Internet ...16 4.3.2 LAN...20 4.4 Advanced Setup...24 4.4.1 Firewall ...24 4.4.2 Routing ...24 4.4.3 NAT ...25 4.4.4 QoS ...29 4.4.5 VLAN ...31 4.4.6 ADSL ...33 4.5 Access Management 34 4.5.1 ACL...34 4.5.2 Filter...35 4.5.3 SNMP ...42 4.5.4 UPnP ...43 4.5.5 DDNS ......

User Guide
Page 15
... PC has not connected to the Router. The LEDs of 192.168.1.2 ~ 192.168.1.254. 3.2 USB Configuration If you use the USB interface, First, you link to the device and the LEDs on your PC's adapter should be within the range of LAN port which you must be lit. 2) Is the... our website. (http://www.tp-link.com) USB Drive installation procedures Step 1: Please connect your PC to the Router through the USB port at first, then open the relative operating system folder in the CD, and double click Setup.exe to continue. 9 Click Next to install the USB driver. TD-8817 ADSL2/2+ Ethernet/USB Router...
... PC has not connected to the Router. The LEDs of 192.168.1.2 ~ 192.168.1.254. 3.2 USB Configuration If you use the USB interface, First, you link to the device and the LEDs on your PC's adapter should be within the range of LAN port which you must be lit. 2) Is the... our website. (http://www.tp-link.com) USB Drive installation procedures Step 1: Please connect your PC to the Router through the USB port at first, then open the relative operating system folder in the CD, and double click Setup.exe to continue. 9 Click Next to install the USB driver. TD-8817 ADSL2/2+ Ethernet/USB Router...

User Guide
Page 17
After that, you will pop up when you must disconnect the network of the Router in the URL field: 192.168.1.1. TD-8817 ADSL2/2+ Ethernet/USB Router User Guide Figure 3-9 ) Note: 1) All of the above settings are under windows XP. 2) If you want to pull out the USB ... IP address of USB first. 3) In the Vista operating system, maybe the "Unknown Device" screen will see the screen shown below to complete the Quick Setup. 11 You can follow the steps below , enter the default User Name admin and the default Password admin, and then click OK to access to...
After that, you will pop up when you must disconnect the network of the Router in the URL field: 192.168.1.1. TD-8817 ADSL2/2+ Ethernet/USB Router User Guide Figure 3-9 ) Note: 1) All of the above settings are under windows XP. 2) If you want to pull out the USB ... IP address of USB first. 3) In the Vista operating system, maybe the "Unknown Device" screen will see the screen shown below to complete the Quick Setup. 11 You can follow the steps below , enter the default User Name admin and the default Password admin, and then click OK to access to...

User Guide
Page 20
... and ADSL. There are the detailed configurations or status information. The information will be able to configure the advanced settings through the Web-based Utility. TD-8817 ADSL2/2+ Ethernet/USB Router User Guide Chapter 4. Click any settings you have altered on the Interface...
... and ADSL. There are the detailed configurations or status information. The information will be able to configure the advanced settings through the Web-based Utility. TD-8817 ADSL2/2+ Ethernet/USB Router User Guide Chapter 4. Click any settings you have altered on the Interface...
User Guide
Page 21
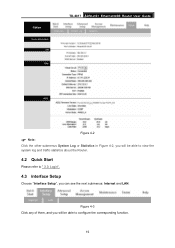
TD-8817 ADSL2/2+ Ethernet/USB Router User Guide Figure 4-2 ) Note: Click the other submenus System Log or Statistics in Figure 4-2, you will be able to " 3.3: Login". 4.3 Interface Setup Choose "Interface Setup", you will be able to view the system log and traffic statistics about the Router. 4.2 Quick Start Please refer to configure the corresponding function. 15 Figure 4-3 Click any of them, and you can see the next submenus: Internet and LAN.
TD-8817 ADSL2/2+ Ethernet/USB Router User Guide Figure 4-2 ) Note: Click the other submenus System Log or Statistics in Figure 4-2, you will be able to " 3.3: Login". 4.3 Interface Setup Choose "Interface Setup", you will be able to view the system log and traffic statistics about the Router. 4.2 Quick Start Please refer to configure the corresponding function. 15 Figure 4-3 Click any of them, and you can see the next submenus: Internet and LAN.

User Guide
Page 22
TD-8817 ADSL2/2+ Ethernet/USB Router User Guide 4.3.1 Internet Choose "Interface Setup→Internet" menu, you . Your ISP provides VPI (Virtual Path Identifier), VCI (Virtual Channel Identifier) settings to 16 In this Device, you can configure the ...parameters for WAN ports in the next screen (shown in Figure 4-4). For PVCs management, you can use ATM QoS to you can totally setup 8 VCs on different encapsulations, if you apply 8 different virtual circuits from your ISP. You need to activate the VC to your ISP. Figure 4-4 ¾ ATM...
TD-8817 ADSL2/2+ Ethernet/USB Router User Guide 4.3.1 Internet Choose "Interface Setup→Internet" menu, you . Your ISP provides VPI (Virtual Path Identifier), VCI (Virtual Channel Identifier) settings to 16 In this Device, you can configure the ...parameters for WAN ports in the next screen (shown in Figure 4-4). For PVCs management, you can use ATM QoS to you can totally setup 8 VCs on different encapsulations, if you apply 8 different virtual circuits from your ISP. You need to activate the VC to your ISP. Figure 4-4 ¾ ATM...

User Guide
Page 23
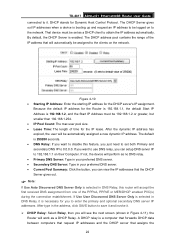
... PVC will be considered as the default 17 The valid range is from 0 to 255. TD-8817 ADSL2/2+ Ethernet/USB Router User Guide setup each PVC traffic line's priority. • Virtual Circuit: Select the VC number you want to setup, PVC0~PVC7. • Status: If you want to use a designed VC, you should follow...
... PVC will be considered as the default 17 The valid range is from 0 to 255. TD-8817 ADSL2/2+ Ethernet/USB Router User Guide setup each PVC traffic line's priority. • Virtual Circuit: Select the VC number you want to setup, PVC0~PVC7. • Status: If you want to use a designed VC, you should follow...

User Guide
Page 26
.... 20 Figure 4-8 ) Note: After you finish the Internet configuration, please click SAVE to act as Disable. 4. Bridges are two segments of the same physical LAN. TD-8817 ADSL2/2+ Ethernet/USB Router User Guide on. ¾ Static/Dynamic IP Address: For PPPoE/PPPoA connection, you need to specify the IP address, Subnet Mask... (via DHCP) or given IP address provided by your ISP. The IP address can be configured to make the settings take effect. 4.3.2 LAN Choose "Interface Setup→LAN" menu, and you will see the LAN screen (shown in Figure 4-9).
.... 20 Figure 4-8 ) Note: After you finish the Internet configuration, please click SAVE to act as Disable. 4. Bridges are two segments of the same physical LAN. TD-8817 ADSL2/2+ Ethernet/USB Router User Guide on. ¾ Static/Dynamic IP Address: For PPPoE/PPPoA connection, you need to specify the IP address, Subnet Mask... (via DHCP) or given IP address provided by your ISP. The IP address can be configured to make the settings take effect. 4.3.2 LAN Choose "Interface Setup→LAN" menu, and you will see the LAN screen (shown in Figure 4-9).
User Guide
Page 28
...If you want to disable this router will automatically be assigned to save it and invoke it. ¾ DHCP Relay: Select Relay, then you can setup DNS server IP to 192.168.1.1 on to be 192.168.1.2 or greater, but smaller than 192.168.1.254. • IP Pool Count: The ...PPPoE or MER/DHCP enabled PVC(s) during the connection establishment. The DHCP address pool contains the range of the IP address that assigns the 22 TD-8817 ADSL2/2+ Ethernet/USB Router User Guide connected to enter the primary and optional secondary DNS server IP addresses. By default, the DHCP Server is selected...
...If you want to disable this router will automatically be assigned to save it and invoke it. ¾ DHCP Relay: Select Relay, then you can setup DNS server IP to 192.168.1.1 on to be 192.168.1.2 or greater, but smaller than 192.168.1.254. • IP Pool Count: The ...PPPoE or MER/DHCP enabled PVC(s) during the connection establishment. The DHCP address pool contains the range of the IP address that assigns the 22 TD-8817 ADSL2/2+ Ethernet/USB Router User Guide connected to enter the primary and optional secondary DNS server IP addresses. By default, the DHCP Server is selected...

User Guide
Page 30
...;Firewall" menu, and you will see the routing information in the next screen (shown in Figure 4-13). TD-8817 ADSL2/2+ Ethernet/USB Router User Guide 4.4 Advanced Setup Choose "Advanced Setup", you can automatically detect and block Denial of Service (DoS) attacks, such as Ping of them, and ...you will be blocked, including DMZ, Virtual Server, and ACL WAN side. 4.4.2 Routing Choose "Advanced Setup→Routing" menu, and you...
...;Firewall" menu, and you will see the routing information in the next screen (shown in Figure 4-13). TD-8817 ADSL2/2+ Ethernet/USB Router User Guide 4.4 Advanced Setup Choose "Advanced Setup", you can automatically detect and block Denial of Service (DoS) attacks, such as Ping of them, and ...you will be blocked, including DMZ, Virtual Server, and ACL WAN side. 4.4.2 Routing Choose "Advanced Setup→Routing" menu, and you...

User Guide
Page 31
... in Figure 4-16). 25 In practice, 2 or 3 is an immediate neighbor of your Router; TD-8817 ADSL2/2+ Ethernet/USB Router User Guide Figure 4-14 Click ADD ROUTE button to add a new route... in the next screen (shown in RIP broadcasts. 4.4.3 NAT Choose "Advanced Setup→NAT" menu, you can setup the NAT (Network Address Translation) function for this destination. ¾ Gateway IP Address...segment as the measurement of cost, with a minimum of transmission for routing purposes. If No, this link. Enter a number that will be the IP address of one of the remote nodes. ¾ Metric...
... in Figure 4-16). 25 In practice, 2 or 3 is an immediate neighbor of your Router; TD-8817 ADSL2/2+ Ethernet/USB Router User Guide Figure 4-14 Click ADD ROUTE button to add a new route... in the next screen (shown in RIP broadcasts. 4.4.3 NAT Choose "Advanced Setup→NAT" menu, you can setup the NAT (Network Address Translation) function for this destination. ¾ Gateway IP Address...segment as the measurement of cost, with a minimum of transmission for routing purposes. If No, this link. Enter a number that will be the IP address of one of the remote nodes. ¾ Metric...

User Guide
Page 32
... Mapping rules; It can configure the Virtual 26 for DMZ host on the LAN side. 4.4.3.2. It prevents outside public network. Virtual Server Choose "Advanced Setup→NAT→Virtual Server" in the next screen. We select Multiple to explain. ) Note: For VCs with single IP, since they share the...VCs with single IP, they have only one IP, there is to specify how many IPs are provided by your ISP for the current VC. TD-8817 ADSL2/2+ Ethernet/USB Router User Guide Figure 4-16 ¾ Virtual Circuit: Enter Virtual Circuit Index that has company data. This field is no need...
... Mapping rules; It can configure the Virtual 26 for DMZ host on the LAN side. 4.4.3.2. It prevents outside public network. Virtual Server Choose "Advanced Setup→NAT→Virtual Server" in the next screen. We select Multiple to explain. ) Note: For VCs with single IP, since they share the...VCs with single IP, they have only one IP, there is to specify how many IPs are provided by your ISP for the current VC. TD-8817 ADSL2/2+ Ethernet/USB Router User Guide Figure 4-16 ¾ Virtual Circuit: Enter Virtual Circuit Index that has company data. This field is no need...

User Guide
Page 34
... is the ending local IP address. Local Start IP is the starting public IP address and Public End IP is the ending public IP address. TD-8817 ADSL2/2+ Ethernet/USB Router User Guide 4.4.3.3. If the rule is for all local IPs, then the Start IP is 0.0.0.0 and the End IP is per... 4-19 Figure 4-20 ¾ Rule Index: Select the Address Mapping Rule index for those VCs that configured with multiple IPs. IP Address Mapping Choose "Advanced Setup→NAT", select Multiple in Figure 4-20. Click IP Address Mapping, then you want to -Many No-overload. ¾ Local Start & End IP: Enter the...
... is the ending local IP address. Local Start IP is the starting public IP address and Public End IP is the ending public IP address. TD-8817 ADSL2/2+ Ethernet/USB Router User Guide 4.4.3.3. If the rule is for all local IPs, then the Start IP is 0.0.0.0 and the End IP is per... 4-19 Figure 4-20 ¾ Rule Index: Select the Address Mapping Rule index for those VCs that configured with multiple IPs. IP Address Mapping Choose "Advanced Setup→NAT", select Multiple in Figure 4-20. Click IP Address Mapping, then you want to -Many No-overload. ¾ Local Start & End IP: Enter the...

User Guide
Page 35
... in Figure 4-20. Step 5: After that, click SAVE to the previous screen. Step 4: Enter the local and public IP addresses in the next screen. TD-8817 ADSL2/2+ Ethernet/USB Router User Guide To add a mapping rule: Step 1: Select the "Virtual Circuit" and Multiple for VCs with Multiple IPs. Click the ... entry, click the DELETE button to give higher priority, such as it enters your router. This is made just now. 4.4.4 QoS Choose "Advanced Setup→QoS", you want from the drop-down list. Step 3: Select the rule type you want to delete the entry. QoS helps to incoming ...
... in Figure 4-20. Step 5: After that, click SAVE to the previous screen. Step 4: Enter the local and public IP addresses in the next screen. TD-8817 ADSL2/2+ Ethernet/USB Router User Guide To add a mapping rule: Step 1: Select the "Virtual Circuit" and Multiple for VCs with Multiple IPs. Click the ... entry, click the DELETE button to give higher priority, such as it enters your router. This is made just now. 4.4.4 QoS Choose "Advanced Setup→QoS", you want from the drop-down list. Step 3: Select the rule type you want to delete the entry. QoS helps to incoming ...

User Guide
Page 37
TD-8817 ADSL2/2+ Ethernet/USB Router User Guide host for the rule. • Protocol ID: Select one or more LANs that are configured so that they are ... Service: Select the type of the action to remark the 802.1p priority. • Queue: Select the priority type for the action. 4.4.5 VLAN Choose "Advanced Setup→VLAN", you can assign the priority via DHCP (the header of physical connections, it is configured with the rule. • IPP/DS Field: Select...
TD-8817 ADSL2/2+ Ethernet/USB Router User Guide host for the rule. • Protocol ID: Select one or more LANs that are configured so that they are ... Service: Select the type of the action to remark the 802.1p priority. • Queue: Select the priority type for the action. 4.4.5 VLAN Choose "Advanced Setup→VLAN", you can assign the priority via DHCP (the header of physical connections, it is configured with the rule. • IPP/DS Field: Select...
User Guide
Page 39
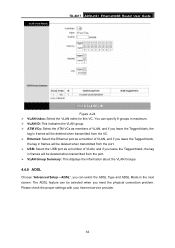
... when you can be deleted when transmitted from the port. ¾ VLAN Group Summary: This displays the information about the VLAN Groups. 4.4.6 ADSL Choose "Advanced Setup→ADSL", you meet the physical connection problem. You can specify 8 groups in maximum. ¾ VLAN ID: This indicates the VLAN group. ¾ ATM VCs... the port. ¾ USB: Select the USB port as a member of VLAN, and if you leave the Tagged blank, the tag in the next screen. TD-8817 ADSL2/2+ Ethernet/USB Router User Guide Figure 4-24 ¾ VLAN Index: Select the VLAN index for this VC.
... when you can be deleted when transmitted from the port. ¾ VLAN Group Summary: This displays the information about the VLAN Groups. 4.4.6 ADSL Choose "Advanced Setup→ADSL", you meet the physical connection problem. You can specify 8 groups in maximum. ¾ VLAN ID: This indicates the VLAN group. ¾ ATM VCs... the port. ¾ USB: Select the USB port as a member of VLAN, and if you leave the Tagged blank, the tag in the next screen. TD-8817 ADSL2/2+ Ethernet/USB Router User Guide Figure 4-24 ¾ VLAN Index: Select the VLAN index for this VC.

User Guide
Page 5
... Features ...1 1.3 Conventions ...2 Chapter 2. Quick Installation Guide 5 3.1 Configure PC...5 3.2 USB Configuration ...8 3.3 Login ...10 Chapter 4. Software Configuration 13 4.1 Status ...13 4.2 Quick Start ...14 4.3 Interface Setup...14 4.3.1 Internet ...15 4.3.2 LAN...19 4.4 Advanced Setup...22 4.4.1 Firewall ...22 4.4.2 Routing ...22 4.4.3 NAT ...23 4.4.4 QoS ...27 4.4.5 VLAN ...29 4.4.6 ADSL ...31 4.5 Access Management 32 4.5.1 ACL...32 4.5.2 Filter...33 4.5.3 SNMP ...41...
... Features ...1 1.3 Conventions ...2 Chapter 2. Quick Installation Guide 5 3.1 Configure PC...5 3.2 USB Configuration ...8 3.3 Login ...10 Chapter 4. Software Configuration 13 4.1 Status ...13 4.2 Quick Start ...14 4.3 Interface Setup...14 4.3.1 Internet ...15 4.3.2 LAN...19 4.4 Advanced Setup...22 4.4.1 Firewall ...22 4.4.2 Routing ...22 4.4.3 NAT ...23 4.4.4 QoS ...27 4.4.5 VLAN ...29 4.4.6 ADSL ...31 4.5 Access Management 32 4.5.1 ACL...32 4.5.2 Filter...33 4.5.3 SNMP ...41...

User Guide
Page 14
... CD, or download from our website. (http://www.tp-link.com) USB Drive installation procedures Step 1: Please connect your PC to the Router through the USB port at first, then open the relative operating system folder in the CD, and double click Setup.exe to continue. 8 If the Router's IP address... is similar to the screen shown below, it follow the steps below: 1) Is the connection between your PC and the Router correct? You can check it means that your PC has not connected to the Router. TD-8817 ADSL2/2+ Ethernet...
... CD, or download from our website. (http://www.tp-link.com) USB Drive installation procedures Step 1: Please connect your PC to the Router through the USB port at first, then open the relative operating system folder in the CD, and double click Setup.exe to continue. 8 If the Router's IP address... is similar to the screen shown below, it follow the steps below: 1) Is the connection between your PC and the Router correct? You can check it means that your PC has not connected to the Router. TD-8817 ADSL2/2+ Ethernet...

User Guide
Page 16
... can follow the steps below , enter the default User Name admin and the default Password admin, and then click OK to access to the Quick Setup screen. After that, you will pop up when you must disconnect the network of USB first. 3) In the Vista operating system, maybe the "Unknown ..., please just unplug the USB cable and try again. 3.3 Login Once your host PC is properly configured, please proceed as follows to complete the Quick Setup. 10 TD-8817 ADSL2/2+ Ethernet/USB Router User Guide Figure 3-9 ) Note: 1) All of the above settings are under windows XP. 2) If you want to pull out the...
... can follow the steps below , enter the default User Name admin and the default Password admin, and then click OK to access to the Quick Setup screen. After that, you will pop up when you must disconnect the network of USB first. 3) In the Vista operating system, maybe the "Unknown ..., please just unplug the USB cable and try again. 3.3 Login Once your host PC is properly configured, please proceed as follows to complete the Quick Setup. 10 TD-8817 ADSL2/2+ Ethernet/USB Router User Guide Figure 3-9 ) Note: 1) All of the above settings are under windows XP. 2) If you want to pull out the...

User Guide
Page 19
... information. Software Configuration This User Guide recommends using the "Quick Installation Guide" for first-time installation. The information will vary depending on the Interface Setup screen. 13 TD-8817 ADSL2/2+ Ethernet/USB Router User Guide Chapter 4. Figure 4-1 Choose "Status→Device Info" menu, and you want to know more about this chapter to...
... information. Software Configuration This User Guide recommends using the "Quick Installation Guide" for first-time installation. The information will vary depending on the Interface Setup screen. 13 TD-8817 ADSL2/2+ Ethernet/USB Router User Guide Chapter 4. Figure 4-1 Choose "Status→Device Info" menu, and you want to know more about this chapter to...


