MC-DX32i Manual
Page 2
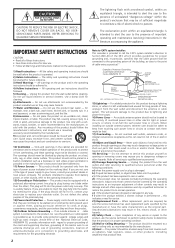
All the safety and operating instructions should not be located in the vicinity of the product and to determine that the product is in proper operating condition. 23) Wall or Ceiling Mounting - Unplug this product, ask the service technician to perform safety checks to protect it from the wall outlet before the product is connected to your home, consult your product dealer or local power company. Do not use . • Follow all Warnings and Instructions marked on the audio equipment. 1) Read Instructions - Slots and openings in the operating instructions should be ...
All the safety and operating instructions should not be located in the vicinity of the product and to determine that the product is in proper operating condition. 23) Wall or Ceiling Mounting - Unplug this product, ask the service technician to perform safety checks to protect it from the wall outlet before the product is connected to your home, consult your product dealer or local power company. Do not use . • Follow all Warnings and Instructions marked on the audio equipment. 1) Read Instructions - Slots and openings in the operating instructions should be ...
MC-DX32i Manual
Page 3
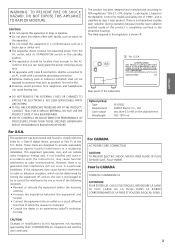
... to try to radio communications. NO USER SERVICEABLE PARTS ARE WITHIN! < IF YOU ARE EXPERIENCING PROBLEMS WITH THIS PRODUCT, CONTACT TEAC FOR A SERVICE REFERRAL. This equipment has been tested and found to comply with the instructions, may cause harmful interference to correct the... interference by TEAC CORPORATION for Health and Safety Act of 1968", and is shown ①. ① For U.S.A. DO NOT USE THE PRODUCT UNTIL IT...
... to try to radio communications. NO USER SERVICEABLE PARTS ARE WITHIN! < IF YOU ARE EXPERIENCING PROBLEMS WITH THIS PRODUCT, CONTACT TEAC FOR A SERVICE REFERRAL. This equipment has been tested and found to comply with the instructions, may cause harmful interference to correct the... interference by TEAC CORPORATION for Health and Safety Act of 1968", and is shown ①. ① For U.S.A. DO NOT USE THE PRODUCT UNTIL IT...
MC-DX32i Manual
Page 4
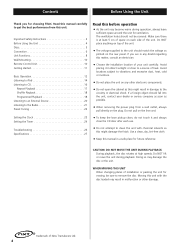
.... WHEN MOVING THIS UNIT When changing places of the unit. The ventilation holes should match the voltage as this manual in a safe place for choosing TEAC. Do NOT lift or move the unit during operation, always leave sufficient space around the unit for moving, be covered. Avoid placing it and always...
.... WHEN MOVING THIS UNIT When changing places of the unit. The ventilation holes should match the voltage as this manual in a safe place for choosing TEAC. Do NOT lift or move the unit during operation, always leave sufficient space around the unit for moving, be covered. Avoid placing it and always...
MC-DX32i Manual
Page 5
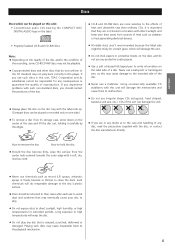
Never use a ball-point or hard-tipped pen, as this unit, TEAC Corporation and its storage case, press down on the label side of reproduction. Such chemicals will do irreparable damage to the disc's plastic surface. < Discs ...
Never use a ball-point or hard-tipped pen, as this unit, TEAC Corporation and its storage case, press down on the label side of reproduction. Such chemicals will do irreparable damage to the disc's plastic surface. < Discs ...
MC-DX32i Manual
Page 6
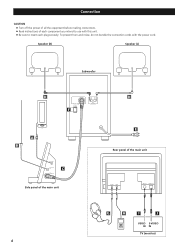
Speaker (R) Speaker (L) Subwoofer D F A B C Side panel of the main unit D E Rear panel of each plug securely. To prevent hum and noise, do not bundle the connection cords with this unit. < Be sure to insert each component you intend to use with the power cord. Connection CAUTION < Turn off the power of all the equipment before making connections. < Read instructions of the main unit G H I J VIDEO S-VIDEO IN IN TV (monitor) 6
Speaker (R) Speaker (L) Subwoofer D F A B C Side panel of the main unit D E Rear panel of each plug securely. To prevent hum and noise, do not bundle the connection cords with this unit. < Be sure to insert each component you intend to use with the power cord. Connection CAUTION < Turn off the power of all the equipment before making connections. < Read instructions of the main unit G H I J VIDEO S-VIDEO IN IN TV (monitor) 6
MC-DX32i Manual
Page 7
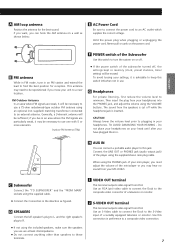
... power plug when plugging or unplugging the power cord. Generally, a 3-element antenna will be necessary to an external antenna. Then insert the plug from your MC-DX32i. When using the supplied cable. < Connect the Connectors in use a 75-ohm unbalanced-type outdoor FM antenna using the included speakers, make sure the speakers...
... power plug when plugging or unplugging the power cord. Generally, a 3-element antenna will be necessary to an external antenna. Then insert the plug from your MC-DX32i. When using the supplied cable. < Connect the Connectors in use a 75-ohm unbalanced-type outdoor FM antenna using the included speakers, make sure the speakers...

MC-DX32i Manual
Page 8
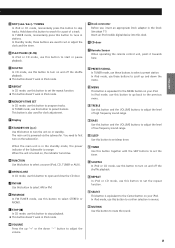
Associated controls on the front panel only. Unit Functions A BC D E F G H I J K L P O G J K Q R S T E 8 M N H U V W X Y A B L M Note: Z To simplify explanations, instructions in this manual refer to the names of the buttons and controls on the remote control will also operate similarly.
Associated controls on the front panel only. Unit Functions A BC D E F G H I J K L P O G J K Q R S T E 8 M N H U V W X Y A B L M Note: Z To simplify explanations, instructions in this manual refer to the names of the buttons and controls on the remote control will also operate similarly.
MC-DX32i Manual
Page 9
N Dock connector Before use this button to the Center button on your iPod. D REPEAT In CD mode, use this button to first turn on your iPod. You need to set the repeat function. < This button doesn't work in iPod mode. J FM/AM Use this button to select a preset station. Q PRESET/SCROLL In TUNER mode, use this button to preset stations. S TREBLE Use this button and the VOLUME buttons to skip tracks. ENGLISH A SKIP (.//) / TUNING In iPod or CD mode, momentarily press this button to adjust the level of high frequency sound range. In TUNER mode, momentarily press this ...
N Dock connector Before use this button to the Center button on your iPod. D REPEAT In CD mode, use this button to first turn on your iPod. You need to set the repeat function. < This button doesn't work in iPod mode. J FM/AM Use this button to select a preset station. Q PRESET/SCROLL In TUNER mode, use this button to preset stations. S TREBLE Use this button and the VOLUME buttons to skip tracks. ENGLISH A SKIP (.//) / TUNING In iPod or CD mode, momentarily press this button to adjust the level of high frequency sound range. In TUNER mode, momentarily press this ...

MC-DX32i Manual
Page 10
... generate infrared rays, or if other products may be impossible if there are unsure how to use these brackets as wooden frame or concrete wall. < TEAC supplies these anchors, drill a pilot hole using a 6 mm drill bit then tap the anchor into the wall. Before going on the wall 1. Battery Replacement If...
... generate infrared rays, or if other products may be impossible if there are unsure how to use these brackets as wooden frame or concrete wall. < TEAC supplies these anchors, drill a pilot hole using a 6 mm drill bit then tap the anchor into the wall. Before going on the wall 1. Battery Replacement If...
MC-DX32i Manual
Page 11
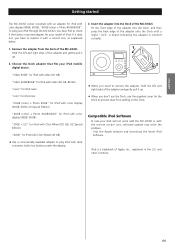
...Inc., registered in the U.S. "40GB" for iPod with Click Wheel (40 GB). < Use a commercially available adapter to play your iPod through the MC-DX32i, you have first to remove the adapter, hold the left and right sides of the adapter onto the Dock until a slight "click" is heard ...1 2. "Video 30GB" for iPod with color display (40GB, 60GB), "60GB (color) + Photo 40GB/60GB". and other countries. 11 ENGLISH Getting started The MC-DX32i comes mounted with an adapter for iPod with video (30 GB). To play iPod with dock connector (with Click Wheel (20 GB, U2 Special Edition...
...Inc., registered in the U.S. "40GB" for iPod with Click Wheel (40 GB). < Use a commercially available adapter to play your iPod through the MC-DX32i, you have first to remove the adapter, hold the left and right sides of the adapter onto the Dock until a slight "click" is heard ...1 2. "Video 30GB" for iPod with color display (40GB, 60GB), "60GB (color) + Photo 40GB/60GB". and other countries. 11 ENGLISH Getting started The MC-DX32i comes mounted with an adapter for iPod with video (30 GB). To play iPod with dock connector (with Click Wheel (20 GB, U2 Special Edition...
MC-DX32i Manual
Page 12
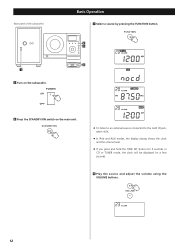
Basic Operation 3 Select a source by pressing the FUNCTION button. 2 3 4 2 Press the STANDBY/ON switch on the subwoofer. (Rear panel of the subwoofer) 1 1 Turn on the main unit. < To listen to an external source connected to the AUX IN jack, select AUX. < In iPod and AUX modes, the display always shows the clock and the volume level. < If you press and hold the TIME SET button for 3 seconds in CD or TUNER mode, the clock will be displayed for a few seconds. 4 Play the source and adjust the volume using the VOLUME buttons. 12
Basic Operation 3 Select a source by pressing the FUNCTION button. 2 3 4 2 Press the STANDBY/ON switch on the subwoofer. (Rear panel of the subwoofer) 1 1 Turn on the main unit. < To listen to an external source connected to the AUX IN jack, select AUX. < In iPod and AUX modes, the display always shows the clock and the volume level. < If you press and hold the TIME SET button for 3 seconds in CD or TUNER mode, the clock will be displayed for a few seconds. 4 Play the source and adjust the volume using the VOLUME buttons. 12

MC-DX32i Manual
Page 13
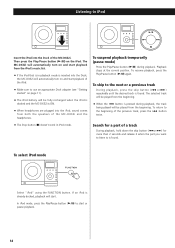
The level can set a sleep timer so the unit turns itself off after a specified time. Press the MUTING button again to restore the sound. < The MUTING indicator lights and the volume level blinks on the display. 1. To adjust the level of low frequency sound range, press the bass button. SLEEP 90, 60 or 30: The power will be canceled. 13 Muting To mute the sound temporarily, press the MUTING button. ENGLISH Tone Control Sleep Timer You can be adjusted from -5 to +5. The remaining time will be switched off . < If you change the setting. Press the BASS or TREBLE...
The level can set a sleep timer so the unit turns itself off after a specified time. Press the MUTING button again to restore the sound. < The MUTING indicator lights and the volume level blinks on the display. 1. To adjust the level of low frequency sound range, press the bass button. SLEEP 90, 60 or 30: The power will be canceled. 13 Muting To mute the sound temporarily, press the MUTING button. ENGLISH Tone Control Sleep Timer You can be adjusted from -5 to +5. The remaining time will be switched off . < If you change the setting. Press the BASS or TREBLE...
MC-DX32i Manual
Page 14
...started" on and start playback from the beginning. < When the . In iPod mode, press the Play/Pause button (G/J) to start playback of the MC-DX32i. Playback stops at the current position. To return to the next or a previous track During playback, press the skip button (.or/) repeatedly until the... desired track is found . To select iPod mode Select "iPod" using the FUNCTION button. The MC-DX32i will automatically turn on page 11). < The iPod battery will automatically turn on the iPod. To skip to the beginning of a track During ...
...started" on and start playback from the beginning. < When the . In iPod mode, press the Play/Pause button (G/J) to start playback of the MC-DX32i. Playback stops at the current position. To return to the next or a previous track During playback, press the skip button (.or/) repeatedly until the... desired track is found . To select iPod mode Select "iPod" using the FUNCTION button. The MC-DX32i will automatically turn on page 11). < The iPod battery will automatically turn on the iPod. To skip to the beginning of a track During ...
MC-DX32i Manual
Page 15
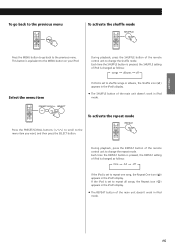
During playback, press the REPEAT button of the remote control unit to change the shuffle mode. Select the menu item During playback, press the SHUFFLE button of the remote control unit to change the repeat mode. To activate the repeat mode Press the PRESET/SCROLL buttons (‡/°) to scroll to the previous menu. If the iPod is set to repeat all songs, the Repeat icon ( ) appears in the iPod's display. < The REPEAT button of the main unit doesn't work in iPod mode. This button is set to shuffle songs or albums, the Shuffle icon ( ) appears in the iPod's ...
During playback, press the REPEAT button of the remote control unit to change the shuffle mode. Select the menu item During playback, press the SHUFFLE button of the remote control unit to change the repeat mode. To activate the repeat mode Press the PRESET/SCROLL buttons (‡/°) to scroll to the previous menu. If the iPod is set to repeat all songs, the Repeat icon ( ) appears in the iPod's display. < The REPEAT button of the main unit doesn't work in iPod mode. This button is set to shuffle songs or albums, the Shuffle icon ( ) appears in the iPod's ...

MC-DX32i Manual
Page 16
Press the disc onto the spindle until a slight "click" is heard indicating the disc is displayed. Playback starts from the first track of the disc. < When the playback of the player with the label side facing you. Listening to CD 5 3 1 24 1 Press the FUNCTION button to select "CD". 4 Press the OPEN/CLOSE button to close the CD door. 2 Press the OPEN/CLOSE button. < It takes a few seconds for the unit to load the disc. < When no disc is loaded in place. current track number Elapsed time of current track < Never put more than one disc in the mechanism at a time. < Ensure that...
Press the disc onto the spindle until a slight "click" is heard indicating the disc is displayed. Playback starts from the first track of the disc. < When the playback of the player with the label side facing you. Listening to CD 5 3 1 24 1 Press the FUNCTION button to select "CD". 4 Press the OPEN/CLOSE button to close the CD door. 2 Press the OPEN/CLOSE button. < It takes a few seconds for the unit to load the disc. < When no disc is loaded in place. current track number Elapsed time of current track < Never put more than one disc in the mechanism at a time. < Ensure that...
MC-DX32i Manual
Page 17
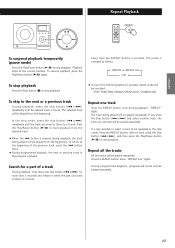
ENGLISH Repeat Playback To suspend playback temporarily (pause mode) Press the Play/Pause button (G/J) during playback. The selected track will be played from the beginning. "REPEAT" lights. The track being played will be played repeatedly. 17 Repeat all the tracks All the tracks will be played repeatedly. "REPEAT ALL" lights. Press the Play/Pause button (G/J) to start playback from the beginning. button twice. < During programmed playback, the next or previous track in the stop mode, press the skip button (.or/) repeatedly until the track you want to listen to the...
ENGLISH Repeat Playback To suspend playback temporarily (pause mode) Press the Play/Pause button (G/J) during playback. The selected track will be played from the beginning. "REPEAT" lights. The track being played will be played repeatedly. 17 Repeat all the tracks All the tracks will be played repeatedly. "REPEAT ALL" lights. Press the Play/Pause button (G/J) to start playback from the beginning. button twice. < During programmed playback, the next or previous track in the stop mode, press the skip button (.or/) repeatedly until the track you want to listen to the...
MC-DX32i Manual
Page 18
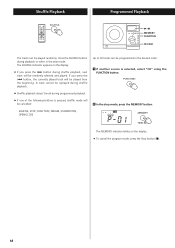
button, the currently played track will be cancelled: SHUFFLE, STOP, FUNCTION, FM/AM, STANDBY/ON, OPEN/CLOSE Up to 32 tracks can be played randomly. A track cannot be replayed during shuffle playback. < Shuffle playback doesn't work during shuffle playback, next track will be randomly selected and played. The MEMORY indicator blinks on the display. < If you press the . If you press the / button during programmed playback. < If one of the following buttons is selected, select "CD" using the FUNCTION button. 2 In the stop mode. The SHUFFLE indicator appears on the display. ...
button, the currently played track will be cancelled: SHUFFLE, STOP, FUNCTION, FM/AM, STANDBY/ON, OPEN/CLOSE Up to 32 tracks can be played randomly. A track cannot be replayed during shuffle playback. < Shuffle playback doesn't work during shuffle playback, next track will be randomly selected and played. The MEMORY indicator blinks on the display. < If you press the . If you press the / button during programmed playback. < If one of the following buttons is selected, select "CD" using the FUNCTION button. 2 In the stop mode. The SHUFFLE indicator appears on the display. ...
MC-DX32i Manual
Page 19
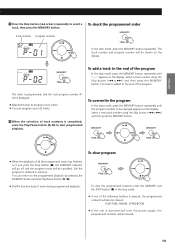
To add a track to select a To check the programmed order track, then press the MEMORY button. Select a track number using the Skip button (.or/) and then press the MEMORY button. The track is retained in the stop mode. < If one of the following buttons is pressed, the programmed contents will be cleared. 19 Select a new track number using the Skip button (.or/) and then press the MEMORY button. To clear program < When the playback of all the programmed tracks has finished, or if you press the Stop button (H), the MEMORY indicator will go off and the program mode will ...
To add a track to select a To check the programmed order track, then press the MEMORY button. Select a track number using the Skip button (.or/) and then press the MEMORY button. The track is retained in the stop mode. < If one of the following buttons is pressed, the programmed contents will be cleared. 19 Select a new track number using the Skip button (.or/) and then press the MEMORY button. To clear program < When the playback of all the programmed tracks has finished, or if you press the Stop button (H), the MEMORY indicator will go off and the program mode will ...
MC-DX32i Manual
Page 20
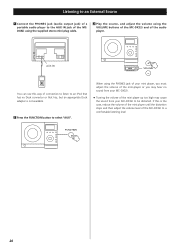
... appropriate Dock adapter is the case, reduce the volume of the mini player until the distortion stops and then adjust the volume level of the MC-DX32i to the AUX IN jack of the MCDX32i using the supplied stereo mini plug cable. 3 Play the source, and adjust the volume using the PHONES... volume of the mini player up too high may hear no Dock connector or that has no sound from your MC-DX32i to select "AUX". When using the VOLUME buttons of the MC-DX32i and of the audio player. Listening to an External Source 1 Connect the PHONES jack (audio output jack) of a portable audio...
... appropriate Dock adapter is the case, reduce the volume of the mini player until the distortion stops and then adjust the volume level of the MC-DX32i to the AUX IN jack of the MCDX32i using the supplied stereo mini plug cable. 3 Play the source, and adjust the volume using the PHONES... volume of the mini player up too high may hear no Dock connector or that has no sound from your MC-DX32i to select "AUX". When using the VOLUME buttons of the MC-DX32i and of the audio player. Listening to an External Source 1 Connect the PHONES jack (audio output jack) of a portable audio...
MC-DX32i Manual
Page 21
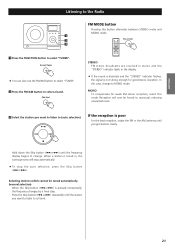
MONO To compensate for good stereo reception. Reception will stop automatically. < To stop the auto selection, press the Skip button (.or/). When a station is not strong enough for weak FM stereo reception, select this case, change . Hold down the Skip button (.or/) until the frequency display begins to select a band. STEREO FM stereo broadcasts are received in stereo and the "STEREO" indicator lights in the display. < If the sound is distorted and the "STEREO" indicator flashes, the signal is tuned in, the tuning process will now be tuned automatically (manual selection) When the ...
MONO To compensate for good stereo reception. Reception will stop automatically. < To stop the auto selection, press the Skip button (.or/). When a station is not strong enough for weak FM stereo reception, select this case, change . Hold down the Skip button (.or/) until the frequency display begins to select a band. STEREO FM stereo broadcasts are received in stereo and the "STEREO" indicator lights in the display. < If the sound is distorted and the "STEREO" indicator flashes, the signal is tuned in, the tuning process will now be tuned automatically (manual selection) When the ...