DP-24 V1.02 Release Notes
Page 1
... TASCAM DP-24 1 Turn the unit's power ON. 2. Maintenance items V1.02 changes •• Some WAV format files were not recognized. This has been fixed. •• Values shown in or out. This has been fixed. •• On the MIXER screen, more effects could become unstable after recording a 24- The stability of your DP-24 before conducting a firmware update. 1. bit, 44.1kHz song using...
... TASCAM DP-24 1 Turn the unit's power ON. 2. Maintenance items V1.02 changes •• Some WAV format files were not recognized. This has been fixed. •• Values shown in or out. This has been fixed. •• On the MIXER screen, more effects could become unstable after recording a 24- The stability of your DP-24 before conducting a firmware update. 1. bit, 44.1kHz song using...

DP-24 Tested Media List
Page 1
Over time, these specific cards may become unavailable. At that is currently available which remains within the maximum capacity limit. TASCAM DP-24 Tested media List SD/SDHC Card Manufacturer SanDisk Panasonic Lexar Model Parts# Extreme Pro SHHC UHSI-I SDSDXP1-032G-J95 Extreme SDHC UHS-I (Class10) SDHC UHS-ⅠSDU SDHC UHIS-Ⅰ...OK OK OK OK OK OK OK OK OK OK OK OK OK Notice: The above cards were tested successfully with the most similar specifications that time, it would be best to contact the CF/SD card manufacturer directly and have them suggest the model with this...
Over time, these specific cards may become unavailable. At that is currently available which remains within the maximum capacity limit. TASCAM DP-24 Tested media List SD/SDHC Card Manufacturer SanDisk Panasonic Lexar Model Parts# Extreme Pro SHHC UHSI-I SDSDXP1-032G-J95 Extreme SDHC UHS-I (Class10) SDHC UHS-ⅠSDU SDHC UHIS-Ⅰ...OK OK OK OK OK OK OK OK OK OK OK OK OK Notice: The above cards were tested successfully with the most similar specifications that time, it would be best to contact the CF/SD card manufacturer directly and have them suggest the model with this...
DP-24 Owner's Manual
Page 5
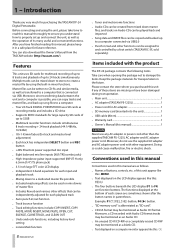
... CD-RW discs 10 2 - Basic Recording 44 Selecting the input sources 44 Assigning inputs 44 Assigning to a mono track 44 Assigning to a stereo track 44 Assigning to a stereo bus 44 Checking the assignment 45 Canceling an assignment 45 Using phantom power 45 Monitoring 45 Monitor selection 45 OL indicators and level meters 46 Setting the Mixer screen 46 Using EQ (equalizer 46 DIGITAL TRIM setting (Track only 47 Built-in Send Effects and External Effects..........47 Setting built-in this manual 8 Intellectual property rights 9 Precautions...
... CD-RW discs 10 2 - Basic Recording 44 Selecting the input sources 44 Assigning inputs 44 Assigning to a mono track 44 Assigning to a stereo track 44 Assigning to a stereo bus 44 Checking the assignment 45 Canceling an assignment 45 Using phantom power 45 Monitoring 45 Monitor selection 45 OL indicators and level meters 46 Setting the Mixer screen 46 Using EQ (equalizer 46 DIGITAL TRIM setting (Track only 47 Built-in Send Effects and External Effects..........47 Setting built-in this manual 8 Intellectual property rights 9 Precautions...
DP-24 Owner's Manual
Page 7
... of the send effects 102 Preset libraries of the guitar effects 102 MIDI Implementation Chart 103 Bit-map array of Contents 11 - Troubleshooting 92 16 - Table of MMC commands 104 7 TASCAM DP-24 SD Card Management 78 Quick formatting an SD card 78 Full formatting an SD card 79 13 - Various Other Functions 74 Metronome 74 MIDI Sync 74 MIDI remote control 75 Tuner function 75 Setup (PREFERENCE 76 Auto Monitor 76...
... of the send effects 102 Preset libraries of the guitar effects 102 MIDI Implementation Chart 103 Bit-map array of Contents 11 - Troubleshooting 92 16 - Table of MMC commands 104 7 TASCAM DP-24 SD Card Management 78 Quick formatting an SD card 78 Full formatting an SD card 79 13 - Various Other Functions 74 Metronome 74 MIDI Sync 74 MIDI remote control 75 Tuner function 75 Setup (PREFERENCE 76 Auto Monitor 76...
DP-24 Owner's Manual
Page 8
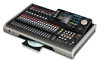
...; Your 24-Track DIGITAL PORTASTUDIO uses SD cards as a blank CD. •• Text displayed on mix downs of up to 32GB •• Multitrack recorder functions include simultaneous 8 track recording + 24 track playback (44.1/48kHz, 16/24bit) •• 18+1 45mm faders (for track and master level adjustment) •• Each track has independent SELECT button and REC button •• +48V Phantom power supported mic input •• Eight balanced mic/line inputs (XLR/TRS combo jacks) •...
...; Your 24-Track DIGITAL PORTASTUDIO uses SD cards as a blank CD. •• Text displayed on mix downs of up to 32GB •• Multitrack recorder functions include simultaneous 8 track recording + 24 track playback (44.1/48kHz, 16/24bit) •• 18+1 45mm faders (for track and master level adjustment) •• Each track has independent SELECT button and REC button •• +48V Phantom power supported mic input •• Eight balanced mic/line inputs (XLR/TRS combo jacks) •...
DP-24 Owner's Manual
Page 14
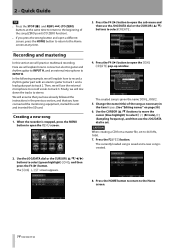
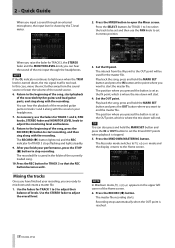
... SONG LIST screen appears. 8. Then, we will assume that you have connected the monitoring equipment, started the unit and inserted the SD card. Quick Guide TIP •• Press the STOP (8) and REW (m) (TO ZERO) buttons at any time. Press the F4 (t) button to open a different screen, press the HOME button to return to track 3. Change the name (title) of the song (ZERO point) (TO ZERO function...
... SONG LIST screen appears. 8. Then, we will assume that you have connected the monitoring equipment, started the unit and inserted the SD card. Quick Guide TIP •• Press the STOP (8) and REW (m) (TO ZERO) buttons at any time. Press the F4 (t) button to open a different screen, press the HOME button to return to track 3. Change the name (title) of the song (ZERO point) (TO ZERO function...
DP-24 Owner's Manual
Page 15
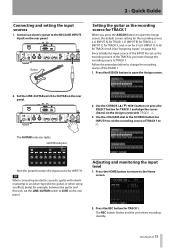
... TRACK 1 to LINE on the rear panel. Set the LINE-GUITAR switch to the MIC/LINE INPUTS H jack on the rear panel. GUITAR indicator Now the guitar becomes the input source for TRACK 1. The REC button flashes and the unit enters recording standby. 15 TASCAM DP-24 2 - Use the JOG/DATA dial or the SOURCE button for TRACK 1 When you press the ASSIGN button to open the Assign screen. 2. TIP When connecting an electric-acoustic guitar with TRACK 1. 3. Adjusting and monitoring the input level...
... TRACK 1 to LINE on the rear panel. Set the LINE-GUITAR switch to the MIC/LINE INPUTS H jack on the rear panel. GUITAR indicator Now the guitar becomes the input source for TRACK 1. The REC button flashes and the unit enters recording standby. 15 TASCAM DP-24 2 - Use the JOG/DATA dial or the SOURCE button for TRACK 1 When you press the ASSIGN button to open the Assign screen. 2. TIP When connecting an electric-acoustic guitar with TRACK 1. 3. Adjusting and monitoring the input level...
DP-24 Owner's Manual
Page 16
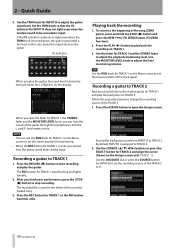
... of the TRACK 2 to change the recording source of the currently loaded song. 3. Set the TRIM knob so that is input. Press the PLAY (7) button to be recorded is being input. Playing back the recording 1. Press the ASSIGN button to adjust the guitar input level. 2 - Use the TRIM knob for TRACK 1, the STEREO fader and the MONITOR LEVEL knob, you raise the fader for INPUT H to open the Assign screen. In this case, lower the output level on TRACK 2.
... of the TRACK 2 to change the recording source of the currently loaded song. 3. Set the TRIM knob so that is input. Press the PLAY (7) button to be recorded is being input. Playing back the recording 1. Press the ASSIGN button to adjust the guitar input level. 2 - Use the TRIM knob for TRACK 1, the STEREO fader and the MONITOR LEVEL knob, you raise the fader for INPUT H to open the Assign screen. In this case, lower the output level on TRACK 2.
DP-24 Owner's Manual
Page 18
... master file. The interval from the sound source or lower the volume of the song, start . 4. The position where you finish your headphones. 7. Play back the song, press and hold the MARK SET button and press the IN or OUT button to adjust the overall level. 3. The Recorder mode switches to Mixdown mode and the display returns to the Home screen. NOTE In Mixdown mode, Mixdown appears on tracks...
... master file. The interval from the sound source or lower the volume of the song, start . 4. The position where you finish your headphones. 7. Play back the song, press and hold the MARK SET button and press the IN or OUT button to adjust the overall level. 3. The Recorder mode switches to Mixdown mode and the display returns to the Home screen. NOTE In Mixdown mode, Mixdown appears on tracks...
DP-24 Owner's Manual
Page 24
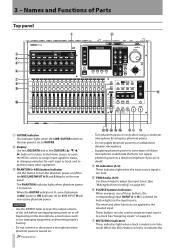
... Solo mode. The mixer and other operations. 3 PHANTOM (+48V) button/indicator Use this button to adjust the input levels. (See "Making the first recording" on . These buttons are applied to change parameters for the MIC/LINE INPUT A-D and E-H jacks on /off . When the GUITAR indicator is lit, even if phantom (+48V) power is muted or in doubt. 4 OL indicators (A-H) These indicators light when the input source signal is set to GUITAR. 2 Display Use the JOG/DATA dial...
... Solo mode. The mixer and other operations. 3 PHANTOM (+48V) button/indicator Use this button to adjust the input levels. (See "Making the first recording" on . These buttons are applied to change parameters for the MIC/LINE INPUT A-D and E-H jacks on /off . When the GUITAR indicator is lit, even if phantom (+48V) power is muted or in doubt. 4 OL indicators (A-H) These indicators light when the input source signal is set to GUITAR. 2 Display Use the JOG/DATA dial...

DP-24 Owner's Manual
Page 30
... change from time line display to display the set IN or OUT point. Multi Track Multi Track mode Bounce Bounce mode Mixdown Mixdown mode Mastering Mastering mode The following items are also displayed: Rehearsal, Auto Punch and Search. 7 INPUT A to H overload indicators If the input signal of the Home screen, press the F1 (TIMELINE) button to change from level meter display to open the SONG SAVE (Saving a song) pop-up window. Names and Functions of Parts Home screen w TIMELINE/METER display...
... change from time line display to display the set IN or OUT point. Multi Track Multi Track mode Bounce Bounce mode Mixdown Mixdown mode Mastering Mastering mode The following items are also displayed: Rehearsal, Auto Punch and Search. 7 INPUT A to H overload indicators If the input signal of the Home screen, press the F1 (TIMELINE) button to change from level meter display to open the SONG SAVE (Saving a song) pop-up window. Names and Functions of Parts Home screen w TIMELINE/METER display...

DP-24 Owner's Manual
Page 37
... any sound, minimize the output volume using an unbalanced connection when phantom power is ON. 4 - Follow the procedure below to LINE. 37 TASCAM DP-24 Doing so could cause a loud noise and damage the equipment. •• Before turning the phantom power on or off, turn down the output volume using an effects pedal, for example, between the guitar and this unit, set in the LINE-GUITAR switch on the microphone, a loud noise could...
... any sound, minimize the output volume using an unbalanced connection when phantom power is ON. 4 - Follow the procedure below to LINE. 37 TASCAM DP-24 Doing so could cause a loud noise and damage the equipment. •• Before turning the phantom power on or off, turn down the output volume using an effects pedal, for example, between the guitar and this unit, set in the LINE-GUITAR switch on the microphone, a loud noise could...

DP-24 Owner's Manual
Page 45
... assignment settings. The next time you to monitor the sound of ribbon microphones could cause a loud noise and damage the equipment. •• Turn phantom power on . Doing so could cause a malfunction. •• Supplying phantom power to H) is displayed, pressing the F1 (DEFAULT) button restores the initial settings. EFFECT SEND 2 Select this to monitor the mono signal of the recording and mastering process. STEREO (default) Select this to monitor the stereo signal of each track on the Assign screen...
... assignment settings. The next time you to monitor the sound of ribbon microphones could cause a loud noise and damage the equipment. •• Turn phantom power on . Doing so could cause a malfunction. •• Supplying phantom power to H) is displayed, pressing the F1 (DEFAULT) button restores the initial settings. EFFECT SEND 2 Select this to monitor the mono signal of the recording and mastering process. STEREO (default) Select this to monitor the stereo signal of each track on the Assign screen...

DP-24 Owner's Manual
Page 46
... adjust the level. ªª Track level meters (1 to turn the equalizer on the input source. REC button Unlit Flashing (recording standby) Flashing (recording standby) Transport status Level meter display contents Playback Playback Track playback signal Track playback signal (Auto Monitor ON) Track input signal + playback signal (Auto Monitor OFF) Stopped Track input signal 46 TASCAM DP-24 2. Use the TRIM knobs of INPUT A to H or the output volume controls of this unit. Setting the Mixer screen To change the levels with the STEREO fader. Press the MIXER button...
... adjust the level. ªª Track level meters (1 to turn the equalizer on the input source. REC button Unlit Flashing (recording standby) Flashing (recording standby) Transport status Level meter display contents Playback Playback Track playback signal Track playback signal (Auto Monitor ON) Track input signal + playback signal (Auto Monitor OFF) Stopped Track input signal 46 TASCAM DP-24 2. Use the TRIM knobs of INPUT A to H or the output volume controls of this unit. Setting the Mixer screen To change the levels with the STEREO fader. Press the MIXER button...

DP-24 Owner's Manual
Page 49
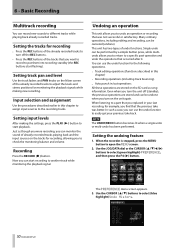
... input is not set the stereo position of each track and the track faders control the recorded track's playback output signal or the monitoring sound of the TRIM knob. In Rehearsal mode, Rehearsal appears on the upper left corner of the track that has an input source assigned to adjust the input level. The REC button of the Home screen. 4. Press the REHEARSE button to adjust the playback level. Press the RECORD (0) button. The recording starts, the RECORD (0) button and the PLAY (7) button...
... input is not set the stereo position of each track and the track faders control the recorded track's playback output signal or the monitoring sound of the TRIM knob. In Rehearsal mode, Rehearsal appears on the upper left corner of the track that has an input source assigned to adjust the input level. The REC button of the Home screen. 4. Press the REHEARSE button to adjust the playback level. Press the RECORD (0) button. The recording starts, the RECORD (0) button and the PLAY (7) button...
DP-24 Owner's Manual
Page 50
... recorded tracks to turn on the Mixer screen of already recorded tracks playing back and the input sources on the SD card as though you were recording, you to check the monitoring balance and volume. Recording Press the RECORD (0) button. You can use the undo function to put them into recording standby (the REC buttons start flashing). NOTE The UNDO/REDO button becomes lit when a single undo or multi-undo has been performed. Setting input levels...
... recorded tracks to turn on the Mixer screen of already recorded tracks playing back and the input sources on the SD card as though you were recording, you to check the monitoring balance and volume. Recording Press the RECORD (0) button. You can use the undo function to put them into recording standby (the REC buttons start flashing). NOTE The UNDO/REDO button becomes lit when a single undo or multi-undo has been performed. Setting input levels...
DP-24 Owner's Manual
Page 65
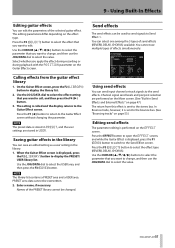
... the user settings are performed on the Mixer screen. (See "Built-in the library. 1. Use the JOG/DATA dial to select the effect type (REVERB, DELAY, CHORUS). Names of send effects (REVERB, DELAY, CHORUS) available. You can select one among the 3 types of the PRESET library cannot be changed. Channel signal send levels and pre/post selection are stored in the library You can send input channel or track signals to edit. Use the CURSOR (5/b/g/t) buttons...
... the user settings are performed on the Mixer screen. (See "Built-in the library. 1. Use the JOG/DATA dial to select the effect type (REVERB, DELAY, CHORUS). Names of send effects (REVERB, DELAY, CHORUS) available. You can select one among the 3 types of the PRESET library cannot be changed. Channel signal send levels and pre/post selection are stored in the library You can send input channel or track signals to edit. Use the CURSOR (5/b/g/t) buttons...

DP-24 Owner's Manual
Page 68
... can mix down tracks is the process of adjusting the volumes and stereo positions of the tracks. The lit SELECT button indicates a track with a group set . In this case, if the master fader is reset to adjust the relative balance of each track to control. 3. Stereo position (panning) Use the PAN knobs on the Mixer screen (TRACK 1 to set light during operation. 68 TASCAM DP-24 ªª Releasing a group 1. CAUTION After canceling the group setting, the positions of tracks with a group set...
... can mix down tracks is the process of adjusting the volumes and stereo positions of the tracks. The lit SELECT button indicates a track with a group set . In this case, if the master fader is reset to adjust the relative balance of each track to control. 3. Stereo position (panning) Use the PAN knobs on the Mixer screen (TRACK 1 to set light during operation. 68 TASCAM DP-24 ªª Releasing a group 1. CAUTION After canceling the group setting, the positions of tracks with a group set...

DP-24 Owner's Manual
Page 69
... internal use). 10 - Mixing Down and Mastering Tracks Use the HIGH, MID, and LOW GAIN knobs to open the Effect screen where the last operation was performed. Press the SOURCE buttons of the signal sent to the Home screen. 4. After making the send effect setting, press the HOME button to return to the effect from the send effect (RETURN LEVEL) can record the mixed down master file. Adjust the level of INPUT A to H to set the INPUT EQ (equalizer). (See "Using...
... internal use). 10 - Mixing Down and Mastering Tracks Use the HIGH, MID, and LOW GAIN knobs to open the Effect screen where the last operation was performed. Press the SOURCE buttons of the signal sent to the Home screen. 4. After making the send effect setting, press the HOME button to return to the effect from the send effect (RETURN LEVEL) can record the mixed down master file. Adjust the level of INPUT A to H to set the INPUT EQ (equalizer). (See "Using...

DP-24 Owner's Manual
Page 75
... control an external MIDI sequencer or another DP-24 unit. ªª MMC Device ID Set the MMC device ID. When the pitch played matches the note shown, the center " ", "t" and "g" lights green. 75 TASCAM DP-24 Tuning cannot be remotely controlled by the MIDI OUT jack, and it is from 1 to G jacks. 2. MASTER: This unit functions as the MMC slave. A bar appears on instruments connected to the MIC/LINE INPUTS...
... control an external MIDI sequencer or another DP-24 unit. ªª MMC Device ID Set the MMC device ID. When the pitch played matches the note shown, the center " ", "t" and "g" lights green. 75 TASCAM DP-24 Tuning cannot be remotely controlled by the MIDI OUT jack, and it is from 1 to G jacks. 2. MASTER: This unit functions as the MMC slave. A bar appears on instruments connected to the MIC/LINE INPUTS...


