DP-008 version 1.01 release notes
Page 1
... program has been set so that you have sufficient charge or power the unit using a TASCAM PS-P520 AC adaptor (sold separately). Also, the screen shows the firmware copied at the beginning of your DP-008 before conducting a firmware update. 1 Turn the unit's power ON. 2 When the Home...to connect it with "._" added to the beginning of the firmware name is also shown. D01155100A TASCAM DP-008 1 CAUTION •• If this unit's UTILITY folder from the TASCAM web site (http://tascam.com/). This unit will not be sure that you planned to update to, then there is insufficient...
... program has been set so that you have sufficient charge or power the unit using a TASCAM PS-P520 AC adaptor (sold separately). Also, the screen shows the firmware copied at the beginning of your DP-008 before conducting a firmware update. 1 Turn the unit's power ON. 2 When the Home...to connect it with "._" added to the beginning of the firmware name is also shown. D01155100A TASCAM DP-008 1 CAUTION •• If this unit's UTILITY folder from the TASCAM web site (http://tascam.com/). This unit will not be sure that you planned to update to, then there is insufficient...

DP-008 version 1.01 release notes
Page 2
DP-008 Release Notes 6 Use the F1 (§) and F2 (¶) keys to select the firmware and press the F4 (NEXT) key to check that the System ... OFF automatically. The actual display differs. 7 Press the F3 (YES) key to a computer with USB and delete the firmware update from the unit's UTILITY folder. 2 TASCAM DP-008 Turn the power ON again. 9 Follow the "Confirmation of firmware version" instructions above to open the following screen. This completes the procedure for updating this...
DP-008 Release Notes 6 Use the F1 (§) and F2 (¶) keys to select the firmware and press the F4 (NEXT) key to check that the System ... OFF automatically. The actual display differs. 7 Press the F3 (YES) key to a computer with USB and delete the firmware update from the unit's UTILITY folder. 2 TASCAM DP-008 Turn the power ON again. 9 Follow the "Confirmation of firmware version" instructions above to open the following screen. This completes the procedure for updating this...
DP-008 Owner's Manual
Page 2
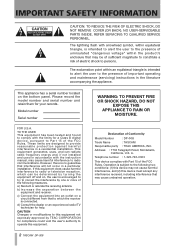
...operate this device must accept any interference recieved, including interference that may not cause harmful interference, and (2) this equipment. 2 TASCAM DP-008 WARNING: TO PREVENT FIRE OR SHOCK HAZARD, DO NOT EXPOSE THIS APPLIANCE TO RAIN OR MOISTURE. However, there is intended to... the following two conditions: (1) this device may be determined by TEAC CORPORATION for a Class B digital device, pursuant to the presence of Conformity Model Number : DP-008 Trade Name : TASCAM Responsible party : TEAC AMERICA, INC. IMPORTANT SAFETY INFORMATION CAUTION: TO REDUCE THE RISK ...
...operate this device must accept any interference recieved, including interference that may not cause harmful interference, and (2) this equipment. 2 TASCAM DP-008 WARNING: TO PREVENT FIRE OR SHOCK HAZARD, DO NOT EXPOSE THIS APPLIANCE TO RAIN OR MOISTURE. However, there is intended to... the following two conditions: (1) this device may be determined by TEAC CORPORATION for a Class B digital device, pursuant to the presence of Conformity Model Number : DP-008 Trade Name : TASCAM Responsible party : TEAC AMERICA, INC. IMPORTANT SAFETY INFORMATION CAUTION: TO REDUCE THE RISK ...
DP-008 Owner's Manual
Page 3
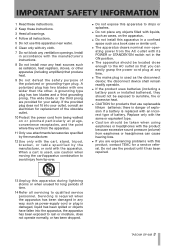
A polarized plug has two blades with this product, contact TEAC for a service referral. The wide blade or the third prong are experiencing problems with one wider than the other apparatus (including amplifiers)...a third grounding prong. IMPORTANT SAFETY INFORMATION 1 Read these instructions. 2 Keep these instructions. 3 Heed all warnings. 4 Follow all servicing to qualified service personnel. TASCAM DP-008 3 the disconnect device shall remain readily operable. •• If the product uses batteries (including a battery pack or installed batteries), they exit from tip-over...
A polarized plug has two blades with this product, contact TEAC for a service referral. The wide blade or the third prong are experiencing problems with one wider than the other apparatus (including amplifiers)...a third grounding prong. IMPORTANT SAFETY INFORMATION 1 Read these instructions. 2 Keep these instructions. 3 Heed all warnings. 4 Follow all servicing to qualified service personnel. TASCAM DP-008 3 the disconnect device shall remain readily operable. •• If the product uses batteries (including a battery pack or installed batteries), they exit from tip-over...

DP-008 Owner's Manual
Page 4
..., injury or stains around them . •• When throwing used batteries away, follow the disposal instructions indicated on the battery case before inserting new batteries. 4 TASCAM DP-008
..., injury or stains around them . •• When throwing used batteries away, follow the disposal instructions indicated on the battery case before inserting new batteries. 4 TASCAM DP-008

DP-008 Owner's Manual
Page 5
... 39 Protecting songs 40 6 - Recorder Functions 52 Punching in /out .52 Setting the foot switch polarity .......... 52 Bouncing tracks 53 Using the bounce function 53 TASCAM DP-008 5 Introduction 7 Overview of this unit 7 About this manual 7 Manual conventions 7 Product parts 7 Intellectual property rights 8 About SD cards 8 Precautions for use 8 Cautions on TRACK 3 18...
... 39 Protecting songs 40 6 - Recorder Functions 52 Punching in /out .52 Setting the foot switch polarity .......... 52 Bouncing tracks 53 Using the bounce function 53 TASCAM DP-008 5 Introduction 7 Overview of this unit 7 About this manual 7 Manual conventions 7 Product parts 7 Intellectual property rights 8 About SD cards 8 Precautions for use 8 Cautions on TRACK 3 18...
DP-008 Owner's Manual
Page 6
... Computer requirements 82 Backup memory 82 Dimensions 83 Block diagram 83 15 - Exchanging Data with a Computer 71 Supported operating systems 71 Connecting with a computer 71 6 TASCAM DP-008 Disconnecting 72 Song backup and restoration 73 Backing-up songs 73 Restoring songs 74 Track import and export 74 Importing tracks 75 Exporting tracks 76...
... Computer requirements 82 Backup memory 82 Dimensions 83 Block diagram 83 15 - Exchanging Data with a Computer 71 Supported operating systems 71 Connecting with a computer 71 6 TASCAM DP-008 Disconnecting 72 Song backup and restoration 73 Backing-up songs 73 Restoring songs 74 Track import and export 74 Importing tracks 75 Exporting tracks 76...

DP-008 Owner's Manual
Page 7
...items. Keep the package materials for transportation in the future. This manual cannot begin to be transferred to a computer connected by USB. TASCAM DP-008 7 After you can record two tracks simultaneously and work with great sound in a multitrack project. You can then be transferred to a.... Chapters 12 and 13 provide troubleshooting information and a list of TASCAM's 8-Track Digital Pocketstudio, the DP-008. 1 - Overview of the keys, knobs, connectors and other things you understand how to properly set up to DP-008 features such as keys and connections, we display them like this...
...items. Keep the package materials for transportation in the future. This manual cannot begin to be transferred to a computer connected by USB. TASCAM DP-008 7 After you can record two tracks simultaneously and work with great sound in a multitrack project. You can then be transferred to a.... Chapters 12 and 13 provide troubleshooting information and a list of TASCAM's 8-Track Digital Pocketstudio, the DP-008. 1 - Overview of the keys, knobs, connectors and other things you understand how to properly set up to DP-008 features such as keys and connections, we display them like this...
DP-008 Owner's Manual
Page 8
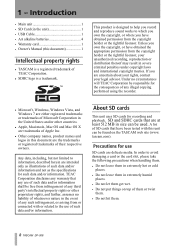
... of them or twist them. •• Do not hit them. 8 TASCAM DP-008 A list of SD cards that are at least 512 MB in this document 1 Intellectual property rights •• TASCAM is a registered trademark of Apple Inc. •• Other company names, ...Cable 1 •• AA alkaline batteries 4 •• Warranty card 1 •• Owner's Manual (this document are delicate media. TEAC Corporation disclaims any warranty that any such infringement, or arising from the copyright holder or the rightful licensor, your legal advisor. This product is a...
... of them or twist them. •• Do not hit them. 8 TASCAM DP-008 A list of SD cards that are at least 512 MB in this document 1 Intellectual property rights •• TASCAM is a registered trademark of Apple Inc. •• Other company names, ...Cable 1 •• AA alkaline batteries 4 •• Warranty card 1 •• Owner's Manual (this document are delicate media. TEAC Corporation disclaims any warranty that any such infringement, or arising from the copyright holder or the rightful licensor, your legal advisor. This product is a...

DP-008 Owner's Manual
Page 9
... could condense on the internal mechanism, making correct operation impossible. Cautions on installation •• The unit's nominal operating temperature is a danger of condensation; Introduction TASCAM DP-008 9 Cleaning the unit To clean the unit, wipe gently with bad ventilation or high humidity Beware of condensation If the unit is moved from a cold...
... could condense on the internal mechanism, making correct operation impossible. Cautions on installation •• The unit's nominal operating temperature is a danger of condensation; Introduction TASCAM DP-008 9 Cleaning the unit To clean the unit, wipe gently with bad ventilation or high humidity Beware of condensation If the unit is moved from a cold...

DP-008 Owner's Manual
Page 10
... cover after installing the batteries. 5 Connect headphones to insert an SD card here. This unit can use alkaline or NiMH batteries. [Start-Up Screen] 10 TASCAM DP-008 [Home Screen] CAUTION • Do not remove or insert the SD card when the unit's power is OFF before you remove Headphones 5 Press and hold... the STANDBY/ON key on the top panel until TASCAM appears on the included SD card. The SD card with the demo song is shipped already installed but we will start by explaining how to...
... cover after installing the batteries. 5 Connect headphones to insert an SD card here. This unit can use alkaline or NiMH batteries. [Start-Up Screen] 10 TASCAM DP-008 [Home Screen] CAUTION • Do not remove or insert the SD card when the unit's power is OFF before you remove Headphones 5 Press and hold... the STANDBY/ON key on the top panel until TASCAM appears on the included SD card. The SD card with the demo song is shipped already installed but we will start by explaining how to...

DP-008 Owner's Manual
Page 11
... power ON, completely turn down properly and all unsaved data and settings will be powered by connecting an amplifier or powered speakers to the unit. TASCAM DP-008 11 If you remove or insert the SD card when the unit's power is stored on , the unit cannot shut down the volume of songs...
... power ON, completely turn down properly and all unsaved data and settings will be powered by connecting an amplifier or powered speakers to the unit. TASCAM DP-008 11 If you remove or insert the SD card when the unit's power is stored on , the unit cannot shut down the volume of songs...

DP-008 Owner's Manual
Page 12
... standard position is around 2-3 o'clock. Use the LEVEL knobs to select DEMO_008, and press the F2 (EXEC) key. The MASTER LEVEL knob adjusts the 12 TASCAM DP-008 TIP • Press the stop (ª) key and the Ô key at the same time. volume of all eight tracks at the same time to...
... standard position is around 2-3 o'clock. Use the LEVEL knobs to select DEMO_008, and press the F2 (EXEC) key. The MASTER LEVEL knob adjusts the 12 TASCAM DP-008 TIP • Press the stop (ª) key and the Ô key at the same time. volume of all eight tracks at the same time to...

DP-008 Owner's Manual
Page 13
... built-in mic to the Home Screen. Quick Start Guides From recording to record a rhythm guitar part on track 1 and a lead guitar part on track 3. TASCAM DP-008 13 In the following example, we will use an electric guitar to creating a master track Here, we will mix the tracks down. Finally, we assume...
... built-in mic to the Home Screen. Quick Start Guides From recording to record a rhythm guitar part on track 1 and a lead guitar part on track 3. TASCAM DP-008 13 In the following example, we will use an electric guitar to creating a master track Here, we will mix the tracks down. Finally, we assume...
DP-008 Owner's Manual
Page 14
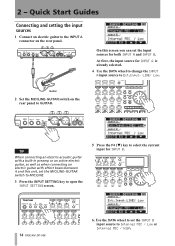
..., as well as when connecting an electric guitar with effect boxes between it and this screen you can set the input sources for INPUT B. 14 TASCAM DP-008 6. Quick Start Guides Connecting and setting the input sources 1 Connect an electric guitar to select the current input for both INPUT A and INPUT B. On this...
..., as well as when connecting an electric guitar with effect boxes between it and this screen you can set the input sources for INPUT B. 14 TASCAM DP-008 6. Quick Start Guides Connecting and setting the input sources 1 Connect an electric guitar to select the current input for both INPUT A and INPUT B. On this...
DP-008 Owner's Manual
Page 15
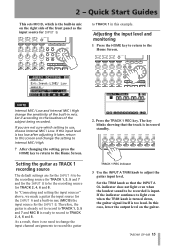
... to record to TRACK 1, 3, 5 and 7 and MIC B is input. Press the TRACK 1 REC key. Set the TRIM knob so that the track is too loud. TASCAM DP-008 15 In "Connecting and setting the input sources" above, we made a guitar the input source for the INPUT A and a built-in mic (MIC B) the input...
... to record to TRACK 1, 3, 5 and 7 and MIC B is input. Press the TRACK 1 REC key. Set the TRIM knob so that the track is too loud. TASCAM DP-008 15 In "Connecting and setting the input sources" above, we made a guitar the input source for the INPUT A and a built-in mic (MIC B) the input...

DP-008 Owner's Manual
Page 16
... blinking and stays lit constantly. Turn up the TRACK 1 LEVEL and MASTER LEVEL knobs and the VOLUME dial to adjust the final monitoring volume. 16 TASCAM DP-008 When doing so, the L and R meters on the right side of the TRACK 1 that it is assigned to adjust the stereo position of the signal...
... blinking and stays lit constantly. Turn up the TRACK 1 LEVEL and MASTER LEVEL knobs and the VOLUME dial to adjust the final monitoring volume. 16 TASCAM DP-008 When doing so, the L and R meters on the right side of the TRACK 1 that it is assigned to adjust the stereo position of the signal...

DP-008 Owner's Manual
Page 17
... shown by the A (INPUT A) and 2 (TRACK 2) meters on TRACK 1. The key blinks showing that the track is assigned as the recording source for each track. TASCAM DP-008 17 2 - Record guitar to TRACK 2 Now, you play the guitar, the input level is to A. TIP Use the TRACK 1 PAN knob to set the TRACK...
... shown by the A (INPUT A) and 2 (TRACK 2) meters on TRACK 1. The key blinks showing that the track is assigned as the recording source for each track. TASCAM DP-008 17 2 - Record guitar to TRACK 2 Now, you play the guitar, the input level is to A. TIP Use the TRACK 1 PAN knob to set the TRACK...

DP-008 Owner's Manual
Page 18
... 2 REC indicator 5 Return to the beginning of the song again and press the playback (Á) key while pressing and holding the record (-) key to B. 18 TASCAM DP-008
... 2 REC indicator 5 Return to the beginning of the song again and press the playback (Á) key while pressing and holding the record (-) key to B. 18 TASCAM DP-008

DP-008 Owner's Manual
Page 19
... 3 REC key. TRACK 3 REC indicator 5 Use the INPUT B TRIM knob to the Home Screen. The input level of built-in record standby. 2 - In this case, TASCAM DP-008 19 OL indicator 3 Press the HOME key to return to adjust the mic input level. Quick Start Guides recorded is shown by the B meter on...
... 3 REC key. TRACK 3 REC indicator 5 Use the INPUT B TRIM knob to the Home Screen. The input level of built-in record standby. 2 - In this case, TASCAM DP-008 19 OL indicator 3 Press the HOME key to return to adjust the mic input level. Quick Start Guides recorded is shown by the B meter on...

