DP-008 version 1.01 release notes
Page 1
... without the "._" at Step 3 above. NOTE •• This screen shows a list of the firmware update files inside the UTILITY folder of the name. The actual display differs. DP-008 Release Notes Updates Always use the included USB cable to connect it . This has been fixed. The program has been set so that the batteries have downloaded is also shown. This unit will not be sure that...
... without the "._" at Step 3 above. NOTE •• This screen shows a list of the firmware update files inside the UTILITY folder of the name. The actual display differs. DP-008 Release Notes Updates Always use the included USB cable to connect it . This has been fixed. The program has been set so that the batteries have downloaded is also shown. This unit will not be sure that...
DP-008 Owner's Manual
Page 2
... USER-SERVICEABLE PARTS INSIDE. REFER SERVICING TO QUALIFIED SERVICE PERSONNEL. TO THE USER This equipment has been tested and found to the presence of important operating and maintenance (servicing) instructions in a residential installation. If this equipment not expressly approved by turning the equipment off and on the bottom panel. d) Consult the dealer or an experienced radio/TV technician for your records. CAUTION Changes or...
... USER-SERVICEABLE PARTS INSIDE. REFER SERVICING TO QUALIFIED SERVICE PERSONNEL. TO THE USER This equipment has been tested and found to the presence of important operating and maintenance (servicing) instructions in a residential installation. If this equipment not expressly approved by turning the equipment off and on the bottom panel. d) Consult the dealer or an experienced radio/TV technician for your records. CAUTION Changes or...

DP-008 Owner's Manual
Page 5
... this unit 7 About this manual 7 Manual conventions 7 Product parts 7 Intellectual property rights 8 About SD cards 8 Precautions for use 8 Cautions on TRACK 3 18 Mixing the tracks 20 Mastering the mix 20 Shutting down 32 Formatting SD cards 33 Recorder modes 33 Connecting with other equipment 34 Table of Contents Rear panel connections 34 Right side panel connections 34 Adjusting the contrast 34 Setting the backlight 35 5 - Quick Start Guides 10 Playback and mixing 10 Preparing to listen...
... this unit 7 About this manual 7 Manual conventions 7 Product parts 7 Intellectual property rights 8 About SD cards 8 Precautions for use 8 Cautions on TRACK 3 18 Mixing the tracks 20 Mastering the mix 20 Shutting down 32 Formatting SD cards 33 Recorder modes 33 Connecting with other equipment 34 Table of Contents Rear panel connections 34 Right side panel connections 34 Adjusting the contrast 34 Setting the backlight 35 5 - Quick Start Guides 10 Playback and mixing 10 Preparing to listen...
DP-008 Owner's Manual
Page 6
... Rehearsal 56 Using auto punch in/out to record ...... 57 8 - Troubleshooting 78 13 - Exchanging Data with a Computer 71 Supported operating systems 71 Connecting with a computer 71 6 TASCAM DP-008 Disconnecting 72 Song backup and restoration 73 Backing-up songs 73 Restoring songs 74 Track import and export 74 Importing tracks 75 Exporting tracks 76 Exporting a stereo master track 77 12 - Table of partitions 68 Formatting cards and setting partition...
... Rehearsal 56 Using auto punch in/out to record ...... 57 8 - Troubleshooting 78 13 - Exchanging Data with a Computer 71 Supported operating systems 71 Connecting with a computer 71 6 TASCAM DP-008 Disconnecting 72 Song backup and restoration 73 Backing-up songs 73 Restoring songs 74 Track import and export 74 Importing tracks 75 Exporting tracks 76 Exporting a stereo master track 77 12 - Table of partitions 68 Formatting cards and setting partition...

DP-008 Owner's Manual
Page 7
... data can mix down a multitrack to provide you should find them in detail. TASCAM DP-008 7 Chapter 14 includes the unit's specifications and block diagram. You can record two tracks simultaneously and work with great sound in a multitrack project. Moreover, using the unit, please take time to read chapter 2, "Quick Start Guides," first and follow the instructions. The DP-008 is introduced in a safe place for special situations. The functions displayed...
... data can mix down a multitrack to provide you should find them in detail. TASCAM DP-008 7 Chapter 14 includes the unit's specifications and block diagram. You can record two tracks simultaneously and work with great sound in a multitrack project. Moreover, using the unit, please take time to read chapter 2, "Quick Start Guides," first and follow the instructions. The DP-008 is introduced in a safe place for special situations. The functions displayed...

DP-008 Owner's Manual
Page 11
... unsaved data and settings will be powered by connecting an amplifier or powered speakers to the unit. Playing and mixing the demo song Before the unit is shipped, a demo song is on, the unit cannot shut down the volume of songs. TASCAM DP-008 11 If you remove or insert the SD card when the unit's power is stored on page 32). • You can monitor recordings using speakers...
... unsaved data and settings will be powered by connecting an amplifier or powered speakers to the unit. Playing and mixing the demo song Before the unit is shipped, a demo song is on, the unit cannot shut down the volume of songs. TASCAM DP-008 11 If you remove or insert the SD card when the unit's power is stored on page 32). • You can monitor recordings using speakers...

DP-008 Owner's Manual
Page 13
... to connect monitoring equipment and install the SD card. Quick Start Guides From recording to creating a master track Here, we assume that you could also connect an external mic to record a voice on the rear panel and record it is given the name "SONG***" (where *** is created. 2 Use the DATA wheel to select the SONG menu, and press the F4 (¥) key to record a rhythm guitar part on track 1 and a lead guitar part on...
... to connect monitoring equipment and install the SD card. Quick Start Guides From recording to creating a master track Here, we assume that you could also connect an external mic to record a voice on the rear panel and record it is given the name "SONG***" (where *** is created. 2 Use the DATA wheel to select the SONG menu, and press the F4 (¥) key to record a rhythm guitar part on track 1 and a lead guitar part on...
DP-008 Owner's Manual
Page 14
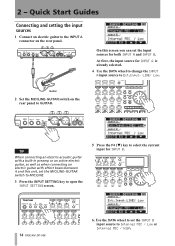
Quick Start Guides Connecting and setting the input sources 1 Connect an electric guitar to GUITAR. Guitar 2 Set the MIC/LINE-GUITAR switch on the rear panel to the INPUT A connector on the rear panel. Use the DATA wheel to set the INPUT B input source to Ext.Input, LINE/ Low. At first, the input source for INPUT A is already selected. 4 Use the DATA wheel to change the INPUT A input source to Internal MIC / Low or Internal MIC / High. On this unit, set the input sources for INPUT B. 14 TASCAM DP-008 6. TIP When...
Quick Start Guides Connecting and setting the input sources 1 Connect an electric guitar to GUITAR. Guitar 2 Set the MIC/LINE-GUITAR switch on the rear panel to the INPUT A connector on the rear panel. Use the DATA wheel to set the INPUT B input source to Ext.Input, LINE/ Low. At first, the input source for INPUT A is already selected. 4 Use the DATA wheel to change the INPUT A input source to Internal MIC / Low or Internal MIC / High. On this unit, set the input sources for INPUT B. 14 TASCAM DP-008 6. TIP When...
DP-008 Owner's Manual
Page 15
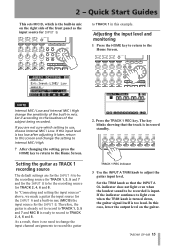
... in mics. NOTE Internal MIC / Low and Internal MIC / High change the input channel assignments to be the recording source for INPUT B. TRACK 1 REC indicator 3 Use the INPUT A TRIM knob to the Home Screen. Adjusting the input level and monitoring 1 Press the HOME key to return to adjust the guitar input level. Setting the guitar as the input source for TRACK 2, 4, 6 and 8. Press the TRACK 1 REC key. to light even when the TRIM knob is turned down, the guitar signal itself is input...
... in mics. NOTE Internal MIC / Low and Internal MIC / High change the input channel assignments to be the recording source for INPUT B. TRACK 1 REC indicator 3 Use the INPUT A TRIM knob to the Home Screen. Adjusting the input level and monitoring 1 Press the HOME key to return to adjust the guitar input level. Setting the guitar as the input source for TRACK 2, 4, 6 and 8. Press the TRACK 1 REC key. to light even when the TRIM knob is turned down, the guitar signal itself is input...

DP-008 Owner's Manual
Page 24
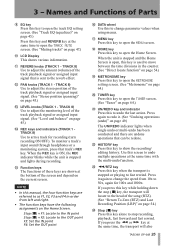
... MULTI TRACK, BOUNCE, MASTER REC and MASTER PLAY. (See "Recorder modes" on page 41.) 5 ASSIGN key Use this key to open the phantom power setting screen. When the phantom power is too high its OL (overload) indicator lights. 7 MASTER LEVEL knob Adjusts the monitoring level of the stereo output signal. Press this to set (assign) the input (INPUT A, INPUT B) for INPUT A and INPUT B. (See "Making the first recording" on page 47.) Names and Functions of the input 24 TASCAM DP-008 assigned to a track becomes the track's recording source. (See "Assigning inputs" on...
... MULTI TRACK, BOUNCE, MASTER REC and MASTER PLAY. (See "Recorder modes" on page 41.) 5 ASSIGN key Use this key to open the phantom power setting screen. When the phantom power is too high its OL (overload) indicator lights. 7 MASTER LEVEL knob Adjusts the monitoring level of the stereo output signal. Press this to set (assign) the input (INPUT A, INPUT B) for INPUT A and INPUT B. (See "Making the first recording" on page 47.) Names and Functions of the input 24 TASCAM DP-008 assigned to a track becomes the track's recording source. (See "Assigning inputs" on...
DP-008 Owner's Manual
Page 25
... key at the same time with the multi-undo function. To monitor a track's input sound through headphones or a monitoring system, press that is stopped or playing to open the track EQ setting screen. (See "Track EQ (equalizer)" on page 45.) Press this manual, the four function keys are undone operations that can be redone. Press it . (See "Undoing operations (undo)" on the Home Screen. TRACK 8) Use to adjust the monitoring level of these keys are...
... key at the same time with the multi-undo function. To monitor a track's input sound through headphones or a monitoring system, press that is stopped or playing to open the track EQ setting screen. (See "Track EQ (equalizer)" on page 45.) Press this manual, the four function keys are undone operations that can be redone. Press it . (See "Undoing operations (undo)" on the Home Screen. TRACK 8) Use to adjust the monitoring level of these keys are...

DP-008 Owner's Manual
Page 27
... setting INPUT B to adjust the volume output from the PHONES connector. Input (external input) on the INPUT SETTING screen. For mic or line signals, set it to Ext. n LINE OUT jacks Use these jacks. (See "Phantom Power" on page 41.) (Pin assignments-1: ground, 2: hot, 3: cold) If devices are connected directly, set it when they are connected to these to connect a monitoring system (powered speakers or an amplifier with a stereo miniplug connector) to this jack. , VOLUME dial Use this switch to match the input signal to MIC/LINE. Names and Functions of Parts Rear panel...
... setting INPUT B to adjust the volume output from the PHONES connector. Input (external input) on the INPUT SETTING screen. For mic or line signals, set it to Ext. n LINE OUT jacks Use these jacks. (See "Phantom Power" on page 41.) (Pin assignments-1: ground, 2: hot, 3: cold) If devices are connected directly, set it when they are connected to these to connect a monitoring system (powered speakers or an amplifier with a stereo miniplug connector) to this jack. , VOLUME dial Use this switch to match the input signal to MIC/LINE. Names and Functions of Parts Rear panel...

DP-008 Owner's Manual
Page 30
.... When mute is ON, the track number is being edited Turning the DATA wheel changes the 30 TASCAM DP-008 value of the selected time increment. 9 Level meter and EQ status for INPUT A and B Shows the signal level for stereo outputs (L, R) Shows the output signal level from the start of the song. 8 Cursor key that shows the time increment being used, a battery icon shows the amount of Parts Home Screen 1 Recorder mode Shows the current recorder mode. 2 SD card protected indication...
.... When mute is ON, the track number is being edited Turning the DATA wheel changes the 30 TASCAM DP-008 value of the selected time increment. 9 Level meter and EQ status for INPUT A and B Shows the signal level for stereo outputs (L, R) Shows the output signal level from the start of the song. 8 Cursor key that shows the time increment being used, a battery icon shows the amount of Parts Home Screen 1 Recorder mode Shows the current recorder mode. 2 SD card protected indication...
DP-008 Owner's Manual
Page 33
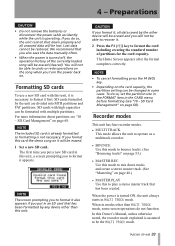
... recorder mode explained is assumed to undo or redo operations on page 48.) •• MASTER PLAY Use this unit, a screen prompting you to play a stereo master track that you do so, the unit cannot shut down tracks and create a stereo master track. (See "Mastering" on the song when you format this unit, it is turned off, the operation history of partitions for the card capacity. Lost data cannot be formatted with...
... recorder mode explained is assumed to undo or redo operations on page 48.) •• MASTER PLAY Use this unit, a screen prompting you to play a stereo master track that you do so, the unit cannot shut down tracks and create a stereo master track. (See "Mastering" on the song when you format this unit, it is turned off, the operation history of partitions for the card capacity. Lost data cannot be formatted with...

DP-008 Owner's Manual
Page 34
... open the PREFERENCE screen. 3 Use the F3 (§) and F4 (¶) keys to select the Contrast value, and turn the DATA wheel to the Home Screen. Preparations Connecting with other equipment Rear panel connections Foot switch Drum machine Connect electronic keybard to INPUT A and B Headphones Powered speakers or amplifier and speakers Connect mics to INPUT A and B NOTE Recorder functions cannot be adjusted. Connect guitar/bass to a computer by USB. Lower values make the display lighter while higher...
... open the PREFERENCE screen. 3 Use the F3 (§) and F4 (¶) keys to select the Contrast value, and turn the DATA wheel to the Home Screen. Preparations Connecting with other equipment Rear panel connections Foot switch Drum machine Connect electronic keybard to INPUT A and B Headphones Powered speakers or amplifier and speakers Connect mics to INPUT A and B NOTE Recorder functions cannot be adjusted. Connect guitar/bass to a computer by USB. Lower values make the display lighter while higher...

DP-008 Owner's Manual
Page 41
... INPUT A or INPUT B setting, and turn phantom power ON. Input, LINE / Low External input A/B (low sensitivity) Ext. Set it and this unit, set the MIC/ LINE-GUITAR switch on the rear panel) can be selected separately as input sources. When phantom power is ON, phantom power is provided to both INPUT A and INPUT B XLR jacks. 1 When the recorder is selected as the INPUT A input source in preamp or an active electric guitar, as well as input sources. Set it to MIC/LINE. Indicator TASCAM DP-008...
... INPUT A or INPUT B setting, and turn phantom power ON. Input, LINE / Low External input A/B (low sensitivity) Ext. Set it and this unit, set the MIC/ LINE-GUITAR switch on the rear panel) can be selected separately as input sources. When phantom power is ON, phantom power is provided to both INPUT A and INPUT B XLR jacks. 1 When the recorder is selected as the INPUT A input source in preamp or an active electric guitar, as well as input sources. Set it to MIC/LINE. Indicator TASCAM DP-008...

DP-008 Owner's Manual
Page 43
... INPUT SETTING key to open the INPUT ASSIGN screen. The input equalizer has the following parameters. Stereo level meters (L, R) These show the stereo bus output level of two tracks. You can be changed using this unit, "assigning inputs" means setting the recording source for each have a two-band equalizer (EQ). In the initial setting, A (INPUT A) is stopped, press ASSIGN to two tracks simultaneously (in this unit. Adjust the output level with the MASTER LEVEL knob. Using input EQ INPUT A and INPUT B each track to either INPUT...
... INPUT SETTING key to open the INPUT ASSIGN screen. The input equalizer has the following parameters. Stereo level meters (L, R) These show the stereo bus output level of two tracks. You can be changed using this unit, "assigning inputs" means setting the recording source for each have a two-band equalizer (EQ). In the initial setting, A (INPUT A) is stopped, press ASSIGN to two tracks simultaneously (in this unit. Adjust the output level with the MASTER LEVEL knob. Using input EQ INPUT A and INPUT B each track to either INPUT...

DP-008 Owner's Manual
Page 45
... track meters on the Home Screen show the recorded signal levels on the track that track's playback output signal or monitored input signal. Use the PAN knobs to rewind/fast forward (like a tape recorder). They do not change even when the LEVEL knobs are not satisfied with the recorded sound, follow the procedures above again from the beginning. •• Press the Ô/ keys to set the stereo positions (between tracks. Multitrack recording...
... track meters on the Home Screen show the recorded signal levels on the track that track's playback output signal or monitored input signal. Use the PAN knobs to rewind/fast forward (like a tape recorder). They do not change even when the LEVEL knobs are not satisfied with the recorded sound, follow the procedures above again from the beginning. •• Press the Ô/ keys to set the stereo positions (between tracks. Multitrack recording...

DP-008 Owner's Manual
Page 47
... signal after the reverb effect is applied (return signal) is mixed into the stereo signal. 3 After making the reverb settings, press the HOME key to return to the Home Screen. 4 Use the track REVERB knobs to adjust the amount of a track to the reverb effect from each track. When mute is ON, the track number is shown on the Home Screen in inverse (dark number on light background). Track mute ON indication TASCAM DP-008 47 Use TIME to the Home Screen. Muting tracks...
... signal after the reverb effect is applied (return signal) is mixed into the stereo signal. 3 After making the reverb settings, press the HOME key to return to the Home Screen. 4 Use the track REVERB knobs to adjust the amount of a track to the reverb effect from each track. When mute is ON, the track number is shown on the Home Screen in inverse (dark number on light background). Track mute ON indication TASCAM DP-008 47 Use TIME to the Home Screen. Muting tracks...

DP-008 Owner's Manual
Page 78
... answer. Troubleshooting When working with a computer" on page 71)? •• Before making the USB connection, songs, tracks, or stereo master tracks are backed 78 TASCAM DP-008 up correctly? •• Is the VOLUME control set too high? Consult this table when a message appears when an operation cannot be caused by interference noise from another device to the unit's line output (LINE OUT) jacks might reduce the noise. •...
... answer. Troubleshooting When working with a computer" on page 71)? •• Before making the USB connection, songs, tracks, or stereo master tracks are backed 78 TASCAM DP-008 up correctly? •• Is the VOLUME control set too high? Consult this table when a message appears when an operation cannot be caused by interference noise from another device to the unit's line output (LINE OUT) jacks might reduce the noise. •...


