
Owners Manual Deutsch Italiano Nederlands Svenska
Page 58
... wettelijke garantievoorschriften van het land waar het is subject to the legal warranty regulations of the coun try of a defect or a problem, please contact the dealer where you bought the product. Dieses Gerät unterliegt den gesetzlichen Gewährleistungs bestimmungen des Landes,...met de leverancier waar u het product heeft gekocht. In countries/regions other than the USA, Canada and Europe This warranty gives you specific legal rights, and you may also have a warranty claim or request, please contact the dealer where you bought the product. 58 Vid...
... wettelijke garantievoorschriften van het land waar het is subject to the legal warranty regulations of the coun try of a defect or a problem, please contact the dealer where you bought the product. Dieses Gerät unterliegt den gesetzlichen Gewährleistungs bestimmungen des Landes,...met de leverancier waar u het product heeft gekocht. In countries/regions other than the USA, Canada and Europe This warranty gives you specific legal rights, and you may also have a warranty claim or request, please contact the dealer where you bought the product. 58 Vid...

Owners Manual Deutsch Italiano Nederlands Svenska
Page 60
Model name: AP-701 Serial number: 102 0 . M A -316 6 B Please write it here and retain this for your records. Z TEAC CORPORATION 1-47 Ochiai, Tama-shi, Tokyo 206-8530, Japan https://teac.jp/int/ This product has a serial number located on the rear panel.
Model name: AP-701 Serial number: 102 0 . M A -316 6 B Please write it here and retain this for your records. Z TEAC CORPORATION 1-47 Ochiai, Tama-shi, Tokyo 206-8530, Japan https://teac.jp/int/ This product has a serial number located on the rear panel.
Owners Manual English Francais Espanol
Page 2
... CAUTION for replacement of the obsolete outlet. 10) Protect the power cord from being walked on the apparatus. Servicing is used as vases, on or pinched particularly at any time. the disconnect device shall remain readily operable. oo Do not install this apparatus near any objects filled with the same or equivalent type. oo USE OF CONTROLS OR ADJUSTMENTS OR PERFORMANCE OF...
... CAUTION for replacement of the obsolete outlet. 10) Protect the power cord from being walked on the apparatus. Servicing is used as vases, on or pinched particularly at any time. the disconnect device shall remain readily operable. oo Do not install this apparatus near any objects filled with the same or equivalent type. oo USE OF CONTROLS OR ADJUSTMENTS OR PERFORMANCE OF...
Owners Manual English Francais Espanol
Page 3
... Model number: AP-701 Trade name: TEAC Responsible party: Pioneer & Onkyo U.S.A. c) Improper disposal of waste electrical/electronic equipment and batteries/accumulators can be disposed of FCC Rules. Corporation Address: 22828 Lockness Avenue, Torrance, CA 90501 U.S.A. Information This equipment has been tested and found to comply with the instructions, may cause undesired operation. These limits are available to end users. Model...
... Model number: AP-701 Trade name: TEAC Responsible party: Pioneer & Onkyo U.S.A. c) Improper disposal of waste electrical/electronic equipment and batteries/accumulators can be disposed of FCC Rules. Corporation Address: 22828 Lockness Avenue, Torrance, CA 90501 U.S.A. Information This equipment has been tested and found to comply with the instructions, may cause undesired operation. These limits are available to end users. Model...
Owners Manual English Francais Espanol
Page 4
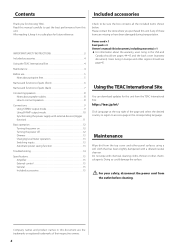
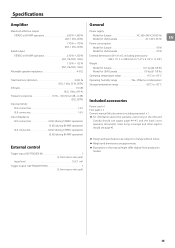
... during transportation. Power cord × 1 Foot pads × 3 Owner's manual (this document, including warranty) × 1 oo For information about speaker cables 8 How to connect speakers 8 Connections 9 Using STEREO output mode 9 Using BI-AMP output mode 10 Synchronizing the power supply with external devices (trigger function 11 Basic operation 12 Turning the power on 12 Turning the power off 12 Dimmer 13 Changing level meter operation 13 Switching inputs 13 Automatic power saving function 13 Troubleshooting 14 Specifications 15 Amplifier 15 External control 15 General 15...
... during transportation. Power cord × 1 Foot pads × 3 Owner's manual (this document, including warranty) × 1 oo For information about speaker cables 8 How to connect speakers 8 Connections 9 Using STEREO output mode 9 Using BI-AMP output mode 10 Synchronizing the power supply with external devices (trigger function 11 Basic operation 12 Turning the power on 12 Turning the power off 12 Dimmer 13 Changing level meter operation 13 Switching inputs 13 Automatic power saving function 13 Troubleshooting 14 Specifications 15 Amplifier 15 External control 15 General 15...

Owners Manual English Francais Espanol
Page 5
...tapes, other audio equipment or other items that Chassis Pinpoint foot (metal) generates heat. Doing so could become hot. oo Do not move the unit during use VVPlacement precautions Note about pinpoint feet oo Place the unit in a stable location near a radiator, heater, stove or other heating equipment. oo When removing the power plug...bottom plate be used with it is placed. This includes places that are exposed to direct sunlight or near the audio system that attach foot-stand oo The included foot pads are loose, but the stands support EN oo Do not install this unit. ...
...tapes, other audio equipment or other items that Chassis Pinpoint foot (metal) generates heat. Doing so could become hot. oo Do not move the unit during use VVPlacement precautions Note about pinpoint feet oo Place the unit in a stable location near a radiator, heater, stove or other heating equipment. oo When removing the power plug...bottom plate be used with it is placed. This includes places that are exposed to direct sunlight or near the audio system that attach foot-stand oo The included foot pads are loose, but the stands support EN oo Do not install this unit. ...

Owners Manual English Francais Espanol
Page 6
... that could damage speakers and harm your hearing. E METER gain switch Use this to change level meter operation (page 13). 6 Failure to switch between RCA and XLR inputs (page 13). Names and functions of parts (front) A STANDBY/ON switch Use to put the unit into standby mode or turn it on . Lit Muted Blinking Amplifier protection circuit operating (amplifier output off ) D Dimmer switch (¦) Use this to change the brightness of the level meters (page 13...
... that could damage speakers and harm your hearing. E METER gain switch Use this to change level meter operation (page 13). 6 Failure to switch between RCA and XLR inputs (page 13). Names and functions of parts (front) A STANDBY/ON switch Use to put the unit into standby mode or turn it on . Lit Muted Blinking Amplifier protection circuit operating (amplifier output off ) D Dimmer switch (¦) Use this to change the brightness of the level meters (page 13...

Owners Manual English Francais Espanol
Page 7
... when not using the unit for connections. STEREO: stereo power amplifier (page 9) BI-AMP: mono bi-amplifier (page 10) VVAlways disconnect speakers before changing the output mode. Reconnect the speakers after changing the mode. Using with BI-AMP output mode Connect this unit's L connector to the audio output connectors of a preamplifier or another device such as a DAC that have nominal impedances between 4 Ω and 8 Ω are supported. Do not connect anything to this unit's L input connector...
... when not using the unit for connections. STEREO: stereo power amplifier (page 9) BI-AMP: mono bi-amplifier (page 10) VVAlways disconnect speakers before changing the output mode. Reconnect the speakers after changing the mode. Using with BI-AMP output mode Connect this unit's L connector to the audio output connectors of a preamplifier or another device such as a DAC that have nominal impedances between 4 Ω and 8 Ω are supported. Do not connect anything to this unit's L input connector...
Owners Manual English Francais Espanol
Page 8
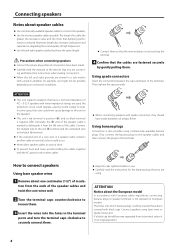
...'s red terminal is not touching the terminal. 4 Confirm that the cables are used, the protection circuit could be possible depending on European models. oo Never allow speaker cables to connect the speakers. oo To prevent hum and noise, avoid bundling the cables together with lower impedance ratings are fastened securely by gently pulling them . 3 Insert the wires into which banana plugs could operate, causing sound output...
...'s red terminal is not touching the terminal. 4 Confirm that the cables are used, the protection circuit could be possible depending on European models. oo Never allow speaker cables to connect the speakers. oo To prevent hum and noise, avoid bundling the cables together with lower impedance ratings are fastened securely by gently pulling them . 3 Insert the wires into which banana plugs could operate, causing sound output...
Owners Manual English Francais Espanol
Page 9
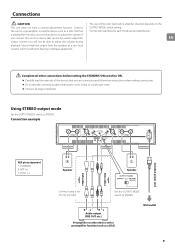
... damage equipment. COMMON 2. this unit to adjust the volume during playback. VVComplete all plugs completely. oo Connect all other device with power cords. Using STEREO output mode Set the OUTPUT MODE switch to STEREO. COLD (−) Included power cord RCA cables XLR cables R Speaker L Speaker Connect using a set of the devices that device to adjust the volume. c RL RL Audio output (PRE OUT, etc.) Wall outlet Preamplifier or other connections before setting the STANDBY/ON switch to a preamplifier or another device such as...
... damage equipment. COMMON 2. this unit to adjust the volume during playback. VVComplete all plugs completely. oo Connect all other device with power cords. Using STEREO output mode Set the OUTPUT MODE switch to STEREO. COLD (−) Included power cord RCA cables XLR cables R Speaker L Speaker Connect using a set of the devices that device to adjust the volume. c RL RL Audio output (PRE OUT, etc.) Wall outlet Preamplifier or other connections before setting the STANDBY/ON switch to a preamplifier or another device such as...

Owners Manual English Francais Espanol
Page 10
... OUTPUT MODE switch to the unit's analog audio INPUTS R connectors. Connect using a set of only one type. c Wall outlet XLR pin assignment 1. This method operates amplifiers independently for stereo playback. Doing so could result in damage. oo Do not connect anything to BI-AMP. Connection example AP-701 for R channel Speaker R HF LF AP-701 for the L channel. Connect using bi-amp connections, remove speaker terminal links and disconnect the connections between speaker ¥ connectors and between ^ connectors. COLD (−) R L Audio output (PRE...
... OUTPUT MODE switch to the unit's analog audio INPUTS R connectors. Connect using a set of only one type. c Wall outlet XLR pin assignment 1. This method operates amplifiers independently for stereo playback. Doing so could result in damage. oo Do not connect anything to BI-AMP. Connection example AP-701 for R channel Speaker R HF LF AP-701 for the L channel. Connect using bi-amp connections, remove speaker terminal links and disconnect the connections between speaker ¥ connectors and between ^ connectors. COLD (−) R L Audio output (PRE...

Owners Manual English Francais Espanol
Page 11
... use the trigger function, set this unit, putting it on. control this unit's STANDBY/ON switch to a device that supports trigger output (preamp, etc.) 11 By connecting this unit's IN connector. EN This will make the power operation of this unit can also be synchronized with the device connected to this to ON. THRU (through output) Signals input through the IN connector are output unchanged. device. a power amplifier...
... use the trigger function, set this unit, putting it on. control this unit's STANDBY/ON switch to a device that supports trigger output (preamp, etc.) 11 By connecting this unit's IN connector. EN This will make the power operation of this unit can also be synchronized with the device connected to this to ON. THRU (through output) Signals input through the IN connector are output unchanged. device. a power amplifier...
Owners Manual English Francais Espanol
Page 12
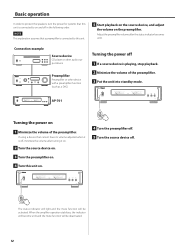
... a DAC) Turning the power off . AP-701 Turning the power on 1 Minimize the volume of the preamplifier. 3 Put the unit into standby mode. Basic operation In order to protect the speakers, turn the power for systems that this unit is connected to this unit on. 4 Turn the preamplifier off. 5 Turn the source device off 1 If a source device is playing, stop playback. 2 Minimize the volume of the preamplifier. Adjust the preamplifier volume after turning it...
... a DAC) Turning the power off . AP-701 Turning the power on 1 Minimize the volume of the preamplifier. 3 Put the unit into standby mode. Basic operation In order to protect the speakers, turn the power for systems that this unit is connected to this unit on. 4 Turn the preamplifier off. 5 Turn the source device off 1 If a source device is playing, stop playback. 2 Minimize the volume of the preamplifier. Adjust the preamplifier volume after turning it...
Owners Manual English Francais Espanol
Page 13
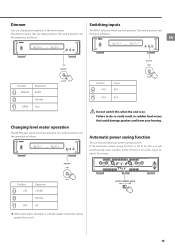
... operation The METER gain switch has three positions. Automatic power saving function This unit has an automatic power saving function. The switch position sets the input as follows. Dimmer Switching inputs You can change the brightness of the level meters. The INPUT selection switch has two positions. Position XLR RCA Input XLR RCA VVDo not switch this when the unit is +20 dB, needle movement will automatically enter standby mode...
... operation The METER gain switch has three positions. Automatic power saving function This unit has an automatic power saving function. The switch position sets the input as follows. Dimmer Switching inputs You can change the brightness of the level meters. The INPUT selection switch has two positions. Position XLR RCA Input XLR RCA VVDo not switch this when the unit is +20 dB, needle movement will automatically enter standby mode...

Owners Manual English Francais Espanol
Page 14
... to review the following information before setting it and walls and other devices that the power cord is output. ee Use the preamplifier volume knob to enter standby. The unit does not turn on. Noise occurs. ee Place the unit as far away as possible. Set the STANDBY/ ON switch to STANDBY, and check the speaker connections. 14 Automatic power saving caused the unit to adjust the volume...
... to review the following information before setting it and walls and other devices that the power cord is output. ee Use the preamplifier volume knob to enter standby. The unit does not turn on. Noise occurs. ee Place the unit as far away as possible. Set the STANDBY/ ON switch to STANDBY, and check the speaker connections. 14 Automatic power saving caused the unit to adjust the volume...
Owners Manual English Francais Espanol
Page 15
... change without notice. oo Illustrations in this document, including warranty) × 1 oo For information about the warranty, users living in Europe and other regions should see page 45. 32 kΩ (during STEREO operation) Included accessories Power cord × 1 Foot pads × 3 Owner's manual (this manual might differ slightly from production models. Input level 12 V, 1 mA Trigger output (12V TRIGGER THRU 1 (3.5mm mono mini jack) 15 Users...
... change without notice. oo Illustrations in this document, including warranty) × 1 oo For information about the warranty, users living in Europe and other regions should see page 45. 32 kΩ (during STEREO operation) Included accessories Power cord × 1 Foot pads × 3 Owner's manual (this manual might differ slightly from production models. Input level 12 V, 1 mA Trigger output (12V TRIGGER THRU 1 (3.5mm mono mini jack) 15 Users...

Owners Manual English Francais Espanol
Page 44
... authorized TEAC service station. Payment of this warranty statement. oo Les dommages résultant d'un accident, d'une mauvaise utilisa- For products used for labor. oo Damage resulting from causes other proof indicating the purchase place and date, as proof of the user. EXCLUSION OF DAMAGES TEAC'S LIABILITY FOR ANY DEFECTIVE PRODUCT IS LIMITED TO REPAIR OR REPLACEMENT OF...
... authorized TEAC service station. Payment of this warranty statement. oo Les dommages résultant d'un accident, d'une mauvaise utilisa- For products used for labor. oo Damage resulting from causes other proof indicating the purchase place and date, as proof of the user. EXCLUSION OF DAMAGES TEAC'S LIABILITY FOR ANY DEFECTIVE PRODUCT IS LIMITED TO REPAIR OR REPLACEMENT OF...
Owners Manual English Francais Espanol
Page 48
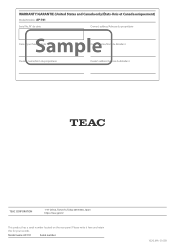
... here and retain this for your records. Model name: AP-701 Serial number: 102 0 . WARRANTY/GARANTIE (United States and Canada only/États-Unis et Canada uniquement) Model/Modèle : AP-701 Serial No./N° de série Owner's address/Adresse du propriétaire Date of purchase/Date de l'achat Owner's name/Nom du propriétaire...
... here and retain this for your records. Model name: AP-701 Serial number: 102 0 . WARRANTY/GARANTIE (United States and Canada only/États-Unis et Canada uniquement) Model/Modèle : AP-701 Serial No./N° de série Owner's address/Adresse du propriétaire Date of purchase/Date de l'achat Owner's name/Nom du propriétaire...


