
Operating Instructions
Page 19
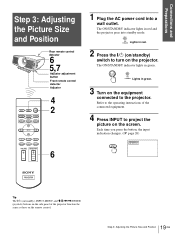
... control detector Adjuster 4 2 6 1 Plug the AC power cord into standby mode. The ON/STANDBY indicator lights in green. The ON/STANDBY indicator lights in red and the projector goes into a wall outlet. ON/ STANDBY Lights in green. 3 Turn on the projector. ON/ STANDBY Lights in red. 2 Press the [/1 (on/standby) switch to turn on the equipment connected to project...
... control detector Adjuster 4 2 6 1 Plug the AC power cord into standby mode. The ON/STANDBY indicator lights in green. The ON/STANDBY indicator lights in red and the projector goes into a wall outlet. ON/ STANDBY Lights in green. 3 Turn on the projector. ON/ STANDBY Lights in red. 2 Press the [/1 (on/standby) switch to turn on the equipment connected to project...
Operating Instructions
Page 23
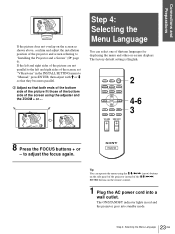
...so that they becomes parallel. 3 Adjust so that both ends of the bottom side of the picture fit those of the bottom side of the projector and screen referring to adjust the focus again. Step 4: Selecting the Menu Language You can operate the menu using the adjuster and the ZOOM +... or -. LIGHT INPUT DYNAMIC STANDARD CINEMA PICTURE MODE USER 1 USER 2 USER 3 ENTER APA MS SLIDE MENU WIDE MODE LENS RESET VOLUME SIDE SHOT ++ -- 2 4-6 3 8 Press the FOCUS buttons + or - Tip You can select one of thirteen ...
...so that they becomes parallel. 3 Adjust so that both ends of the bottom side of the picture fit those of the bottom side of the projector and screen referring to adjust the focus again. Step 4: Selecting the Menu Language You can operate the menu using the adjuster and the ZOOM +... or -. LIGHT INPUT DYNAMIC STANDARD CINEMA PICTURE MODE USER 1 USER 2 USER 3 ENTER APA MS SLIDE MENU WIDE MODE LENS RESET VOLUME SIDE SHOT ++ -- 2 4-6 3 8 Press the FOCUS buttons + or - Tip You can select one of thirteen ...
Operating Instructions
Page 24
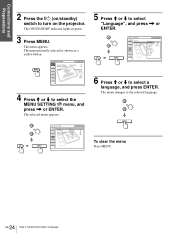
... A or ENTER 6 Press M or m to the selected language. The menu changes to select a language, and press ENTER. Vo l u m e : 30 Input A 4 Press M or m to turn on /standby) switch to select the MENU SETTING menu, and press , or ENTER. The menu presently selected is shown as a yellow button. MENU PICTURE SETTING Picture...
... A or ENTER 6 Press M or m to the selected language. The menu changes to select a language, and press ENTER. Vo l u m e : 30 Input A 4 Press M or m to turn on /standby) switch to select the MENU SETTING menu, and press , or ENTER. The menu presently selected is shown as a yellow button. MENU PICTURE SETTING Picture...
Operating Instructions
Page 26
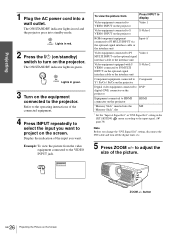
... the Picture on the screen. or "DVI Signal Sel." The ON/STANDBY indicator lights in red. 2 Press the [/1 (on/standby) switch to HDMI connector on the projector Equipment connected to turn off the digital tuner, etc. 5 Press ZOOM +/- setting, disconnect the DVI cable ...PB/CB / PR/CR on the projector Digital video equipment connected to DVI* digital (DVI) connector on the projector HDMI "Memory Stick" inserted into the MS "Memory Stick" slot * Set the "Input-A Signal Sel." Projecting 1 Plug the AC power cord into standby mode. Display the indication of the connected...
... the Picture on the screen. or "DVI Signal Sel." The ON/STANDBY indicator lights in red. 2 Press the [/1 (on/standby) switch to HDMI connector on the projector Equipment connected to turn off the digital tuner, etc. 5 Press ZOOM +/- setting, disconnect the DVI cable ...PB/CB / PR/CR on the projector Digital video equipment connected to DVI* digital (DVI) connector on the projector HDMI "Memory Stick" inserted into the MS "Memory Stick" slot * Set the "Input-A Signal Sel." Projecting 1 Plug the AC power cord into standby mode. Display the indication of the connected...
Operating Instructions
Page 27
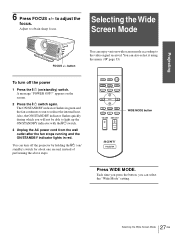
...fan continues to run to the video signal received. button You can select the "Wide Mode" setting. 27 Selecting the Wide Screen Mode GB You can turn off the projector by holding the [/1 (on/ standby) switch for about one second, instead of performing the above steps. Selecting the Wide ...Screen Mode FOCUS +/- A message "POWER OFF?" You can also select it using the menu. (1 page 33) To ...
...fan continues to run to the video signal received. button You can select the "Wide Mode" setting. 27 Selecting the Wide Screen Mode GB You can turn off the projector by holding the [/1 (on/ standby) switch for about one second, instead of performing the above steps. Selecting the Wide ...Screen Mode FOCUS +/- A message "POWER OFF?" You can also select it using the menu. (1 page 33) To ...
Operating Instructions
Page 60
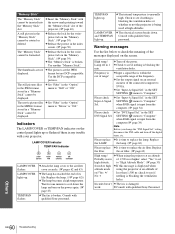
...one minute to check the meaning of the frequency. TEMP/FAN lights up . c Turn off the digital tuner, etc. c Input a signal that is broken. setting, disconnect the DVI cable and turn ...has reached the end of the connected computer to see if nothing is displayed when altitude mode using the projector at an altitude Probably use in the index screen. (1 page 50) The "Memory...Sony Personnel. in the MPEG1 format menu to "Computer" when RGB signal is being used at an altitude of range! LAMP/COVER Indicator TEMP/FAN Indicator LAMP/ COVER TEMP/ FAN POWER SAVING ON/ STANDBY...
...one minute to check the meaning of the frequency. TEMP/FAN lights up . c Turn off the digital tuner, etc. c Input a signal that is broken. setting, disconnect the DVI cable and turn ...has reached the end of the connected computer to see if nothing is displayed when altitude mode using the projector at an altitude Probably use in the index screen. (1 page 50) The "Memory...Sony Personnel. in the MPEG1 format menu to "Computer" when RGB signal is being used at an altitude of range! LAMP/COVER Indicator TEMP/FAN Indicator LAMP/ COVER TEMP/ FAN POWER SAVING ON/ STANDBY...
Operating Instructions
Page 62
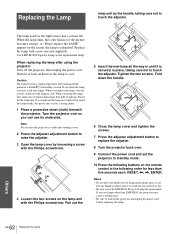
... Lamp lamp unit by loosening a screw with the Philips screwdriver. 3 1 2 4 Loosen the two screws on /standby) switch. Caution The lamp becomes a high temperature after using the projector Turn off the projector with the [/1 (on the lamp unit with a new one (not supplied). Do not tilt the lamp unit. If... the Philips screwdriver. Wait for at least an hour for less than five seconds each: RESET, Turn the projector over . 9 Connect the power cord and set the projector to standby mode. 10 Press the following order for the lamp to touch the adjuster. When the lamp dims, the color ...
... Lamp lamp unit by loosening a screw with the Philips screwdriver. 3 1 2 4 Loosen the two screws on /standby) switch. Caution The lamp becomes a high temperature after using the projector Turn off the projector with the [/1 (on the lamp unit with a new one (not supplied). Do not tilt the lamp unit. If... the Philips screwdriver. Wait for at least an hour for less than five seconds each: RESET, Turn the projector over . 9 Connect the power cord and set the projector to standby mode. 10 Press the following order for the lamp to touch the adjuster. When the lamp dims, the color ...
Operating Instructions
Page 64
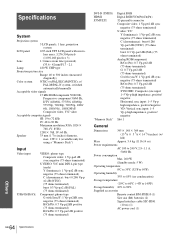
Specifications System Projection system 3 LCD panels, 1 lens, projection system LCD panel 0.87-inch TFT LCD panel with sync/Y: 1 Vp-p±2 ... kg (11 lb 14 oz) Power requirements AC 100 to 240 V, 2.9-1.1 A, 50/60 Hz Power consumption Max. 260 W (Standby mode: 5 W) Operating temperature 0ºC to 35ºC (32ºF to 95ºF) Operating humidity 35% to 85% (no...PR: 0.7 Vp-p±2 dB positive (75 ohms terminated) DVI-D (TMDS) HDMI PJ MULTI "Memory Stick" Digital RGB Digital RGB/YCB(PB)CR(PR) 32-pin multi connector Composite video: 1 Vp-p±2 dB sync negative (75 ohms...
Specifications System Projection system 3 LCD panels, 1 lens, projection system LCD panel 0.87-inch TFT LCD panel with sync/Y: 1 Vp-p±2 ... kg (11 lb 14 oz) Power requirements AC 100 to 240 V, 2.9-1.1 A, 50/60 Hz Power consumption Max. 260 W (Standby mode: 5 W) Operating temperature 0ºC to 35ºC (32ºF to 95ºF) Operating humidity 35% to 85% (no...PR: 0.7 Vp-p±2 dB positive (75 ohms terminated) DVI-D (TMDS) HDMI PJ MULTI "Memory Stick" Digital RGB Digital RGB/YCB(PB)CR(PR) 32-pin multi connector Composite video: 1 Vp-p±2 dB sync negative (75 ohms...
Operating Instructions
Page 77
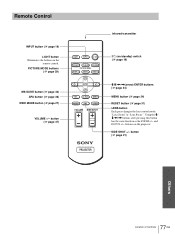
Remote Control INPUT button (1 page 19) LIGHT button Illuminates the buttons on /standby) switch (1 page 19) M/m/ button (1 page 47) Infrared transmitter LIGHT INPUT DYNAMIC STANDARD CINEMA PICTURE MODE USER 1 USER 2 USER 3 ENTER APA MS SLIDE MENU WIDE MODE LENS RESET VOLUME SIDE SHOT [/1 (on the remote control. PICTURE MODE buttons (1 page 29) MS SLIDE button (1 page 44) APA button (1 page 36) WIDE MODE button (1 page 27) VOLUME +/-
Remote Control INPUT button (1 page 19) LIGHT button Illuminates the buttons on /standby) switch (1 page 19) M/m/ button (1 page 47) Infrared transmitter LIGHT INPUT DYNAMIC STANDARD CINEMA PICTURE MODE USER 1 USER 2 USER 3 ENTER APA MS SLIDE MENU WIDE MODE LENS RESET VOLUME SIDE SHOT [/1 (on the remote control. PICTURE MODE buttons (1 page 29) MS SLIDE button (1 page 44) APA button (1 page 36) WIDE MODE button (1 page 27) VOLUME +/-


