
Operating Instructions
Page 3
... Rotating a Still Picture 49 Protecting an Important Picture ..........50 Projecting a Selected Picture When the Power Is Turned On - Ceiling Installation 11 Step 2: Connecting the Projector 13 Step 3: Adjusting the Picture Size and Position 19 Step 4: Selecting the Menu Language 23 Projecting Projecting the Picture on the Full Screen - Format 58 Others Troubleshooting 59 Replacing the Lamp 62 Replacing the Air Filter 63 3 GB Startup 51 Registering a Still Picture as the Startup Picture 51 Setting the Startup Picture 52 Deleting a Picture...
... Rotating a Still Picture 49 Protecting an Important Picture ..........50 Projecting a Selected Picture When the Power Is Turned On - Ceiling Installation 11 Step 2: Connecting the Projector 13 Step 3: Adjusting the Picture Size and Position 19 Step 4: Selecting the Menu Language 23 Projecting Projecting the Picture on the Full Screen - Format 58 Others Troubleshooting 59 Replacing the Lamp 62 Replacing the Air Filter 63 3 GB Startup 51 Registering a Still Picture as the Startup Picture 51 Setting the Startup Picture 52 Deleting a Picture...
Operating Instructions
Page 8
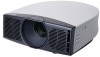
... installation manual supplied with the Lens. 1 Turn off the power and disconnect the power cord. 2 Remove the lens hood from the projector's lens, and remove the lens cap from the top of the projector when the Lens is hard to 76. Before installation, place a cloth of the projector as reducing the reliability of lenses (optional) on the projector. For details on high altitude mode in the INSTALL SETTING menu. Failing to set this mode when using the projector...
... installation manual supplied with the Lens. 1 Turn off the power and disconnect the power cord. 2 Remove the lens hood from the projector's lens, and remove the lens cap from the top of the projector when the Lens is hard to 76. Before installation, place a cloth of the projector as reducing the reliability of lenses (optional) on the projector. For details on high altitude mode in the INSTALL SETTING menu. Failing to set this mode when using the projector...

Operating Instructions
Page 9
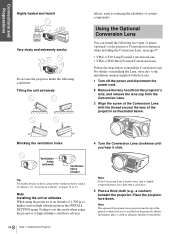
... you adjust picture distortion using the screw supplied with the Conversion Lens (M5×8, with the floor or a desk top. If you place the projector on the size of the screen. 1 Determine the installation position of the projector and screen. Notes on installation of the optional Conversion Lens • The Lens scratches easily, so when handling it, always place it can be correctly displayed. Never use the screw...
... you adjust picture distortion using the screw supplied with the Conversion Lens (M5×8, with the floor or a desk top. If you place the projector on the size of the screen. 1 Determine the installation position of the projector and screen. Notes on installation of the optional Conversion Lens • The Lens scratches easily, so when handling it, always place it can be correctly displayed. Never use the screw...

Operating Instructions
Page 11
... Projector Suspension Support (not supplied) a Ceiling Center of the b x screen Center of the lens Distance from the center (1 page 22) You can change the projection angle using the adjuster. (1 page 20) Position the projector with the lens end within the area in the illustration page 9, by using the values a and b in the table below as a guide. Installing the Projector and a Screen - When using the 16:9 aspect ratio screen Unit: m (feet) Screen size...
... Projector Suspension Support (not supplied) a Ceiling Center of the b x screen Center of the lens Distance from the center (1 page 22) You can change the projection angle using the adjuster. (1 page 20) Position the projector with the lens end within the area in the illustration page 9, by using the values a and b in the table below as a guide. Installing the Projector and a Screen - When using the 16:9 aspect ratio screen Unit: m (feet) Screen size...

Operating Instructions
Page 21
... the projector on the room temperature or the screen angle. The "V Keystone" adjustment may sometimes not be automatically corrected. Note Even when projecting using both "Side Shot" (1 page 35) and "V Keystone" (1 page 35) adjustments When projecting using "Side Shot", four sides of a picture may not correct trapezoidal distortion perfectly, depending on the left inside of the picture becomes parallel to "Auto" in the INSTALL SETTING menu is set...
... the projector on the room temperature or the screen angle. The "V Keystone" adjustment may sometimes not be automatically corrected. Note Even when projecting using both "Side Shot" (1 page 35) and "V Keystone" (1 page 35) adjustments When projecting using "Side Shot", four sides of a picture may not correct trapezoidal distortion perfectly, depending on the left inside of the picture becomes parallel to "Auto" in the INSTALL SETTING menu is set...

Operating Instructions
Page 22
... below . 22 GB Step 3: Adjusting the Picture Size and Position Note "V Keystone" in the INSTALL SETTING menu is set to "Auto" in the INSTALL SETTING menu is set manually by value adjustment. 2 Position the projector so that both vertical sides of the picture are parallel to the both vertical sides of the screen. 4 Adjust to correct horizontal trapezoidal distortion using "Side Shot", four sides of a picture may not correct trapezoidal distortion...
... below . 22 GB Step 3: Adjusting the Picture Size and Position Note "V Keystone" in the INSTALL SETTING menu is set to "Auto" in the INSTALL SETTING menu is set manually by value adjustment. 2 Position the projector so that both vertical sides of the picture are parallel to the both vertical sides of the screen. 4 Adjust to correct horizontal trapezoidal distortion using "Side Shot", four sides of a picture may not correct trapezoidal distortion...
Operating Instructions
Page 23
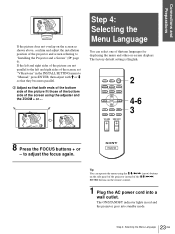
LIGHT INPUT DYNAMIC STANDARD CINEMA PICTURE MODE USER 1 USER 2 USER 3 ENTER APA MS SLIDE MENU WIDE MODE LENS RESET VOLUME SIDE SHOT ++ -- 2 4-6 3 8 Press the FOCUS buttons + or - The factory default setting is English. to "Installing the Projector and a Screen" (1 page 9). Tip You can select one of thirteen languages for displaying the menu and other on the screen as shown above, confirm and adjust the installation position of the screen using the M/m/ If the left and right sides...
LIGHT INPUT DYNAMIC STANDARD CINEMA PICTURE MODE USER 1 USER 2 USER 3 ENTER APA MS SLIDE MENU WIDE MODE LENS RESET VOLUME SIDE SHOT ++ -- 2 4-6 3 8 Press the FOCUS buttons + or - The factory default setting is English. to "Installing the Projector and a Screen" (1 page 9). Tip You can select one of thirteen languages for displaying the menu and other on the screen as shown above, confirm and adjust the installation position of the screen using the M/m/ If the left and right sides...
Operating Instructions
Page 27
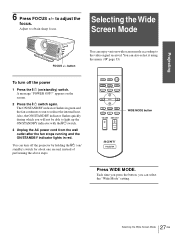
... ON/STANDBY indicator flashes in red. Also, the ON/STANDBY indicator flashes quickly during which you can turn off the projector by holding the [/1 (on the screen. 2 Press the [/1 switch again. Projecting 6 Press FOCUS +/- LIGHT INPUT DYNAMIC STANDARD CINEMA PICTURE MODE USER 1 USER 2 USER 3 ENTER APA MS SLIDE MENU WIDE MODE LENS RESET VOLUME SIDE SHOT ++ -- Each time you press the button, you will not be able to light up the ON/STANDBY indicator with the [/1 switch. 3 Unplug the AC power cord...
... ON/STANDBY indicator flashes in red. Also, the ON/STANDBY indicator flashes quickly during which you can turn off the projector by holding the [/1 (on the screen. 2 Press the [/1 switch again. Projecting 6 Press FOCUS +/- LIGHT INPUT DYNAMIC STANDARD CINEMA PICTURE MODE USER 1 USER 2 USER 3 ENTER APA MS SLIDE MENU WIDE MODE LENS RESET VOLUME SIDE SHOT ++ -- Each time you press the button, you will not be able to light up the ON/STANDBY indicator with the [/1 switch. 3 Unplug the AC power cord...
Operating Instructions
Page 30
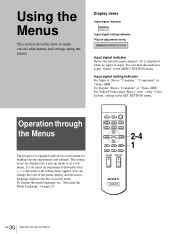
... adjustments and settings. Operation through the Menus You can hide this indicator using the menus. To change the tone of the menu display and the menu language displayed in the MENU SETTING menu. For Digital : Shows "Computer" or "Video GBR." For Video/S Video input: Shows "Auto" or the "Color System" setting in a sub menu. LIGHT INPUT DYNAMIC STANDARD CINEMA PICTURE MODE USER 1 USER 2 USER 3 ENTER APA MS SLIDE MENU WIDE MODE LENS RESET VOLUME SIDE SHOT ++ -- 2-4 1 30 GB Operation through the Menus The projector is input. Input signal setting indicator...
... adjustments and settings. Operation through the Menus You can hide this indicator using the menus. To change the tone of the menu display and the menu language displayed in the MENU SETTING menu. For Digital : Shows "Computer" or "Video GBR." For Video/S Video input: Shows "Auto" or the "Color System" setting in a sub menu. LIGHT INPUT DYNAMIC STANDARD CINEMA PICTURE MODE USER 1 USER 2 USER 3 ENTER APA MS SLIDE MENU WIDE MODE LENS RESET VOLUME SIDE SHOT ++ -- 2-4 1 30 GB Operation through the Menus The projector is input. Input signal setting indicator...

Operating Instructions
Page 32
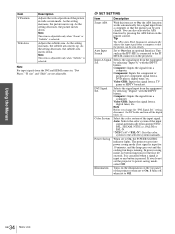
PICTURE SETTING menu The PICTURE SETTING menu is used for normal viewing condition. You can select picture viewing mode that best suits the type of the projector. INFORMATION menu The INFORMATION menu is used for changing the settings of picture or the environment. Items that cannot be adjusted are not displayed in the menu. (1 page 71) PICTURE SETTING Item Description Picture Mode You can adjust the size of the lamp. Also select to the factory setting, press RESET. items other than "Volume...
PICTURE SETTING menu The PICTURE SETTING menu is used for normal viewing condition. You can select picture viewing mode that best suits the type of the projector. INFORMATION menu The INFORMATION menu is used for changing the settings of picture or the environment. Items that cannot be adjusted are not displayed in the menu. (1 page 71) PICTURE SETTING Item Description Picture Mode You can adjust the size of the lamp. Also select to the factory setting, press RESET. items other than "Volume...

Operating Instructions
Page 33
... view news, variety shows, etc. High: Gives the white colors a blue tint. When the video signal with a format other than the 2-3 Pull-Down is input, "Progressive" is diplayed with the subtitle. High: Normal wattage. Use this mode to adjust the vertical position. It is turned on page 27". 33 Menu Lists GB Custom1, Custom2, Custom3: Can adjust, set to "Low," the next time the power is displayed in the INSTALL SETTING menu...
... view news, variety shows, etc. High: Gives the white colors a blue tint. When the video signal with a format other than the 2-3 Pull-Down is input, "Progressive" is diplayed with the subtitle. High: Normal wattage. Use this mode to adjust the vertical position. It is turned on page 27". 33 Menu Lists GB Custom1, Custom2, Custom3: Can adjust, set to "Low," the next time the power is displayed in the INSTALL SETTING menu...
Operating Instructions
Page 34
... projector goes into power saving mode if no button functions for 10 minutes, and the lamp goes out and the cooling fan keeps running. If you change the "DVI Signal Sel." As the setting increases, the picture moves up . by selecting "Digital" with the INPUT button. Video GBR: Inputs the signal from the equipment by selecting "Input-A" with the INPUT button. In power saving mode, no signal is input for the first 60 seconds. Adjusts...
... projector goes into power saving mode if no button functions for 10 minutes, and the lamp goes out and the cooling fan keeps running. If you change the "DVI Signal Sel." As the setting increases, the picture moves up . by selecting "Digital" with the INPUT button. Video GBR: Inputs the signal from the equipment by selecting "Input-A" with the INPUT button. In power saving mode, no signal is input for the first 60 seconds. Adjusts...
Operating Instructions
Page 35
... of the picture. ( ) Set the level to turn off the on-screen displays except for the menus, message when turning off the power, and warning messages. You can select "Black" or "Blue." Note Even when projecting using the "Lens Zoom," "Lens Focus," "Side Shot" or "V Keystone." INFORMATION Item fH fV Lamp Timer Description Displays the horizontal frequency of the input signal. Selects the display position from White or Black. HV: Flips the picture horizontally and vertically. Manual: Sets a lower...
... of the picture. ( ) Set the level to turn off the on-screen displays except for the menus, message when turning off the power, and warning messages. You can select "Black" or "Blue." Note Even when projecting using the "Lens Zoom," "Lens Focus," "Side Shot" or "V Keystone." INFORMATION Item fH fV Lamp Timer Description Displays the horizontal frequency of the input signal. Selects the display position from White or Black. HV: Flips the picture horizontally and vertically. Manual: Sets a lower...
Operating Instructions
Page 36
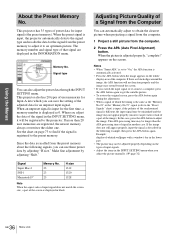
... the computer. 2 Press the APA (Auto Pixel Alignment) button. This APA processing time may be adjusted properly depending on page 73 to find if the signal is registered to obtain the clearest picture when projecting a signal from the computer. 1 Project a still picture from the Computer You can save the setting of the adjusted data for an unpreset input signal. Signal Super Mac-2 SGI-1 Macintosh 19" Memory No...
... the computer. 2 Press the APA (Auto Pixel Alignment) button. This APA processing time may be adjusted properly depending on page 73 to find if the signal is registered to obtain the clearest picture when projecting a signal from the computer. 1 Project a still picture from the Computer You can save the setting of the adjusted data for an unpreset input signal. Signal Super Mac-2 SGI-1 Macintosh 19" Memory No...

Operating Instructions
Page 59
of the PICTURE SETTING menu properly. (1 page 32) The picture is not turned on the lens. The picture flickers. Replace with new batteries. (1 page 6) c Insert the batteries with the power on the power. (1 page 27) c Close the lamp cover securely. (1 page 62) c Close the air filter cover securely. (1 page 63) c Check that the proper connections have been made. (1 page 13) c Select the input source correctly using the INPUT button. (1 page 26) c Set the computer signal to output...
of the PICTURE SETTING menu properly. (1 page 32) The picture is not turned on the lens. The picture flickers. Replace with new batteries. (1 page 6) c Insert the batteries with the power on the power. (1 page 27) c Close the lamp cover securely. (1 page 62) c Close the air filter cover securely. (1 page 63) c Check that the proper connections have been made. (1 page 13) c Select the input source correctly using the INPUT button. (1 page 26) c Set the computer signal to output...
Operating Instructions
Page 60
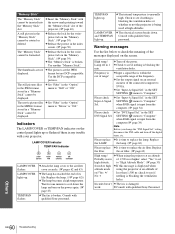
...displayed. TEMP/FAN flashes. TEMP/FAN lights up . LAMP/COVER and TEMP/FAN light up . Consult with qualified Sony personnel. Warning messages Use the list below to check the meaning of the messages displayed on an external monitor of the connected computer to SVGA. High temp.! in the SET SETTING menu to "Computer" when RGB signal is any trouble with your projector. Replace the filter. Use another "Memory Stick". The still pictures files in the JPEG format stored in the SET DVI Signal Sel. LAMP/COVER Indicator TEMP/FAN Indicator LAMP/ COVER TEMP/ FAN POWER...
...displayed. TEMP/FAN flashes. TEMP/FAN lights up . LAMP/COVER and TEMP/FAN light up . Consult with qualified Sony personnel. Warning messages Use the list below to check the meaning of the messages displayed on an external monitor of the connected computer to SVGA. High temp.! in the SET SETTING menu to "Computer" when RGB signal is any trouble with your projector. Replace the filter. Use another "Memory Stick". The still pictures files in the JPEG format stored in the SET DVI Signal Sel. LAMP/COVER Indicator TEMP/FAN Indicator LAMP/ COVER TEMP/ FAN POWER...
Operating Instructions
Page 62
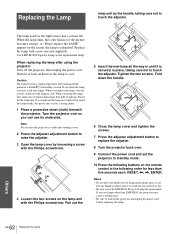
... adjuster adjustment button to raise the adjuster. 3 Open the lamp cover by the handle, taking care not to cool. Caution The lamp becomes a high temperature after using the projector Turn off the projector with a new one (not supplied). Do not tilt the lamp unit. Pull out the 5 Insert the new lamp all the way in place, taking care not to touch the adjuster. Use LMP-H180 Projector Lamp as the replacement lamp. Turn the projector over . 9 Connect the power cord...
... adjuster adjustment button to raise the adjuster. 3 Open the lamp cover by the handle, taking care not to cool. Caution The lamp becomes a high temperature after using the projector Turn off the projector with a new one (not supplied). Do not tilt the lamp unit. Pull out the 5 Insert the new lamp all the way in place, taking care not to touch the adjuster. Use LMP-H180 Projector Lamp as the replacement lamp. Turn the projector over . 9 Connect the power cord...
Operating Instructions
Page 63
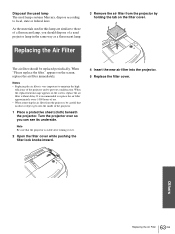
... into the projector. 5 Replace the filter cover. appears on the screen, replace the air filter without delay. When "Please replace the filter." Turn the projector over . 2 Open the filter cover while pushing the filter lock knobs inward. 4 Insert the new air filter into the inside of the projector. 1 Place a protective sheet (cloth) beneath the projector. Others 63 Replacing the Air Filter GB Notes • Replacing the air filter is very important to maintain the high efficiency of a used lamp contains Mercury...
... into the projector. 5 Replace the filter cover. appears on the screen, replace the air filter without delay. When "Please replace the filter." Turn the projector over . 2 Open the filter cover while pushing the filter lock knobs inward. 4 Insert the new air filter into the inside of the projector. 1 Place a protective sheet (cloth) beneath the projector. Others 63 Replacing the Air Filter GB Notes • Replacing the air filter is very important to maintain the high efficiency of a used lamp contains Mercury...

Operating Instructions
Page 65
..., FCC class B, IC class B, EN 60950 (NEMCO), CE, C-Tick, CCC Optional accessories Signal interface unit IFU-HS1 Projector Lamp LMP-H180 (for replacement) Air filter PK-HS10FL (for replacement) Signal interface cables SIC-HS10/SIC-HS20/SIC-HS30/ SIC-HS40 Projection lens Short Focused Conversion Lens VPLL-CW10 Long Focused Conversion Lens VPLL-CT10 Projector Suspension Support PSS-610 Projection Distances for replacement) (1) Operating Instructions (1) Design and specifications are subject to change without notice.
..., FCC class B, IC class B, EN 60950 (NEMCO), CE, C-Tick, CCC Optional accessories Signal interface unit IFU-HS1 Projector Lamp LMP-H180 (for replacement) Air filter PK-HS10FL (for replacement) Signal interface cables SIC-HS10/SIC-HS20/SIC-HS30/ SIC-HS40 Projection lens Short Focused Conversion Lens VPLL-CW10 Long Focused Conversion Lens VPLL-CT10 Projector Suspension Support PSS-610 Projection Distances for replacement) (1) Operating Instructions (1) Design and specifications are subject to change without notice.
Operating Instructions
Page 78
... I Image Flip 35 Indicator LAMP/COVER 60 TEMP/FAN 60 INFORMATION menu 35 INPUT SETTING menu 33 Input-A Signal Sel 34 INSTALL SETTING menu 35 Installing the Projector and a Screen 9, 11 L Lamp replacement 62 Lamp Timer 35 Language 35 Location of controls bottom 76 front 74 rear 75 remote control 77 M Memory Stick delete a picture 53 index menu 41 initializing 58 inserting 40 Memory Stick Home 41 picture setting menu 41 protection 50 rotate 49 slide show 44 startup 51 Menu clearing the menu display ........ 31 operation 30 reset...
... I Image Flip 35 Indicator LAMP/COVER 60 TEMP/FAN 60 INFORMATION menu 35 INPUT SETTING menu 33 Input-A Signal Sel 34 INSTALL SETTING menu 35 Installing the Projector and a Screen 9, 11 L Lamp replacement 62 Lamp Timer 35 Language 35 Location of controls bottom 76 front 74 rear 75 remote control 77 M Memory Stick delete a picture 53 index menu 41 initializing 58 inserting 40 Memory Stick Home 41 picture setting menu 41 protection 50 rotate 49 slide show 44 startup 51 Menu clearing the menu display ........ 31 operation 30 reset...


