
Operating Instructions
Page 5
... the unit. On preventing internal heat buildup The unit is desirable to be exposed to catch your local power supply. To remove dust on the lens, use a damp cloth, detergent solution, or thinner. • Clean the filter whenever you adjust the height of your fingers by the plug.... fluorescent lamps to avoid lowering the contrast ratio. • Cover any windows that face the screen with qualified Sony personnel. • Should any liquid or solid object fall into the lens while the lamp is recommended. Do not use a soft dry cloth. Never install it was originally packed at...
... the unit. On preventing internal heat buildup The unit is desirable to be exposed to catch your local power supply. To remove dust on the lens, use a damp cloth, detergent solution, or thinner. • Clean the filter whenever you adjust the height of your fingers by the plug.... fluorescent lamps to avoid lowering the contrast ratio. • Cover any windows that face the screen with qualified Sony personnel. • Should any liquid or solid object fall into the lens while the lamp is recommended. Do not use a soft dry cloth. Never install it was originally packed at...

Operating Instructions
Page 7
... adverse effects, such as reducing the reliability of the unit. Do not install the unit other than 20 degrees. This is not a malfunction of the lens Do not place any object just in temperature. Subject to direct cool or warm air from the light may damage the object. Do not topple... the unit Malfunction of the sensor may cause a malfunction of the lens that may rarely appear on the screen depending on the screen When using as the unit tilts more than on its side. Do not place...
... adverse effects, such as reducing the reliability of the unit. Do not install the unit other than 20 degrees. This is not a malfunction of the lens Do not place any object just in temperature. Subject to direct cool or warm air from the light may damage the object. Do not topple... the unit Malfunction of the sensor may cause a malfunction of the lens that may rarely appear on the screen depending on the screen When using as the unit tilts more than on its side. Do not place...

Operating Instructions
Page 8
... lens shift function which you have to set up and operate the network presentation. Software (on the CD-ROM) This Operating Instructions describes how to pay attention when handling and using this projector. Also, optional lenses are supplied with the newgeneration LCD .../ Features Features High brightness and high picture performance High brightness Sony's unique optical system with the projector. VPL-FX40/FX41: Three 0.79-inch XGA panels with 1,470,000 pixels provide a resolution of this projector. Quick Reference Manual (separately printed manual) This manual describes...
... lens shift function which you have to set up and operate the network presentation. Software (on the CD-ROM) This Operating Instructions describes how to pay attention when handling and using this projector. Also, optional lenses are supplied with the newgeneration LCD .../ Features Features High brightness and high picture performance High brightness Sony's unique optical system with the projector. VPL-FX40/FX41: Three 0.79-inch XGA panels with 1,470,000 pixels provide a resolution of this projector. Quick Reference Manual (separately printed manual) This manual describes...

Operating Instructions
Page 9
...computer, if it 90 degrees at front and rear) You can also display VGA, SVGA, XGA, WXGA, SXGA, SXGA+ and UXGA (60 Hz) signals. Features 9 Simple maintenance Even when the projector is mounted on and off away from a long distance. Direct Power On/Power Off function The...VPL-FE40, VPL-FX40 and VPL-FX41 equipped with one room. ID function The function allows you to connect to -use two or more projectors in one Remote Commander when you to connect to equipment output high-resolution signals and to connect to adjust or control each projector individually with a standard lens ...
...computer, if it 90 degrees at front and rear) You can also display VGA, SVGA, XGA, WXGA, SXGA, SXGA+ and UXGA (60 Hz) signals. Features 9 Simple maintenance Even when the projector is mounted on and off away from a long distance. Direct Power On/Power Off function The...VPL-FE40, VPL-FX40 and VPL-FX41 equipped with one room. ID function The function allows you to connect to -use two or more projectors in one Remote Commander when you to connect to equipment output high-resolution signals and to connect to adjust or control each projector individually with a standard lens ...
Operating Instructions
Page 10
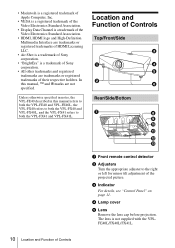
...Shot is a trademark of Sony corporation. • "BrightEra" is not supplied with the VPLFE40L/FX40L/FX41L. 10 Location and Function of Controls In this manual refers to both the VPL-FE40 and VPL-FE40L, the VPL-FX40 refers to both the VPL-FX41 and VPL-FX41L. Location and Function of... the appropriate adjuster to both the VPL-FX40 and VPL-FX40L, and the VPL-FX41 refers to the right or left for minor tilt adjustment of their respective holders. d Lamp cover e Lens Remove the lens cap before projection. Unless otherwise specified in notes, the VPL-FE40 described in this manual, &#...
...Shot is a trademark of Sony corporation. • "BrightEra" is not supplied with the VPLFE40L/FX40L/FX41L. 10 Location and Function of Controls In this manual refers to both the VPL-FE40 and VPL-FE40L, the VPL-FX40 refers to both the VPL-FX41 and VPL-FX41L. Location and Function of... the appropriate adjuster to both the VPL-FX40 and VPL-FX40L, and the VPL-FX41 refers to the right or left for minor tilt adjustment of their respective holders. d Lamp cover e Lens Remove the lens cap before projection. Unless otherwise specified in notes, the VPL-FE40 described in this manual, &#...

Operating Instructions
Page 12
.... Otherwise, edges of the picture may be used when you attach the optional lens VPLL-1008 to align the center point of the screen with the ?/1 key. - The fan runs for about 90 seconds after installation, because the projector is turned off with that of the picture using the arrow keys. Press... mode. Next, adjust the focus using the arrow keys. Press the v or B key to focus on a picture further back, and the V or b key to the projector, do not perform a lens-shift operation after the power is attached to focus on page 46. f MENU key Displays the on the...
.... Otherwise, edges of the picture may be used when you attach the optional lens VPLL-1008 to align the center point of the screen with the ?/1 key. - The fan runs for about 90 seconds after installation, because the projector is turned off with that of the picture using the arrow keys. Press... mode. Next, adjust the focus using the arrow keys. Press the v or B key to focus on a picture further back, and the V or b key to the projector, do not perform a lens-shift operation after the power is attached to focus on page 46. f MENU key Displays the on the...

Operating Instructions
Page 16
..." on installation, ceiling installation or when you use an optional lens, be a slight difference between the lens and the screen varies depending on the size of installing the standard lens supplied with VPL-FE40/ VPL-FX40/VPL-FX41. For details on the CD-ROM. 16 Installing the Projector The distance between the actual value and the design value...
..." on installation, ceiling installation or when you use an optional lens, be a slight difference between the lens and the screen varies depending on the size of installing the standard lens supplied with VPL-FE40/ VPL-FX40/VPL-FX41. For details on the CD-ROM. 16 Installing the Projector The distance between the actual value and the design value...
Operating Instructions
Page 21
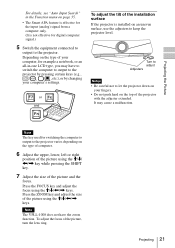
...APA feature is effective for digital computer signal.) 5 Switch the equipment connected to output to keep the projector level. It may have to switch the computer to output to the projector by pressing certain keys (e.g., / , LCD VGA / , etc.), or by changing your computer, for example a notebook, or an all-...in the Function menu on an uneven surface, use the adjusters to the projector. Projecting the Picture For details, see "Auto Input Search" in -one LCD type, you may cause a malfunction. F7 or Fx and Fn To adjust the tilt of the picture using ...
...APA feature is effective for digital computer signal.) 5 Switch the equipment connected to output to keep the projector level. It may have to switch the computer to output to the projector by pressing certain keys (e.g., / , LCD VGA / , etc.), or by changing your computer, for example a notebook, or an all-...in the Function menu on an uneven surface, use the adjusters to the projector. Projecting the Picture For details, see "Auto Input Search" in -one LCD type, you may cause a malfunction. F7 or Fx and Fn To adjust the tilt of the picture using ...

Operating Instructions
Page 35
You can adjust the picture by pressing INPUT key. Set this item is set to "On", the projector detects whether a Input-A, Input-B, Input-C, Input-D, Input-E, Video or S Video signal is input when the input connector with effective signals is automatically selected ...from a computer. • On: When a signal is input from a computer, the APA functions automatically so that the picture can be used when adjusting the lens with "Focus," "Zoom," and "Shift," or correcting the screen proportions with "V Keystone." The Function Menu 35 Detects the input signal and displays the detected ...
You can adjust the picture by pressing INPUT key. Set this item is set to "On", the projector detects whether a Input-A, Input-B, Input-C, Input-D, Input-E, Video or S Video signal is input when the input connector with effective signals is automatically selected ...from a computer. • On: When a signal is input from a computer, the APA functions automatically so that the picture can be used when adjusting the lens with "Focus," "Zoom," and "Shift," or correcting the screen proportions with "V Keystone." The Function Menu 35 Detects the input signal and displays the detected ...

Operating Instructions
Page 37
... detector only. • Rear: Activates the rear detector only. Flips the picture on the front and rear of the lens. When set this item for installation for changing the settings of the projector. The Installation Menu The Installation menu is used during the projection. • High: Illuminates the projected image brightly. •...
... detector only. • Rear: Activates the rear detector only. Flips the picture on the front and rear of the lens. When set this item for installation for changing the settings of the projector. The Installation Menu The Installation menu is used during the projection. • High: Illuminates the projected image brightly. •...

Operating Instructions
Page 38
When it is set to "1," you can control the projector with the Remote Commander with M / m key. Illumination Selects whether the SONY logo on the top panel of the On projector lights when the projector is on the Blanking adjustment screen with the ID MODE key set the V Keystone to "0." &#...Since the V keystone function is adjusted, information necessary on /off without pressing the power key on the picture position adjusted with the lens shift feature, the aspect ratio of the picture may change from the original or picture distortion may occur with the Remote Commander independently ...
When it is set to "1," you can control the projector with the Remote Commander with M / m key. Illumination Selects whether the SONY logo on the top panel of the On projector lights when the projector is on the Blanking adjustment screen with the ID MODE key set the V Keystone to "0." &#...Since the V keystone function is adjusted, information necessary on /off without pressing the power key on the picture position adjusted with the lens shift feature, the aspect ratio of the picture may change from the original or picture distortion may occur with the Remote Commander independently ...

Operating Instructions
Page 45
...spite of inputting the correct signal from INPUT C. c Set "Status" in the Setup menu to the input signal (see page 33). c Leave the projector for about two hours with a new one (see page 41). Cause and Remedy • A cable is disconnected or the connections are black edges ...has not been adjusted properly. The picture is incorrect. • The picture has not been adjusted properly. The picture flickers. key on the lens. The image extends beyond The APA key has been pressed even though there are wrong. c Use a no-resistance stereo audio cable (see page...
...spite of inputting the correct signal from INPUT C. c Set "Status" in the Setup menu to the input signal (see page 33). c Leave the projector for about two hours with a new one (see page 41). Cause and Remedy • A cable is disconnected or the connections are black edges ...has not been adjusted properly. The picture is incorrect. • The picture has not been adjusted properly. The picture flickers. key on the lens. The image extends beyond The APA key has been pressed even though there are wrong. c Use a no-resistance stereo audio cable (see page...

Operating Instructions
Page 48
... 2.18 * The lens is not supplied with the VPL-FE40L/FX40L/FX41L. Specifications Optical characteristics Projection system 3 LCD panels, 1 lens, 3 primary color shutter system LCD panel VPL-FE40: 0.79-inch SXGA+ panel, 4,410,000 pixels (1400 × 1050 × 3) VPL-FX40/FX41: 0.79-inch XGA panel, 2,359,296...Lens 1.3 times zoom lens (powered) f 30.6 to 39.7 mm/F1.66 to 92 Hz (Maximum input signal resolution: UXGA 1600 × 1200 fV: 60 Hz) 1) Set the resolution and the frequency of the signal of the connected computer within the range of acceptable preset signals of the projector...
... 2.18 * The lens is not supplied with the VPL-FE40L/FX40L/FX41L. Specifications Optical characteristics Projection system 3 LCD panels, 1 lens, 3 primary color shutter system LCD panel VPL-FE40: 0.79-inch SXGA+ panel, 4,410,000 pixels (1400 × 1050 × 3) VPL-FX40/FX41: 0.79-inch XGA panel, 2,359,296...Lens 1.3 times zoom lens (powered) f 30.6 to 39.7 mm/F1.66 to 92 Hz (Maximum input signal resolution: UXGA 1600 × 1200 fV: 60 Hz) 1) Set the resolution and the frequency of the signal of the connected computer within the range of acceptable preset signals of the projector...

Operating Instructions
Page 49
SONY WILL NOT BE LIABLE FOR DAMAGES OF ANY KIND INCLUDING, BUT NOT LIMITED TO, COMPENSATION OR REIMBURSEMENT ON ACCOUNT OF THE LOSS OF PRESENT OR ... -20°C to +60°C (-4°F to +140°F) Storage humidity 10% to 90% Supplied accessories Remote Commander (1) Size AA (R6) batteries (2) Lens cap (1) (VPL-FE40/FX40/ FX41) Lens hole cover (1) (VPL-FE40L/ FX40L/FX41L) AC power cord (1) CD-ROM (Operating Instructions, Application Software) (1) Quick Reference Manual (1) Safety Regulations (1) Security Label (1) Design and specifications are...
SONY WILL NOT BE LIABLE FOR DAMAGES OF ANY KIND INCLUDING, BUT NOT LIMITED TO, COMPENSATION OR REIMBURSEMENT ON ACCOUNT OF THE LOSS OF PRESENT OR ... -20°C to +60°C (-4°F to +140°F) Storage humidity 10% to 90% Supplied accessories Remote Commander (1) Size AA (R6) batteries (2) Lens cap (1) (VPL-FE40/FX40/ FX41) Lens hole cover (1) (VPL-FE40L/ FX40L/FX41L) AC power cord (1) CD-ROM (Operating Instructions, Application Software) (1) Quick Reference Manual (1) Safety Regulations (1) Security Label (1) Design and specifications are...

Operating Instructions
Page 50
For details, please consult your nearest Sony dealer. Pin assignment INPUT A/B RGB connector (HD D-sub 15-pin, female) 1 R 9 Power supply...97 × 87 × 180 mm (W × H × D) Weight 1140 g 50 Specifications Long focus zoom lens VPLL-Z1032 F = 2.0 to 2.4 f = 52.6 to 84.3 mm Powered focus/zoom Projection screen size 40 to 600... WARRANTY, OR FOR ANY OTHER REASON WHATSOEVER. Optional accessories Projector Lamp LMP-F270 (for replacement) Projector Suspension Support PSS-610 Presentation Tool RM-PJPK1 Projection Lense Fixed short focus lens VPLL-1008 (for DDC 2 G 10 GND 3 B...
For details, please consult your nearest Sony dealer. Pin assignment INPUT A/B RGB connector (HD D-sub 15-pin, female) 1 R 9 Power supply...97 × 87 × 180 mm (W × H × D) Weight 1140 g 50 Specifications Long focus zoom lens VPLL-Z1032 F = 2.0 to 2.4 f = 52.6 to 84.3 mm Powered focus/zoom Projection screen size 40 to 600... WARRANTY, OR FOR ANY OTHER REASON WHATSOEVER. Optional accessories Projector Lamp LMP-F270 (for replacement) Projector Suspension Support PSS-610 Presentation Tool RM-PJPK1 Projection Lense Fixed short focus lens VPLL-1008 (for DDC 2 G 10 GND 3 B...

Operating Instructions
Page 54
26 (1 1/16) Dimensions Front 29.5 (1 3/16) 532 (21) 497 (19 5/8) 116 (4 5/8) (5/16) 7.6 71 (2 7/8) 13 (17/32) (4) 10 0 145 (5 3/4) 87.5 (3 1/2) 47.5 (1 7/8) 24.5 (31/32) Top 133 (5 1/4) 65.4 65.4 (2 5/8) (2 5/8) 133 (5 1/4) Center of the lens 500 (19 3/4) 27.5(1 1/8) 40 (1 5/8) 352 (13 7/8) 54 Dimensions 532 (21) Unit: mm (inches)
26 (1 1/16) Dimensions Front 29.5 (1 3/16) 532 (21) 497 (19 5/8) 116 (4 5/8) (5/16) 7.6 71 (2 7/8) 13 (17/32) (4) 10 0 145 (5 3/4) 87.5 (3 1/2) 47.5 (1 7/8) 24.5 (31/32) Top 133 (5 1/4) 65.4 65.4 (2 5/8) (2 5/8) 133 (5 1/4) Center of the lens 500 (19 3/4) 27.5(1 1/8) 40 (1 5/8) 352 (13 7/8) 54 Dimensions 532 (21) Unit: mm (inches)

Operating Instructions
Page 57
... 34 Installation 16 Installation examples unsuitable conditions 7 unsuitable installation 6 L Lamp Mode 37 Lamp replacement 41 Lamp Timer 39 Language 33 selecting the menu language 23 Lens 10 Location and function of controls connector panel 12 control panel 11 rear/side/bottom 10 Remote Commander 14 top/front/side 10 M Menu clearing...
... 34 Installation 16 Installation examples unsuitable conditions 7 unsuitable installation 6 L Lamp Mode 37 Lamp replacement 41 Lamp Timer 39 Language 33 selecting the menu language 23 Lens 10 Location and function of controls connector panel 12 control panel 11 rear/side/bottom 10 Remote Commander 14 top/front/side 10 M Menu clearing...

