

Operating Instructions
Page 1
2-672-629-13 (1) Data Projector Operating Instructions VPL-ES3 VPL-EX3 © 2006 Sony Corporation
2-672-629-13 (1) Data Projector Operating Instructions VPL-ES3 VPL-EX3 © 2006 Sony Corporation

Operating Instructions
Page 4
... Function of Controls .... 9 Top/Right Side/Front 9 Rear/Bottom 9 Control Panel 10 Connector Panel 11 Remote Commander 11 Projecting the Picture Installing the Projector 13 Connecting the Projector 14 Connecting a Computer 14 Connecting a VCR 15 Projecting 16 Turning Off the Power 18 Maintenance Replacing the Lamp 34 Cleaning the Air Filter 36...
... Function of Controls .... 9 Top/Right Side/Front 9 Rear/Bottom 9 Control Panel 10 Connector Panel 11 Remote Commander 11 Projecting the Picture Installing the Projector 13 Connecting the Projector 14 Connecting a Computer 14 Connecting a VCR 15 Projecting 16 Turning Off the Power 18 Maintenance Replacing the Lamp 34 Cleaning the Air Filter 36...

Operating Instructions
Page 5
... personnel before operating it further. • Unplug the unit from the wall outlet while the cooling fan is still running. LCD data projector • This LCD data projector is recommended. If the floor and walls are not of lightreflecting material. Preventing internal heat build-up may occur, causing picture...to avoid lowering the contrast ratio. • Cover any liquid or solid object fall into the lens while the lamp is on the LCD data projector. Precautions 5 Never pull the cord itself has been turned off the power with the ?/1 key, do not disconnect the unit from ...
... personnel before operating it further. • Unplug the unit from the wall outlet while the cooling fan is still running. LCD data projector • This LCD data projector is recommended. If the floor and walls are not of lightreflecting material. Preventing internal heat build-up may occur, causing picture...to avoid lowering the contrast ratio. • Cover any liquid or solid object fall into the lens while the lamp is on the LCD data projector. Precautions 5 Never pull the cord itself has been turned off the power with the ?/1 key, do not disconnect the unit from ...
Operating Instructions
Page 6
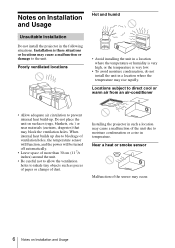
When internal heat builds up . Installing the projector in a location where the temperature may cause a malfunction or damage to prevent internal heat build-up due to blockage of ventilation holes, the temperature sensor ... unit on surfaces (rugs, blankets, etc.) or near materials (curtains, draperies) that may occur. 6 Notes on Installation and Usage Unsuitable Installation Do not install the projector in a location where the temperature or humidity is very high, or the temperature is these situations or locations may rise rapidly. Notes on Installation and...
When internal heat builds up . Installing the projector in a location where the temperature may cause a malfunction or damage to prevent internal heat build-up due to blockage of ventilation holes, the temperature sensor ... unit on surfaces (rugs, blankets, etc.) or near materials (curtains, draperies) that may occur. 6 Notes on Installation and Usage Unsuitable Installation Do not install the projector in a location where the temperature or humidity is very high, or the temperature is these situations or locations may rise rapidly. Notes on Installation and...

Operating Instructions
Page 7
... installation may cause a malfunction of the unit. Heat from the ceiling. Use the PIC MUTING key on Installation and Usage 7 Note on carrying the projector The unit is not a malfunction of the carrying case. When transporting the unit stored in the internal temperature of the unit or damage it on... components. It may build up. Tilting the unit to the right or left Avoid tilting the unit to set this mode when using the projector at high altitudes could have adverse effects, such as this may cause color shading or shorten the lamp life excessively. Standing the unit upright ...
... installation may cause a malfunction of the unit. Heat from the ceiling. Use the PIC MUTING key on Installation and Usage 7 Note on carrying the projector The unit is not a malfunction of the carrying case. When transporting the unit stored in the internal temperature of the unit or damage it on... components. It may build up. Tilting the unit to the right or left Avoid tilting the unit to set this mode when using the projector at high altitudes could have adverse effects, such as this may cause color shading or shorten the lamp life excessively. Standing the unit upright ...
Operating Instructions
Page 8
... projection distance is turned on. High picture quality VPL-ES3: Three super-high-aperture 0.63inch SVGA panels...VPL-EX3: Three super-high-aperture 0.63inch XGA panels with approximately 480,000 effective pixels, produce a resolution of a picture on the screen unless the required password is entered when the projector...panel of the projector, allowing use of the keys on a ...other countries. • VGA, SVGA, XGA and SXGA are registered trademarks of the ...is a registered trademark of 2000 ANSI lumen. This prevents the projector from operating incorrectly. It allows the 165 W lamp to ...
... projection distance is turned on. High picture quality VPL-ES3: Three super-high-aperture 0.63inch SVGA panels...VPL-EX3: Three super-high-aperture 0.63inch XGA panels with approximately 480,000 effective pixels, produce a resolution of a picture on the screen unless the required password is entered when the projector...panel of the projector, allowing use of the keys on a ...other countries. • VGA, SVGA, XGA and SXGA are registered trademarks of the ...is a registered trademark of 2000 ANSI lumen. This prevents the projector from operating incorrectly. It allows the 165 W lamp to ...

Operating Instructions
Page 10
...around the ?/1 key) Lights up or flashes under the following conditions: - Flashes in green from the projector is turned on , and when it on the projector when the projector is ready to enter the settings of items in green while the cooling fan is running after the power...a high temperature. - e INPUT key f Status indicators • POWER SAVING Lights when the projector is broken. • LAMP/COVER Lights or flashes under the following conditions: - Lights in green until the projector is ready to operate. b ON/STANDBY indicator (located around the ?/1 key flashes in green ...
...around the ?/1 key) Lights up or flashes under the following conditions: - Flashes in green from the projector is turned on , and when it on the projector when the projector is ready to enter the settings of items in green while the cooling fan is running after the power...a high temperature. - e INPUT key f Status indicators • POWER SAVING Lights when the projector is broken. • LAMP/COVER Lights or flashes under the following conditions: - Lights in green until the projector is ready to operate. b ON/STANDBY indicator (located around the ?/1 key flashes in green ...

Operating Instructions
Page 11
... keys on page 15. • INPUT B connector (HD D-sub 15pin) (for INPUT A/B is common for VPL-EX3 only): Connect to the output connector of Controls 11 Overview For the VPL-EX3, when INPUT A or INPUT B is selected, the sound input to the AUDIO (AUDIO INPUT A/B) connector which ... via this jack to external active speakers. d RS-232C connector (D-sub 9pin, female) Connects to a computer to operate the projector from the INPUT A or INPUT B (VPL-EX3 only). • AUDIO (stereo minijack): Connects to the audio output of the speakers can be controlled by the VOLUME +/-
... keys on page 15. • INPUT B connector (HD D-sub 15pin) (for INPUT A/B is common for VPL-EX3 only): Connect to the output connector of Controls 11 Overview For the VPL-EX3, when INPUT A or INPUT B is selected, the sound input to the AUDIO (AUDIO INPUT A/B) connector which ... via this jack to external active speakers. d RS-232C connector (D-sub 9pin, female) Connects to a computer to operate the projector from the INPUT A or INPUT B (VPL-EX3 only). • AUDIO (stereo minijack): Connects to the audio output of the speakers can be controlled by the VOLUME +/-
Operating Instructions
Page 12
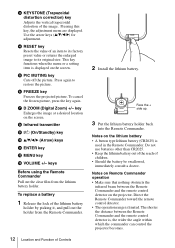
...the remote control detector. • The operation range is used in the Remote Commander. key Enlarges the image at a desired location on the projector. keys Before using the Remote Commander Pull out the clear film from the Remote Commander. 12 Location and Function of Controls 2 Install the ... are displayed. This key functions when the menu or a setting item is , the wider the angle within which the commander can control the projector becomes. To replace a battery 1 Release the lock of the image. Face the + side up. 3 Put the lithium battery holder back into the...
...the remote control detector. • The operation range is used in the Remote Commander. key Enlarges the image at a desired location on the projector. keys Before using the Remote Commander Pull out the clear film from the Remote Commander. 12 Location and Function of Controls 2 Install the ... are displayed. This key functions when the menu or a setting item is , the wider the angle within which the commander can control the projector becomes. To replace a battery 1 Release the lock of the image. Face the + side up. 3 Put the lithium battery holder back into the...

Operating Instructions
Page 13
... on page 46. Use the following table as a guide. For details on installation diagram, see "Installation Diagram" on the size of the screen. Installing the Projector 13 Projecting the Picture B Projecting the Picture Installing the Projector The distance between the actual value and the design value shown in the table above.
... on page 46. Use the following table as a guide. For details on installation diagram, see "Installation Diagram" on the size of the screen. Installing the Projector 13 Projecting the Picture B Projecting the Picture Installing the Projector The distance between the actual value and the design value shown in the table above.

Operating Instructions
Page 14
... recommend that you set your computer, such as a notebook computer, to output the signal to both your computer to SVGA (VPL-ES3) or XGA (VPL-EX3) mode for the external monitor. • If you connect the projector, make sure to: • Turn off all equipment before making any connections. • Use the proper cables for...
... recommend that you set your computer, such as a notebook computer, to output the signal to both your computer to SVGA (VPL-ES3) or XGA (VPL-EX3) mode for the external monitor. • If you connect the projector, make sure to: • Turn off all equipment before making any connections. • Use the proper cables for...
Operating Instructions
Page 15
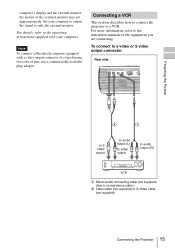
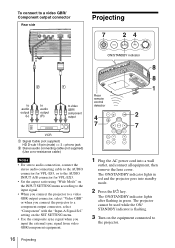
Connecting a VCR This section describes how to connect the projector to the operating instructions supplied with a video output connector of a type having two rows of pins, use a commercially available plug adaptor. Note To connect a Macintosh...to audio output (R) VCR 1 Stereo audio connecting cable (not supplied) (Use a no-resistance cable.) 2 Video cable (not supplied) or S-Video cable (not supplied) Connecting the Projector 15 For details, refer to a VCR. To connect to a video or S video output connector Rear side INPUT AUDIO S VIDEO VIDEO AUDIO INPUT A/B INPUT A INP Projecting...
Connecting a VCR This section describes how to connect the projector to the operating instructions supplied with a video output connector of a type having two rows of pins, use a commercially available plug adaptor. Note To connect a Macintosh...to audio output (R) VCR 1 Stereo audio connecting cable (not supplied) (Use a no-resistance cable.) 2 Video cable (not supplied) or S-Video cable (not supplied) Connecting the Projector 15 For details, refer to a VCR. To connect to a video or S video output connector Rear side INPUT AUDIO S VIDEO VIDEO AUDIO INPUT A/B INPUT A INP Projecting...
Operating Instructions
Page 16
...used while the ON/ STANDBY indicator is flashing. 3 Turn on the SET SETTING menu. • Use the composite sync signal when you connect the projector to a component output connector, select "Component" with the "Input-A Signal Sel." The ON/STANDBY indicator lights in green. To connect to a video... audio connecting cable to the AUDIO connector for VPL-ES3, or to the AUDIO INPUT A/B connector for VPL-EX3. • Set the aspect ratio using "Wide Mode" on the INPUT SETTING menu according to the input signal. • When you connect the projector to a video GBR output connector, select "Video...
...used while the ON/ STANDBY indicator is flashing. 3 Turn on the SET SETTING menu. • Use the composite sync signal when you connect the projector to a component output connector, select "Component" with the "Input-A Signal Sel." The ON/STANDBY indicator lights in green. To connect to a video... audio connecting cable to the AUDIO connector for VPL-ES3, or to the AUDIO INPUT A/B connector for VPL-EX3. • Set the aspect ratio using "Wide Mode" on the INPUT SETTING menu according to the input signal. • When you connect the projector to a video GBR output connector, select "Video...

Operating Instructions
Page 17
...adjustment menu and adjust the tilt using the v/V/ b/B keys. Projecting 17 It may have to switch the computer to output to the projector. Note The key used for the signals from the connected equipment and displays the input channel where the input signals are found. Use ... the input signal switches as follows: Input-A t INPUT B t Video t S-Video (VPL-EX3 only) F7 or Fx and Fn To input from a computer only. 5 Switch the equipment connected to output to the projector by pressing certain keys (e.g., / , LCD VGA / , etc.), or by changing your fingers. • Do not push hard on...
...adjustment menu and adjust the tilt using the v/V/ b/B keys. Projecting 17 It may have to switch the computer to output to the projector. Note The key used for the signals from the connected equipment and displays the input channel where the input signals are found. Use ... the input signal switches as follows: Input-A t INPUT B t Video t S-Video (VPL-EX3 only) F7 or Fx and Fn To input from a computer only. 5 Switch the equipment connected to output to the projector by pressing certain keys (e.g., / , LCD VGA / , etc.), or by changing your fingers. • Do not push hard on...

Operating Instructions
Page 18
... running ; The ON/STANDBY indicator flashes in red. otherwise, the fan will not be able to reduce the internal heat. 8 Adjust the size of the projector. 18 Turning Off the Power
... running ; The ON/STANDBY indicator flashes in red. otherwise, the fan will not be able to reduce the internal heat. 8 Adjust the size of the projector. 18 Turning Off the Power
Operating Instructions
Page 19
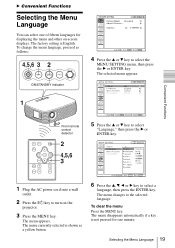
... disappears automatically if a key is English. The factory setting is not pressed for one of fifteen languages for displaying the menu and other on the projector. 3 Press the MENU key. Selecting the Menu Language 19
... disappears automatically if a key is English. The factory setting is not pressed for one of fifteen languages for displaying the menu and other on the projector. 3 Press the MENU key. Selecting the Menu Language 19

Operating Instructions
Page 20
...your own password. After this case, press the ?/1 key to turn on the next time. If "Invalid Password!" The screen used . Security Lock The projector is displayed, enter the password that using the security lock can put in such cases. Note You will not be able to use the... setting for security lock is displayed. (Enter the password on this screen even if you fail to enter the correct password after three tries, the projector cannot be performed without the password. If you want to remember this procedure again from step 1. 4 Turn the main power off the "Security Lock"...
...your own password. After this case, press the ?/1 key to turn on the next time. If "Invalid Password!" The screen used . Security Lock The projector is displayed, enter the password that using the security lock can put in such cases. Note You will not be able to use the... setting for security lock is displayed. (Enter the password on this screen even if you fail to enter the correct password after three tries, the projector cannot be performed without the password. If you want to remember this procedure again from step 1. 4 Turn the main power off the "Security Lock"...

Operating Instructions
Page 21
... enlarge. The digital zoom icon appears in other countries/regions.) Once your identity has been confirmed, we will need to be able to verify the projector's serial number and your identity. (This process may differ in the center of the image to enlarge. Use the arrow key (v/V/b/B) to the point on...
... enlarge. The digital zoom icon appears in other countries/regions.) Once your identity has been confirmed, we will need to be able to verify the projector's serial number and your identity. (This process may differ in the center of the image to enlarge. Use the arrow key (v/V/b/B) to the point on...

Operating Instructions
Page 23
... changing the adjustment level: To increase the number, press the v or B key. Adjustments and Settings Using a Menu B Adjustments and Settings Using a Menu Using a MENU The projector is equipped with an on the MENU SETTING menu. Display items Input signal indicator 3 Select an item. The menu appears. The menu presently selected is...
... changing the adjustment level: To increase the number, press the v or B key. Adjustments and Settings Using a Menu B Adjustments and Settings Using a Menu Using a MENU The projector is equipped with an on the MENU SETTING menu. Display items Input signal indicator 3 Select an item. The menu appears. The menu presently selected is...

Operating Instructions
Page 24
... clear the menu Press the MENU key. Storage of the item that cannot be adjusted, depending on the input signal, are automatically stored in the projector memory except the settings for one minute. "Complete!" For details, see page 33. 24 Using a MENU appears on the screen. appears on the screen and...
... clear the menu Press the MENU key. Storage of the item that cannot be adjusted, depending on the input signal, are automatically stored in the projector memory except the settings for one minute. "Complete!" For details, see page 33. 24 Using a MENU appears on the screen. appears on the screen and...


