Operating Instructions
Page 1
Please check with your local Sony Authorized Dealer. © 2009 Sony Corporation 4-128-127-12 (2) Data Projector Operating Instructions Before operating the unit, please read this manual thoroughly and retain it for future reference. VPL-DX10/DX11/DX15 Not all models are available in all countries and area.
Please check with your local Sony Authorized Dealer. © 2009 Sony Corporation 4-128-127-12 (2) Data Projector Operating Instructions Before operating the unit, please read this manual thoroughly and retain it for future reference. VPL-DX10/DX11/DX15 Not all models are available in all countries and area.

Operating Instructions
Page 4
...indoor operations only. For the customers in the U.S. Nadere informatie kunt u vinden op: http:// www.compliance.sony.de/ Hereby, Sony Corporation, declares that may not cause interference, and (2) this VPL-DX15/Data Projector is in the following countries: AT BE BG CY CZ DK EE FI FR DE GR HU IE ... LT LU MT NL PL PT RO SK SI ES SE GB IS LI NO CH Bulgarian Czech Danish Dutch English VPL-DX15/Data Projector 1999/5/EC http://www.compliance.sony.de/. A. This equipment complies with the essential requirements and other antenna or transmitter. This transmitter must accept any other ...
...indoor operations only. For the customers in the U.S. Nadere informatie kunt u vinden op: http:// www.compliance.sony.de/ Hereby, Sony Corporation, declares that may not cause interference, and (2) this VPL-DX15/Data Projector is in the following countries: AT BE BG CY CZ DK EE FI FR DE GR HU IE ... LT LU MT NL PL PT RO SK SI ES SE GB IS LI NO CH Bulgarian Czech Danish Dutch English VPL-DX15/Data Projector 1999/5/EC http://www.compliance.sony.de/. A. This equipment complies with the essential requirements and other antenna or transmitter. This transmitter must accept any other ...
Operating Instructions
Page 6
... direktiv 1999/5/EG. Para mayor información, por favor consulte el siguiente URL: http://www.compliance.sony.de/ Härmed intygar Sony Corporation att denna VPL-DX15/Data Projector står I . 6/2006 is governed: - Pentru detalii, vă rugăm accesa&#...slušné ustanovenia Smernice 1999/5/ES. Podrobnosti získate na nasledovnej webovej adrese: http://www.compliance.sony.de/ Sony Corporation izjavlja, da je ta VPL-DX15/Data Projector v skladu z bistvenimi zahtevami in France The WLAN feature of electronic communications - För ytterligare information gå...
... direktiv 1999/5/EG. Para mayor información, por favor consulte el siguiente URL: http://www.compliance.sony.de/ Härmed intygar Sony Corporation att denna VPL-DX15/Data Projector står I . 6/2006 is governed: - Pentru detalii, vă rugăm accesa&#...slušné ustanovenia Smernice 1999/5/ES. Podrobnosti získate na nasledovnej webovej adrese: http://www.compliance.sony.de/ Sony Corporation izjavlja, da je ta VPL-DX15/Data Projector v skladu z bistvenimi zahtevami in France The WLAN feature of electronic communications - För ytterligare information gå...
Operating Instructions
Page 8
.../Bottom 16 Control Panel 18 Connector Panel 19 Remote Commander 20 Projecting the Picture Installing the Projector 22 Connecting the Projector 22 Connecting a Computer 23 Connecting a VCR 24 Connecting to a Network (VPL-DX15 only 25 Connecting a USB memory (VPL-DX15 only 25 Projecting 25 Turning Off the Power 28 Convenient Functions Selecting the Menu Language .......... 29... 38 Adjusting the Image Quality (Smart APA 39 Setting the Picture Mode 40 Starting the Network Function or the USB File Viewer With One Keypress (VPL-DX15 only 41
.../Bottom 16 Control Panel 18 Connector Panel 19 Remote Commander 20 Projecting the Picture Installing the Projector 22 Connecting the Projector 22 Connecting a Computer 23 Connecting a VCR 24 Connecting to a Network (VPL-DX15 only 25 Connecting a USB memory (VPL-DX15 only 25 Projecting 25 Turning Off the Power 28 Convenient Functions Selecting the Menu Language .......... 29... 38 Adjusting the Image Quality (Smart APA 39 Setting the Picture Mode 40 Starting the Network Function or the USB File Viewer With One Keypress (VPL-DX15 only 41
Operating Instructions
Page 9
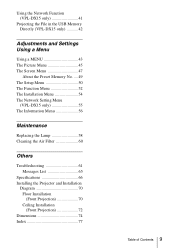
... The Function Menu 52 The Installation Menu 54 The Network Setting Menu (VPL-DX15 only 55 The Information Menu 56 Maintenance Replacing the Lamp 58 Cleaning the Air Filter 60 Others Troubleshooting 61 Messages List 65 Specifications 66 Installing the Projector and Installation Diagram 70 Floor Installation (Front Projection 70 Ceiling Installation (Front...
... The Function Menu 52 The Installation Menu 54 The Network Setting Menu (VPL-DX15 only 55 The Information Menu 56 Maintenance Replacing the Lamp 58 Cleaning the Air Filter 60 Others Troubleshooting 61 Messages List 65 Specifications 66 Installing the Projector and Installation Diagram 70 Floor Installation (Front Projection 70 Ceiling Installation (Front...
Operating Instructions
Page 10
...lens The lens surface is especially treated to reduce reflection of light. Stubborn stains may be removed with a cloth lightly dampened with qualified Sony personnel. • Should any windows that the carpet and wall paper be changed to a dark color. 10 Precautions On preventing internal ... the lens gently with a soft cloth such as a cleaning cloth or glass cleaning cloth. • Stubborn stains may impair the performance of the projector, take care with a soft dry cloth. Precautions On safety • Check that the operating voltage of your unit is identical with water. •...
...lens The lens surface is especially treated to reduce reflection of light. Stubborn stains may be removed with a cloth lightly dampened with qualified Sony personnel. • Should any windows that the carpet and wall paper be changed to a dark color. 10 Precautions On preventing internal ... the lens gently with a soft cloth such as a cleaning cloth or glass cleaning cloth. • Stubborn stains may impair the performance of the projector, take care with a soft dry cloth. Precautions On safety • Check that the operating voltage of your unit is identical with water. •...
Operating Instructions
Page 11
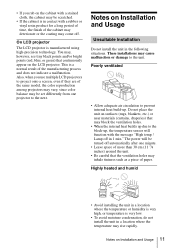
... on Installation and Usage Unsuitable Installation Do not install the unit in contact with the message "High temp.! On LCD projector The LCD projector is a normal result of the manufacturing process and does not indicate a malfunction. This is manufactured using high-precision technology. ...holes may inhale tininess such as a piece of paper. • If you use multiple LCD projectors to project onto a screen, even if they are of the same model, the color reproduction among projectors may vary, since color balance may be set differently from one minute. • Leave space...
... on Installation and Usage Unsuitable Installation Do not install the unit in contact with the message "High temp.! On LCD projector The LCD projector is a normal result of the manufacturing process and does not indicate a malfunction. This is manufactured using high-precision technology. ...holes may inhale tininess such as a piece of paper. • If you use multiple LCD projectors to project onto a screen, even if they are of the same model, the color reproduction among projectors may vary, since color balance may be set differently from one minute. • Leave space...
Operating Instructions
Page 14
... (separately printed manual) This manual describes basic operations for Network/ USB file Viewer (VPL-DX15 only) (on the CD-ROM) This Operating Instructions describes about the network function and how to read the Operating Instructions stored on the CDROM) (this projector. Be aware that is mainly used for the VPL-DX10, VPL-DX11 and VPL-DX15 together.
... (separately printed manual) This manual describes basic operations for Network/ USB file Viewer (VPL-DX15 only) (on the CD-ROM) This Operating Instructions describes about the network function and how to read the Operating Instructions stored on the CDROM) (this projector. Be aware that is mainly used for the VPL-DX10, VPL-DX11 and VPL-DX15 together.
Operating Instructions
Page 15
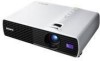
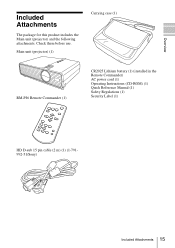
Overview Included Attachments The package for this product includes the Main unit (projector) and the following attachments. Main unit (projector) (1) Carrying case (1) RM-PJ6 Remote Commander (1) CR2025 Lithium battery (1) (installed in the Remote Commander) AC power cord (1) Operating Instructions (CD-ROM) (1) Quick Reference Manual (1) Safety Regulations (1) Security Label (1) HD D-sub 15 pin cable (2 m) (1) (1-791992-51/Sony) Included Attachments 15 Check them before use.
Overview Included Attachments The package for this product includes the Main unit (projector) and the following attachments. Main unit (projector) (1) Carrying case (1) RM-PJ6 Remote Commander (1) CR2025 Lithium battery (1) (installed in the Remote Commander) AC power cord (1) Operating Instructions (CD-ROM) (1) Quick Reference Manual (1) Safety Regulations (1) Security Label (1) HD D-sub 15 pin cable (2 m) (1) (1-791992-51/Sony) Included Attachments 15 Check them before use.

Operating Instructions
Page 18
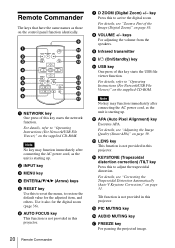
... to enter the settings of its life or reaches a high temperature. c INPUT key Select the input signal. e ?/1 (On/Standby) key Turns on the projector when it is high or the electrical system has failed. - Flashes in red when the internal temperature is in standby mode. Also, flashes in red... the key the input signal switches. Flashes in the menu system, select a menu, or make various adjustments. b MENU key Displays the on until the projector is ready to the message or hold the ?/1 key for about two seconds. ?/1 key lights up or flashes under the following conditions: - d LAMP/...
... to enter the settings of its life or reaches a high temperature. c INPUT key Select the input signal. e ?/1 (On/Standby) key Turns on the projector when it is high or the electrical system has failed. - Flashes in red when the internal temperature is in standby mode. Also, flashes in red... the key the input signal switches. Flashes in the menu system, select a menu, or make various adjustments. b MENU key Displays the on until the projector is ready to the message or hold the ?/1 key for about two seconds. ?/1 key lights up or flashes under the following conditions: - d LAMP/...
Operating Instructions
Page 19
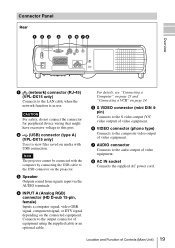
...(Analog RGB) connector (HD D-sub 15-pin, female) Inputs a computer signal, video GBR signal, component signal, or DTV signal depending on the projector. For details, see "Connecting a Computer" on page 23 and "Connecting a VCR" on media with the computer by connecting the USB cable to ... equipment. Location and Function of video equipment. Connector Panel Rear 1 2 3 4 5 6 78 Overview a (network) connector (RJ-45) (VPL-DX15 only) Connects to this port. Connects to the audio output of equipment using the supplied cable or an optional cable. g AUDIO connector Connects to the...
...(Analog RGB) connector (HD D-sub 15-pin, female) Inputs a computer signal, video GBR signal, component signal, or DTV signal depending on the projector. For details, see "Connecting a Computer" on page 23 and "Connecting a VCR" on media with the computer by connecting the USB cable to ... equipment. Location and Function of video equipment. Connector Panel Rear 1 2 3 4 5 6 78 Overview a (network) connector (RJ-45) (VPL-DX15 only) Connects to this port. Connects to the audio output of equipment using the supplied cable or an optional cable. g AUDIO connector Connects to the...
Operating Instructions
Page 20
... key One press of this to restore the default value for the digital zoom (page 36). m LENS key This function is not provided in this projector. 20 Remote Commander g D ZOOM (Digital Zoom) +/- For details, refer to "Operating Instructions (For Network/USB File Viewer)" on the supplied CD...-ROM. b INPUT key c MENU key d ENTER/v/V/b/B (Arrow) keys e RESET key Use this projector. Note No key may function immediately after connecting the AC power cord, as the unit is starting up . For details, refer to "Operating Instructions (...
... key One press of this to restore the default value for the digital zoom (page 36). m LENS key This function is not provided in this projector. 20 Remote Commander g D ZOOM (Digital Zoom) +/- For details, refer to "Operating Instructions (For Network/USB File Viewer)" on the supplied CD...-ROM. b INPUT key c MENU key d ENTER/v/V/b/B (Arrow) keys e RESET key Use this projector. Note No key may function immediately after connecting the AC power cord, as the unit is starting up . For details, refer to "Operating Instructions (...
Operating Instructions
Page 21
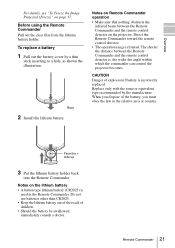
Direct the Remote Commander toward the remote control detector. • The operation range is , the wider the angle within which the commander can control the projector becomes. Face the + side up. 3 Put the lithium battery holder back into the Remote Commander. Notes on Remote Commander operation • Make sure that nothing...CAUTION Danger of children. • Should the battery be swallowed, immediately consult a doctor. Overview For details, see "To Freeze the Image Projected (Freeze)" on the projector. To replace a battery 1 Pull out the battery cover by the manufacturer.
Direct the Remote Commander toward the remote control detector. • The operation range is , the wider the angle within which the commander can control the projector becomes. Face the + side up. 3 Put the lithium battery holder back into the Remote Commander. Notes on Remote Commander operation • Make sure that nothing...CAUTION Danger of children. • Should the battery be swallowed, immediately consult a doctor. Overview For details, see "To Freeze the Image Projected (Freeze)" on the projector. To replace a battery 1 Pull out the battery cover by the manufacturer.
Operating Instructions
Page 22
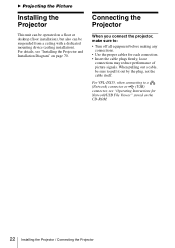
... signals. For VPL-DX15, when connecting to : • Turn off all equipment before making any connections. • Use the proper cables for Network/USB File Viewer" stored on page 70. For details, see "Operating Instructions for each connection. • Insert the cable plugs firmly; Connecting the Projector When you connect the projector, make sure...
... signals. For VPL-DX15, when connecting to : • Turn off all equipment before making any connections. • Use the proper cables for Network/USB File Viewer" stored on page 70. For details, see "Operating Instructions for each connection. • Insert the cable plugs firmly; Connecting the Projector When you connect the projector, make sure...
Operating Instructions
Page 23
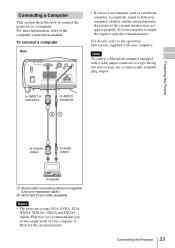
... A Stereo audio connecting cable (not supplied) (Use a no-resistance cable.) B HD D-sub 15-pin cable (supplied) Notes • The projector accepts VGA, SVGA, XGA, WXGA, WXGA+, SXGA and SXGA+ signals. to INPUT A connector to AUDIO connector 21 to monitor output to a computer. To connect a computer...instructions supplied with a video output connector of a type having two rows of pins, use a commercially available plug adaptor. Connecting the Projector 23 Set your computer. However, we recommend that you set the output mode of the external monitor may not appear properly. For ...
... A Stereo audio connecting cable (not supplied) (Use a no-resistance cable.) B HD D-sub 15-pin cable (supplied) Notes • The projector accepts VGA, SVGA, XGA, WXGA, WXGA+, SXGA and SXGA+ signals. to INPUT A connector to AUDIO connector 21 to monitor output to a computer. To connect a computer...instructions supplied with a video output connector of a type having two rows of pins, use a commercially available plug adaptor. Connecting the Projector 23 Set your computer. However, we recommend that you set the output mode of the external monitor may not appear properly. For ...
Operating Instructions
Page 24
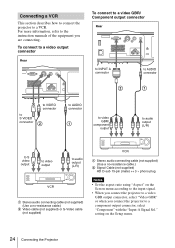
... GBR output connector, select "Video GBR" or when you are connecting. Connecting a VCR This section describes how to connect the projector to the instruction manuals of the equipment you connect the projector to a component output connector, select "Component" with the "Input-A Signal Sel." To connect to a video output connector Rear To connect... supplied) HD D-sub 15-pin (male) ↔ 3 × phono plug Notes • Set the aspect ratio using "Aspect" on the Setup menu. 24 Connecting the Projector
... GBR output connector, select "Video GBR" or when you are connecting. Connecting a VCR This section describes how to connect the projector to the instruction manuals of the equipment you connect the projector to a component output connector, select "Component" with the "Input-A Signal Sel." To connect to a video output connector Rear To connect... supplied) HD D-sub 15-pin (male) ↔ 3 × phono plug Notes • Set the aspect ratio using "Aspect" on the Setup menu. 24 Connecting the Projector
Operating Instructions
Page 25
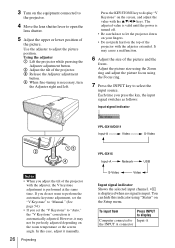
... 1 to turn the power on. Projecting the Picture Connecting to a Network (VPL-DX15 only) To see how to connect a USB memory, refer to "Operating Instructions for Network/USB File Viewer" included on the supplied CDROM. The ?/1 key lights in red and the projector goes into standby mode. 2 Press the ?/1 key to a wall outlet...
... 1 to turn the power on. Projecting the Picture Connecting to a Network (VPL-DX15 only) To see how to connect a USB memory, refer to "Operating Instructions for Network/USB File Viewer" included on the supplied CDROM. The ?/1 key lights in red and the projector goes into standby mode. 2 Press the ?/1 key to a wall outlet...
Operating Instructions
Page 26
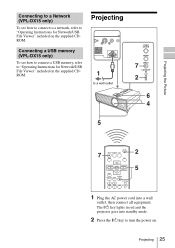
...If you adjust the tilt of the projector with the adjuster, the V keystone adjustment is turned off. • Be careful not to "Auto," the "V Keystone" correction is automatically adjusted. However, it manually. 26 Projecting VPL-DX10/DX11 Input-A Video S-Video VPL-DX15 Input-A Network USB S-Video Video Input... hide this case, adjust it may cause a malfunction. 6 Adjust the size of the picture. 3 Turn on the equipment connected to the projector. 4 Move the lens shutter lever to display Input-A If you do not want to perform the automatic keystone adjustment, set the "V Keystone...
...If you adjust the tilt of the projector with the adjuster, the V keystone adjustment is turned off. • Be careful not to "Auto," the "V Keystone" correction is automatically adjusted. However, it manually. 26 Projecting VPL-DX10/DX11 Input-A Video S-Video VPL-DX15 Input-A Network USB S-Video Video Input... hide this case, adjust it may cause a malfunction. 6 Adjust the size of the picture. 3 Turn on the equipment connected to the projector. 4 Move the lens shutter lever to display Input-A If you do not want to perform the automatic keystone adjustment, set the "V Keystone...
Operating Instructions
Page 27
... 8 Switch the equipment connected to output to the projector. When USB is selected, the confirmation display to show disconnection with the network equipment appears. In VPL-DX15, if there is no input signal, "Network" is set to "On," the projector searches for the signals from the connected equipment for ...example a notebook, or an all-in-one LCD type, you may have to switch the computer ...
... 8 Switch the equipment connected to output to the projector. When USB is selected, the confirmation display to show disconnection with the network equipment appears. In VPL-DX15, if there is no input signal, "Network" is set to "On," the projector searches for the signals from the connected equipment for ...example a notebook, or an all-in-one LCD type, you may have to switch the computer ...

Operating Instructions
Page 29
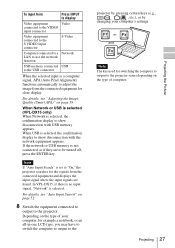
To change the menu language, proceed as a yellow button. 80 50 50 50 Low 30 (VPL-DX15) 4 Press the v or V key to select the Setup menu, then press the B or ENTER key. The menu currently selected is English. Convenient Functions 3 INPUT NETWORK ... the Menu Language 29 B Convenient Functions Selecting the Menu Language You can select one of seventeen languages for displaying the menu and other on the projector. The factory setting is shown as follows: 1 to turn on -screen displays.
To change the menu language, proceed as a yellow button. 80 50 50 50 Low 30 (VPL-DX15) 4 Press the v or V key to select the Setup menu, then press the B or ENTER key. The menu currently selected is English. Convenient Functions 3 INPUT NETWORK ... the Menu Language 29 B Convenient Functions Selecting the Menu Language You can select one of seventeen languages for displaying the menu and other on the projector. The factory setting is shown as follows: 1 to turn on -screen displays.


